# Access Rights for Goals
Source: https://mooncamp.com/docs/access-rights-for-goals
## Access Rights for Goals described
In Mooncamp there are two different ways to determine access rights to goals. Once as the general **default setting** for all goals created in the account, these can be set by admins only. Secondly, as **individual access rights** for single or multiple goals, these can also be set by non-admins and goal creators and can override the default setting (see below).
## Default Settings (Admins)
**As an admin**, you have the possibility to define default settings that apply to the creation of each goal, regardless of who creates the goal.
💡 **Important note for admins:** We recommend you to define these default settings before creating goals in the account (by the admin or by users), because the settings will be applied only to goals created afterwards, but not to goals created before.
You can configure the default access settings under `Settings > Goals`.
 Please note that this setting takes effect as soon as new goals are created. The settings will not be applied retroactively to formerly created goals. We therefore advise you to set up the general default setting before creating your goals in Mooncamp.
In this video we explain the procedure step by step:
## Individual Settings (Non-Admins)
**As the creator (admin or non-admin)** of a goal, you can define which access rights apply to this goal, regardless of the default settings. This is useful in case you want to set different access rights on your goals than the default ones, for example if you want to make some goals private or editable for specific users.
In this video we explain the procedure step by step:
# Adding Key Results and Other Subgoals
Source: https://mooncamp.com/docs/adding-subgoals
Adding subgoals to an existing goal
There are three ways to add subgoals (e.g. Key Results, initiatives) to an existing goal.
## 1. Adding the subgoal via the `+` button next to the parent goal
## 2. Adding the subgoal on the parent goal detail view
## 3. Adding the subgoal via the `New` button
In most cases, we recommend option 1 or 2 because the context is easily visible.
# Getting Started Guide for Admins
Source: https://mooncamp.com/docs/admins-introduction
Learn how to get started with Mooncamp as an admin
Please note that this setting takes effect as soon as new goals are created. The settings will not be applied retroactively to formerly created goals. We therefore advise you to set up the general default setting before creating your goals in Mooncamp.
In this video we explain the procedure step by step:
## Individual Settings (Non-Admins)
**As the creator (admin or non-admin)** of a goal, you can define which access rights apply to this goal, regardless of the default settings. This is useful in case you want to set different access rights on your goals than the default ones, for example if you want to make some goals private or editable for specific users.
In this video we explain the procedure step by step:
# Adding Key Results and Other Subgoals
Source: https://mooncamp.com/docs/adding-subgoals
Adding subgoals to an existing goal
There are three ways to add subgoals (e.g. Key Results, initiatives) to an existing goal.
## 1. Adding the subgoal via the `+` button next to the parent goal
## 2. Adding the subgoal on the parent goal detail view
## 3. Adding the subgoal via the `New` button
In most cases, we recommend option 1 or 2 because the context is easily visible.
# Getting Started Guide for Admins
Source: https://mooncamp.com/docs/admins-introduction
Learn how to get started with Mooncamp as an admin
 ## Welcome to Mooncamp 👋
This guide will help you get started with Mooncamp. At the end, you will have
* learned about the core features of Mooncamp
* set up your workspace, teamspaces and permissions
* set up your integrations
* established your strategy framework
* invited employees
To learn about what Mooncamp is and why it will transform the way you do strategy, please visit the [overview page](/overview).
## Step 1: Familiarize yourself with Mooncamp's platform
### Workspace navigation
* [Sidebar](/sidebar)
* [Homepage](/homepage)
* [Teamspaces](/teamspaces)
### Core features
* [Goals](/goals-overview)
* [Custom dashboards](/dashboards), [Progress dashboard](/progress-dashboard) and [Health dashboard](/health-dashboard)
* [Reports](/reports)
* [Check-ins](/check-ins)
* [Integrations](/data-integrations)
* [Planning spaces](/planning-spaces)
## Step 2: Set up your workspace, teamspaces and permissions
1. [ ] [Clear your trial data](/clearing-your-trial-data)
2. [ ] [Update workspace name and logo](/workspace-settings)
3. [ ] [Create teamspaces](/teamspaces)
4. [ ] [Manage employee permissions](/rights-and-access-control)
5. [ ] [Set up default access rights for goals](/access-rights-for-goals)
[Default access](/access-rights-for-goals) rights apply to all **newly** created goals and do not take effect on already existing goals, therefore it is useful to set them before creating your first goals.
## Step 3: Set up your integrations
1. [ ] [Set up data integrations](/data-integrations) to auto-update your goals
2. [ ] [Set up the MS Teams](/microsoft-teams-integration) or [Slack](/slack-integration) integration
## Step 4: Establish your strategy framework
1. [ ] [Set up your cycles](/cycles)
2. [ ] [Set up goal properties](/properties) in the property system
3. [ ] [Configure goal statuses](/goal-statuses)
4. [ ] [Set up rules for goals and OKRs](/goal-rules)
## Step 5: Invite employees
1. [ ] Single-Sign On: [Set up SSO](/sso) or [SAML-based SSO](/saml-sso)
2. [ ] Either [invite employees manually](/managing-employees), [share an invite link](/managing-employees#invite-link) with them (*after* you created them in Mooncamp) or set up SCIM (e.g. [via Azure AD](/scim-azure)) to automatically import employees
For a smooth start with Mooncamp, you can support your colleagues by providing them with the [employees introduction guide](/employees-introduction).
# Asana Integration
Source: https://mooncamp.com/docs/asana-integration
Learn how to connect Asana to Mooncamp Goals and OKRs
You can use the Asana integration to link your goals/OKRs in Mooncamp to Asana tasks or projects and update them automatically.
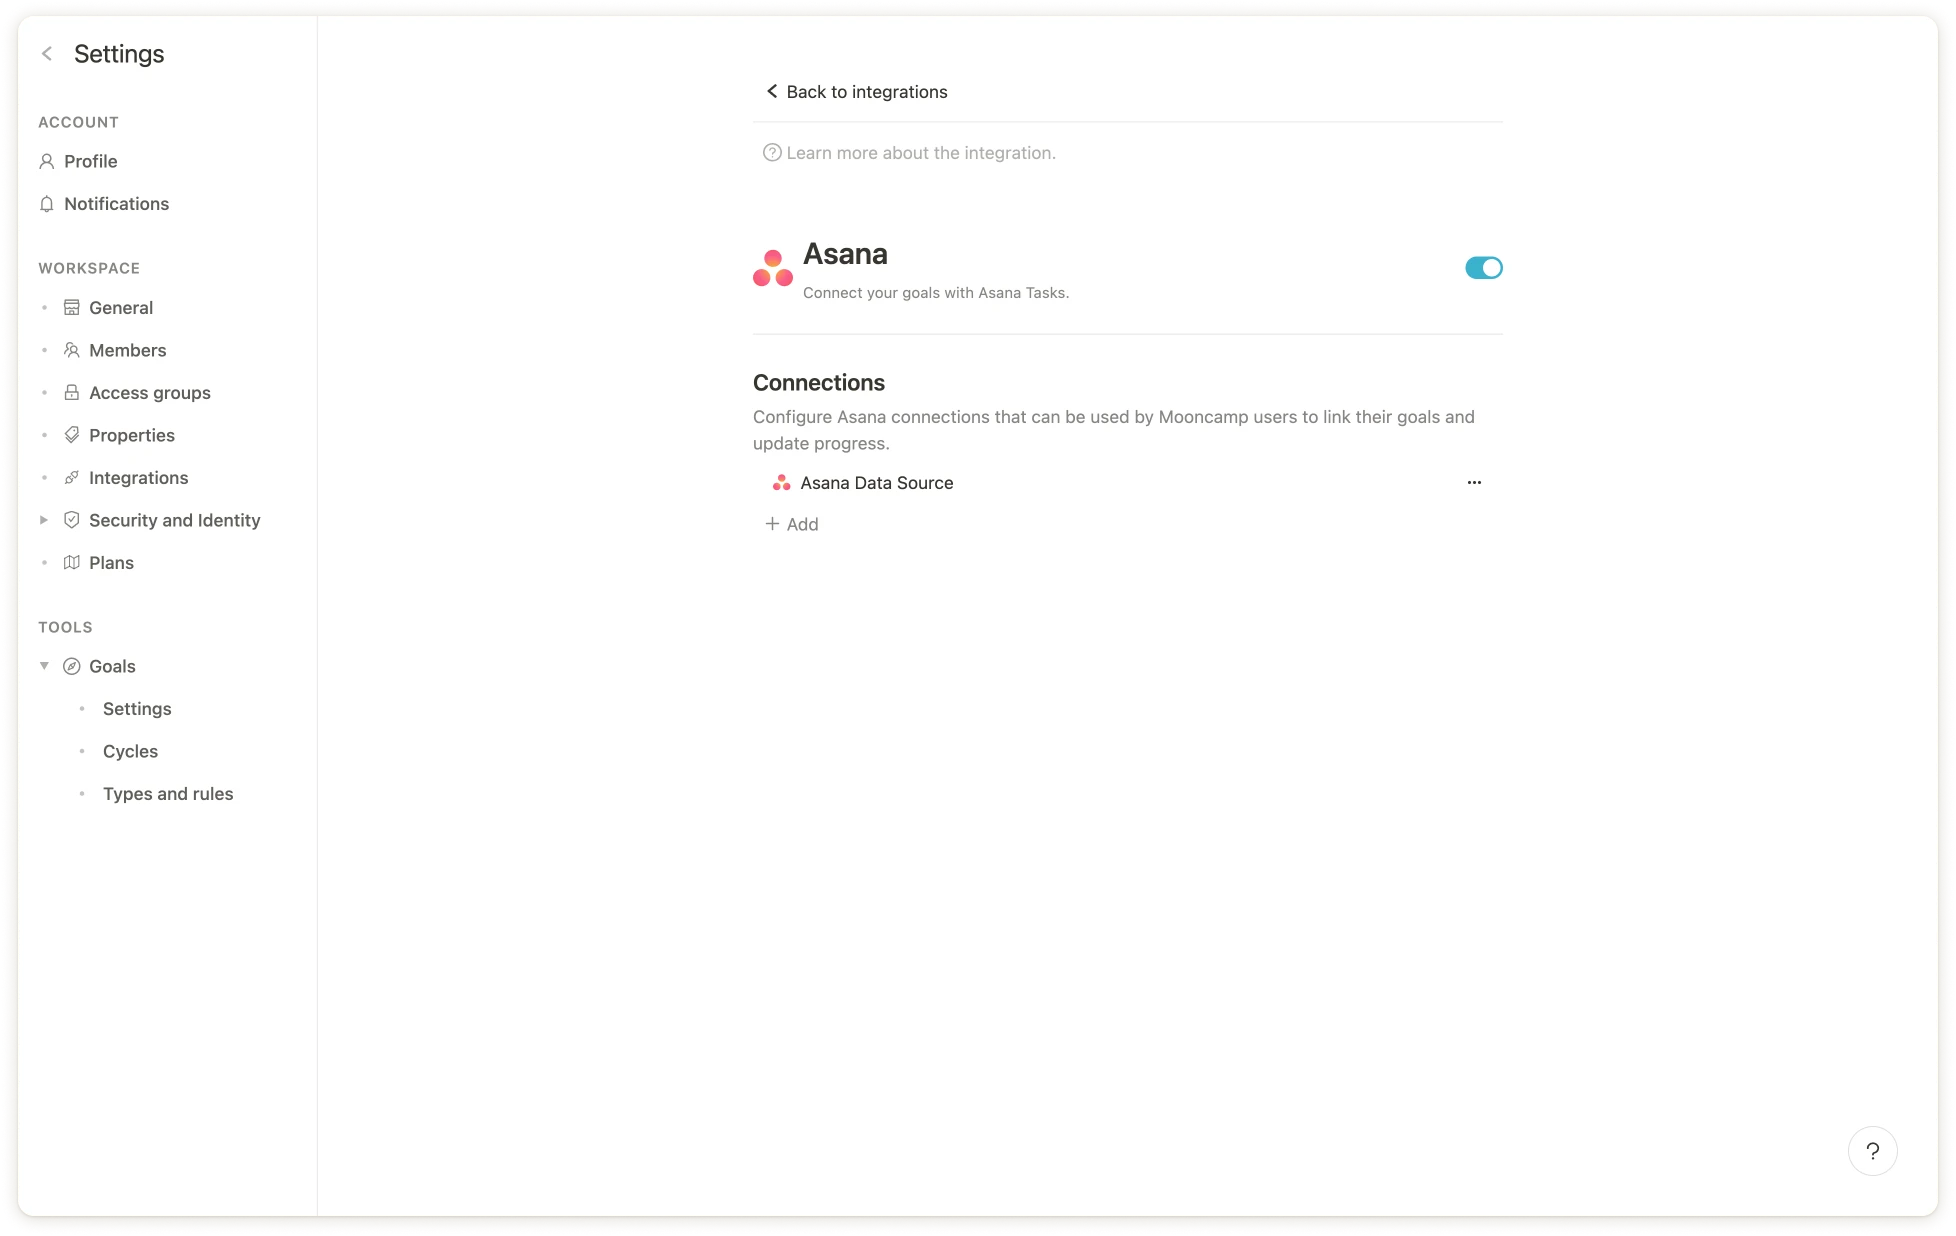
## Activate integration
Before linking a goal to Asana, make sure that the Asana integration is enabled for your account. As an administrator, you can find the integrations enabled for your account under *Settings > Integrations*.
## Welcome to Mooncamp 👋
This guide will help you get started with Mooncamp. At the end, you will have
* learned about the core features of Mooncamp
* set up your workspace, teamspaces and permissions
* set up your integrations
* established your strategy framework
* invited employees
To learn about what Mooncamp is and why it will transform the way you do strategy, please visit the [overview page](/overview).
## Step 1: Familiarize yourself with Mooncamp's platform
### Workspace navigation
* [Sidebar](/sidebar)
* [Homepage](/homepage)
* [Teamspaces](/teamspaces)
### Core features
* [Goals](/goals-overview)
* [Custom dashboards](/dashboards), [Progress dashboard](/progress-dashboard) and [Health dashboard](/health-dashboard)
* [Reports](/reports)
* [Check-ins](/check-ins)
* [Integrations](/data-integrations)
* [Planning spaces](/planning-spaces)
## Step 2: Set up your workspace, teamspaces and permissions
1. [ ] [Clear your trial data](/clearing-your-trial-data)
2. [ ] [Update workspace name and logo](/workspace-settings)
3. [ ] [Create teamspaces](/teamspaces)
4. [ ] [Manage employee permissions](/rights-and-access-control)
5. [ ] [Set up default access rights for goals](/access-rights-for-goals)
[Default access](/access-rights-for-goals) rights apply to all **newly** created goals and do not take effect on already existing goals, therefore it is useful to set them before creating your first goals.
## Step 3: Set up your integrations
1. [ ] [Set up data integrations](/data-integrations) to auto-update your goals
2. [ ] [Set up the MS Teams](/microsoft-teams-integration) or [Slack](/slack-integration) integration
## Step 4: Establish your strategy framework
1. [ ] [Set up your cycles](/cycles)
2. [ ] [Set up goal properties](/properties) in the property system
3. [ ] [Configure goal statuses](/goal-statuses)
4. [ ] [Set up rules for goals and OKRs](/goal-rules)
## Step 5: Invite employees
1. [ ] Single-Sign On: [Set up SSO](/sso) or [SAML-based SSO](/saml-sso)
2. [ ] Either [invite employees manually](/managing-employees), [share an invite link](/managing-employees#invite-link) with them (*after* you created them in Mooncamp) or set up SCIM (e.g. [via Azure AD](/scim-azure)) to automatically import employees
For a smooth start with Mooncamp, you can support your colleagues by providing them with the [employees introduction guide](/employees-introduction).
# Asana Integration
Source: https://mooncamp.com/docs/asana-integration
Learn how to connect Asana to Mooncamp Goals and OKRs
You can use the Asana integration to link your goals/OKRs in Mooncamp to Asana tasks or projects and update them automatically.
## Activate integration
Before linking a goal to Asana, make sure that the Asana integration is enabled for your account. As an administrator, you can find the integrations enabled for your account under *Settings > Integrations*.
 ## Linking an Asana project or task to a goal
Once the Asana integration is enabled, follow these steps to link a goal to Asana:
### Step 1: Open a goal that you want to update via Asana
### Step 2: Select the option "Start and target value" under "Progress"
### Step 3: Click on "Connect to data source".
### Step 4: Select an existing Asana data source or create a new one
If you are creating a new data source and have not connected Mooncamp to Asana before, you must first do so by clicking "Add Asana" and then "Sign in with Asana".
Then select the project you want to connect with from your Asana account. There are three options to measure the progress of your Mooncamp goal:
## Linking an Asana project or task to a goal
Once the Asana integration is enabled, follow these steps to link a goal to Asana:
### Step 1: Open a goal that you want to update via Asana
### Step 2: Select the option "Start and target value" under "Progress"
### Step 3: Click on "Connect to data source".
### Step 4: Select an existing Asana data source or create a new one
If you are creating a new data source and have not connected Mooncamp to Asana before, you must first do so by clicking "Add Asana" and then "Sign in with Asana".
Then select the project you want to connect with from your Asana account. There are three options to measure the progress of your Mooncamp goal:
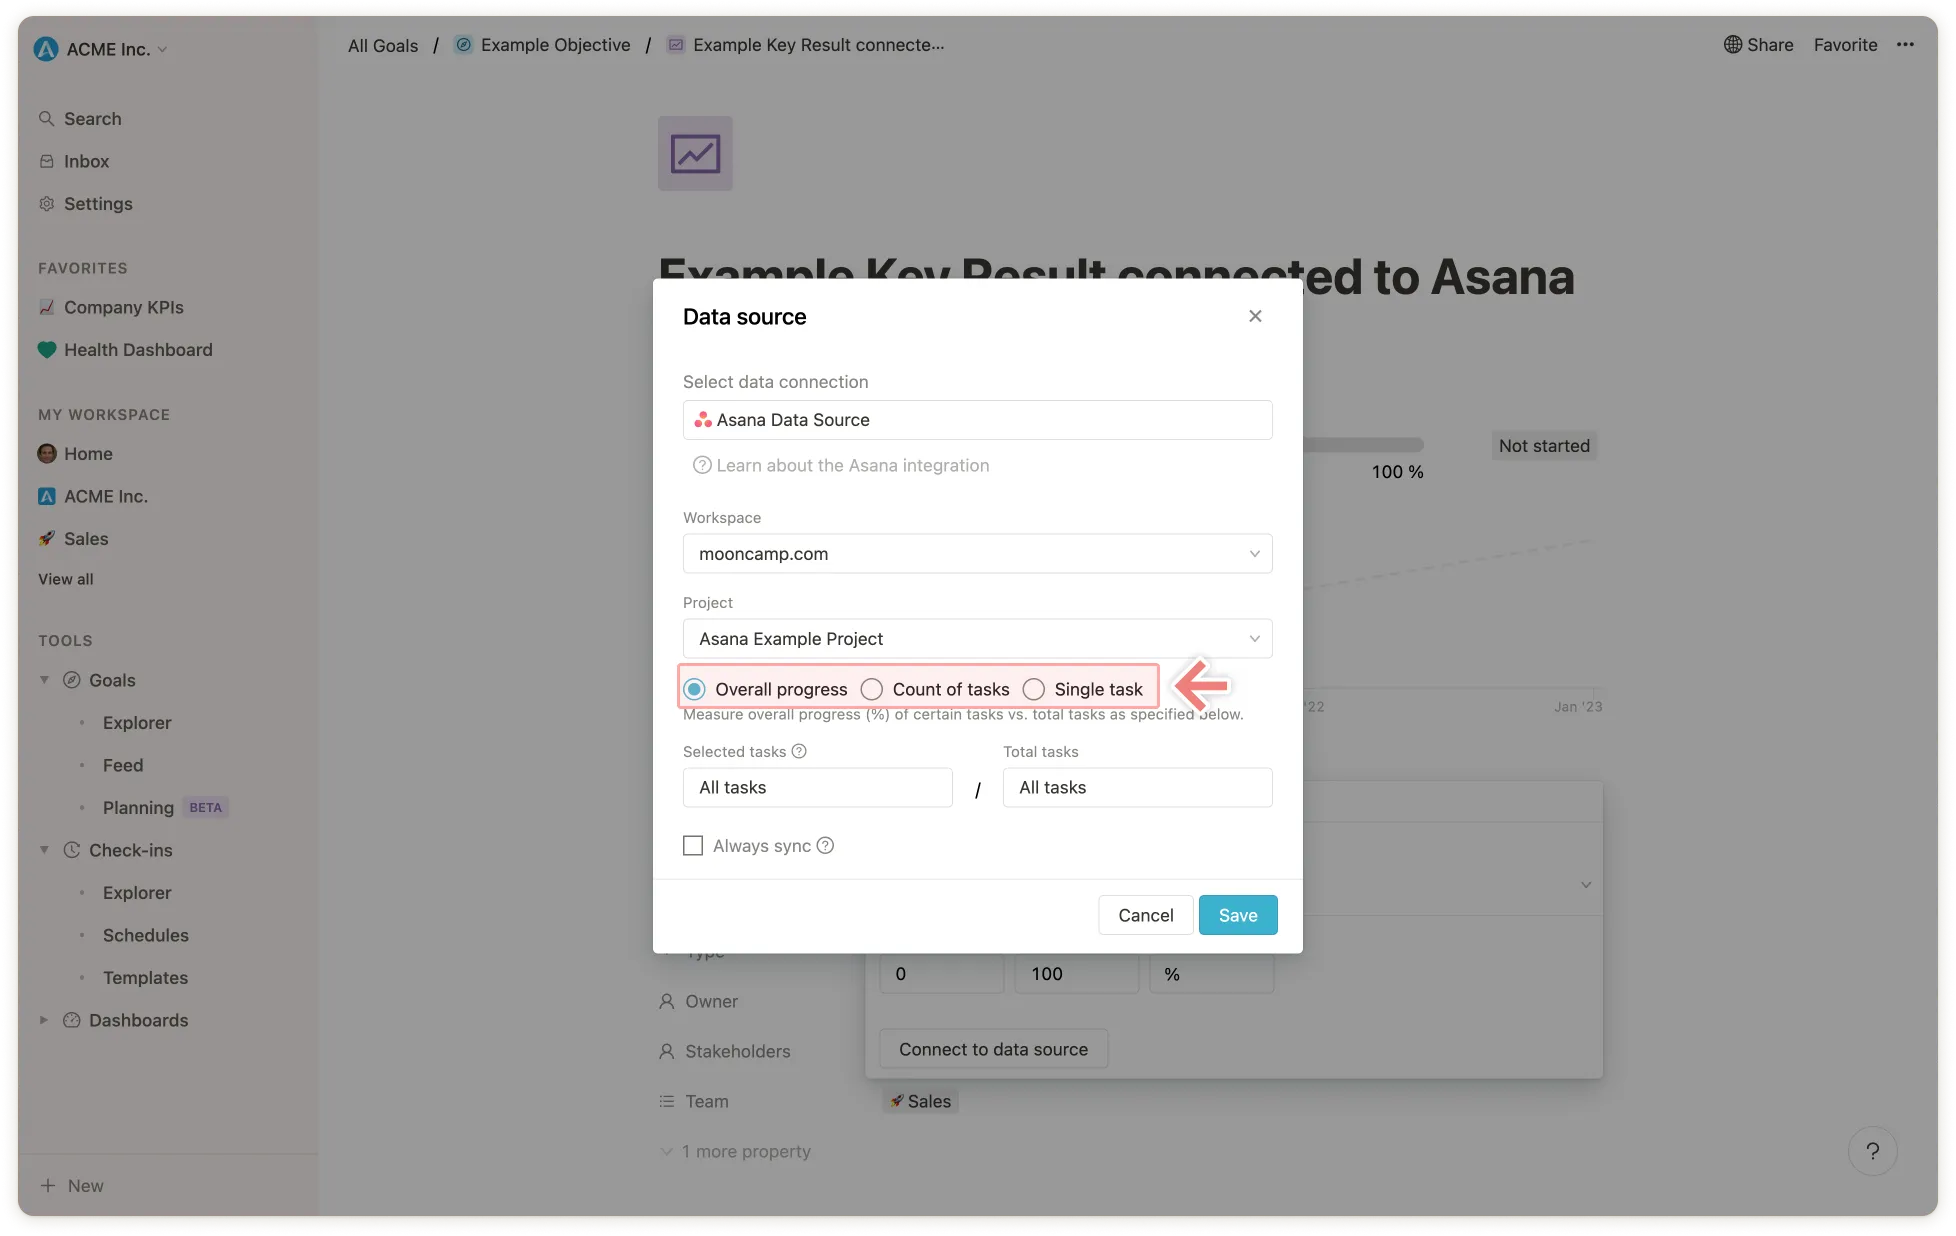 **Overall progress**
Measure overall progress (%) of certain tasks vs. total tasks.
1. In the first step, select which tasks determine the progress of the project under "Selected tasks". If you want to include only the tasks of specific people, you can specify this here (otherwise leave the "Assigned to" field blank). Then select the section (e.g. "Done") and status (e.g. "Any" or "Completed") that identifies which tasks should be measured for the progress of the goal. If you want to include more sections in the measurement, you can add new sections below.
2. In the second step, select the total amount of tasks under "Total tasks" so that the ratio or progress percentage can be calculated. If you want to include all tasks, you can leave the fields "Assigned to" and below that "Section" and "Status" set to "Any". If you want to include more sections in the measurement, you can add new sections below them.
Example: Measure the overall progress of a "Website Redesign" project by counting all tasks that are in the "Done" section. Keep the fields for specifying the total amount of tasks set to "All" so that all tasks within the project are included.
**Count of tasks**
Returns a count of specific tasks.
1. First select whether all tasks should be counted or only tasks that are assigned to specific responsible persons.
2. Then select the section (e.g. "Done") and status (e.g. "Any" or "Completed") that indicates which tasks should be counted. If you want to include more sections in the measurement, you can add new sections below them.
Example: Say you work in marketing and want to track how many blog posts you've published in a Mooncamp goal, select yourself in the "Assigned to" field and measure progress via the number of all blog post tasks in the "Published" section.
**Single task**
1. Track the completion of a single task.
2. Then select the section (e.g. "Done") and the status (e.g. "Any" or "Completed") that indicates when the task in question should be considered completed. If you want to include more sections in the measurement, you can add new sections below.
### Step 5: Now click on "Save" and Asana is linked to the goal 🎉
## Synchronize, edit and delete the connection
Once a goal is connected to Asana, you can view, edit, and delete the connection on the goal under "Progress" or synchronize the goal manually. Otherwise, the goal will sync with Asana once a day.
💡 Tip for the Admins: Go to Settings → Integrations → and make sure every day is selected under “Synchronization”.
# Check-ins
Source: https://mooncamp.com/docs/check-ins
An overview of Check-ins
## What are Check-ins?
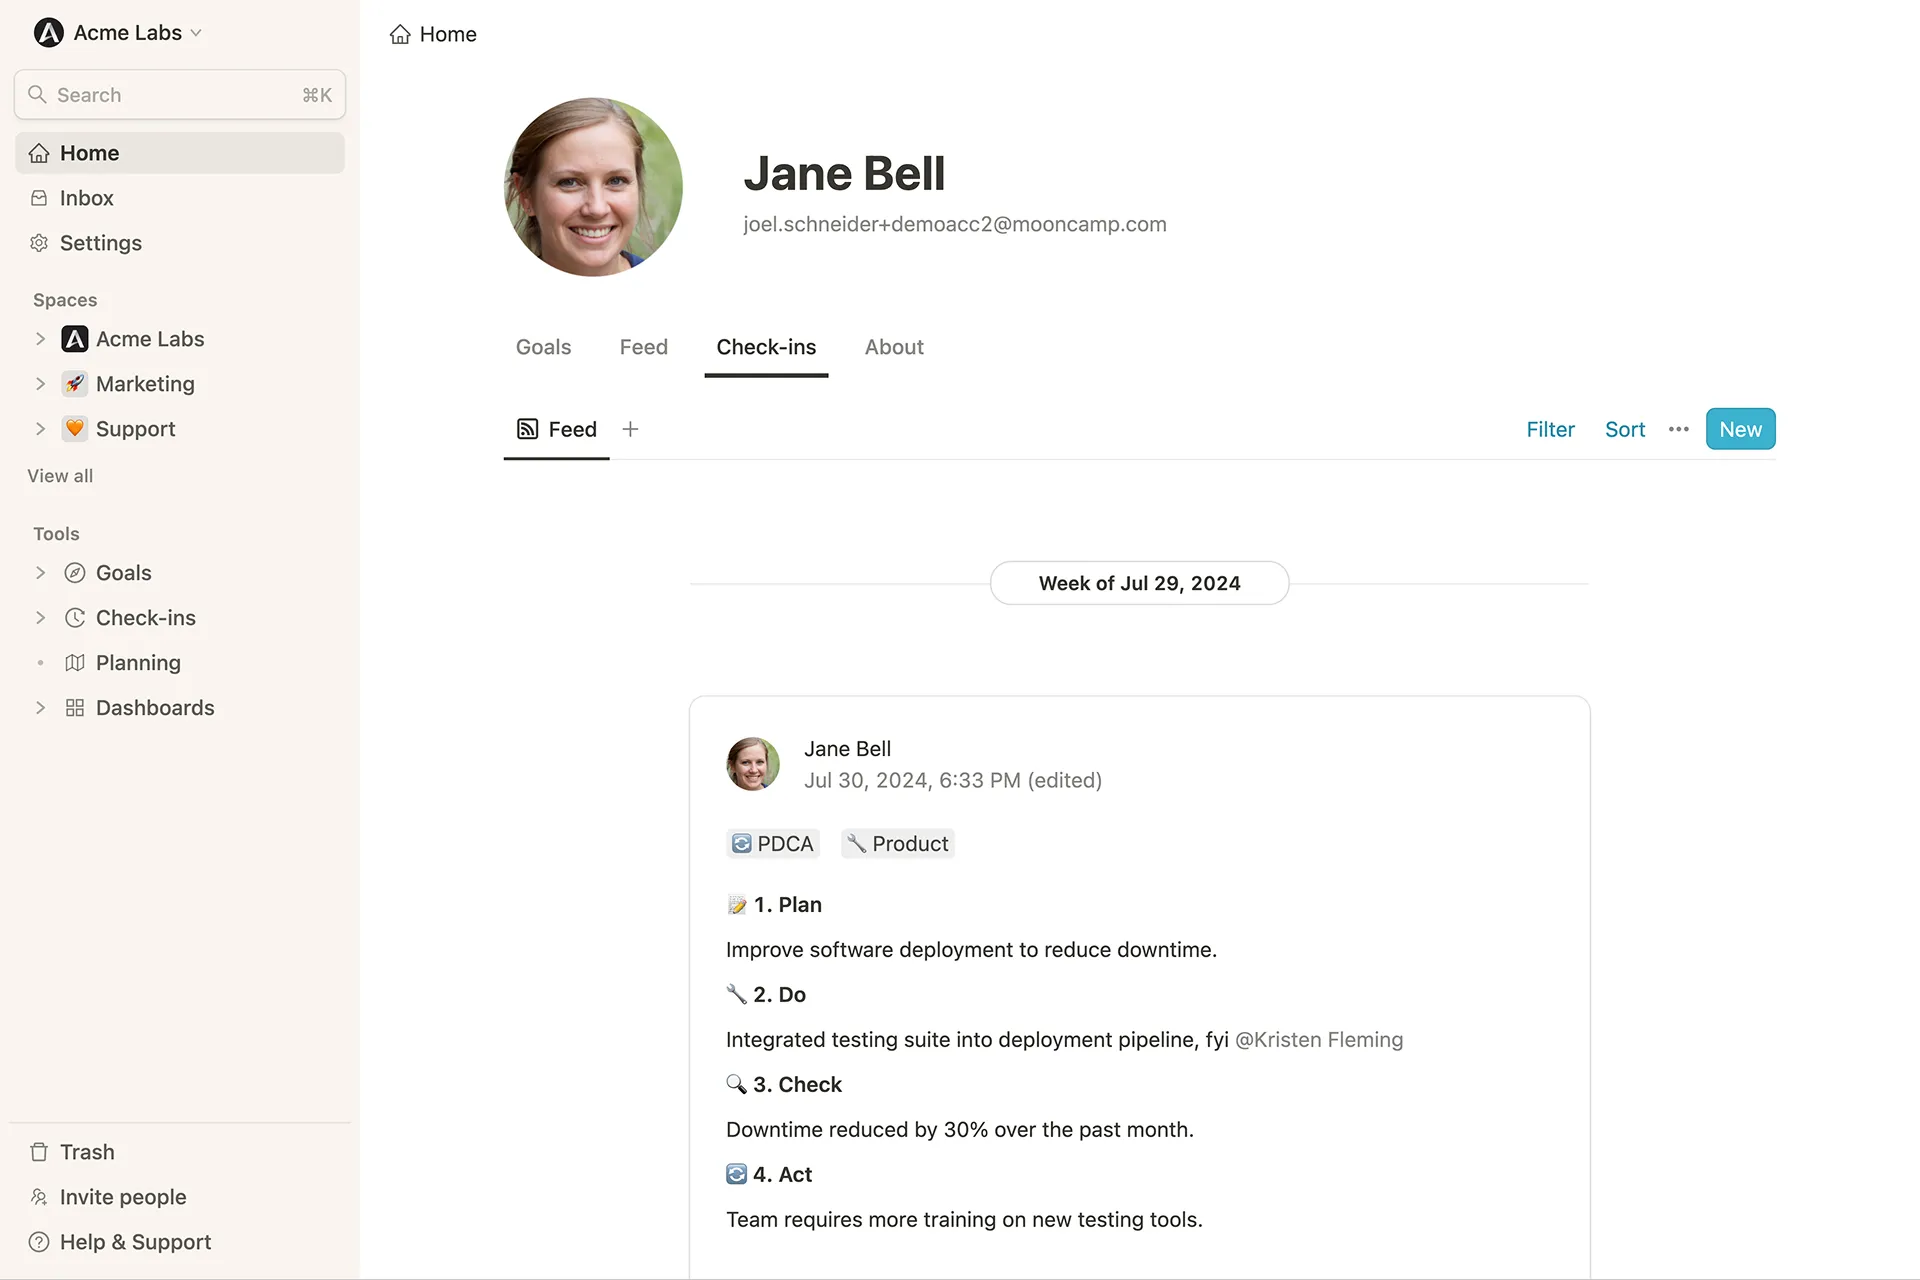
A check-in is an update from an employee on their work progress. Employees can, for example, enter updates of their goals/OKRs in a weekly cycle, comment on them and also answer various questions, such as:
* What did you work on last week?
* What are your priorities for this week?
## Why should you use Check-ins?
(Weekly) Check-ins are a simple tool to keep goals and OKRs top of mind, let everyone see what others are working on, discuss progress and new insights, and uncover where mutual support is needed. It ensures continuous feedback and learning, as well as a high level of participation and accountability in teams.
## How can Check-ins be created?
Check-ins can be created by
* clicking on `New` under the `Check-ins` tab on your homepage or teamspaces
* navigating to Check-ins under Tools and clicking on `New`.
**Overall progress**
Measure overall progress (%) of certain tasks vs. total tasks.
1. In the first step, select which tasks determine the progress of the project under "Selected tasks". If you want to include only the tasks of specific people, you can specify this here (otherwise leave the "Assigned to" field blank). Then select the section (e.g. "Done") and status (e.g. "Any" or "Completed") that identifies which tasks should be measured for the progress of the goal. If you want to include more sections in the measurement, you can add new sections below.
2. In the second step, select the total amount of tasks under "Total tasks" so that the ratio or progress percentage can be calculated. If you want to include all tasks, you can leave the fields "Assigned to" and below that "Section" and "Status" set to "Any". If you want to include more sections in the measurement, you can add new sections below them.
Example: Measure the overall progress of a "Website Redesign" project by counting all tasks that are in the "Done" section. Keep the fields for specifying the total amount of tasks set to "All" so that all tasks within the project are included.
**Count of tasks**
Returns a count of specific tasks.
1. First select whether all tasks should be counted or only tasks that are assigned to specific responsible persons.
2. Then select the section (e.g. "Done") and status (e.g. "Any" or "Completed") that indicates which tasks should be counted. If you want to include more sections in the measurement, you can add new sections below them.
Example: Say you work in marketing and want to track how many blog posts you've published in a Mooncamp goal, select yourself in the "Assigned to" field and measure progress via the number of all blog post tasks in the "Published" section.
**Single task**
1. Track the completion of a single task.
2. Then select the section (e.g. "Done") and the status (e.g. "Any" or "Completed") that indicates when the task in question should be considered completed. If you want to include more sections in the measurement, you can add new sections below.
### Step 5: Now click on "Save" and Asana is linked to the goal 🎉
## Synchronize, edit and delete the connection
Once a goal is connected to Asana, you can view, edit, and delete the connection on the goal under "Progress" or synchronize the goal manually. Otherwise, the goal will sync with Asana once a day.
💡 Tip for the Admins: Go to Settings → Integrations → and make sure every day is selected under “Synchronization”.
# Check-ins
Source: https://mooncamp.com/docs/check-ins
An overview of Check-ins
## What are Check-ins?
A check-in is an update from an employee on their work progress. Employees can, for example, enter updates of their goals/OKRs in a weekly cycle, comment on them and also answer various questions, such as:
* What did you work on last week?
* What are your priorities for this week?
## Why should you use Check-ins?
(Weekly) Check-ins are a simple tool to keep goals and OKRs top of mind, let everyone see what others are working on, discuss progress and new insights, and uncover where mutual support is needed. It ensures continuous feedback and learning, as well as a high level of participation and accountability in teams.
## How can Check-ins be created?
Check-ins can be created by
* clicking on `New` under the `Check-ins` tab on your homepage or teamspaces
* navigating to Check-ins under Tools and clicking on `New`.
 ## Create templates for check-ins
You can create templates for your check-ins with specific questions that you would like the check-in recipients to reply to. Further you can add infos or instructions on how recipients are supposed to fill-in their check-in. To create a new template, navigate to the `Check-ins` tool and click on the tab `Templates`.
**Step 1:** Click on the `New` button to create a new template.
**Step 2:** Give the new template a title and add an icon, if you wish.
**Step 3:** In case you would like to use the template only for check-ins of one or more specific team(s), choose these from your list.
**Step 4:** *Start typing* questions for your check-in recipients to reply to each time the check-in is sent out to them. Further you can note down instructions on how recipients are supposed to fill-in their check-in.
**Step 5:** Use the *Access* button in the top right corner to allow further colleagues to view or edit the template, e.g. in case it needs to be adjusted at some point.
**Step 6:** Navigate to the *Schedules* tab to specify the time and frequency with which your check-in including template should be sent out.
## Create schedules for check-ins
## Create templates for check-ins
You can create templates for your check-ins with specific questions that you would like the check-in recipients to reply to. Further you can add infos or instructions on how recipients are supposed to fill-in their check-in. To create a new template, navigate to the `Check-ins` tool and click on the tab `Templates`.
**Step 1:** Click on the `New` button to create a new template.
**Step 2:** Give the new template a title and add an icon, if you wish.
**Step 3:** In case you would like to use the template only for check-ins of one or more specific team(s), choose these from your list.
**Step 4:** *Start typing* questions for your check-in recipients to reply to each time the check-in is sent out to them. Further you can note down instructions on how recipients are supposed to fill-in their check-in.
**Step 5:** Use the *Access* button in the top right corner to allow further colleagues to view or edit the template, e.g. in case it needs to be adjusted at some point.
**Step 6:** Navigate to the *Schedules* tab to specify the time and frequency with which your check-in including template should be sent out.
## Create schedules for check-ins
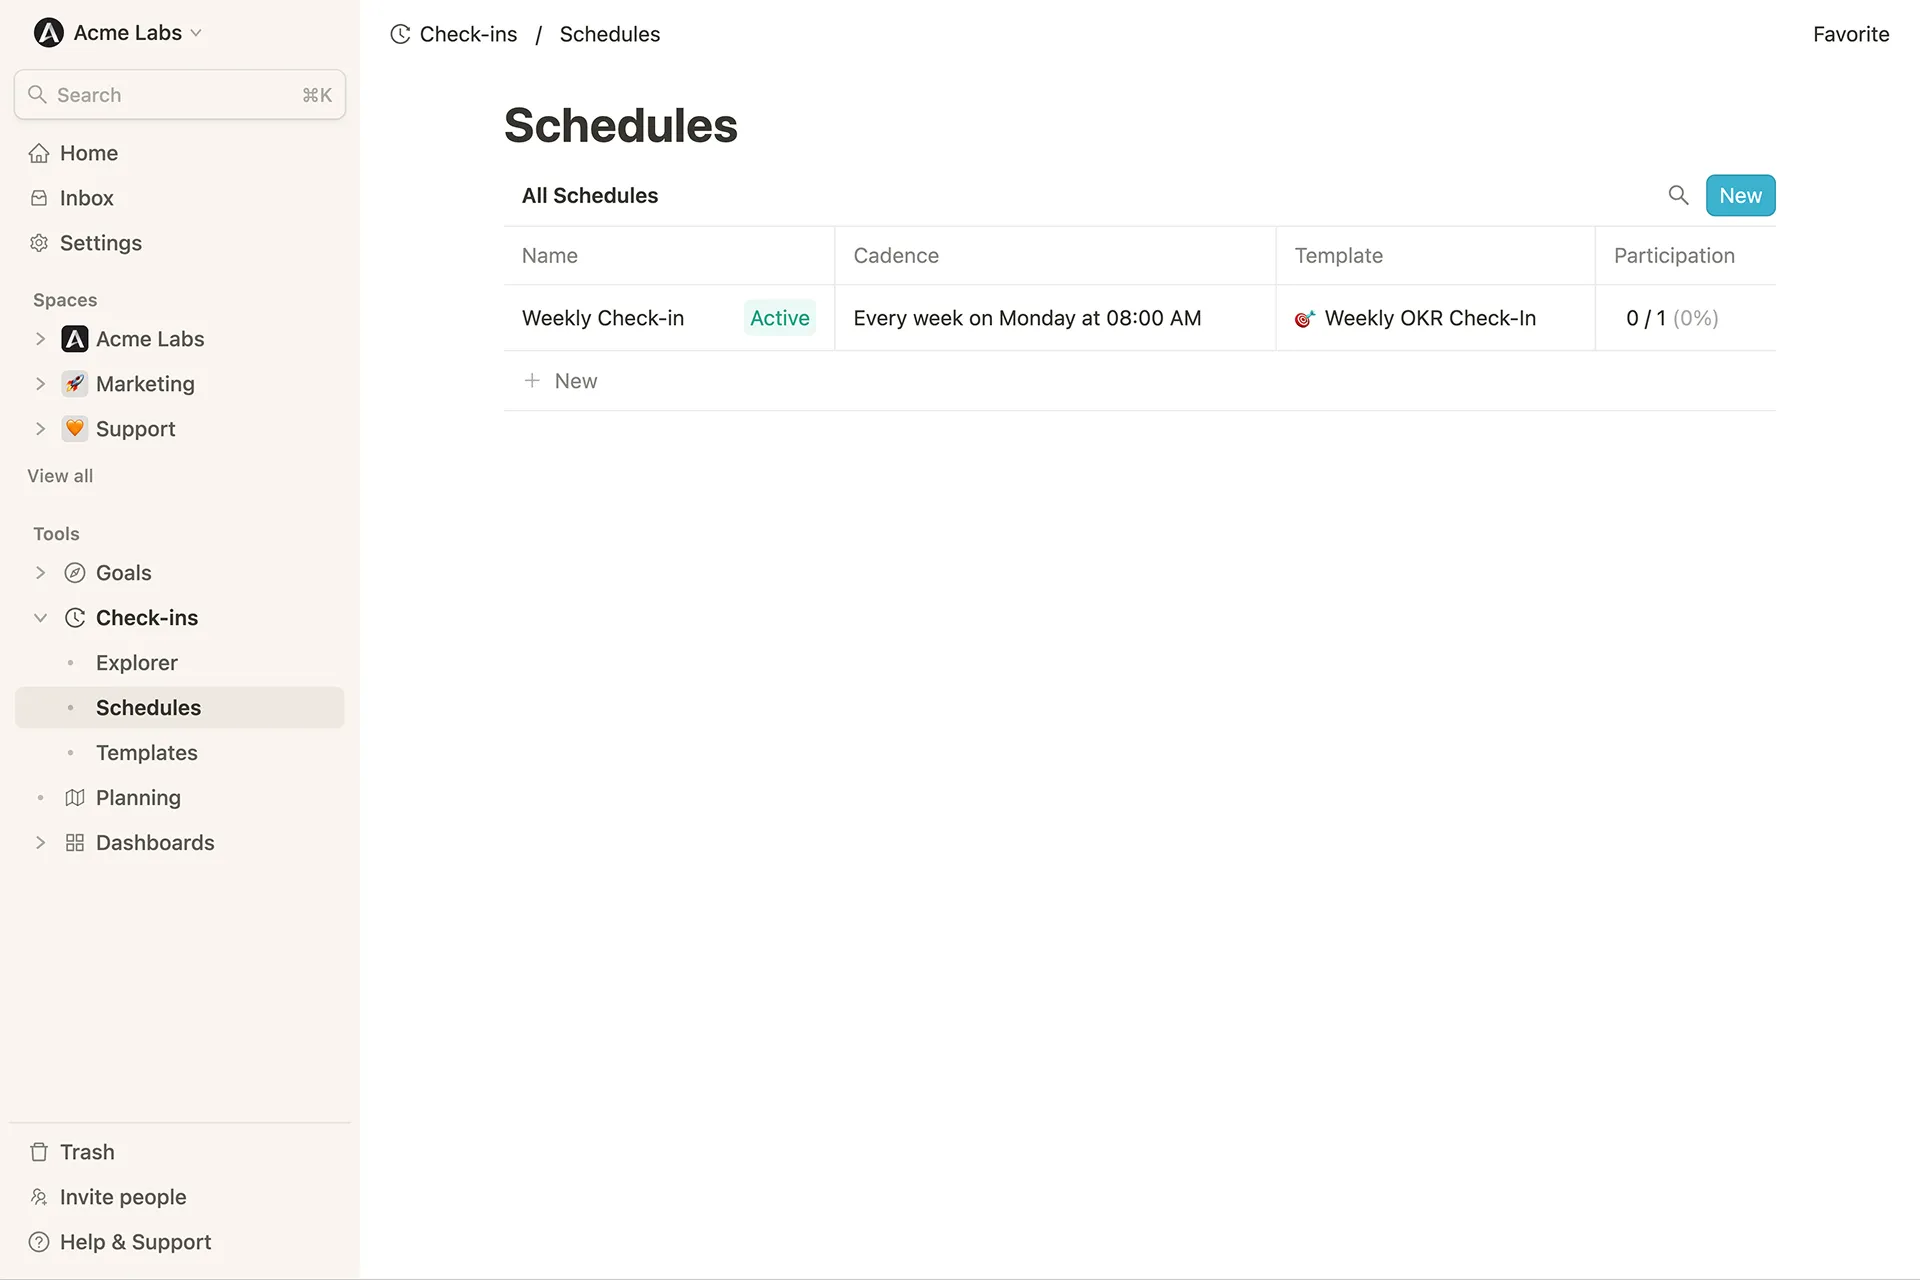 To create a new schedule, navigate to the Check-ins tool and click on the tab `Schedules`.
**Step 1:** Name the new schedule to be created.
**Step 2:** Specify the cadence with which the check-in should be sent out.
**Step 3:** Select the people who should receive the check-in.
**Step 4:** Specify the time and frequency with which reminders should be sent.
**Step 5:** Select the template for the reminder.
Each schedule page also contains an overview of all participants and their participation per check-in as well as the participation rate over time.
**Important note:** Please be aware that in the **participation overview of a schedule page** a check-in will only be marked as “Done” when a participant completed it via their e-mail, MS Teams or Slack notification as these contain a **direct link to the check-in schedule**. Another possible way would be via the *check-in explorer > New > and then using the according schedule* (e.g. “Weekly Check-in”). If a participant chooses the way via the check-in explorer and uses *+ New without schedule*, their check-in will not be marked as “Done” on any schedule page as it has no link to any schedule.
# Clearing Your Trial Data
Source: https://mooncamp.com/docs/clearing-your-trial-data
Clear your test account from existing data to start setting up your company's OKRs
To create a new schedule, navigate to the Check-ins tool and click on the tab `Schedules`.
**Step 1:** Name the new schedule to be created.
**Step 2:** Specify the cadence with which the check-in should be sent out.
**Step 3:** Select the people who should receive the check-in.
**Step 4:** Specify the time and frequency with which reminders should be sent.
**Step 5:** Select the template for the reminder.
Each schedule page also contains an overview of all participants and their participation per check-in as well as the participation rate over time.
**Important note:** Please be aware that in the **participation overview of a schedule page** a check-in will only be marked as “Done” when a participant completed it via their e-mail, MS Teams or Slack notification as these contain a **direct link to the check-in schedule**. Another possible way would be via the *check-in explorer > New > and then using the according schedule* (e.g. “Weekly Check-in”). If a participant chooses the way via the check-in explorer and uses *+ New without schedule*, their check-in will not be marked as “Done” on any schedule page as it has no link to any schedule.
# Clearing Your Trial Data
Source: https://mooncamp.com/docs/clearing-your-trial-data
Clear your test account from existing data to start setting up your company's OKRs
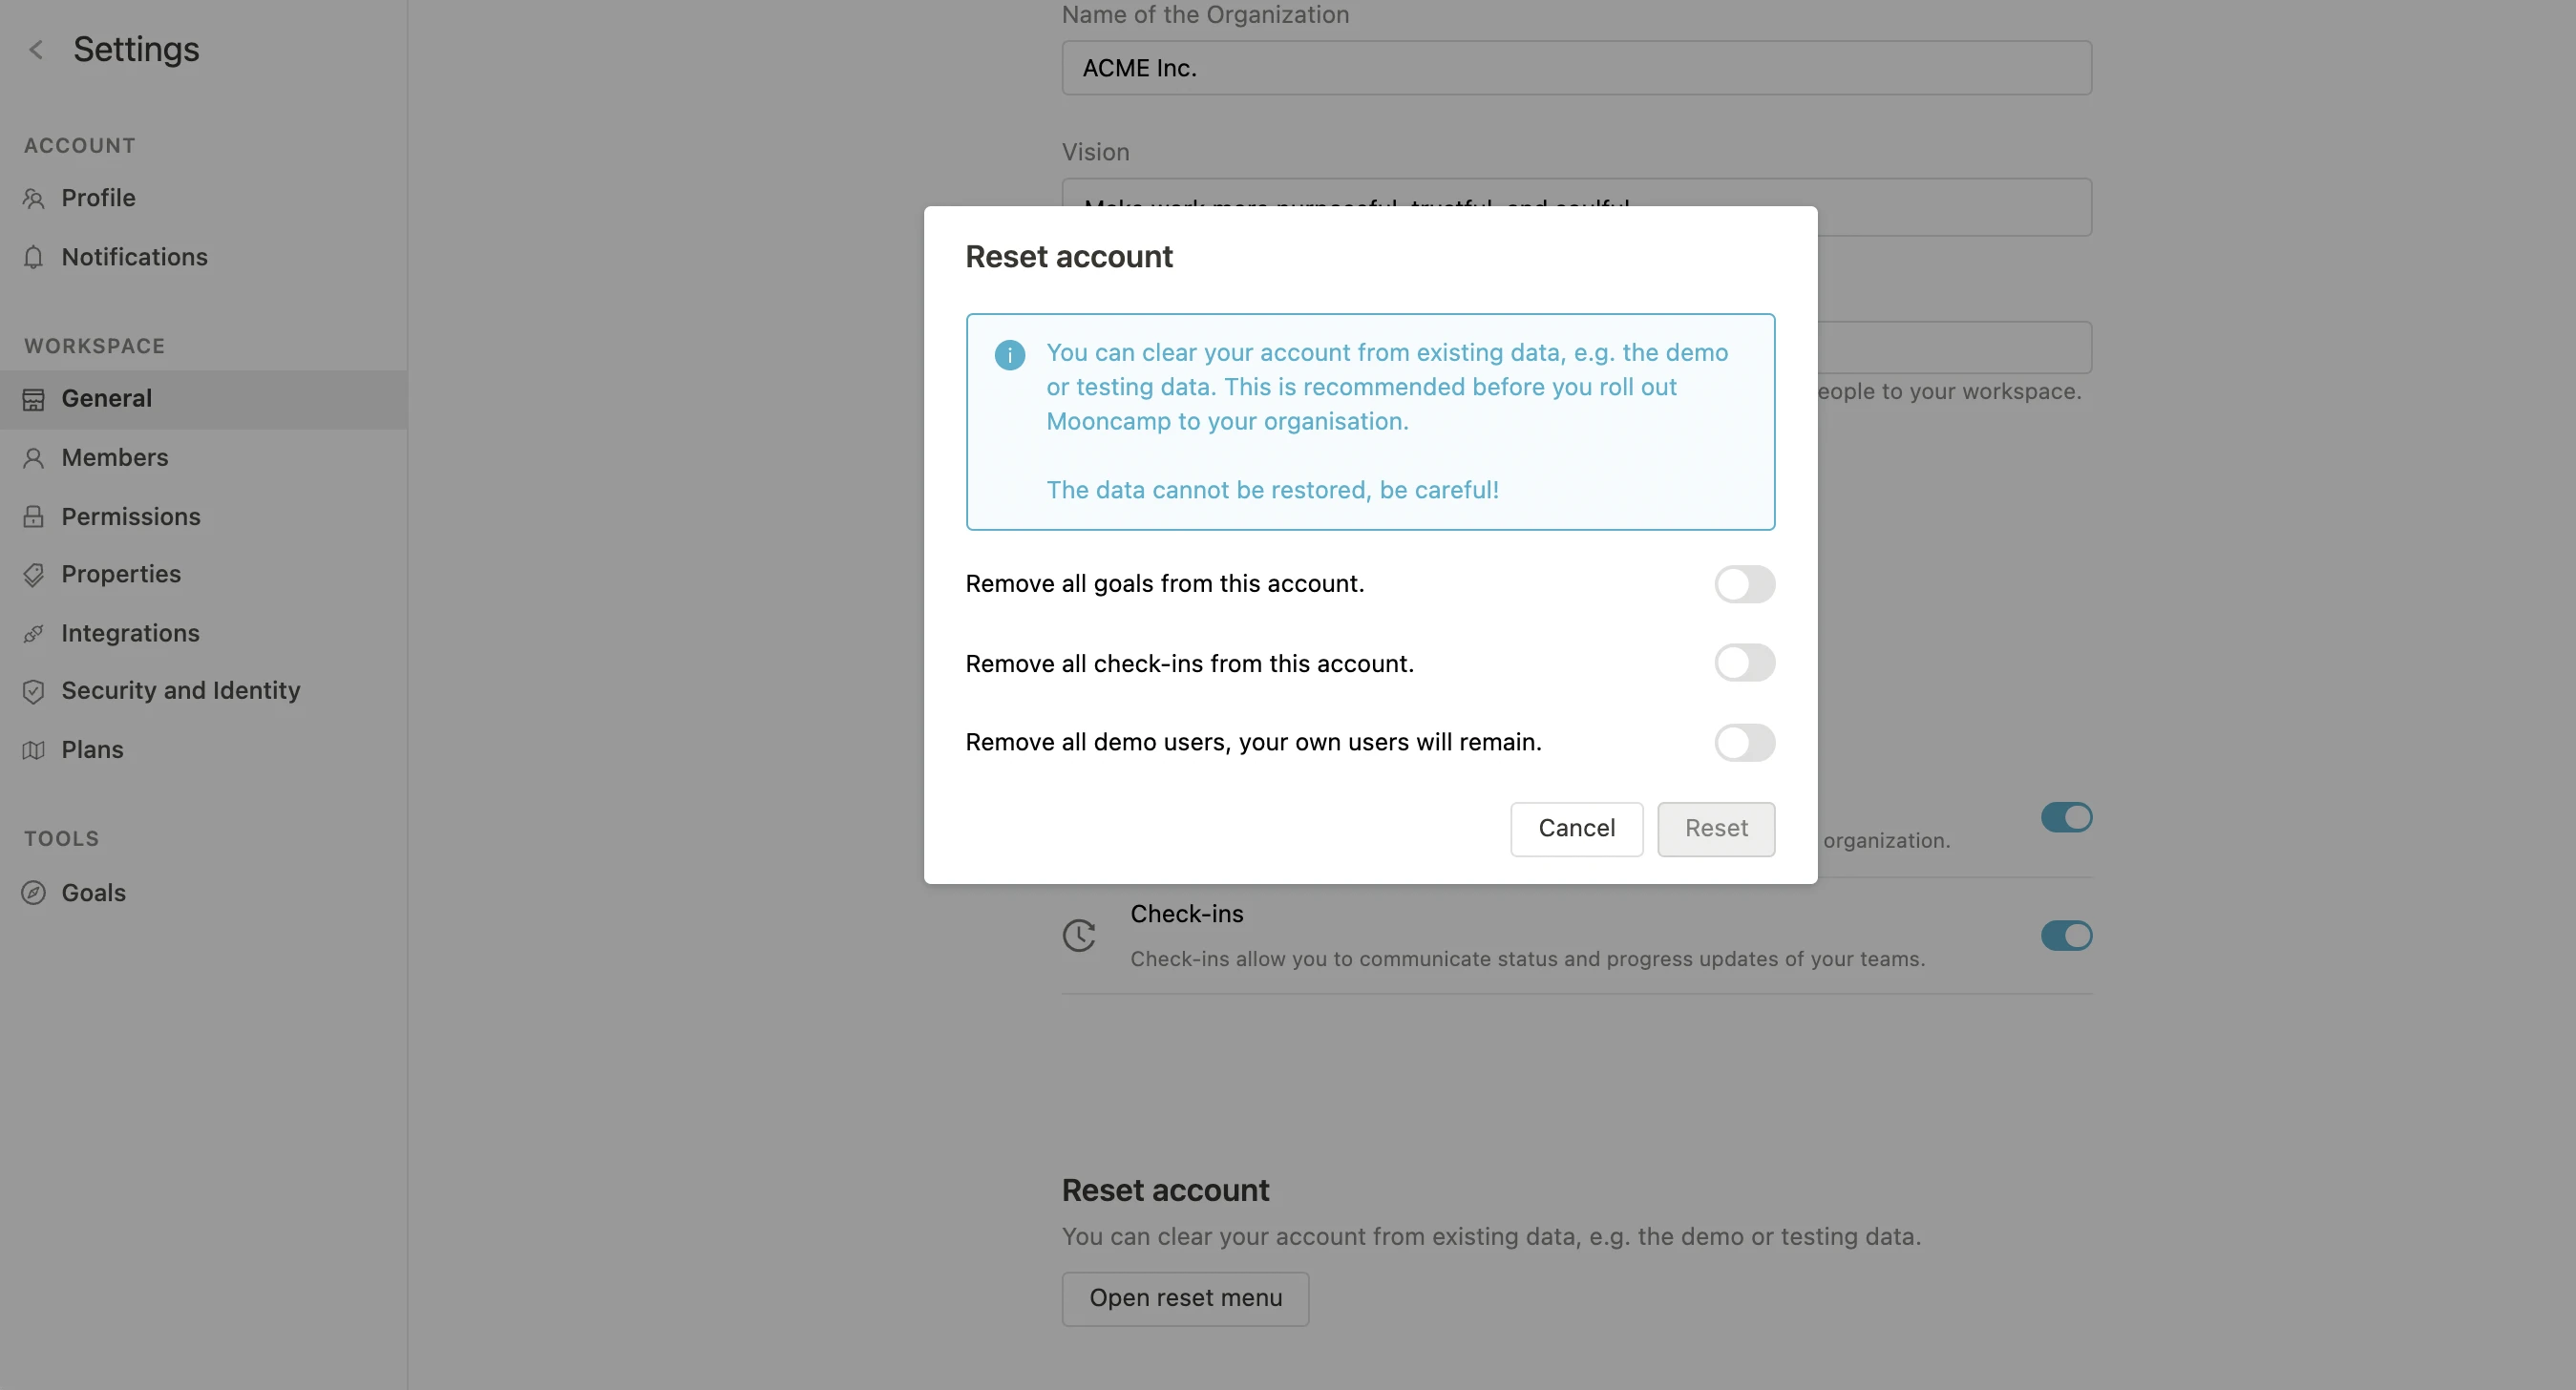 Under `Settings > General` you can reset your account to clear existing data such as demo or testing data.
In the reset menu you have the option to choose what you would like to remove. You can either remove all goals, all check-ins or all demo users separately, only two of these options or remove everything at once.
# How to Create and Edit a Goal
Source: https://mooncamp.com/docs/create-and-edit-goals
A step-by-step guide on creating goals
You can create a goal via "New" on the following pages:
* Homepage
* Team page
* Goal Explorer
**Please note**: Goals are auto-saved, i.e. you don't have to click on *Save* anywhere. As soon as you click on *New*, the goal will be created. If you would rather discard the draft, you can simply delete the goal in the upper right corner of the window.
## Creating a goal
To create a goal, click on "New" in one of the following places:
Under `Settings > General` you can reset your account to clear existing data such as demo or testing data.
In the reset menu you have the option to choose what you would like to remove. You can either remove all goals, all check-ins or all demo users separately, only two of these options or remove everything at once.
# How to Create and Edit a Goal
Source: https://mooncamp.com/docs/create-and-edit-goals
A step-by-step guide on creating goals
You can create a goal via "New" on the following pages:
* Homepage
* Team page
* Goal Explorer
**Please note**: Goals are auto-saved, i.e. you don't have to click on *Save* anywhere. As soon as you click on *New*, the goal will be created. If you would rather discard the draft, you can simply delete the goal in the upper right corner of the window.
## Creating a goal
To create a goal, click on "New" in one of the following places:
 After clicking on "New" the detail view of a new goal will open:
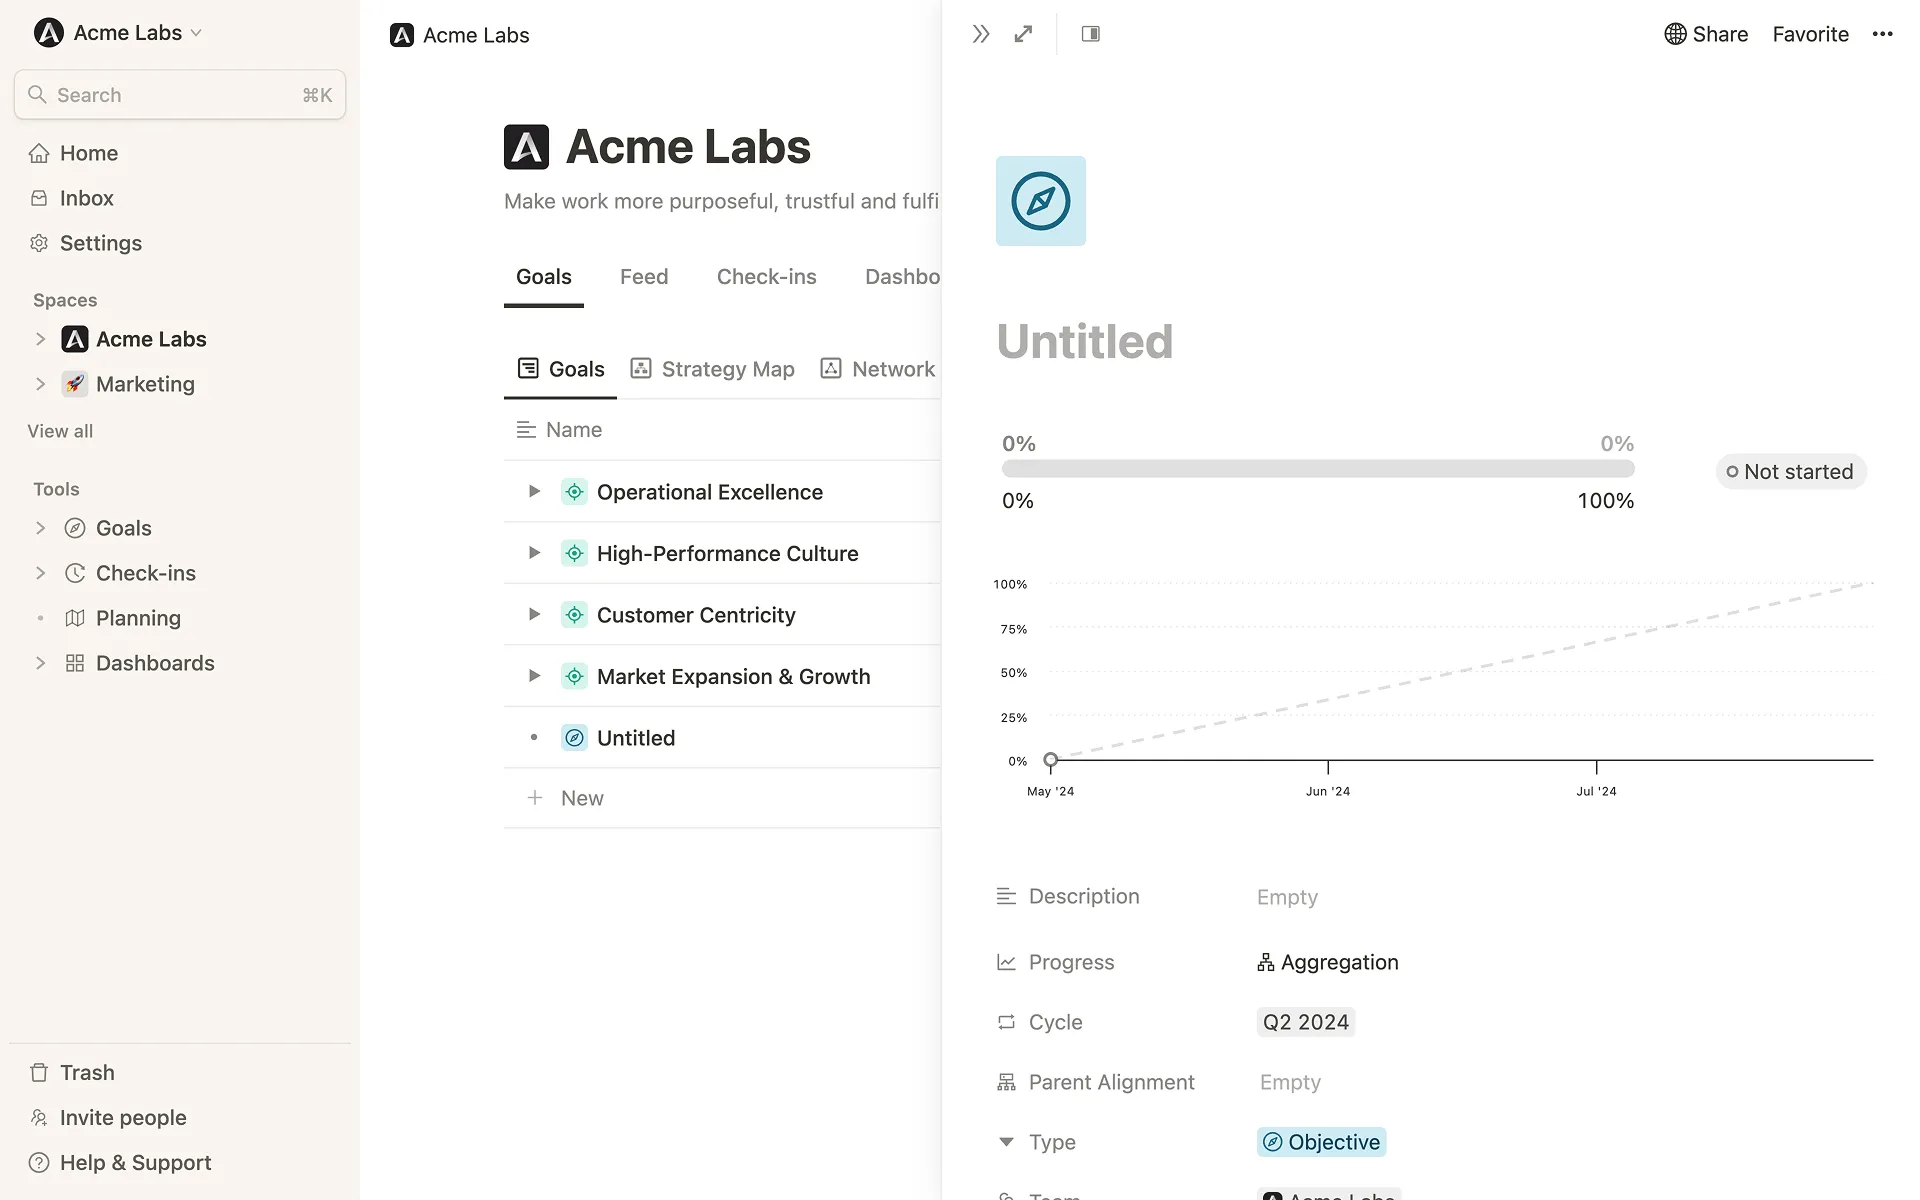 ### Step 1: Add a title for the goal
Optionally, you can also add a description and an icon.
### Step 2: Determine how the progress of the goal should be measured
Four options are available for measuring progress:
* `Start and target value`: set metric with or without unit (e.g. 5 USD, 20%, 10 customers).
* `Aggregation`: progress is measured by sub-goal and expressed as a percentage (0 - 100%)
* `Threshold`: The goal should not exceed or fall below a certain threshold
* `Open/Done`: a goal that is either done or not done
* `None`: The goal does not measure progress (e.g., useful for strictly qualitative objectives)
For further information on the respective options and their application, see [this article](/progress-measurement).
**Tip:** Step 1 as well as 3 to 8 **can easily be done directly in the cascade view** without the need to open a goal detail page. You can simply edit the different properties, goal progress and -status via the columns of the table. Also the **goal title** can be edited in-line by hovering over the title and using the edit icon on the right end of the column.
### Step 3: Select a parent goal
Here you select which objective the goal in question is related to. If the goal is a company goal on the first level, for instance, this field could also remain empty.
### Step 4: Assign the goal to a cycle
Select the cycle (e.g. Q1 2026 or H2 2026) the goal is associated with.
### Step 5: Select the type of the goal
The types of a goal are freely configurable for administrators under `Settings > Properties`.
By default, the following types are set:
* `Objective`
* `Key Result`
* `Initiative`
### Step 6: Fill in additional fields/properties of the goal, if applicable
Each additional property for Goals created by administrators under `Settings > Properties` will appear here.
Typical additional properties are *Owner* or *Team* to indicate who or which team is responsible for the goal.
### Step 7: Create additional subgoals for the respective goal, if needed
When creating a goal, you can create subgoals (e.g. Key Results or Initiatives) in the same step. To do this, simply click on `New` under *Subitems* and a new window will open for the subgoal.
### Step 8: Check and, if necessary, adjust who should have access to the goal
If you want to make the goal accessible only to certain groups of people or adjust read and write permissions, you can configure access via `Share`.
**Note**: As an administrator, you can specify which access settings should be selected by default when a goal is created (`Settings > Goals`).
**Done! 🎉**
# Create KPIs in Mooncamp
Source: https://mooncamp.com/docs/create-kpis-in-mooncamp
A guide on how to create KPIs (Key Performance Indicators) in Mooncamp
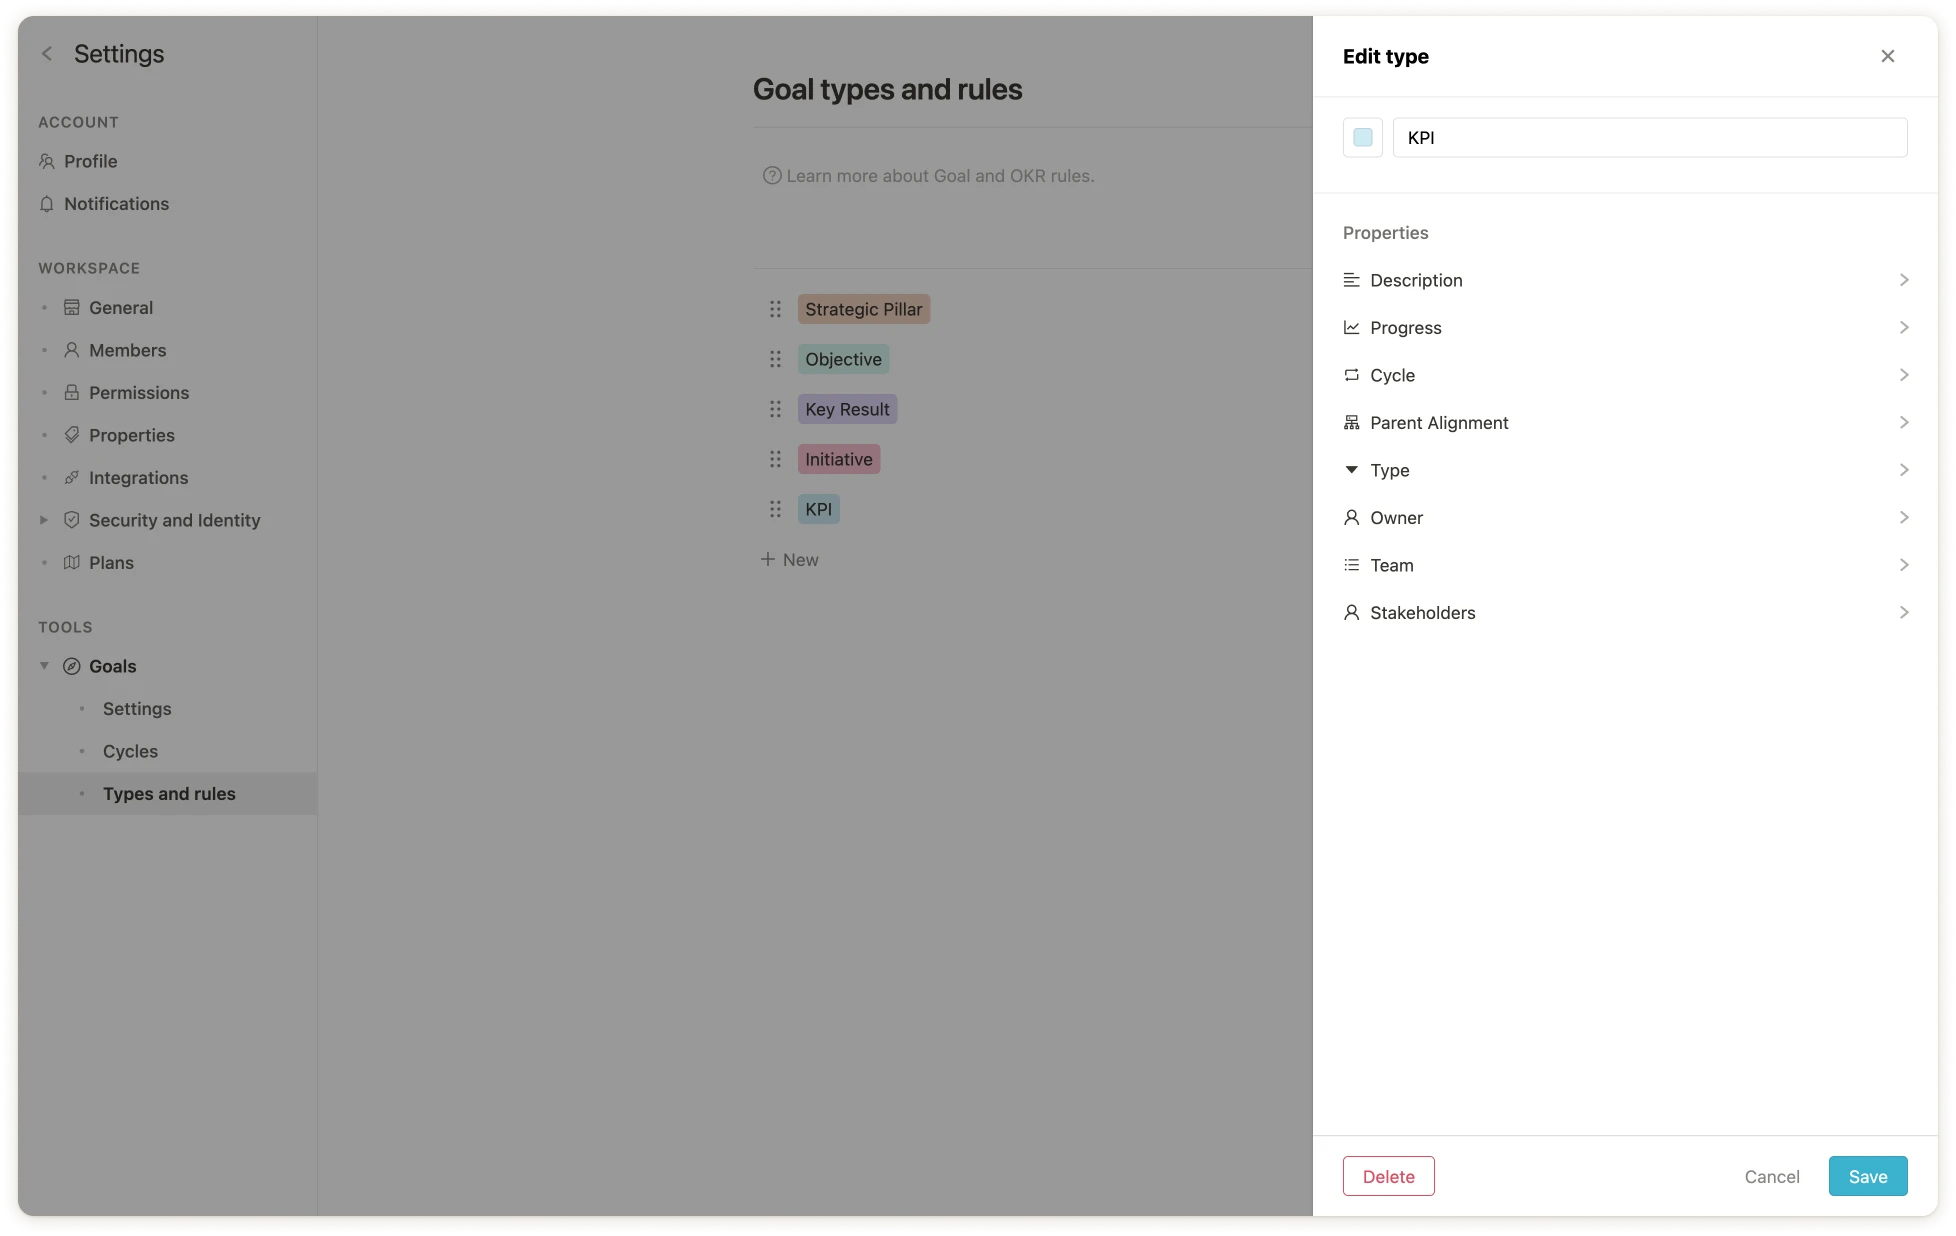
As an admin, under `Settings` > `Goals` > `Types and rules` you can find all created goal types in your Goal management system, such as `Objective`, `Key Result` or `Initiative`.
### Step 1: Add KPI as a goal type (admin function)
To create a KPI (Key Performance Indicator) in Mooncamp, navigate to the goal types in the settings and click on `New`, name the type (e.g. `KPI`) and click on `Save`.
### Step 1: Add a title for the goal
Optionally, you can also add a description and an icon.
### Step 2: Determine how the progress of the goal should be measured
Four options are available for measuring progress:
* `Start and target value`: set metric with or without unit (e.g. 5 USD, 20%, 10 customers).
* `Aggregation`: progress is measured by sub-goal and expressed as a percentage (0 - 100%)
* `Threshold`: The goal should not exceed or fall below a certain threshold
* `Open/Done`: a goal that is either done or not done
* `None`: The goal does not measure progress (e.g., useful for strictly qualitative objectives)
For further information on the respective options and their application, see [this article](/progress-measurement).
**Tip:** Step 1 as well as 3 to 8 **can easily be done directly in the cascade view** without the need to open a goal detail page. You can simply edit the different properties, goal progress and -status via the columns of the table. Also the **goal title** can be edited in-line by hovering over the title and using the edit icon on the right end of the column.
### Step 3: Select a parent goal
Here you select which objective the goal in question is related to. If the goal is a company goal on the first level, for instance, this field could also remain empty.
### Step 4: Assign the goal to a cycle
Select the cycle (e.g. Q1 2026 or H2 2026) the goal is associated with.
### Step 5: Select the type of the goal
The types of a goal are freely configurable for administrators under `Settings > Properties`.
By default, the following types are set:
* `Objective`
* `Key Result`
* `Initiative`
### Step 6: Fill in additional fields/properties of the goal, if applicable
Each additional property for Goals created by administrators under `Settings > Properties` will appear here.
Typical additional properties are *Owner* or *Team* to indicate who or which team is responsible for the goal.
### Step 7: Create additional subgoals for the respective goal, if needed
When creating a goal, you can create subgoals (e.g. Key Results or Initiatives) in the same step. To do this, simply click on `New` under *Subitems* and a new window will open for the subgoal.
### Step 8: Check and, if necessary, adjust who should have access to the goal
If you want to make the goal accessible only to certain groups of people or adjust read and write permissions, you can configure access via `Share`.
**Note**: As an administrator, you can specify which access settings should be selected by default when a goal is created (`Settings > Goals`).
**Done! 🎉**
# Create KPIs in Mooncamp
Source: https://mooncamp.com/docs/create-kpis-in-mooncamp
A guide on how to create KPIs (Key Performance Indicators) in Mooncamp
As an admin, under `Settings` > `Goals` > `Types and rules` you can find all created goal types in your Goal management system, such as `Objective`, `Key Result` or `Initiative`.
### Step 1: Add KPI as a goal type (admin function)
To create a KPI (Key Performance Indicator) in Mooncamp, navigate to the goal types in the settings and click on `New`, name the type (e.g. `KPI`) and click on `Save`.
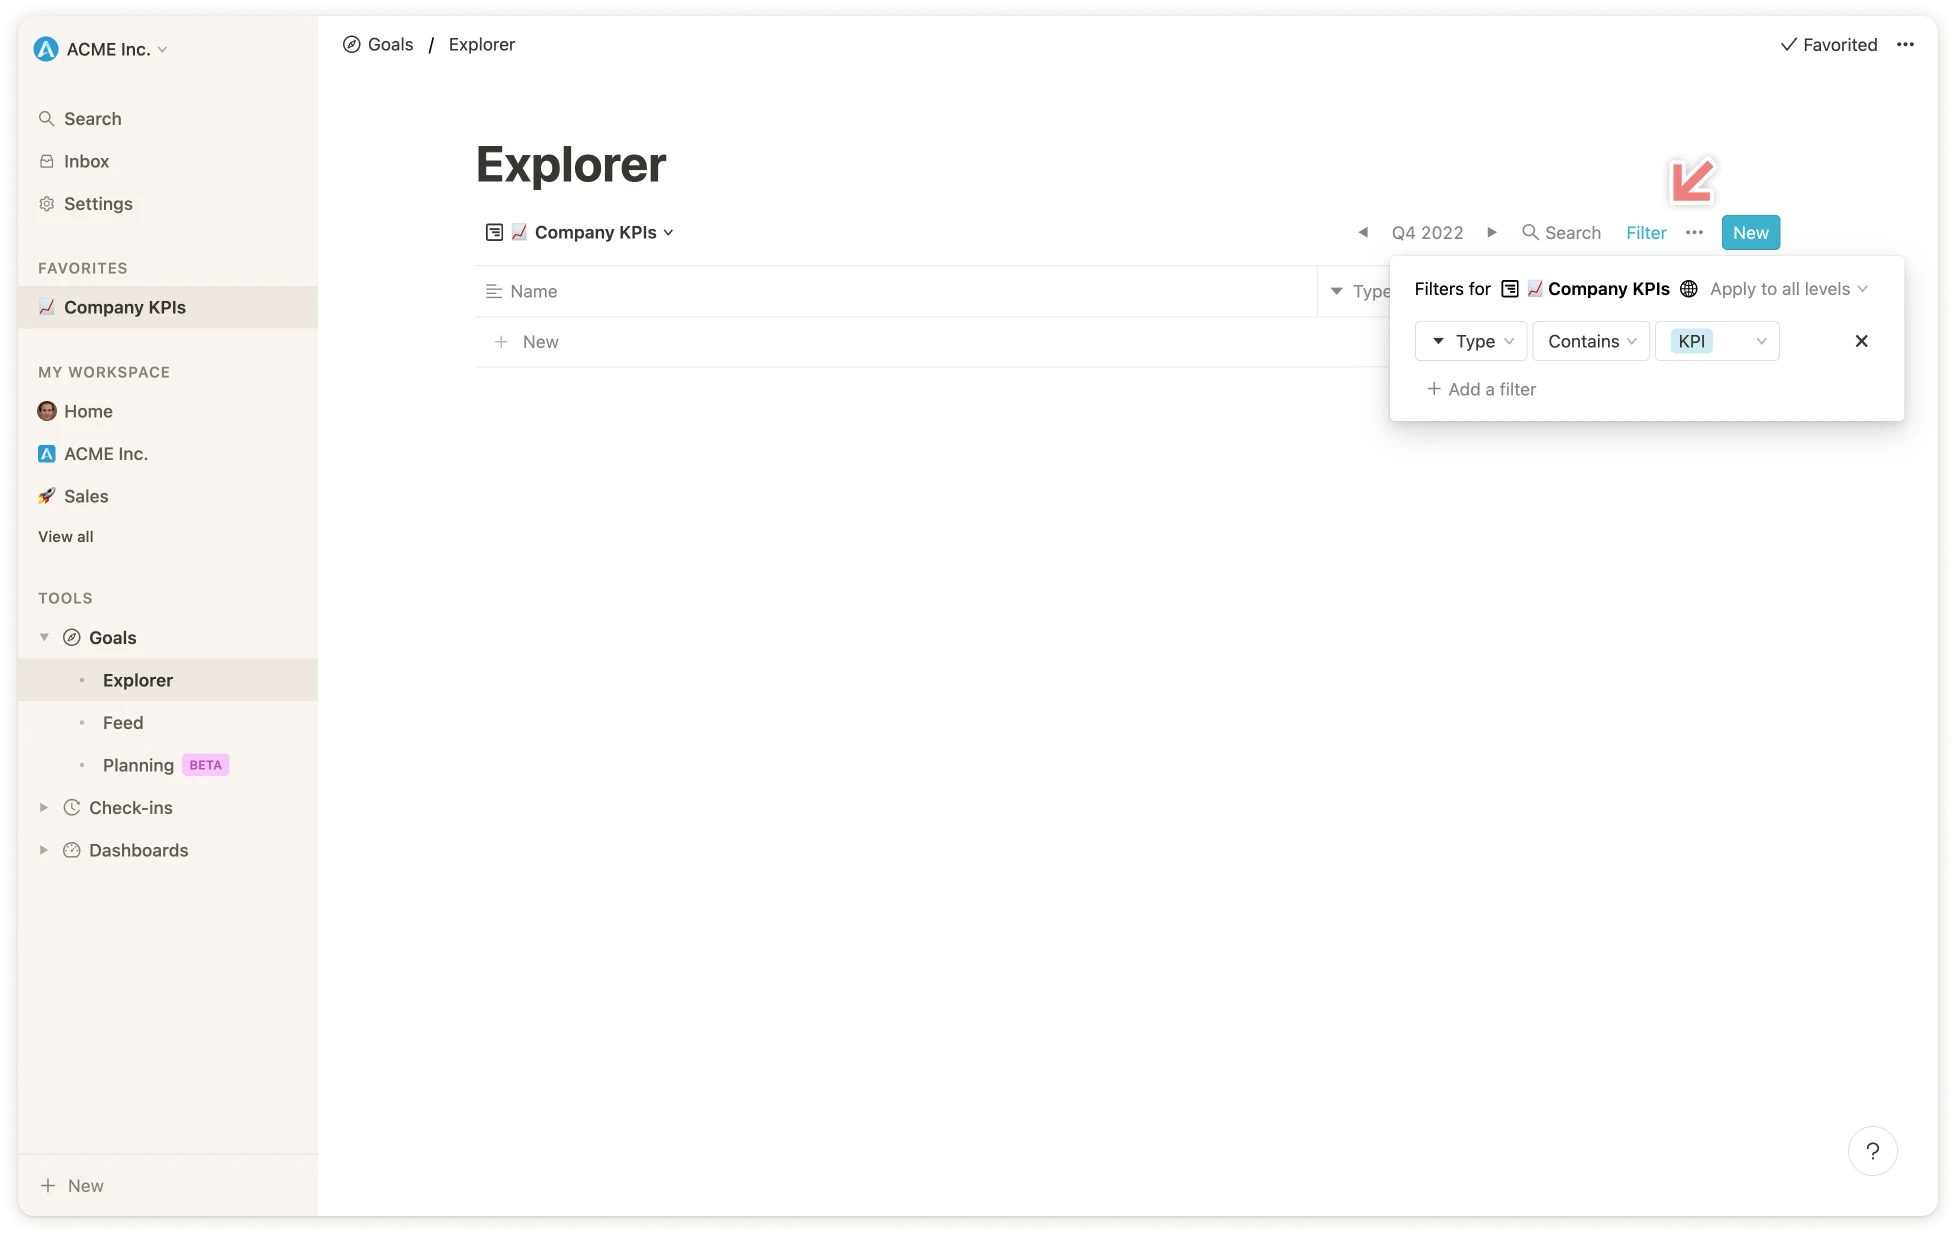
 ### Step 2: Create a new view for your KPIs
Navigate to the Goal Explorer `1` and create a new view for your KPIs. To do this, click `Add a view` `2`, name the view and choose whether you want it to be visible only to you or to everyone in the account `3`.
### Step 2: Create a new view for your KPIs
Navigate to the Goal Explorer `1` and create a new view for your KPIs. To do this, click `Add a view` `2`, name the view and choose whether you want it to be visible only to you or to everyone in the account `3`.
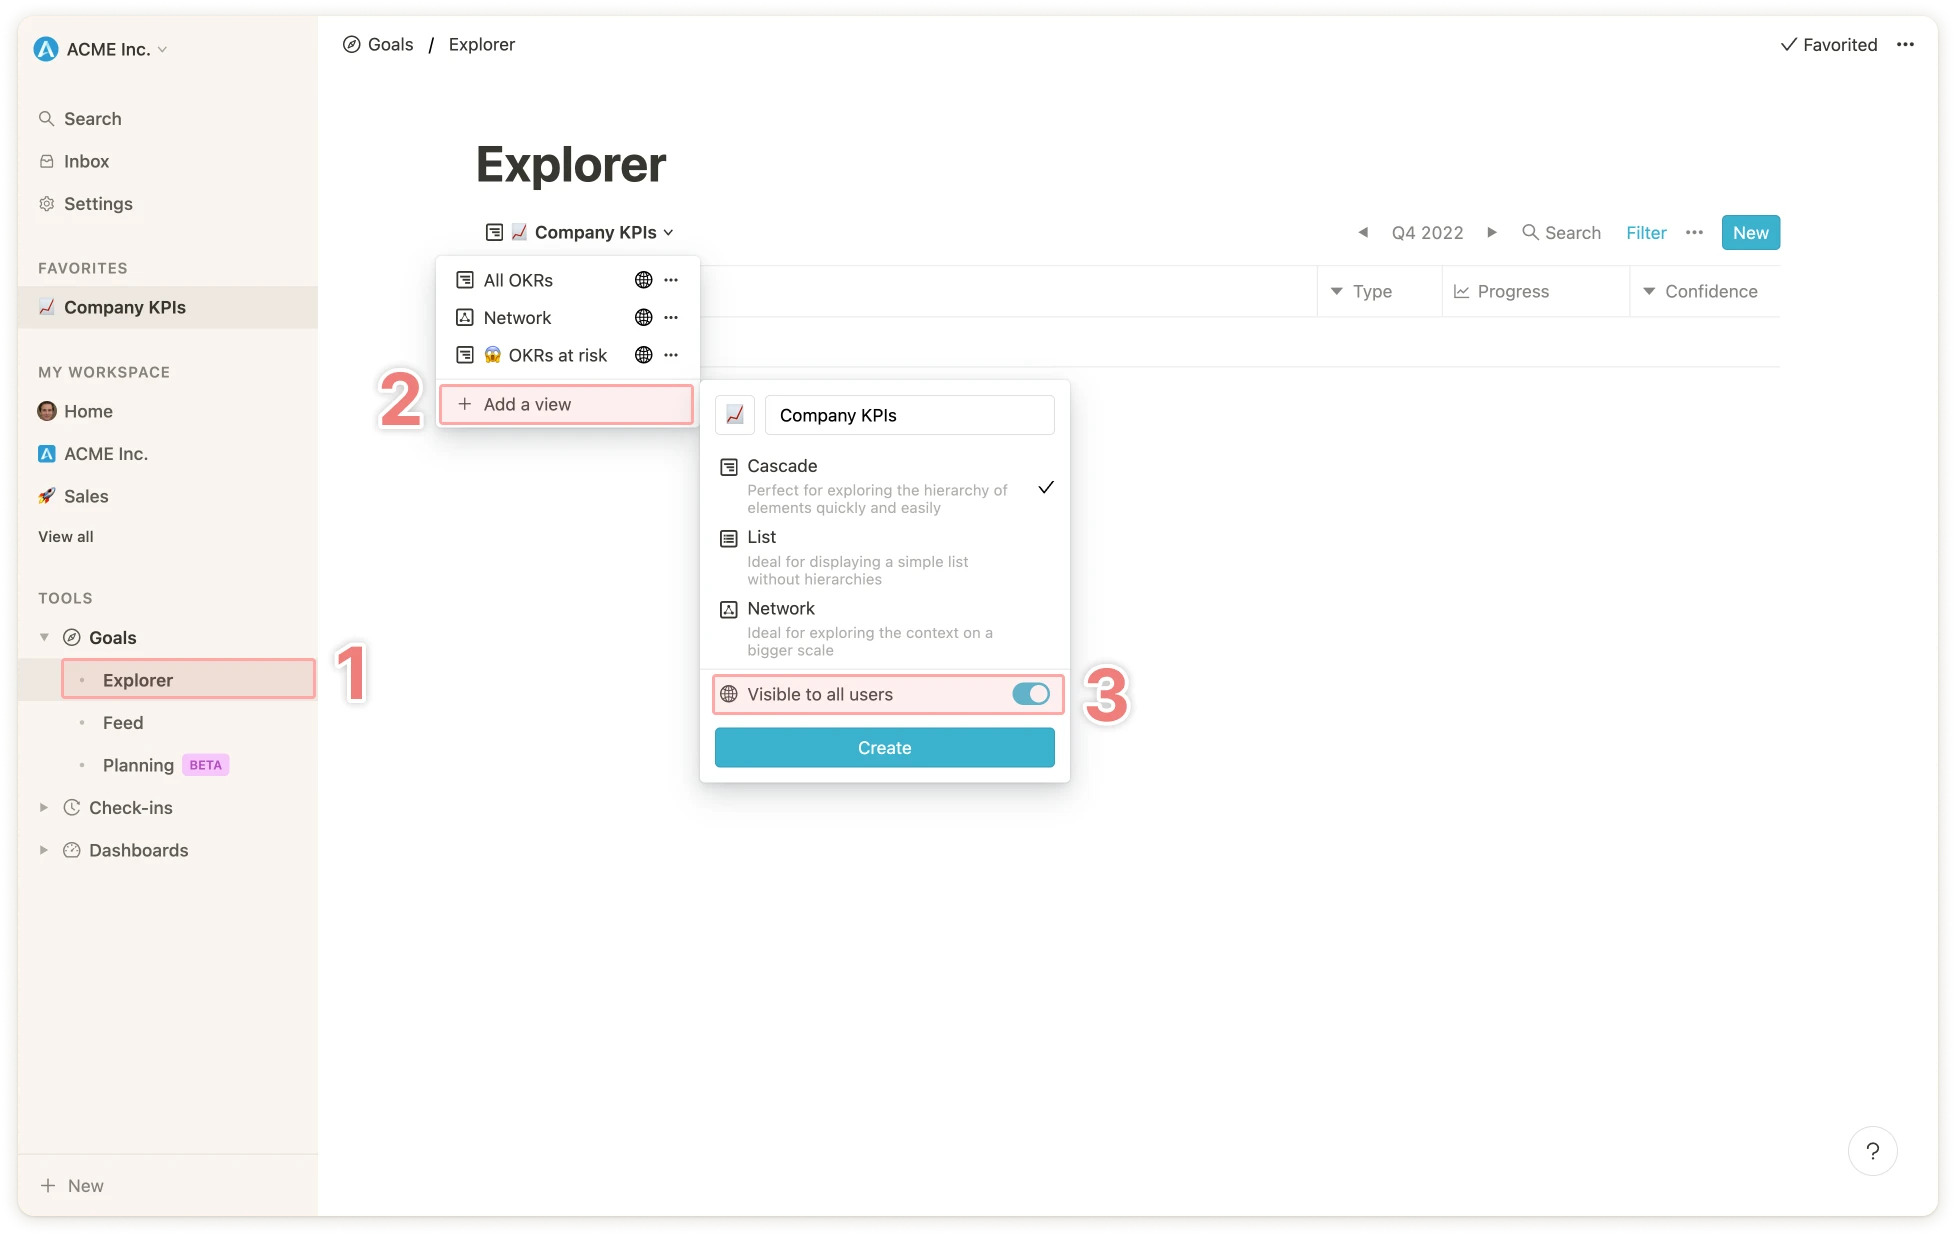 Then filter the goal type by `KPI`.
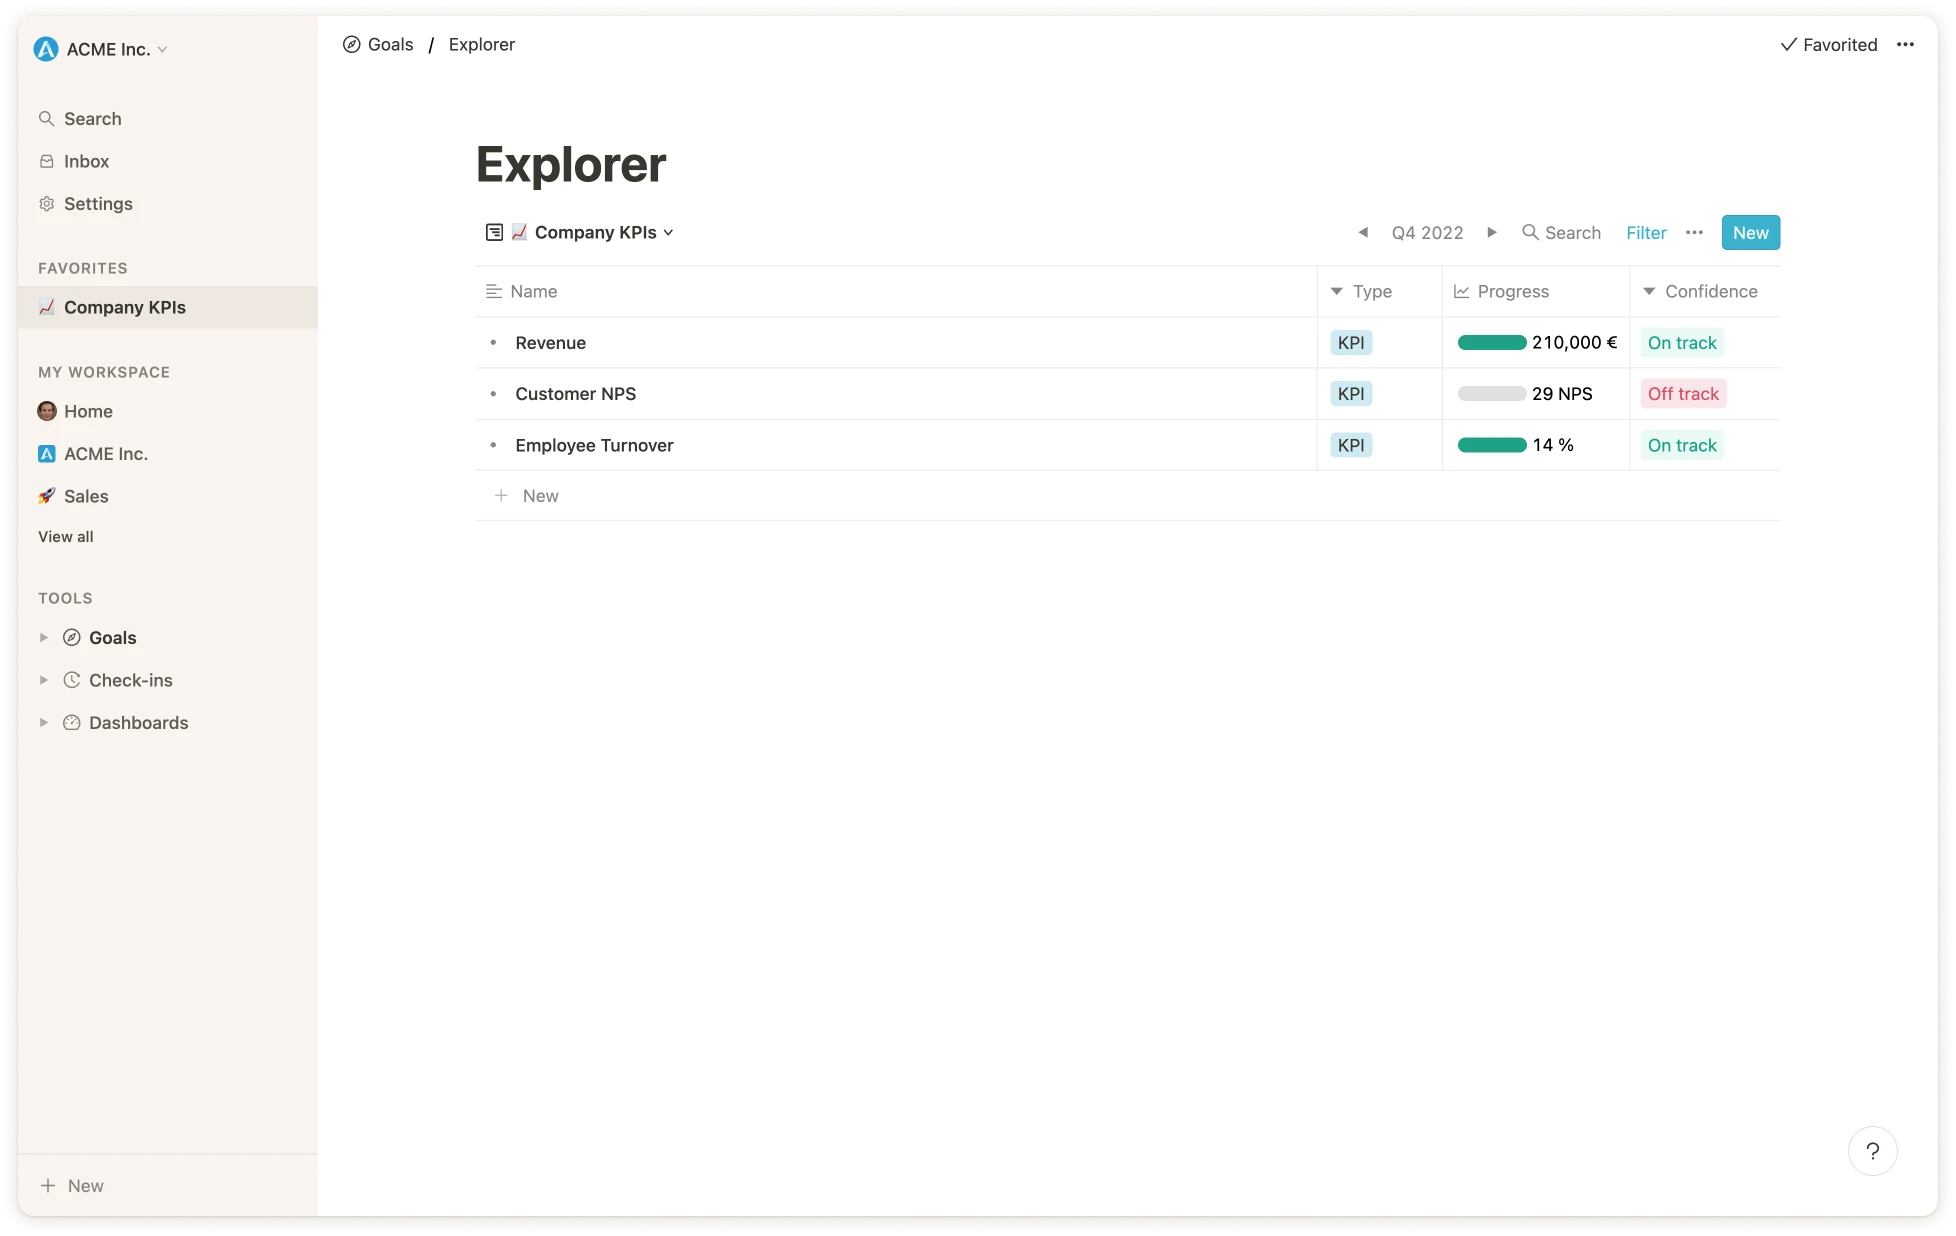
 ### Step 3: Create the KPIs
Click on `New` to create a new KPI. For KPIs, it is useful to select the `Threshold` option under `Progress`. Here you can specify whether the associated KPI should be above or below a certain value. The status of the KPI changes accordingly.
### Step 3: Create the KPIs
Click on `New` to create a new KPI. For KPIs, it is useful to select the `Threshold` option under `Progress`. Here you can specify whether the associated KPI should be above or below a certain value. The status of the KPI changes accordingly.
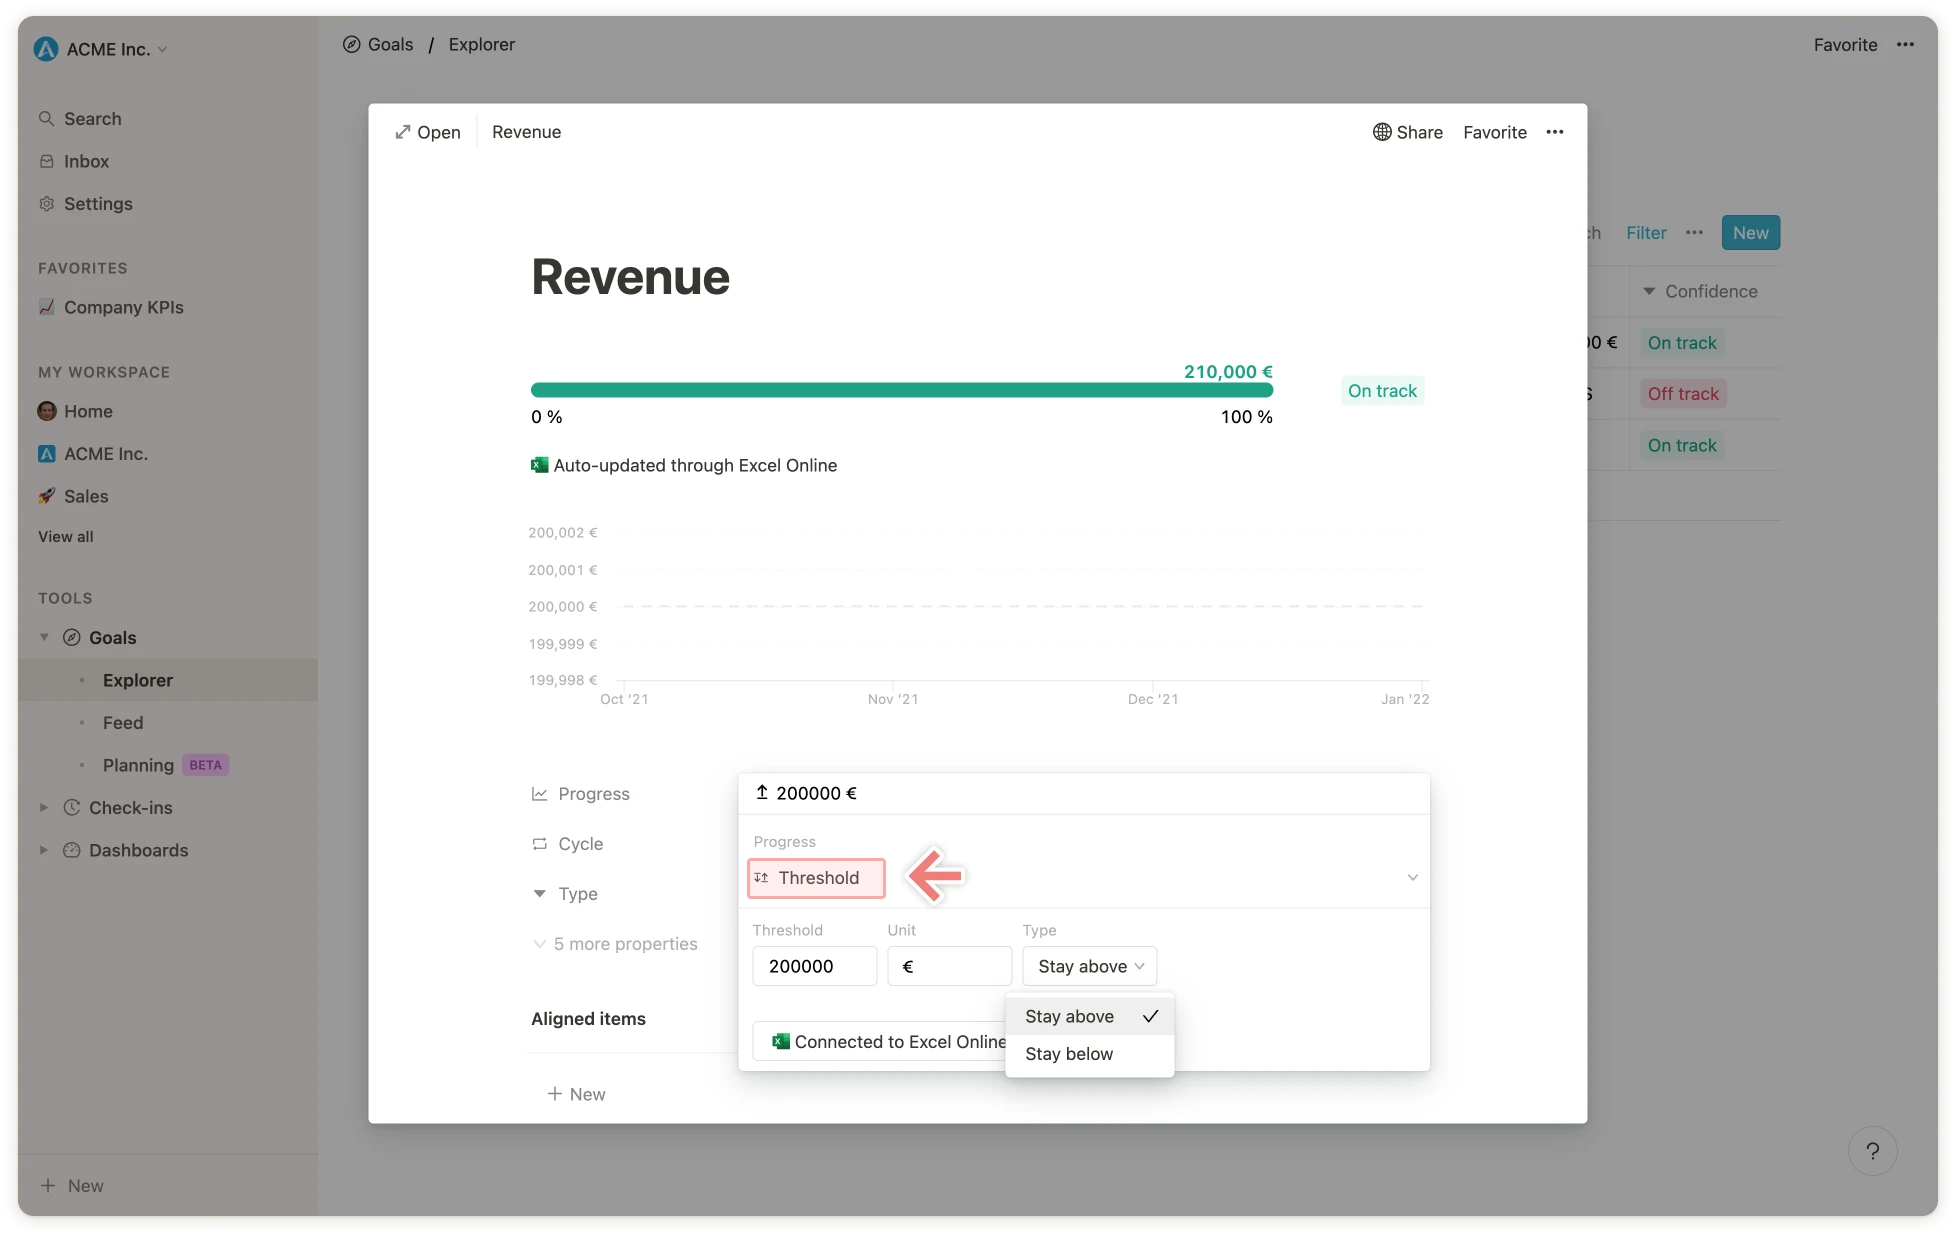
 **Note:** If only the metric of the KPI and not the status should be displayed, the column for the status can be hidden in the view.
### Step 4: Update your KPIs
Afterwards, the KPIs can be updated either manually or via integration.
**Manual update**
Just like with other goal types, the KPIs can be updated via the cascade view or on the goal's detail page. You can learn more about how to update goals in this help center article:
[How to Update a Goal](/updating-goals)
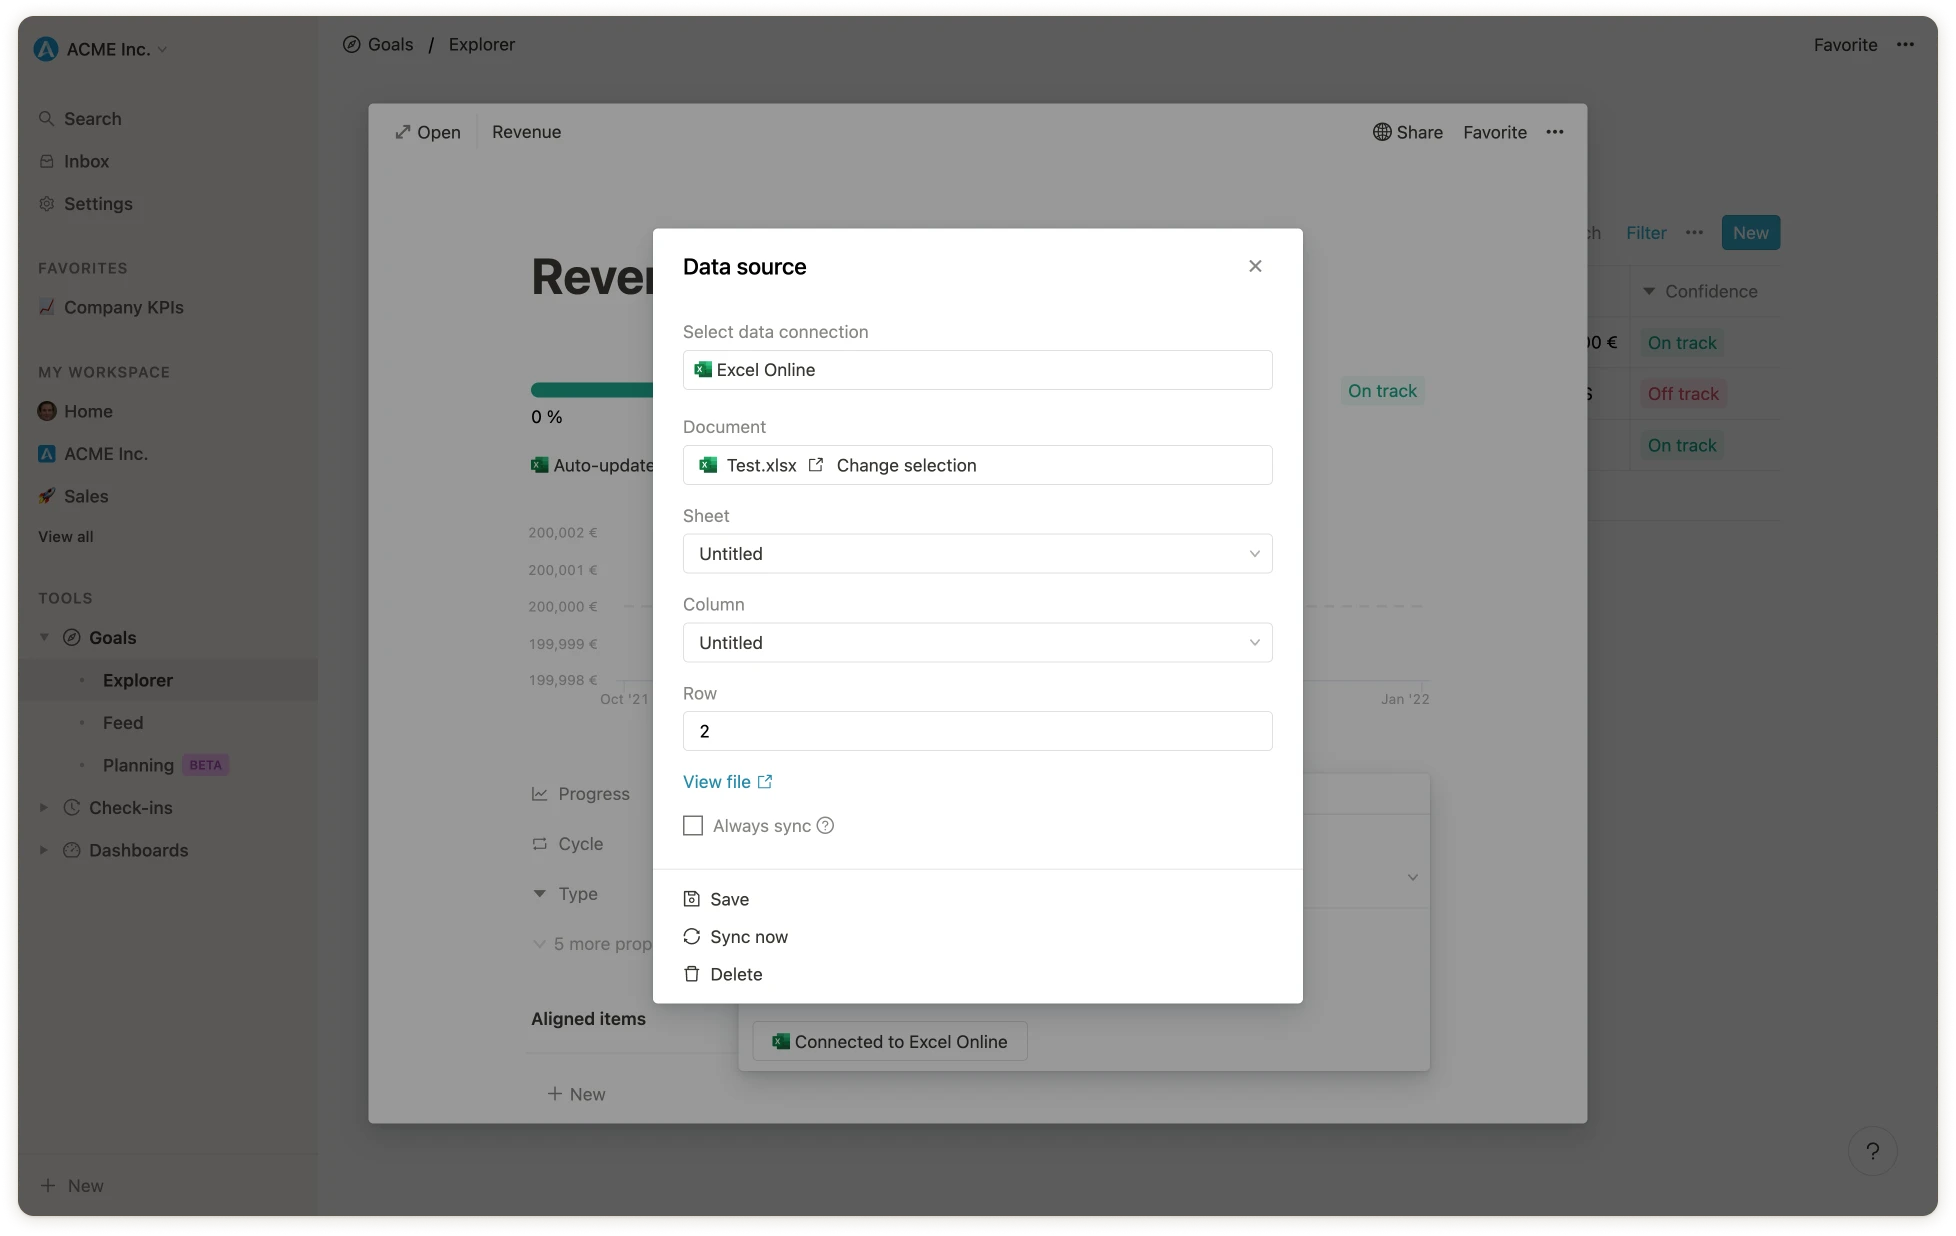
**Automatic update via integration**
KPIs can also be updated automatically by linking them to other tools like Excel, Jira or Google Sheets. You can learn more about how to connect data integrations in this help center article:
[Connect data integrations to Goals and OKRs](/data-integrations)
**Note:** If only the metric of the KPI and not the status should be displayed, the column for the status can be hidden in the view.
### Step 4: Update your KPIs
Afterwards, the KPIs can be updated either manually or via integration.
**Manual update**
Just like with other goal types, the KPIs can be updated via the cascade view or on the goal's detail page. You can learn more about how to update goals in this help center article:
[How to Update a Goal](/updating-goals)
**Automatic update via integration**
KPIs can also be updated automatically by linking them to other tools like Excel, Jira or Google Sheets. You can learn more about how to connect data integrations in this help center article:
[Connect data integrations to Goals and OKRs](/data-integrations)
 ### (Optional) **Step 5: Add the view to your favorites**
To have the most important KPIs quickly accessible, they can be added as favorites to the sidebar.
### (Optional) **Step 5: Add the view to your favorites**
To have the most important KPIs quickly accessible, they can be added as favorites to the sidebar.
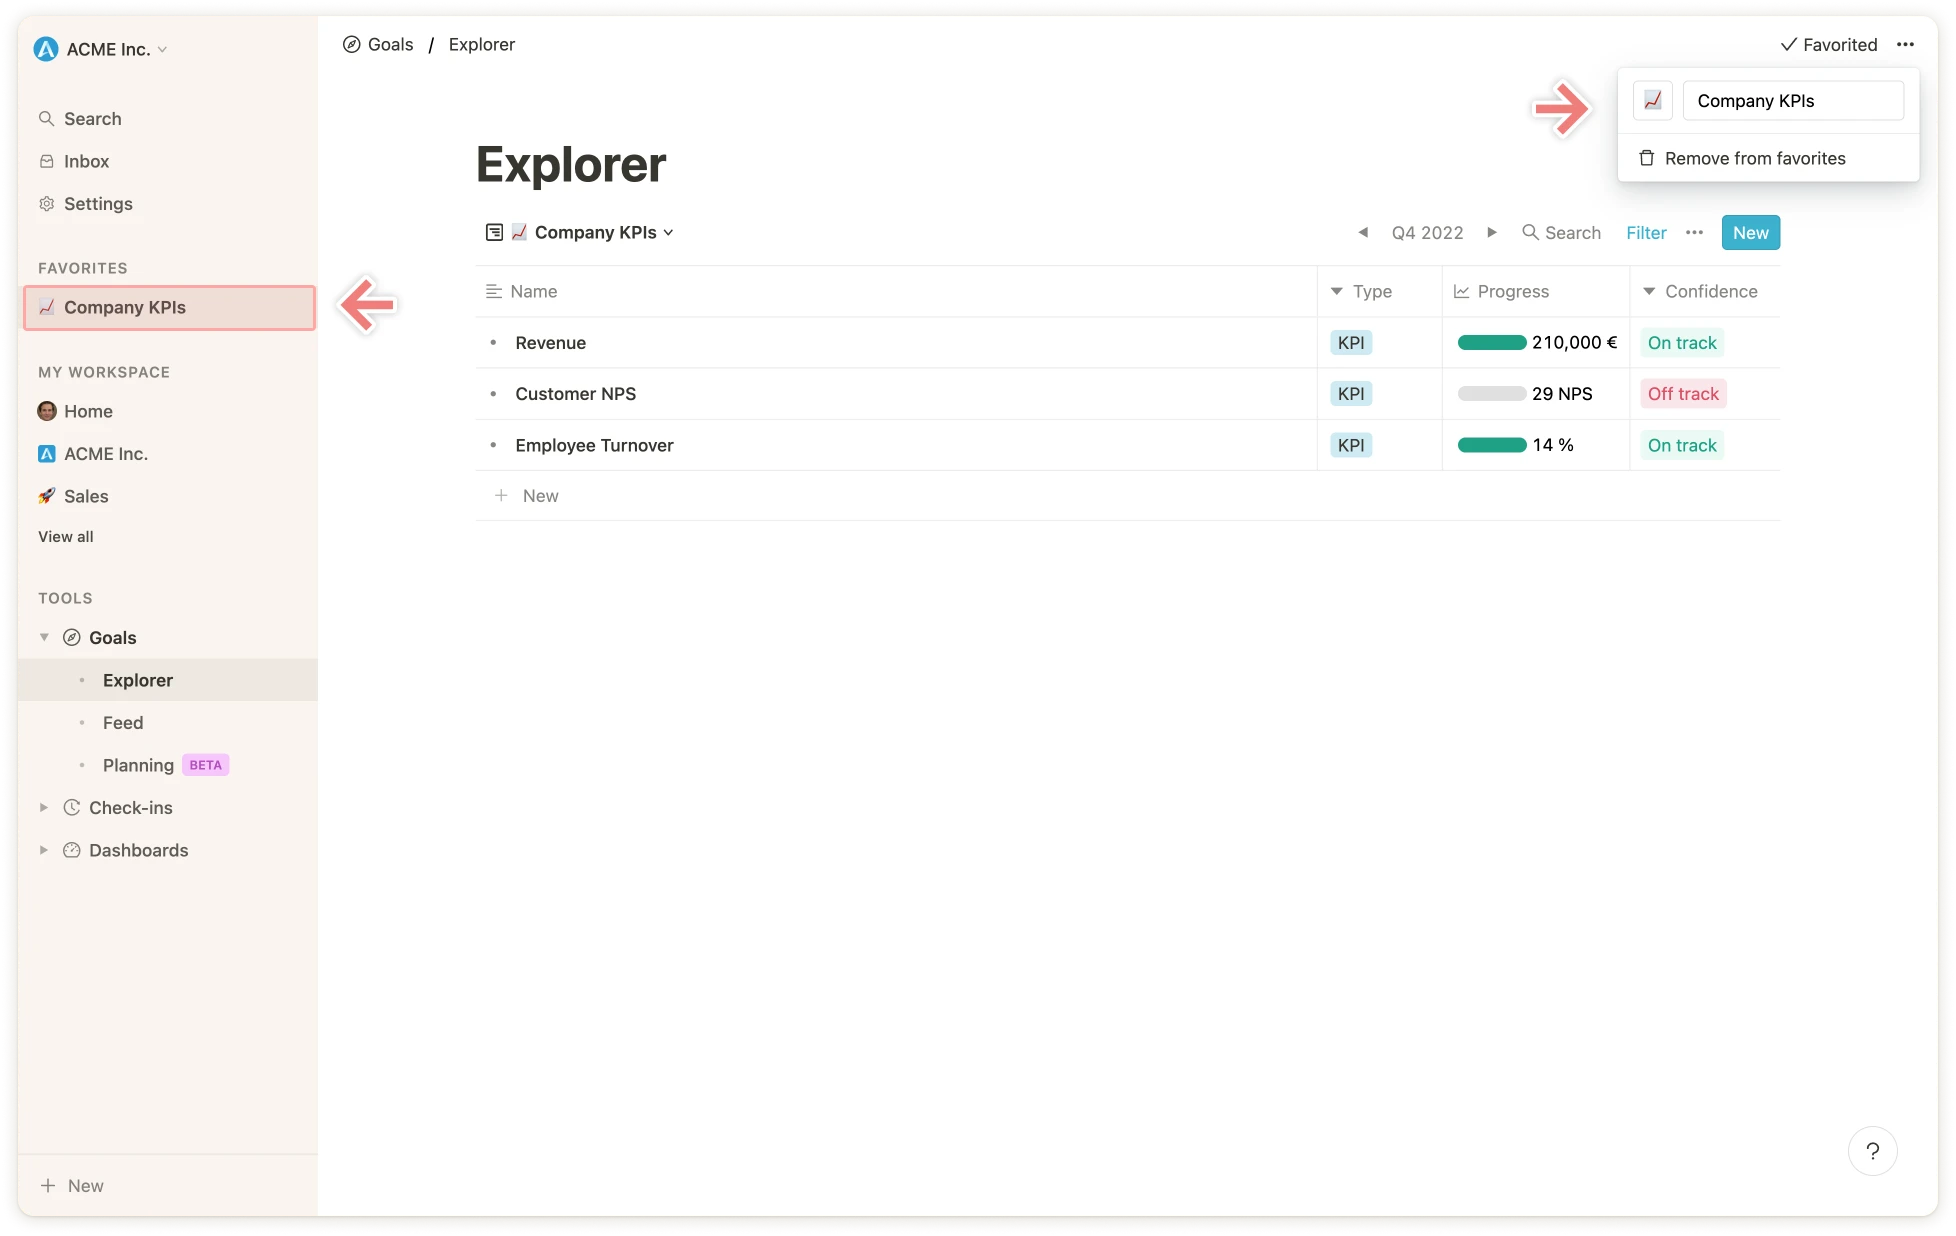 Of course, the same approach can also be used to create different views for specific users or teams. As an example, for `Marketing KPIs` you would set a filter for the Marketing team accordingly.
### (Optional) **Step 6: Export your KPIs**
To export the data of a view, navigate to the respective view and click on the ellipsis in the upper right corner `...` and select `Export CSV`.
Of course, the same approach can also be used to create different views for specific users or teams. As an example, for `Marketing KPIs` you would set a filter for the Marketing team accordingly.
### (Optional) **Step 6: Export your KPIs**
To export the data of a view, navigate to the respective view and click on the ellipsis in the upper right corner `...` and select `Export CSV`.
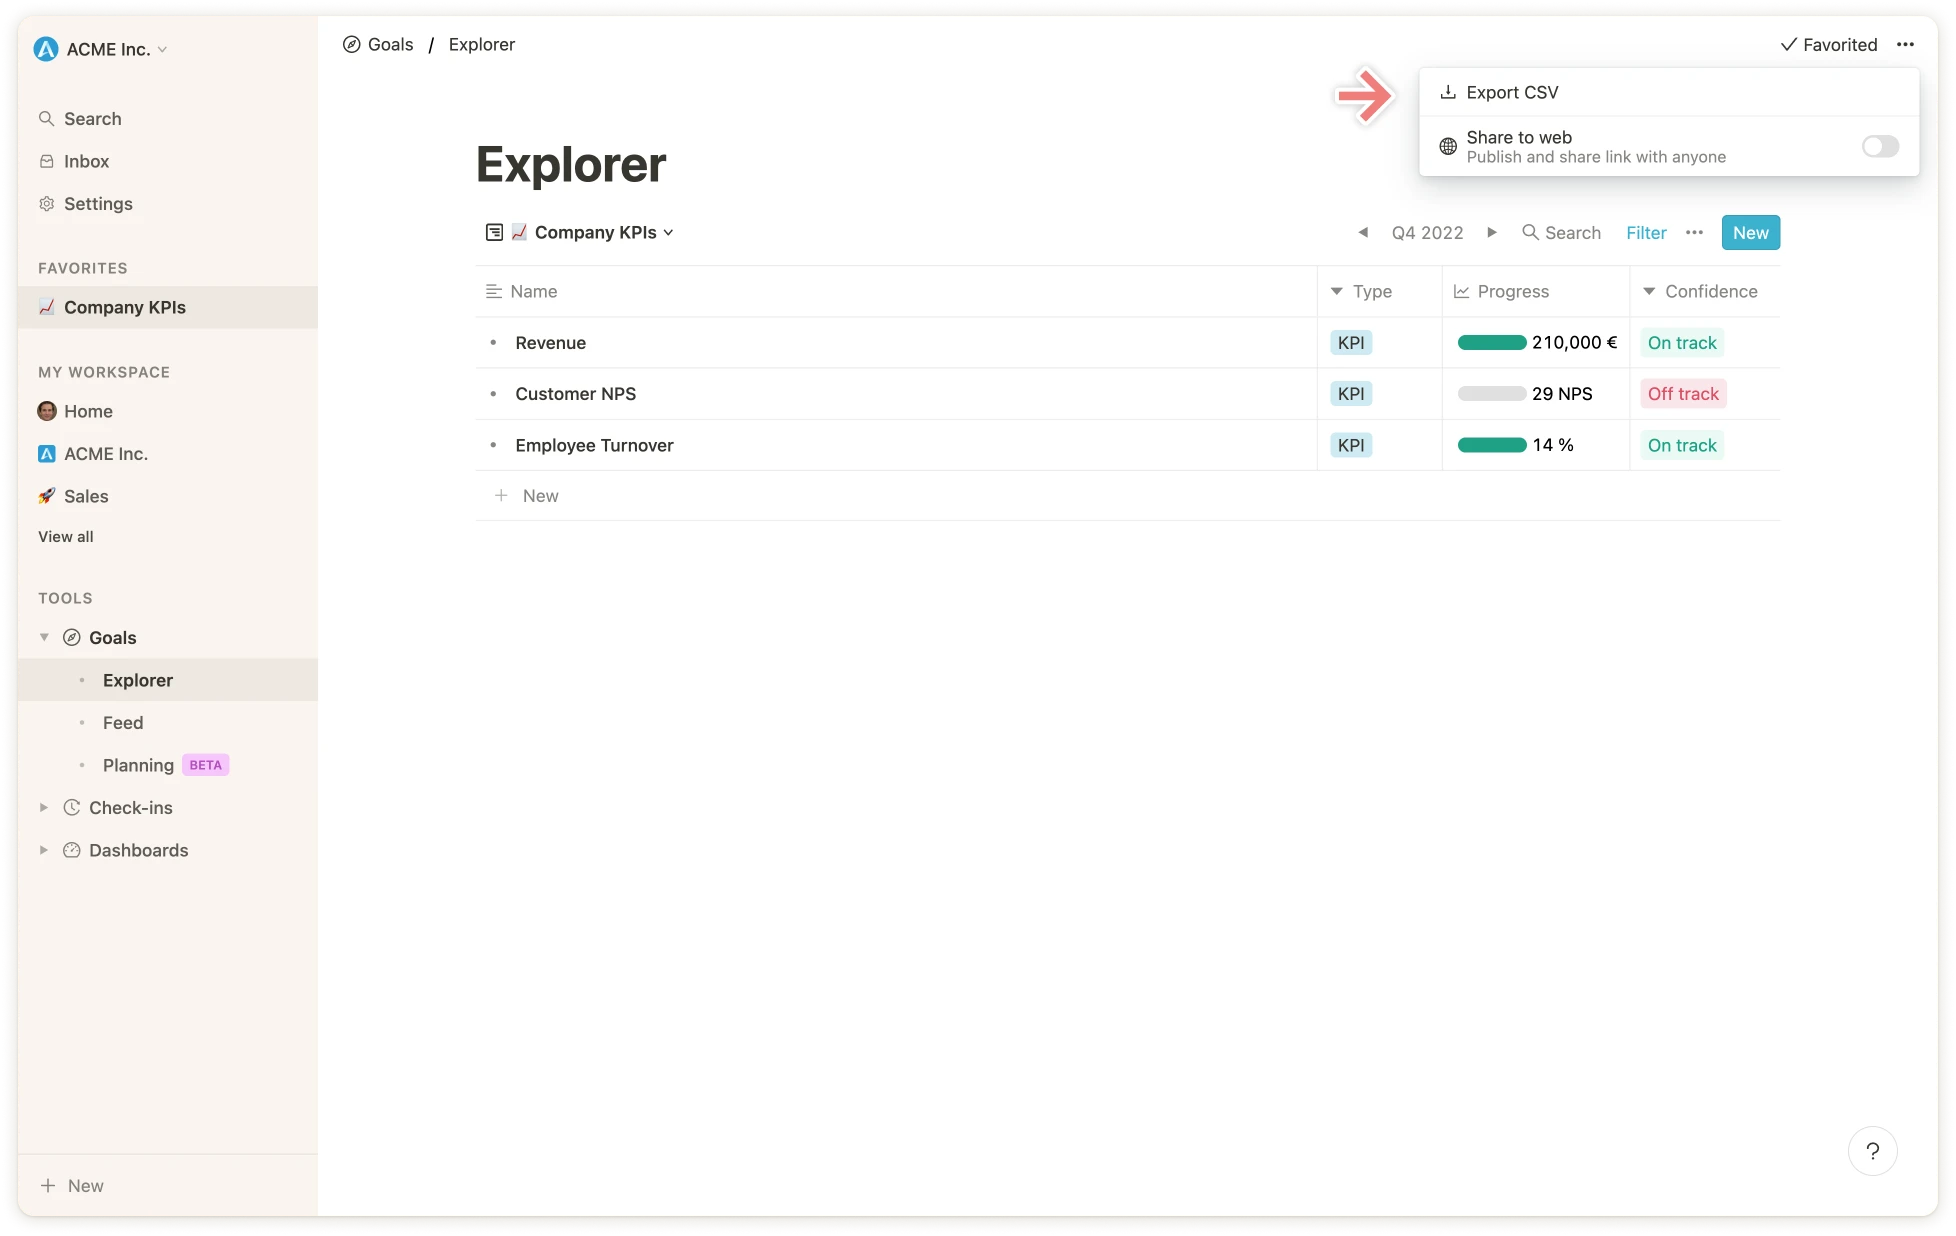 The CSV file will be downloaded afterwards.
# Cycles
Source: https://mooncamp.com/docs/cycles
An overview of Mooncamp's flexible cycles
## Video tutorial
In case you don’t feel like reading, here is a video tutorial explaining the cycles.
## How to create cycles
First, let’s navigate to the settings, where you will find a tab for “Cycles” at the bottom.
The CSV file will be downloaded afterwards.
# Cycles
Source: https://mooncamp.com/docs/cycles
An overview of Mooncamp's flexible cycles
## Video tutorial
In case you don’t feel like reading, here is a video tutorial explaining the cycles.
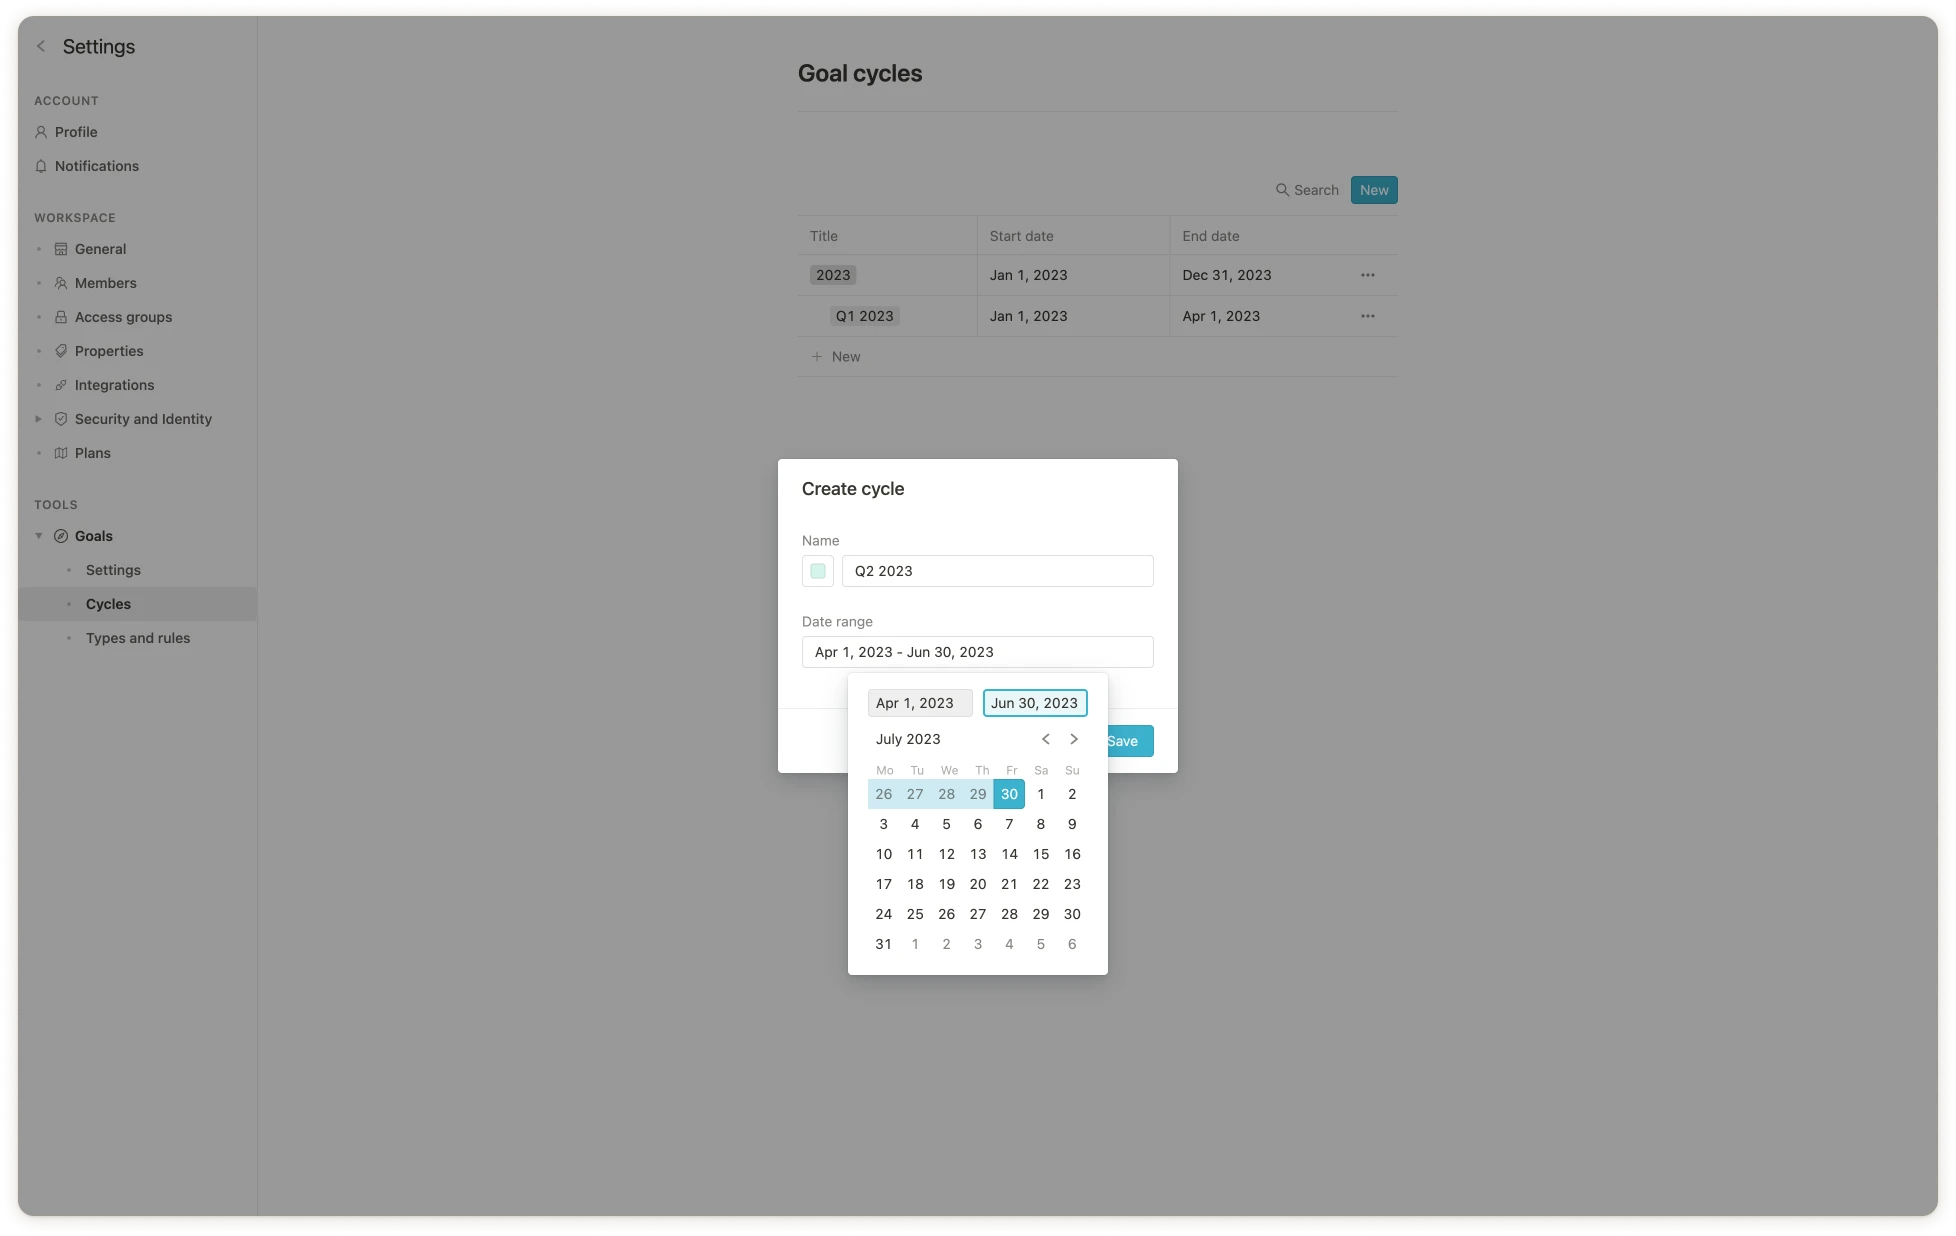
## How to create cycles
First, let’s navigate to the settings, where you will find a tab for “Cycles” at the bottom.
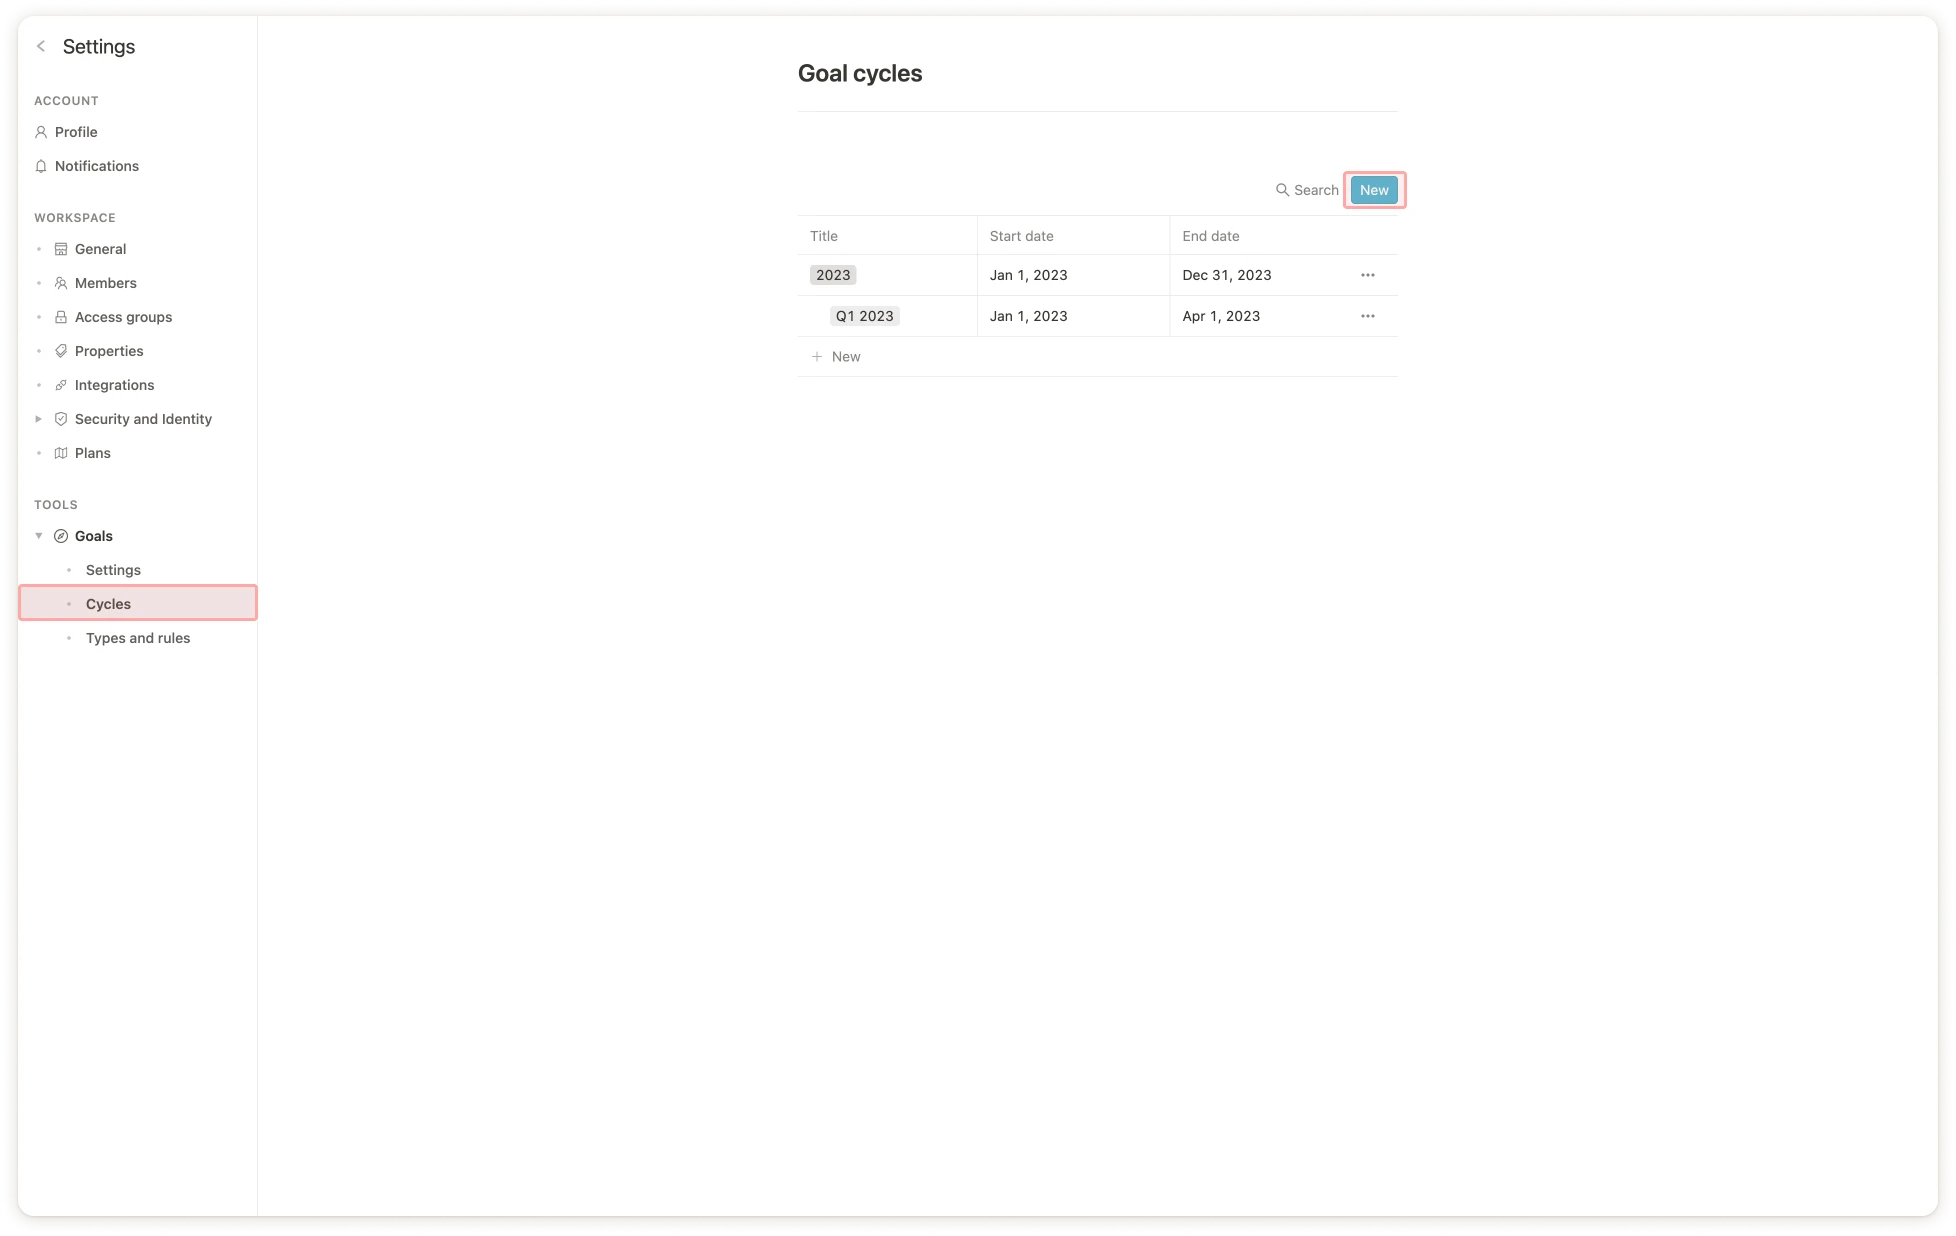 Once there, you click on the blue new button as shown in the screenshot above. Then you just enter the cycle’s name, choose the timeframe, and click “Save”.
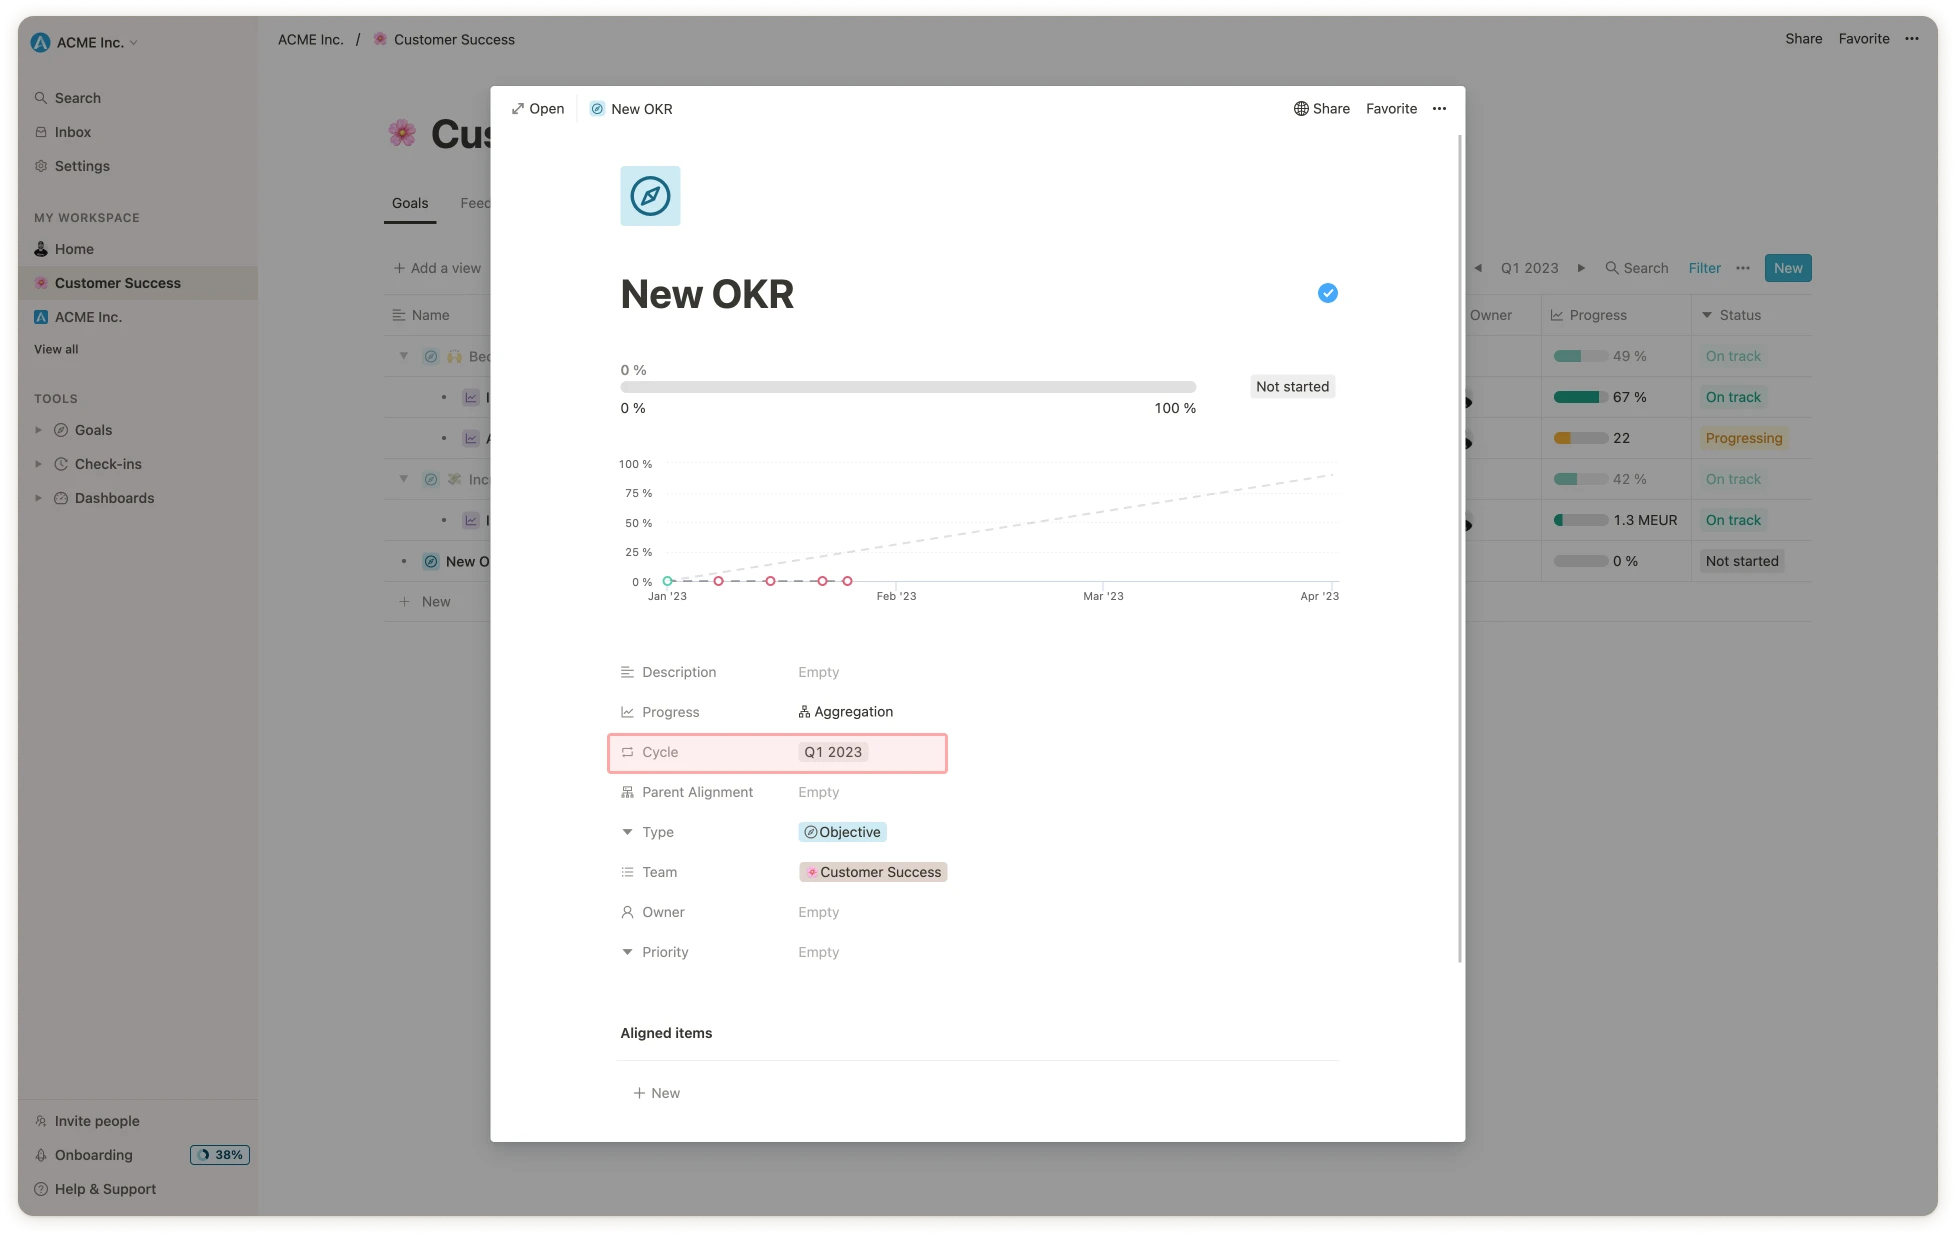
 ## Assigning cycles to goals
Now that you have created your cycles, you can assign your goals to them. This is usually done automatically by the system when you create a goal. Here is an example:
## Assigning cycles to goals
Now that you have created your cycles, you can assign your goals to them. This is usually done automatically by the system when you create a goal. Here is an example:
 ## Using the cycle picker
This is an important part of navigating Mooncamp because the goals you can see are based on the cycle you have picked. The cycle picker can be found in the top right corner of any view, as shown in the screenshot below.
## Using the cycle picker
This is an important part of navigating Mooncamp because the goals you can see are based on the cycle you have picked. The cycle picker can be found in the top right corner of any view, as shown in the screenshot below.
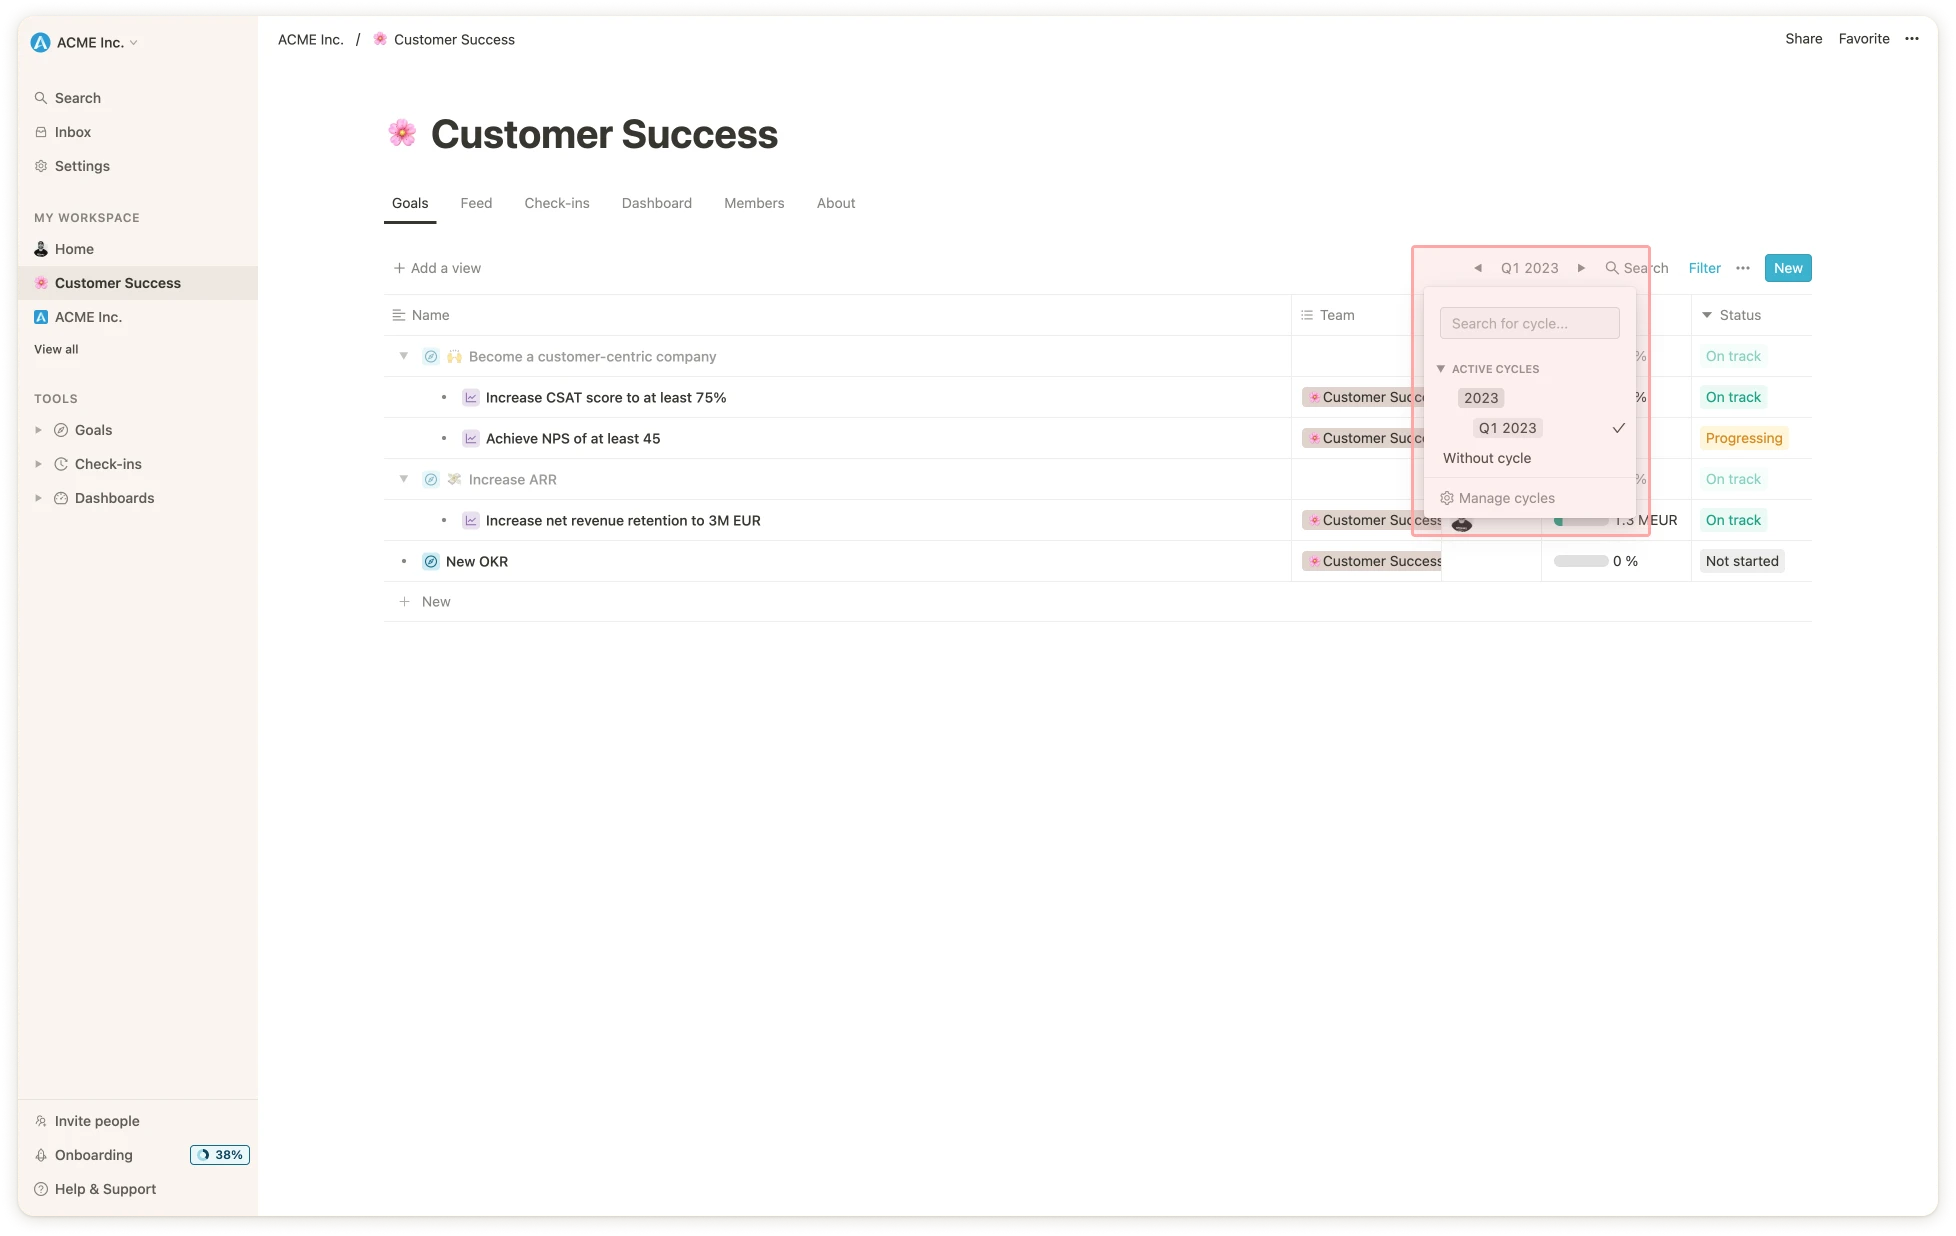 In case you wish to build an overview of goals from different cycles you can simply choose several cycles at once in the cycle picker. To then differentiate in this view, which goal belongs to which cycle, you can display the cycle as a column in the table. To do so, click on the ellipsis `...` in the top right corner > `Properties` > `Cycle` and activate the button.
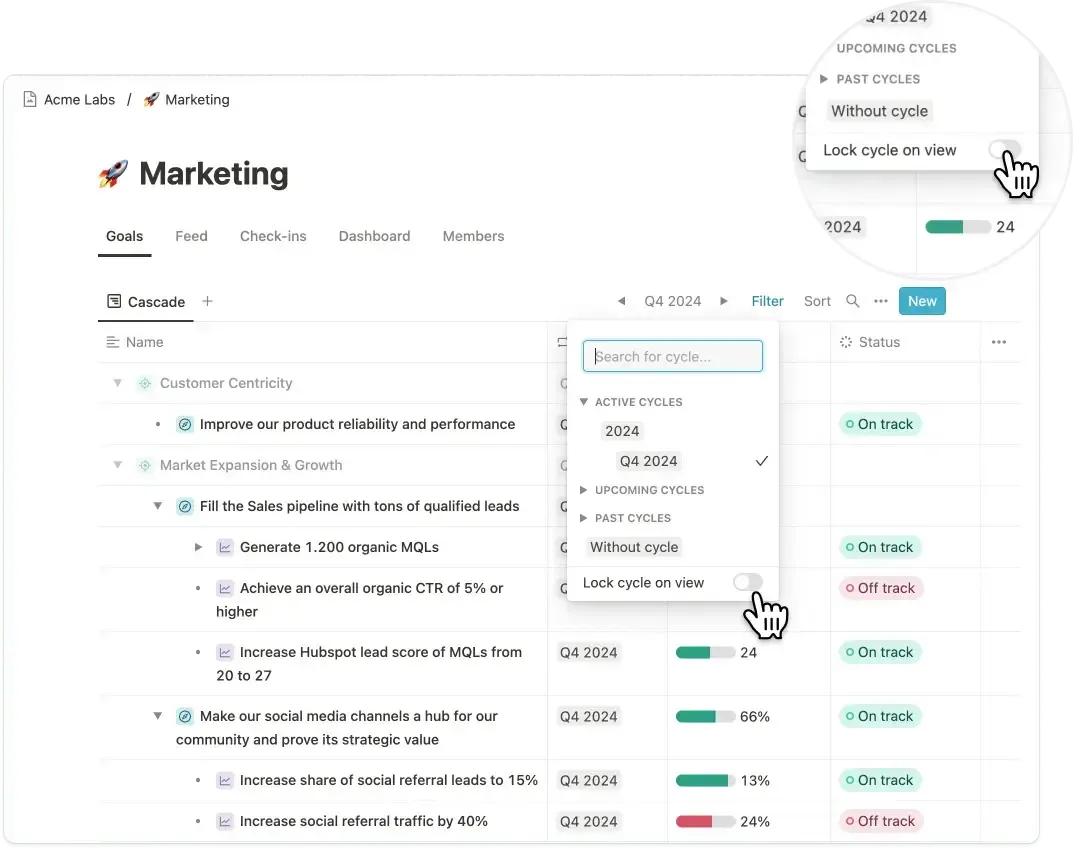
**Please note:** Be aware that the **cycle pickers settings take effect universally** throughout the app (for your user account), i.e. in goal views as well as the progress and health dashboards.
However, you can lock a cycle within a view, ensuring that users see the exact data you want them to see on goal tables or dashboards. If no cycle is locked, the currently selected cycle for each user will apply automatically.
In case you wish to build an overview of goals from different cycles you can simply choose several cycles at once in the cycle picker. To then differentiate in this view, which goal belongs to which cycle, you can display the cycle as a column in the table. To do so, click on the ellipsis `...` in the top right corner > `Properties` > `Cycle` and activate the button.
**Please note:** Be aware that the **cycle pickers settings take effect universally** throughout the app (for your user account), i.e. in goal views as well as the progress and health dashboards.
However, you can lock a cycle within a view, ensuring that users see the exact data you want them to see on goal tables or dashboards. If no cycle is locked, the currently selected cycle for each user will apply automatically.
 💡 **Tip:** It can happen that **one of your goals gets lost from your view** or you cannot find it anymore. A possible reason can be that you either **did not tag your goal with a cycle** or you **did not specify your cycle** in the cycle picker. Moreover the search function on top of your sidebar could help you in this case.
# Dashboards
Source: https://mooncamp.com/docs/dashboards
An overview of Dashboards for goals and OKR reporting.
Dashboards are available for customers in the `Pro` and `Enterprise` plan. The [Progress Dashboard](/progress-dashboard) is free for all plans.
## Dashboards explained
Dashboards can be configured freely and can be used to visualize any kind of data within Mooncamp for the reporting of your OKRs and beyond. Dashboards can be displayed publicly or privately and can be shared with chosen access groups. Therefore they are especially helpful for the facilitation of management or department meetings or any other use cases that might require privacy. This could, for example, be a Company Cockpit containing general info about the company, a Quarterly Business Review on the company’s achievements, challenges and OKR progress, a Weekly Management Report, a Department Overview or a Personal Dashboard for individual users (for more details and screenshots on these use cases, please scroll down to ‘Custom Dashboard Examples’).
## How to use Dashboards
In the following video we will give you a run through the major functions of Dashboards. You will learn:
* How to create and customize dashboards, including adding different types of metrics, text fields, bullet lists, and images
* How to resize and restructure items on the dashboard using drag and drop
* How to apply filters within a list and create new content, such as goals and metrics
Further, it is possible to duplicate single cards as parts of the dashboard as well as entire dashboards in order to use them as a template for further teams, departments or meetings. To **duplicate a dashboard**, navigate via `Tools > Dashboards` to the overview that shows a list of all your Dashboards. Hover to the dashboard you would like to duplicate and use the right-click to do so. To **duplicate a card** on one of your Dashboards you can use the menu in the upper right corner of each card.
Of course, you can also favourite Dashboards to your sidebar in order to always have your most important data available in one click.
Via the ellipsis `…` in the upper right corner of the screen, a Dashboard can be exported as a **PDF file**.
## Dashboard Examples
A few of many potential use cases can be the following:
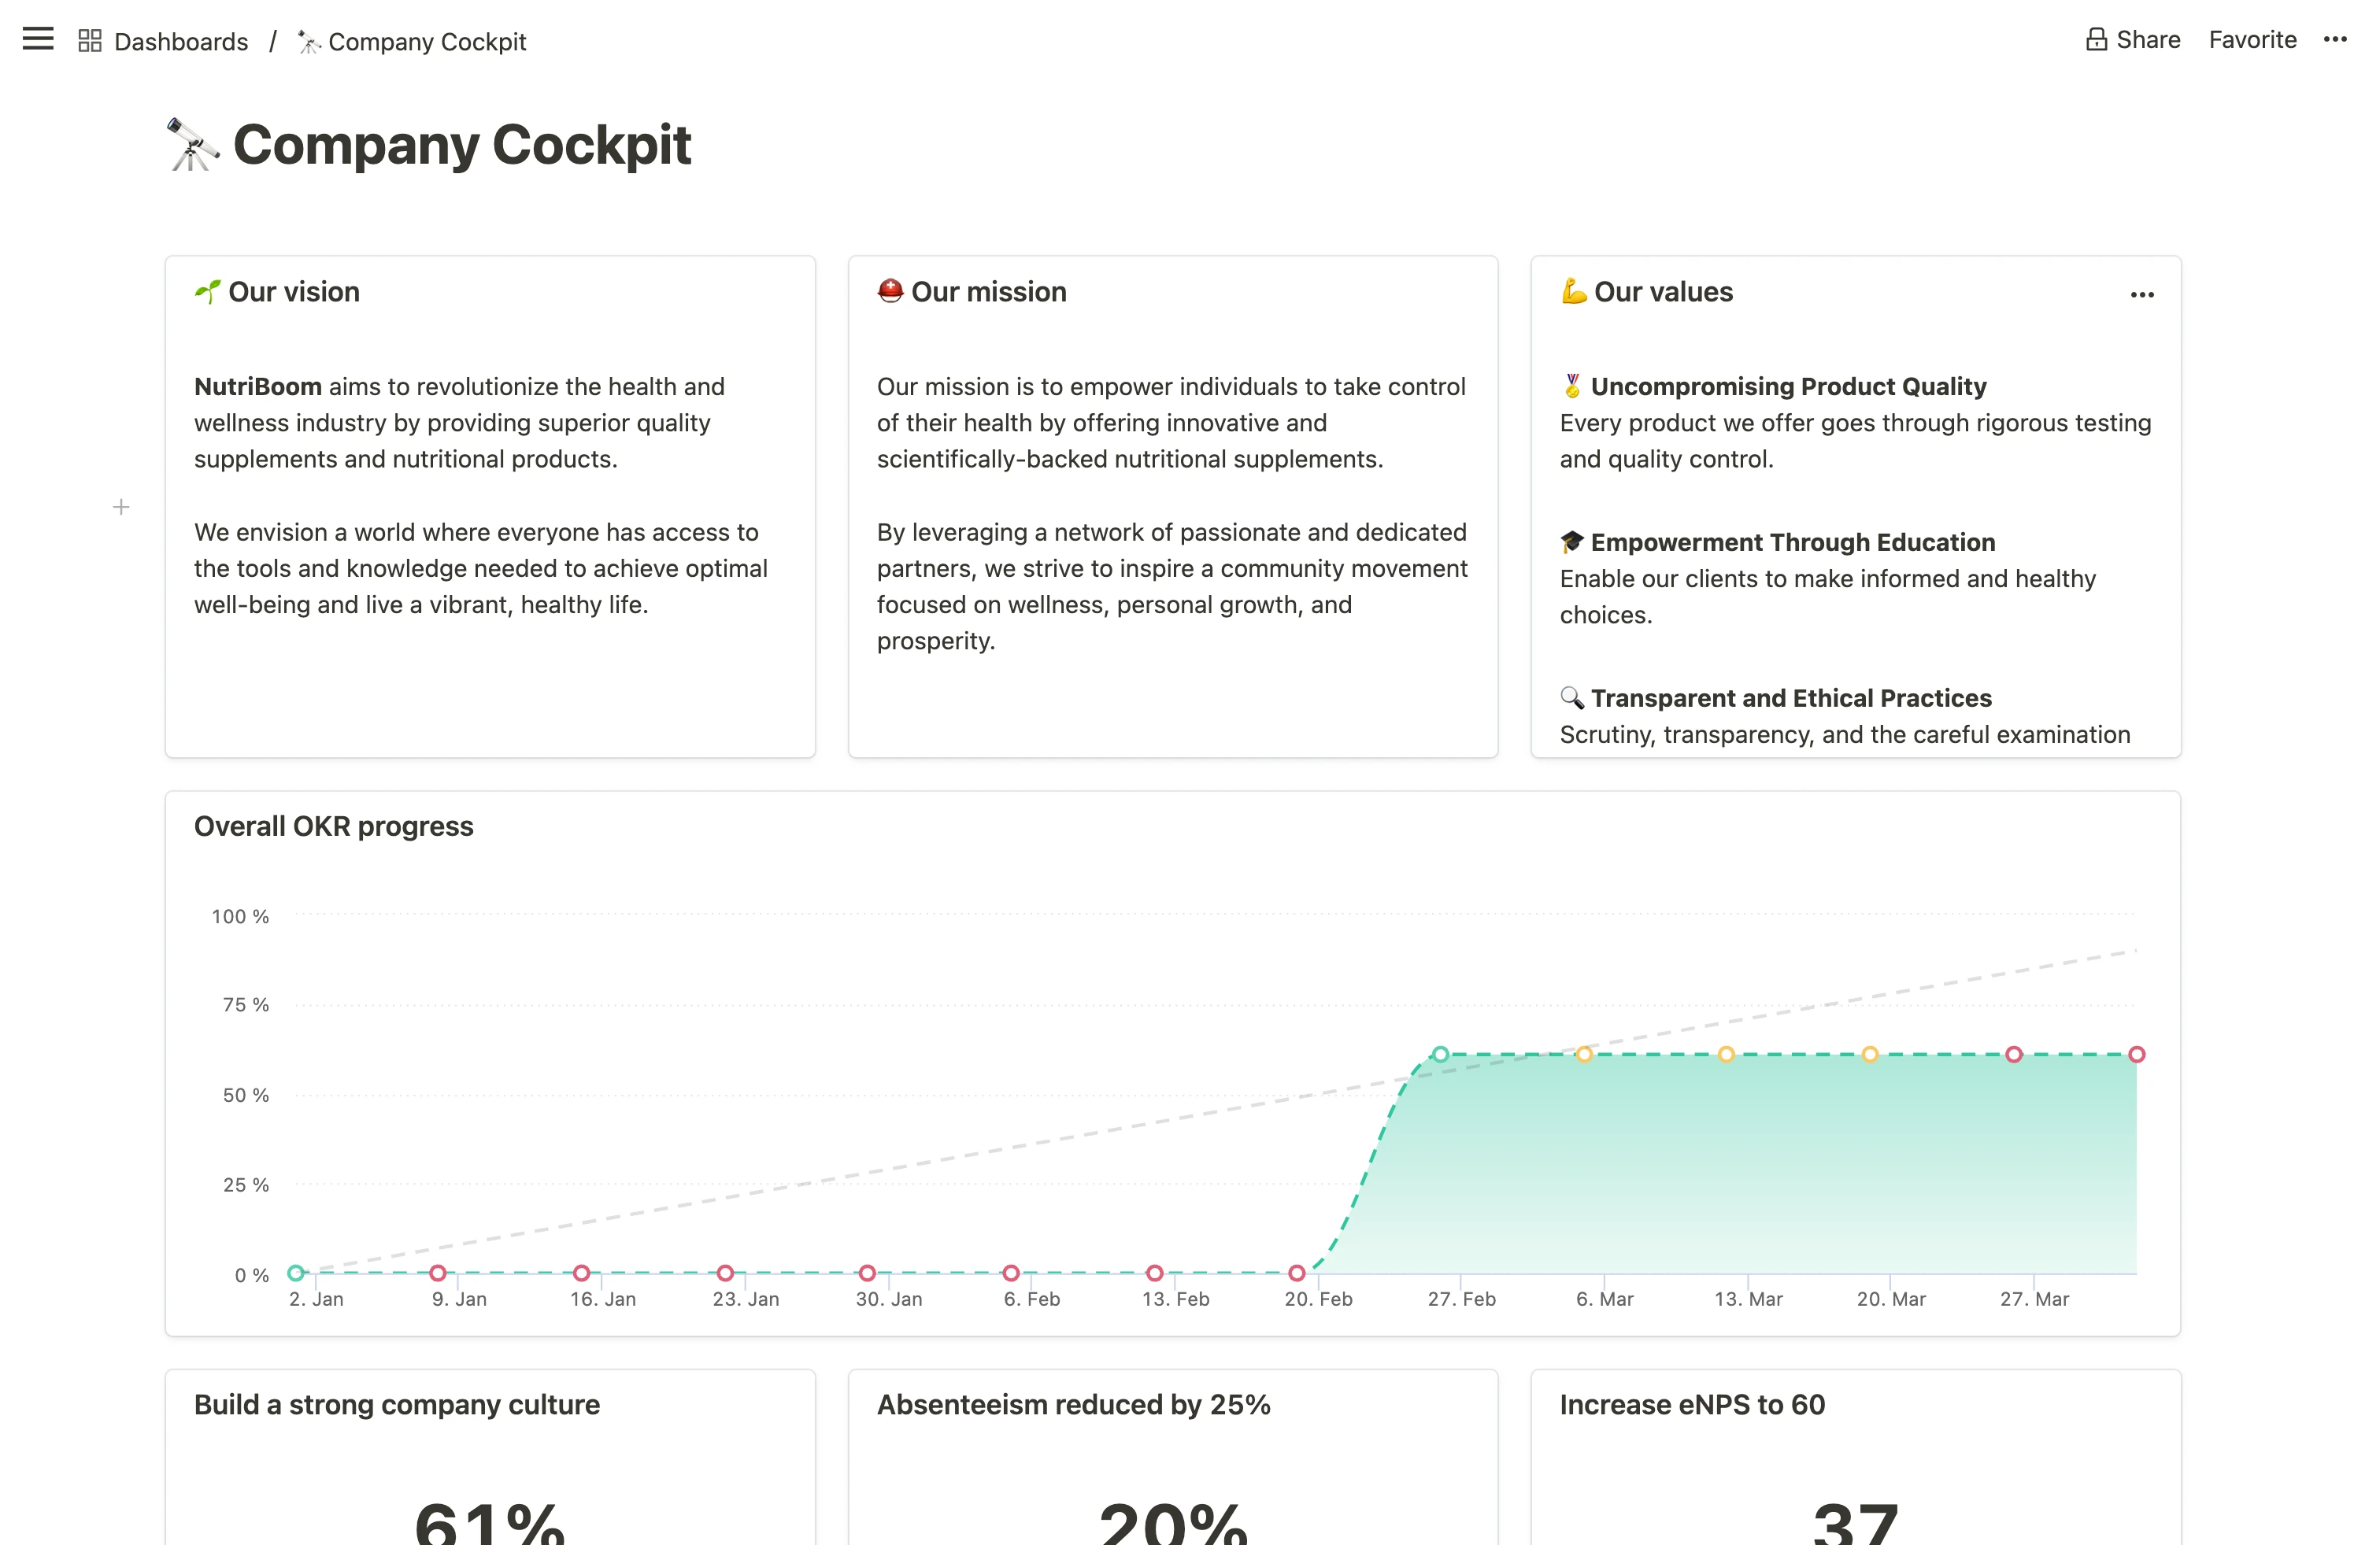
* **Company Cockpit:** An executive summary encapsulating the company's vision, mission, and values, as well as top-level KPIs and overall OKR progress.
💡 **Tip:** It can happen that **one of your goals gets lost from your view** or you cannot find it anymore. A possible reason can be that you either **did not tag your goal with a cycle** or you **did not specify your cycle** in the cycle picker. Moreover the search function on top of your sidebar could help you in this case.
# Dashboards
Source: https://mooncamp.com/docs/dashboards
An overview of Dashboards for goals and OKR reporting.
Dashboards are available for customers in the `Pro` and `Enterprise` plan. The [Progress Dashboard](/progress-dashboard) is free for all plans.
## Dashboards explained
Dashboards can be configured freely and can be used to visualize any kind of data within Mooncamp for the reporting of your OKRs and beyond. Dashboards can be displayed publicly or privately and can be shared with chosen access groups. Therefore they are especially helpful for the facilitation of management or department meetings or any other use cases that might require privacy. This could, for example, be a Company Cockpit containing general info about the company, a Quarterly Business Review on the company’s achievements, challenges and OKR progress, a Weekly Management Report, a Department Overview or a Personal Dashboard for individual users (for more details and screenshots on these use cases, please scroll down to ‘Custom Dashboard Examples’).
## How to use Dashboards
In the following video we will give you a run through the major functions of Dashboards. You will learn:
* How to create and customize dashboards, including adding different types of metrics, text fields, bullet lists, and images
* How to resize and restructure items on the dashboard using drag and drop
* How to apply filters within a list and create new content, such as goals and metrics
Further, it is possible to duplicate single cards as parts of the dashboard as well as entire dashboards in order to use them as a template for further teams, departments or meetings. To **duplicate a dashboard**, navigate via `Tools > Dashboards` to the overview that shows a list of all your Dashboards. Hover to the dashboard you would like to duplicate and use the right-click to do so. To **duplicate a card** on one of your Dashboards you can use the menu in the upper right corner of each card.
Of course, you can also favourite Dashboards to your sidebar in order to always have your most important data available in one click.
Via the ellipsis `…` in the upper right corner of the screen, a Dashboard can be exported as a **PDF file**.
## Dashboard Examples
A few of many potential use cases can be the following:
* **Company Cockpit:** An executive summary encapsulating the company's vision, mission, and values, as well as top-level KPIs and overall OKR progress.
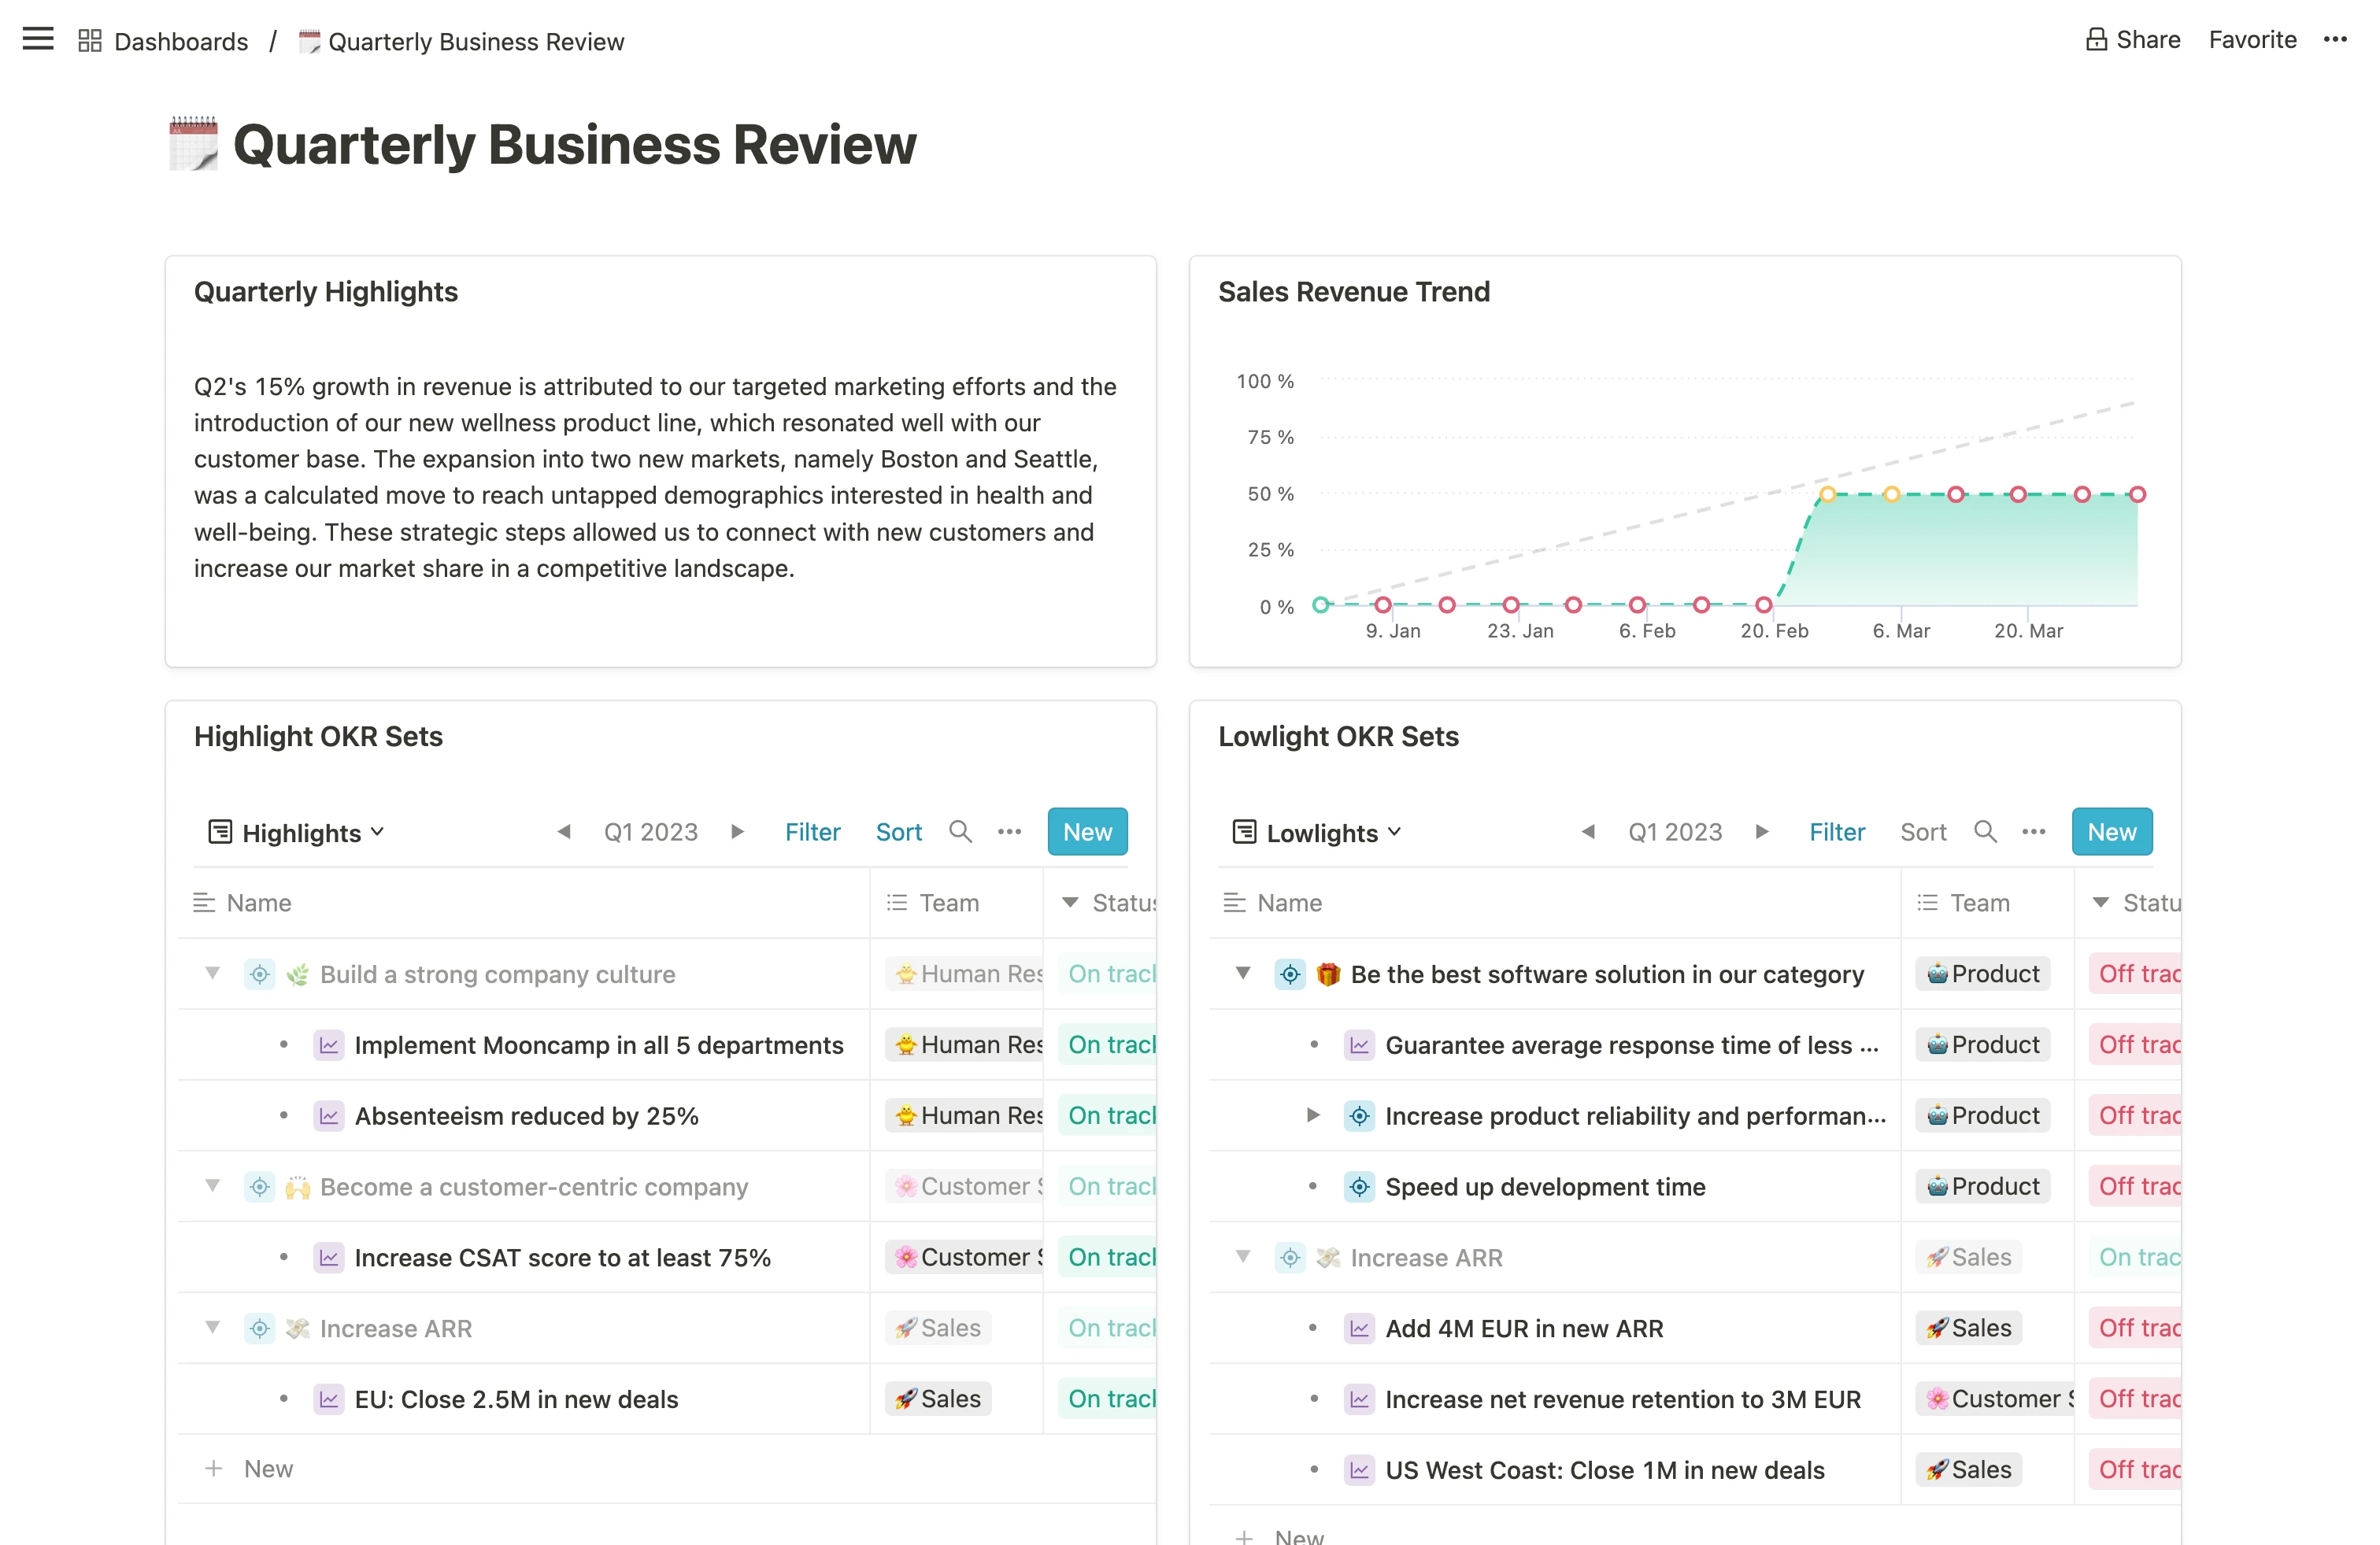
 * **Quarterly Business Review (QBR):** An in-depth analysis of quarterly achievements, growth, challenges, strategic initiatives, as well as OKR highlights and lowlights.
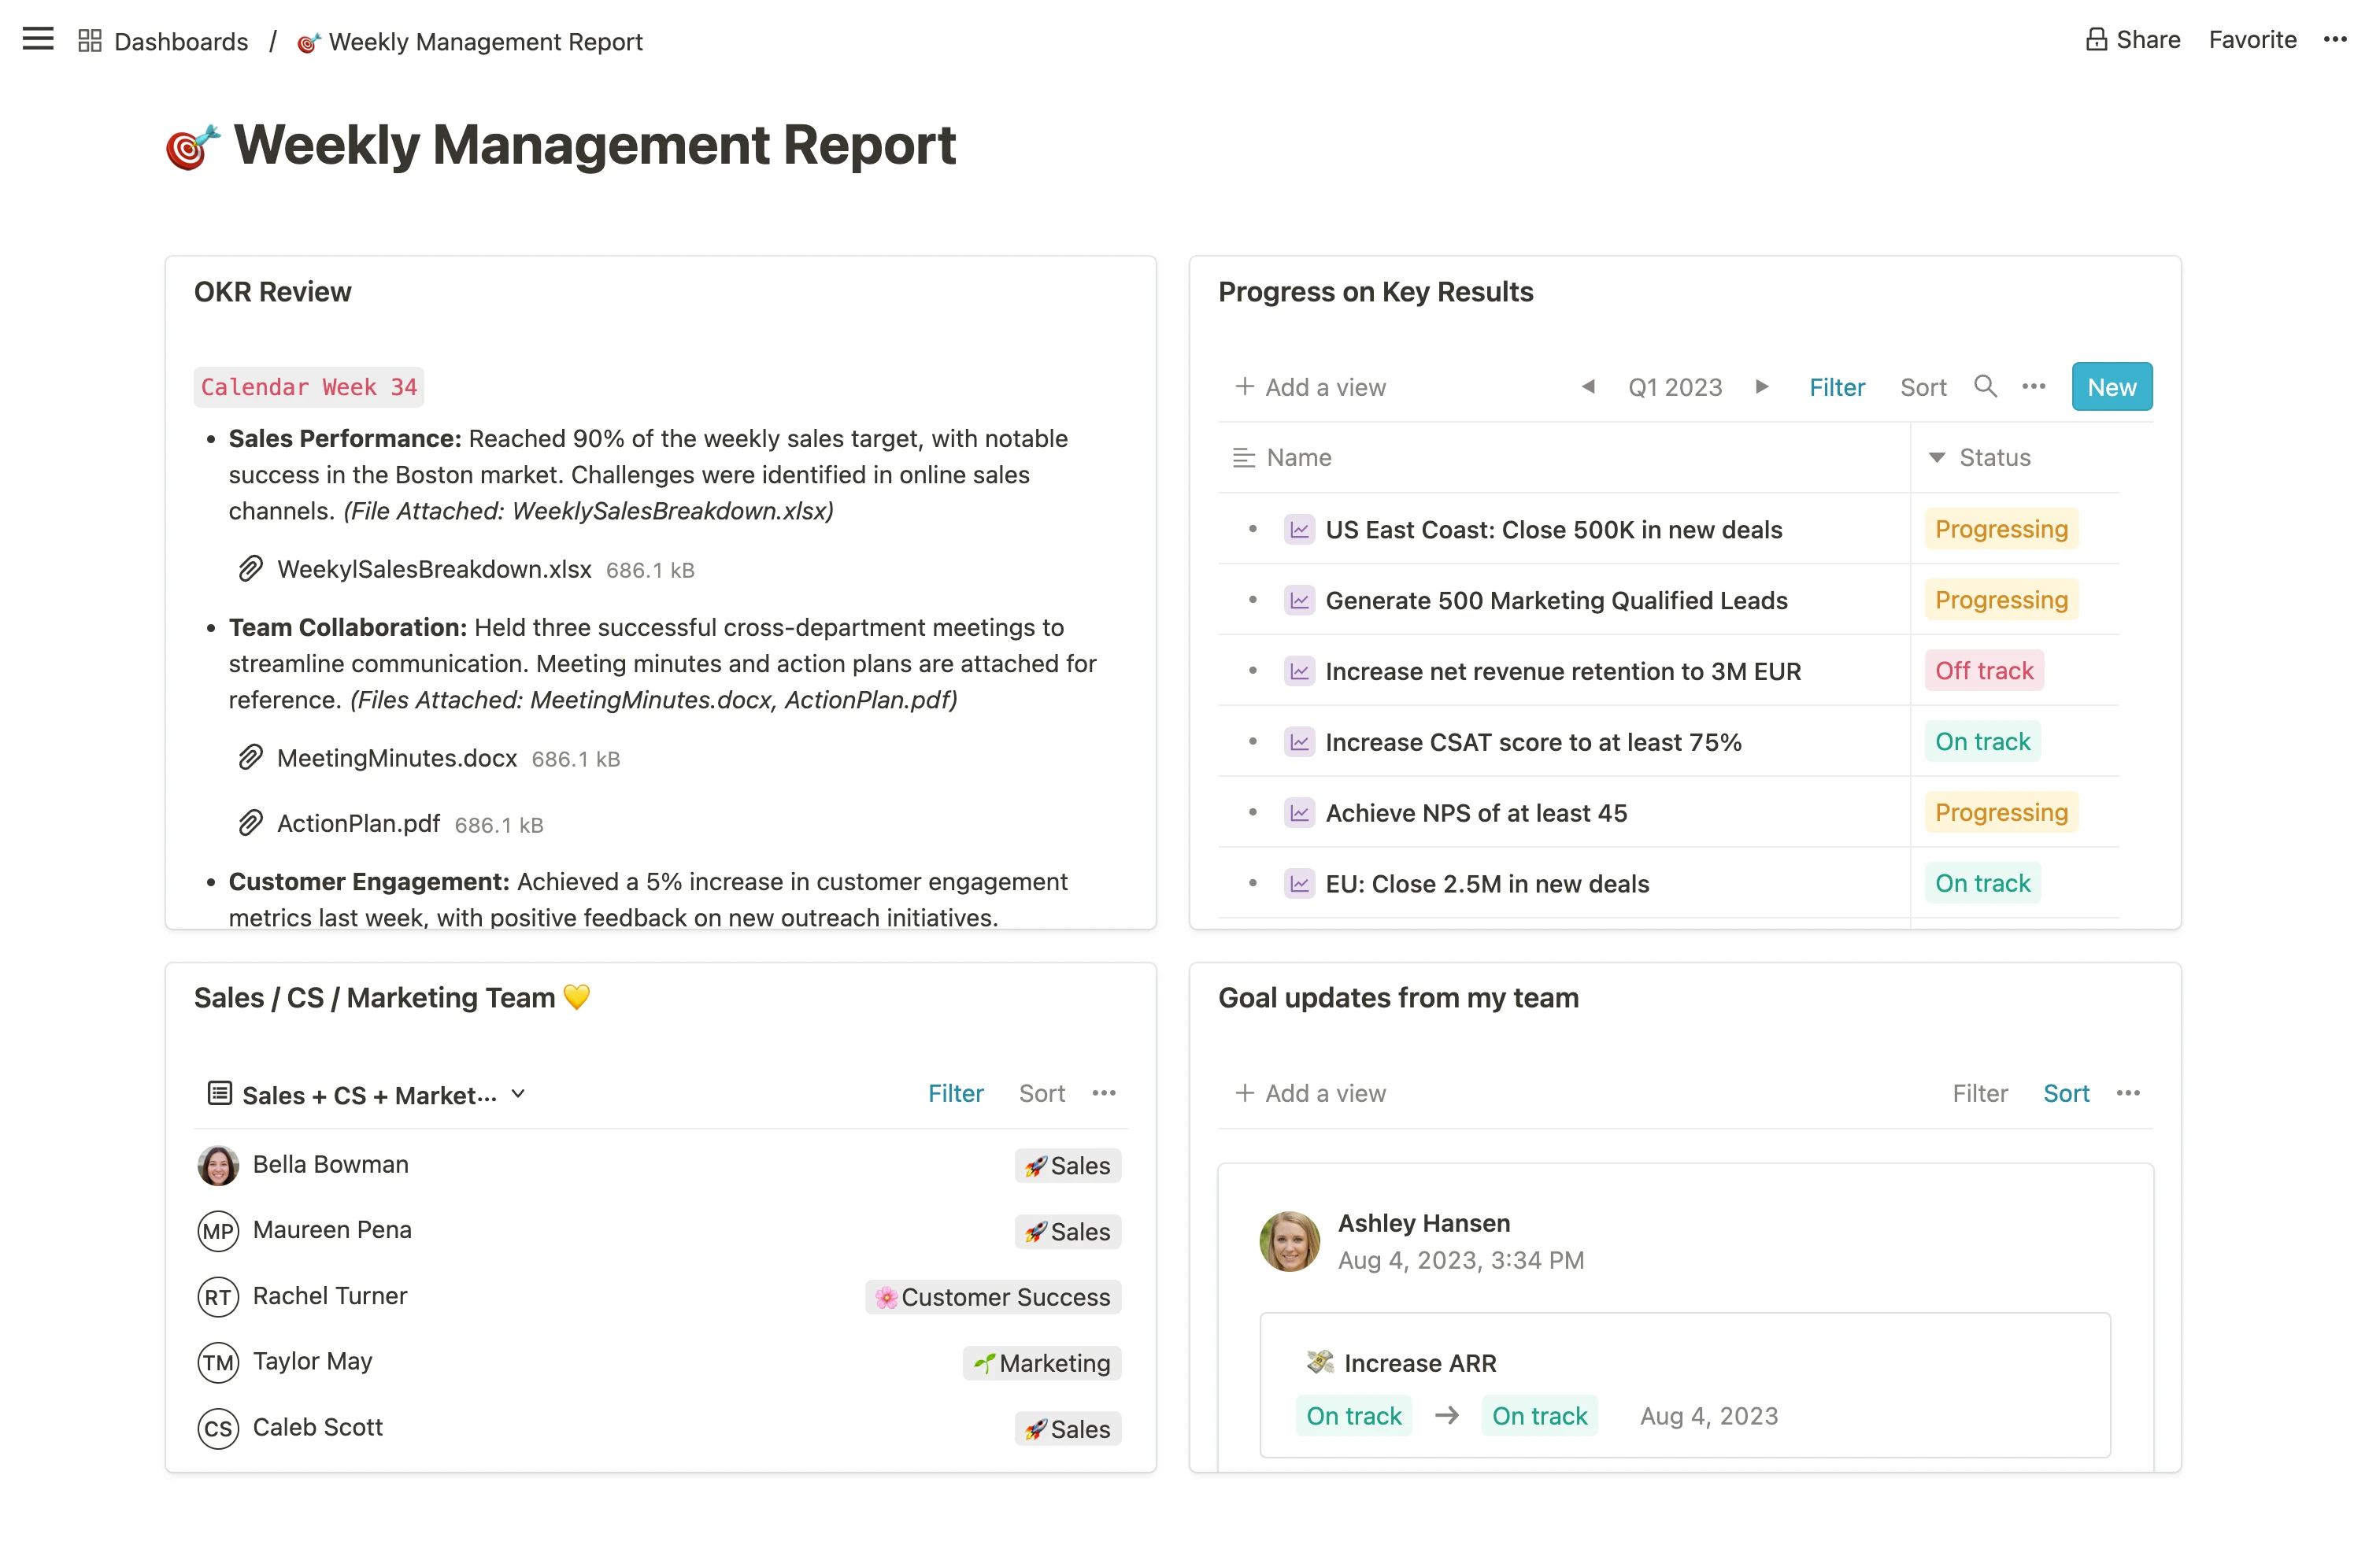
 * **Weekly Management Report:** A report that highlights key accomplishments, challenges, and focus areas for the week, aiding in short-term decision-making and planning.
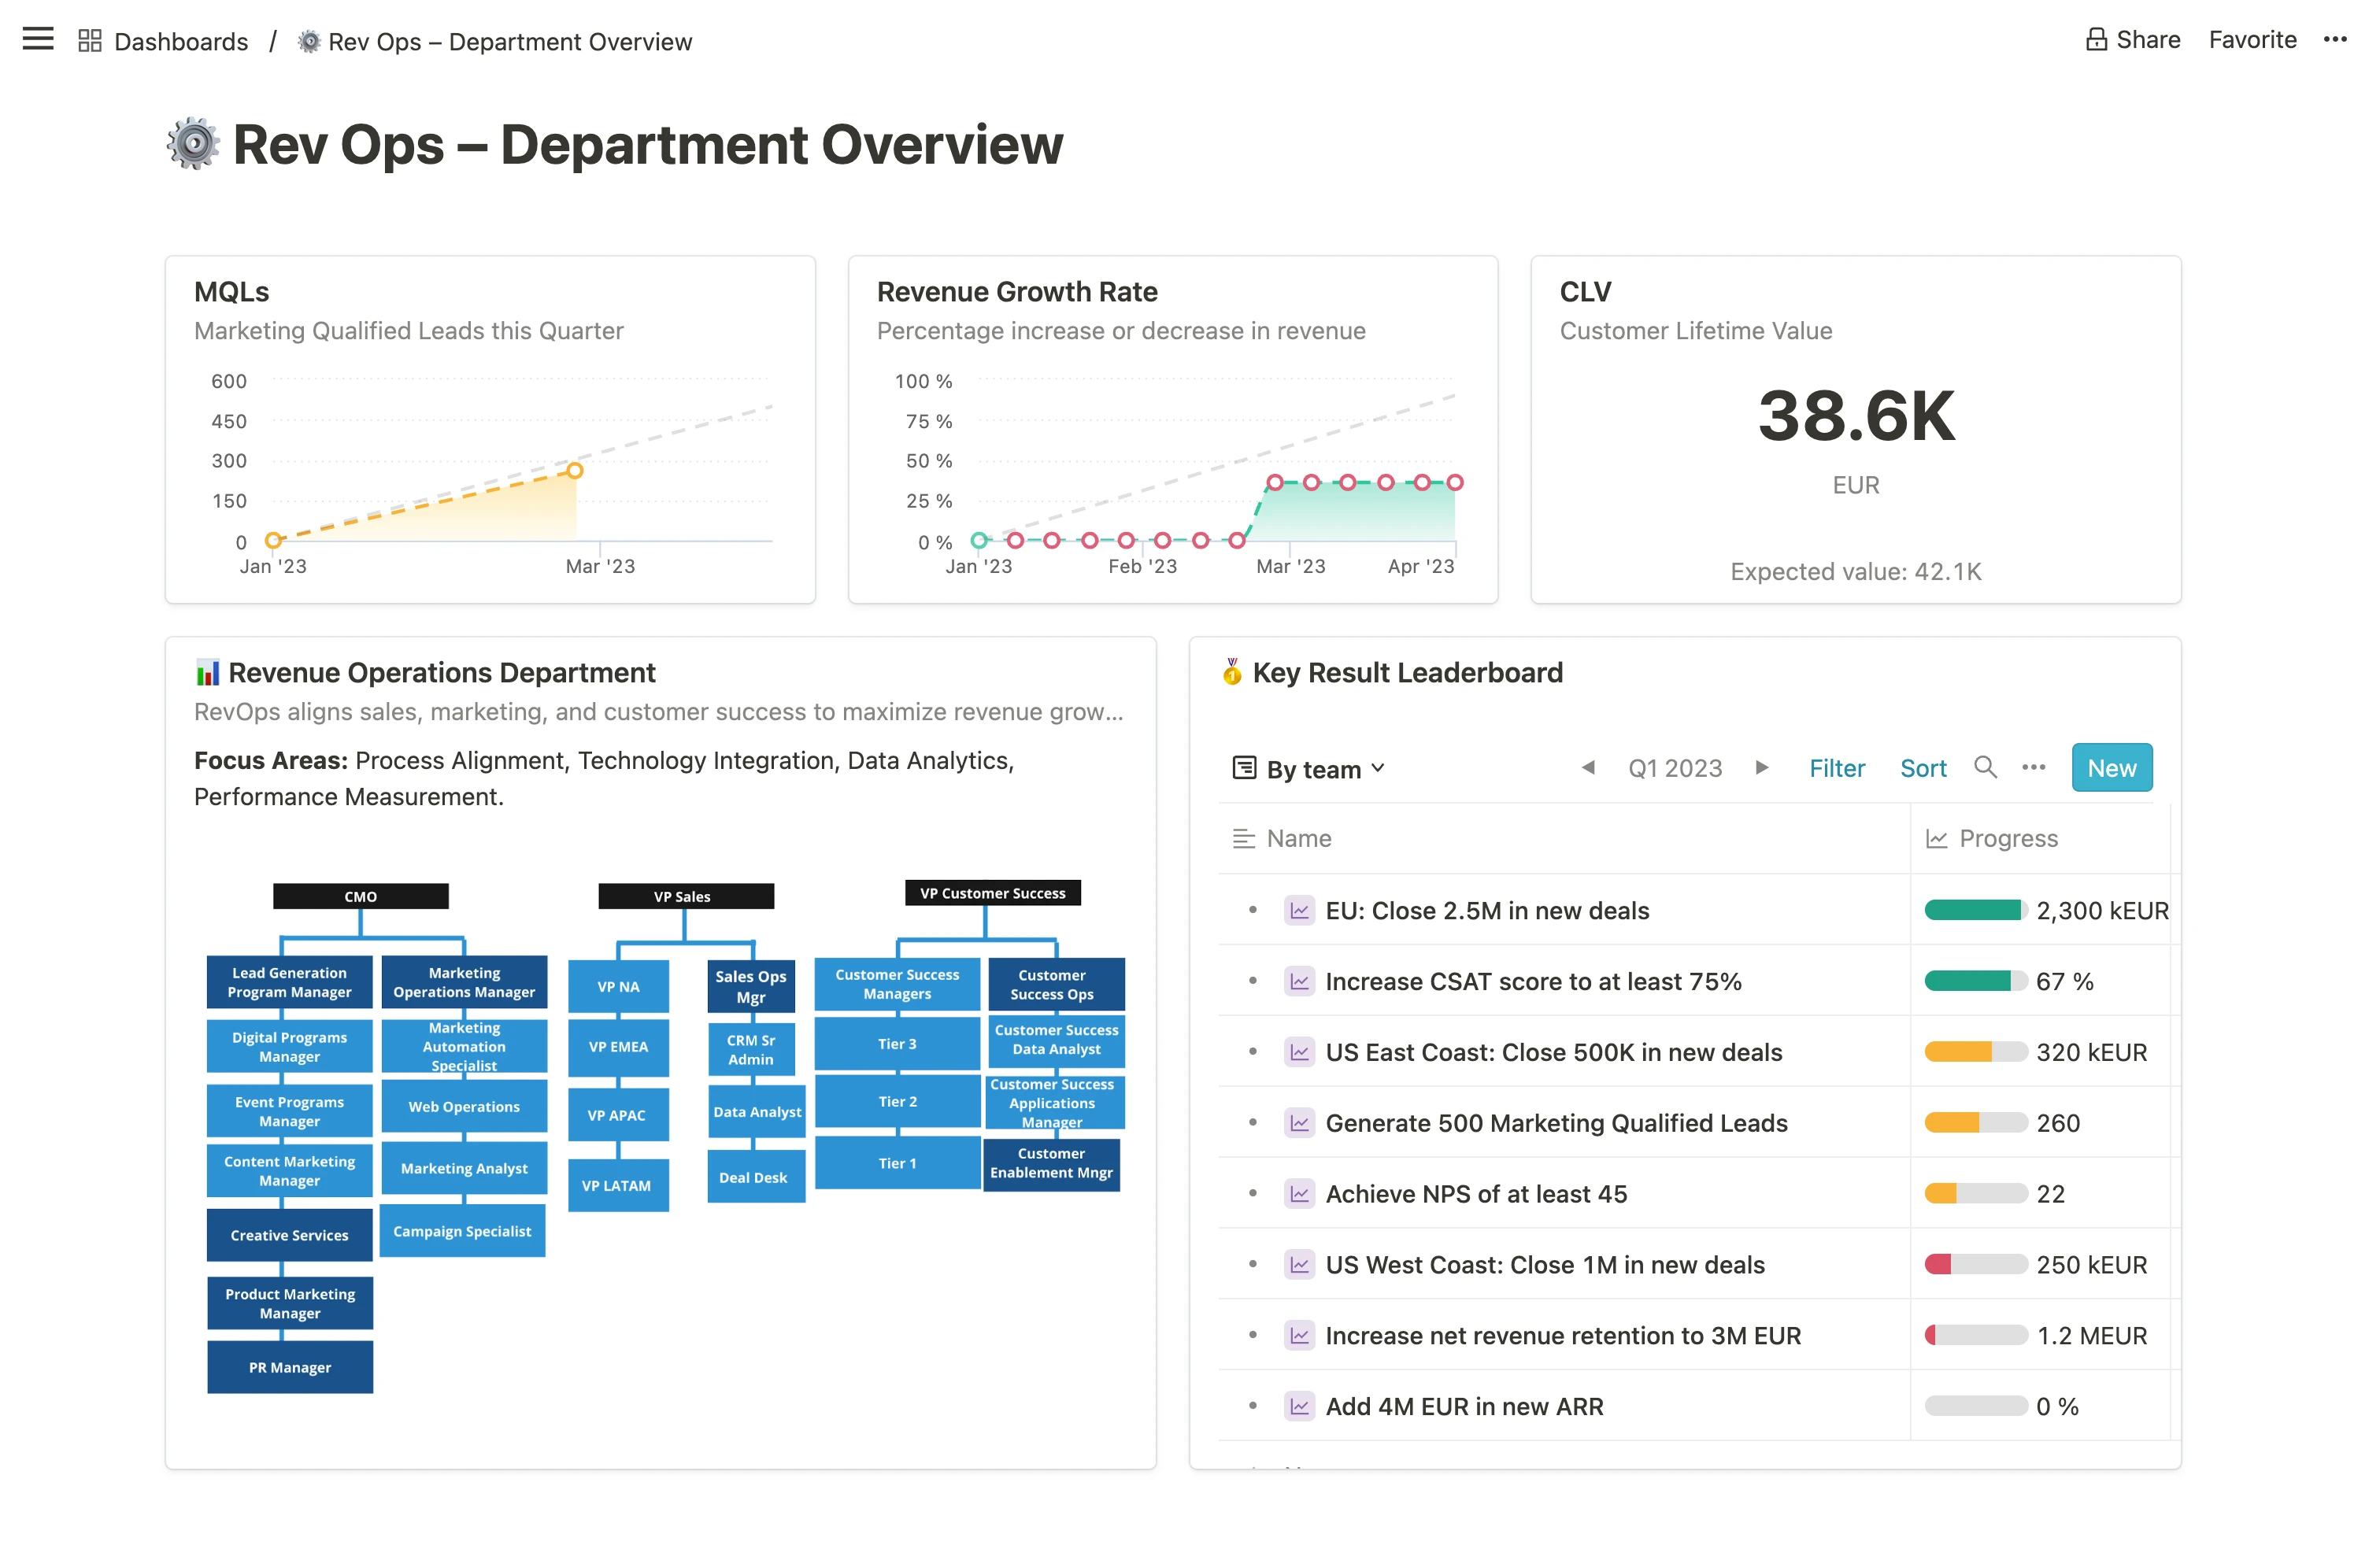
 * **Department Overview:** A comprehensive snapshot of a department's mission, key metrics, goals, team members, and other possible reports, like OKR leaderboards.
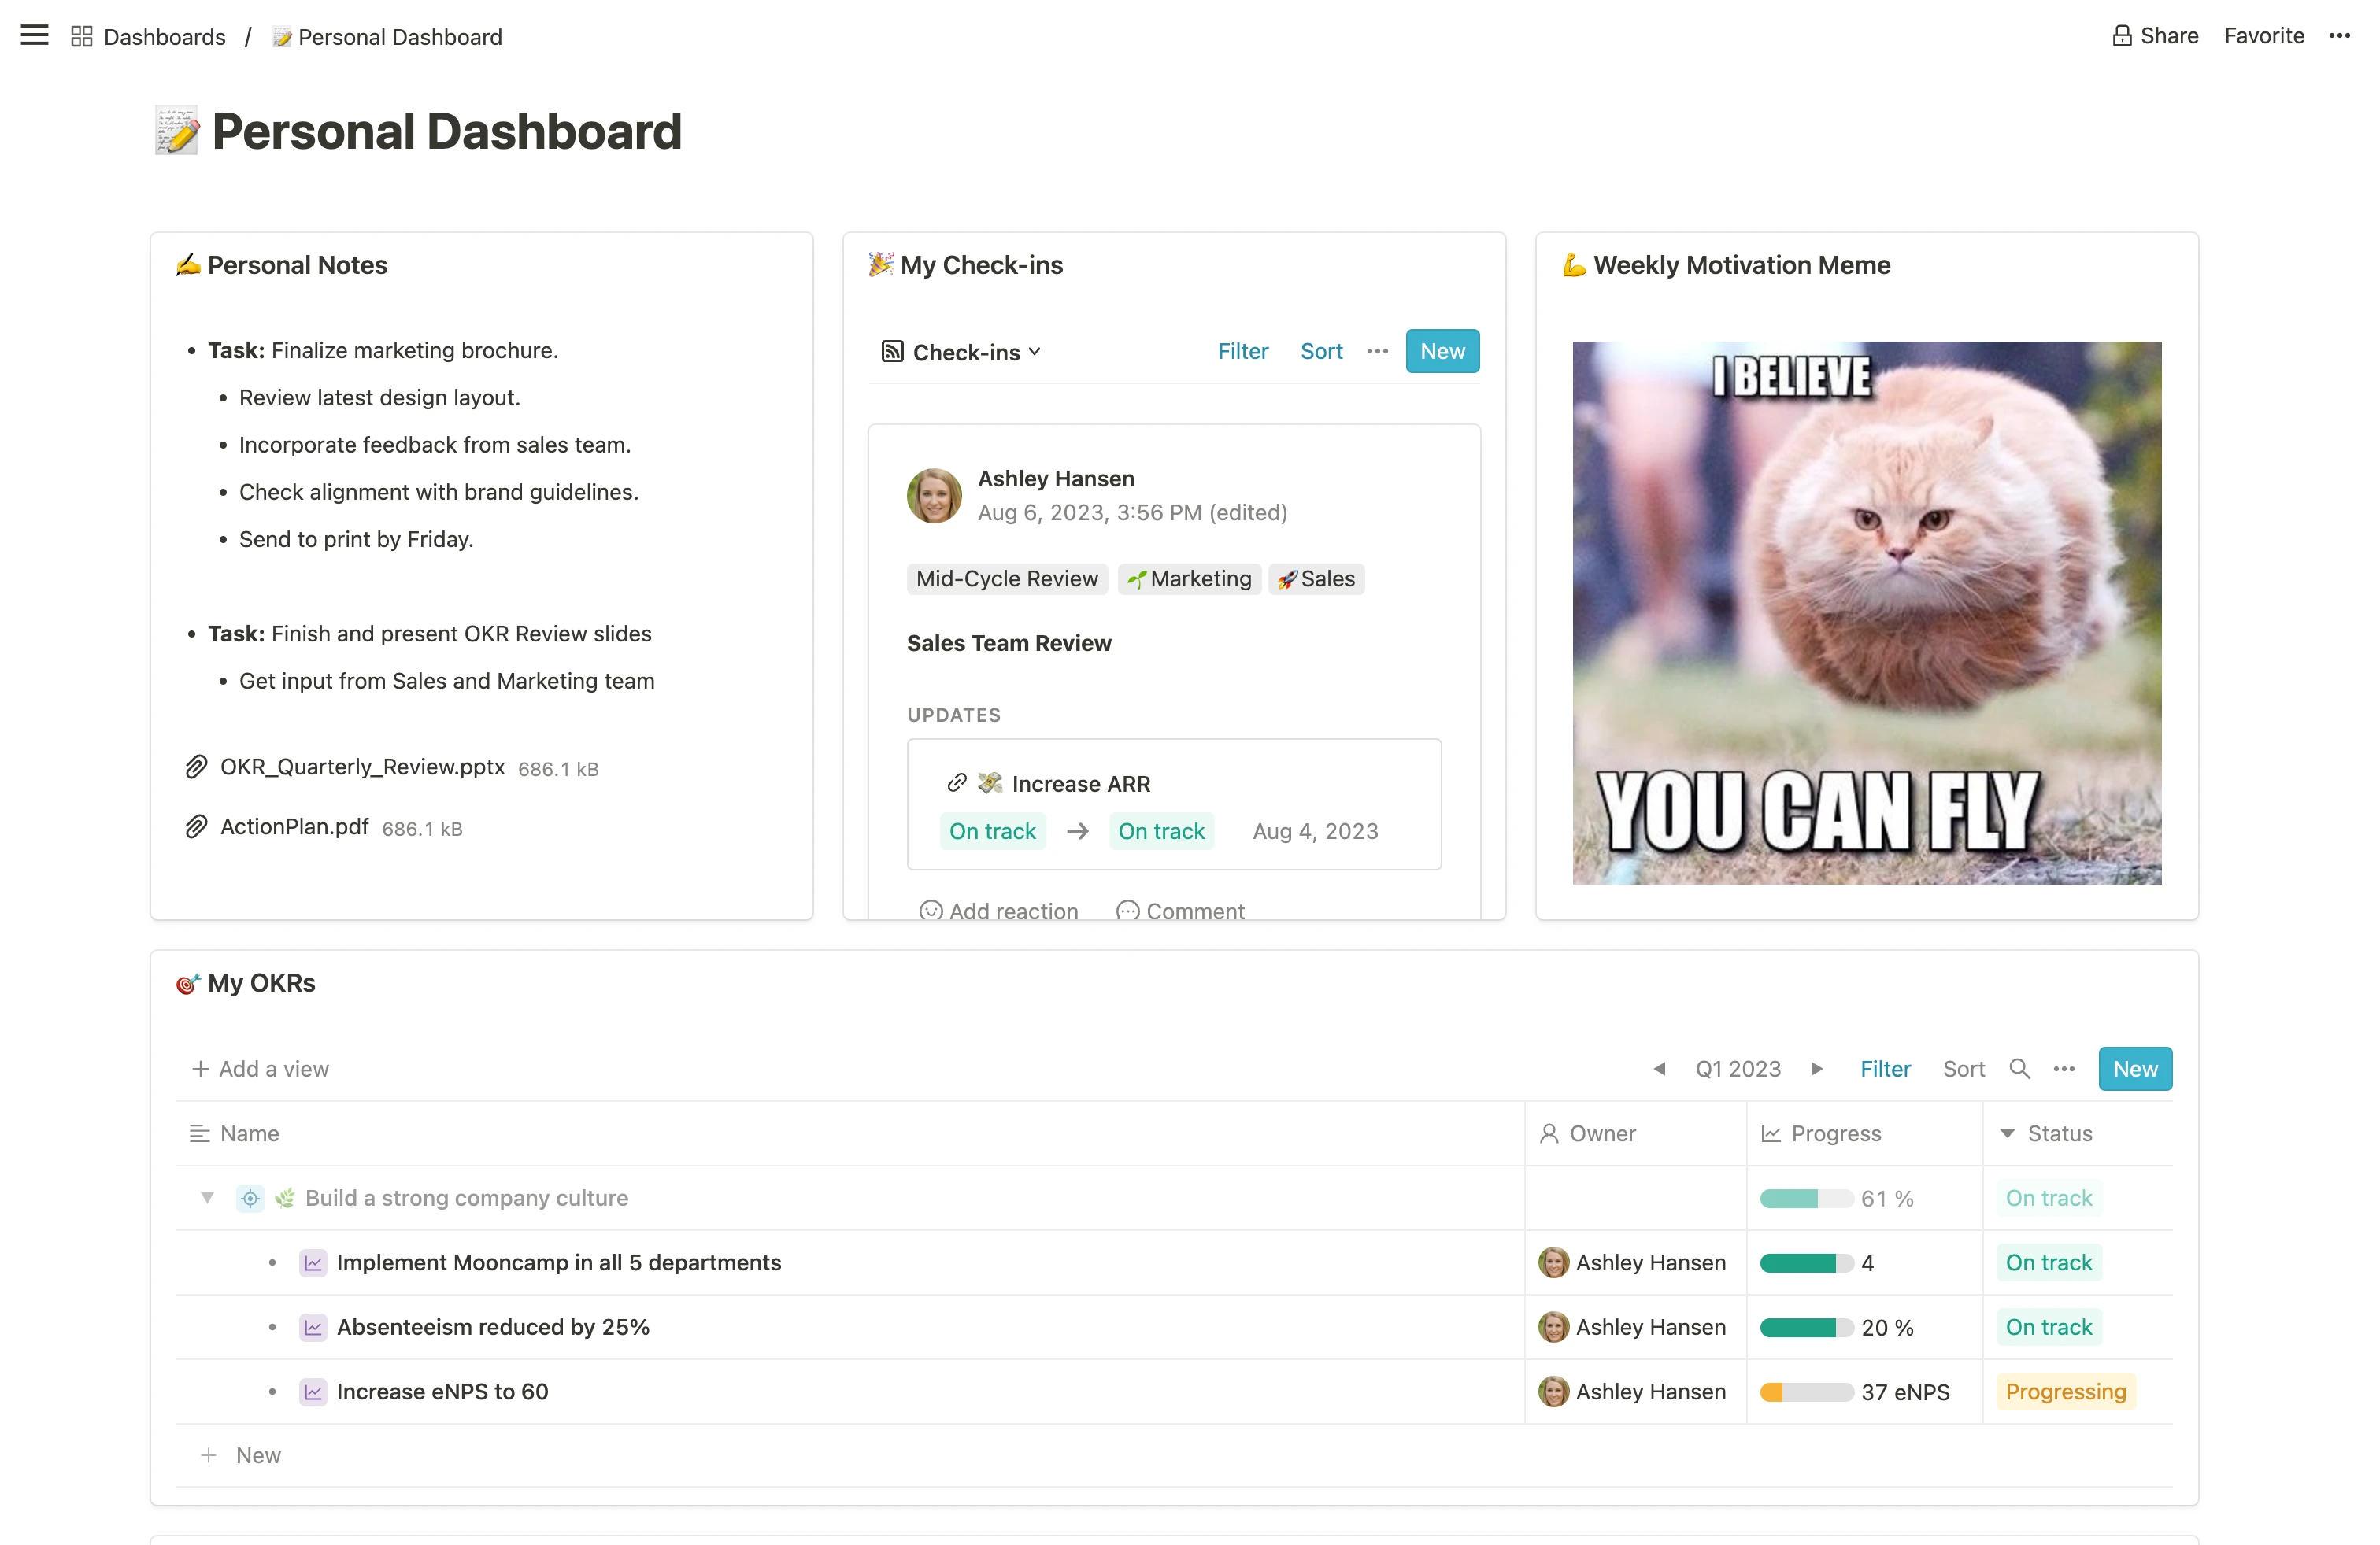
 * **Personal Dashboard:** A tailored view featuring individual OKRs, your check-ins, personal notes, relevant files, and quick links to your team members public profiles.
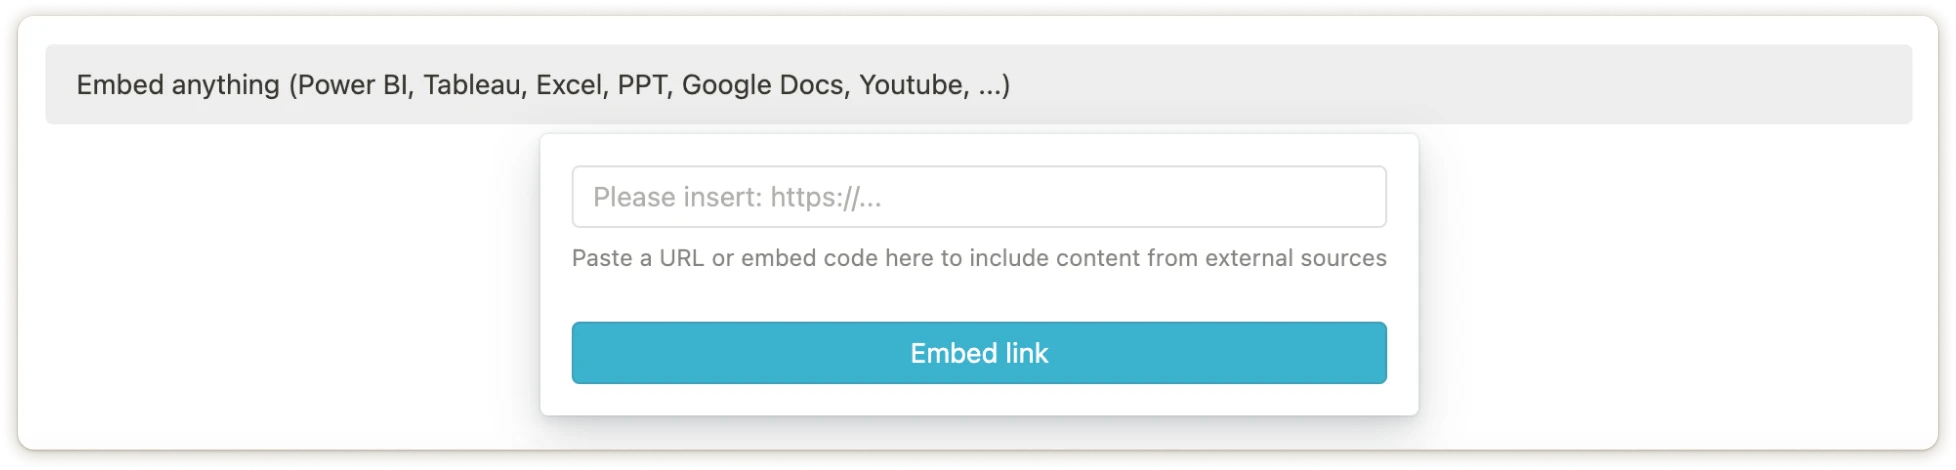
 ## iframe embed
The data integration via iframe lets you embed external content directly on your custom dashboards. It is possible to add live views from almost every tool like Power BI, Tableau, Miro, Excel, Google Sheets and Docs, Looker Studio, Powerpoint or Google Slides, and many more.
You can use iframe embeds to add context and display real-time data, on your dashboards. This way you have all your most important data and insights in one place, without the need to switch between apps.
### How to set up an iframe embed
Any user with the right to create custom dashboards can enable an iframe embed by following these steps:
1. Access the Dashboards area via your sidebar under `Tools`.
2. Enter one of your custom dashboards from the list or create a new one.
3. Click the `+Add content` button and use the `<>` Embed option from the list.
4. Paste your URL of the original data or embed code to include your content of choice.
## iframe embed
The data integration via iframe lets you embed external content directly on your custom dashboards. It is possible to add live views from almost every tool like Power BI, Tableau, Miro, Excel, Google Sheets and Docs, Looker Studio, Powerpoint or Google Slides, and many more.
You can use iframe embeds to add context and display real-time data, on your dashboards. This way you have all your most important data and insights in one place, without the need to switch between apps.
### How to set up an iframe embed
Any user with the right to create custom dashboards can enable an iframe embed by following these steps:
1. Access the Dashboards area via your sidebar under `Tools`.
2. Enter one of your custom dashboards from the list or create a new one.
3. Click the `+Add content` button and use the `<>` Embed option from the list.
4. Paste your URL of the original data or embed code to include your content of choice.
 ### Automatic Updates
Once the iframe is embedded, Mooncamp automatically updates your data based on changes in the tool of origin.
# Data Integrations 101
Source: https://mooncamp.com/docs/data-integrations
Learn how to connect your data to goals in Mooncamp
You can connect goals to different data sources / services to update them automatically and save yourself the manual work.
**Info for admins:** Before your co-workers can use a data integration, it needs to be activated in the settings area via `Settings > Integrations > Data Integrations` and then switching the toggle on. When you click on `Manage` and then `+ Add` below `Connections`, you can set up your data connection.
Here are some examples of available integrations:
* Jira
* Google Sheets
* Microsoft Excel
* Asana
* Hubspot
* Salesforce
* MS Planner
* MS Power BI
* …
**Are you missing a specific integration?** Just write to us at [support@mooncamp.com](mailto:support@mooncamp.com)
* **Step 1:** Navigate to a goal whose progress you want to update via a data integration.
* **Step 2:** On the goal's progress property, select the option `Start and target value` or `Threshold`.
* **Step 3:** Click on `Connect to data source`.
* **Step 4:** Select an existing data connection or create a new one via `+ Add` at the bottom of the list.
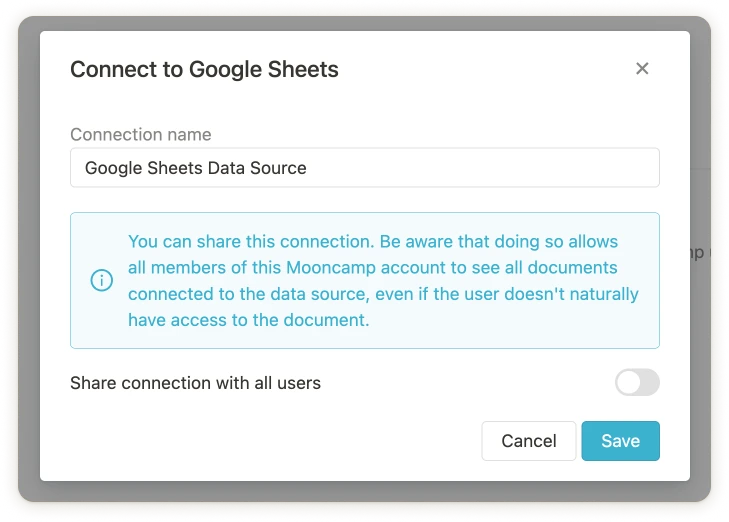
**Important info:** In case you are **adding add a new data connection**, you will be asked to sign-in to the respective data source with your user account. Once done, a modal pops-up that lets you edit the connection’s name as well as its **privacy settings** (see screenshot below). When you *share your connection with all users*, it **allows all members of your Mooncamp account to see all documents connected to the data source**, even if these members do not have access to the document in its original location.
### Automatic Updates
Once the iframe is embedded, Mooncamp automatically updates your data based on changes in the tool of origin.
# Data Integrations 101
Source: https://mooncamp.com/docs/data-integrations
Learn how to connect your data to goals in Mooncamp
You can connect goals to different data sources / services to update them automatically and save yourself the manual work.
**Info for admins:** Before your co-workers can use a data integration, it needs to be activated in the settings area via `Settings > Integrations > Data Integrations` and then switching the toggle on. When you click on `Manage` and then `+ Add` below `Connections`, you can set up your data connection.
Here are some examples of available integrations:
* Jira
* Google Sheets
* Microsoft Excel
* Asana
* Hubspot
* Salesforce
* MS Planner
* MS Power BI
* …
**Are you missing a specific integration?** Just write to us at [support@mooncamp.com](mailto:support@mooncamp.com)
* **Step 1:** Navigate to a goal whose progress you want to update via a data integration.
* **Step 2:** On the goal's progress property, select the option `Start and target value` or `Threshold`.
* **Step 3:** Click on `Connect to data source`.
* **Step 4:** Select an existing data connection or create a new one via `+ Add` at the bottom of the list.
**Important info:** In case you are **adding add a new data connection**, you will be asked to sign-in to the respective data source with your user account. Once done, a modal pops-up that lets you edit the connection’s name as well as its **privacy settings** (see screenshot below). When you *share your connection with all users*, it **allows all members of your Mooncamp account to see all documents connected to the data source**, even if these members do not have access to the document in its original location.
 * **Step 5:** Fill in all the necessary data source-specific information and click on `Save`.
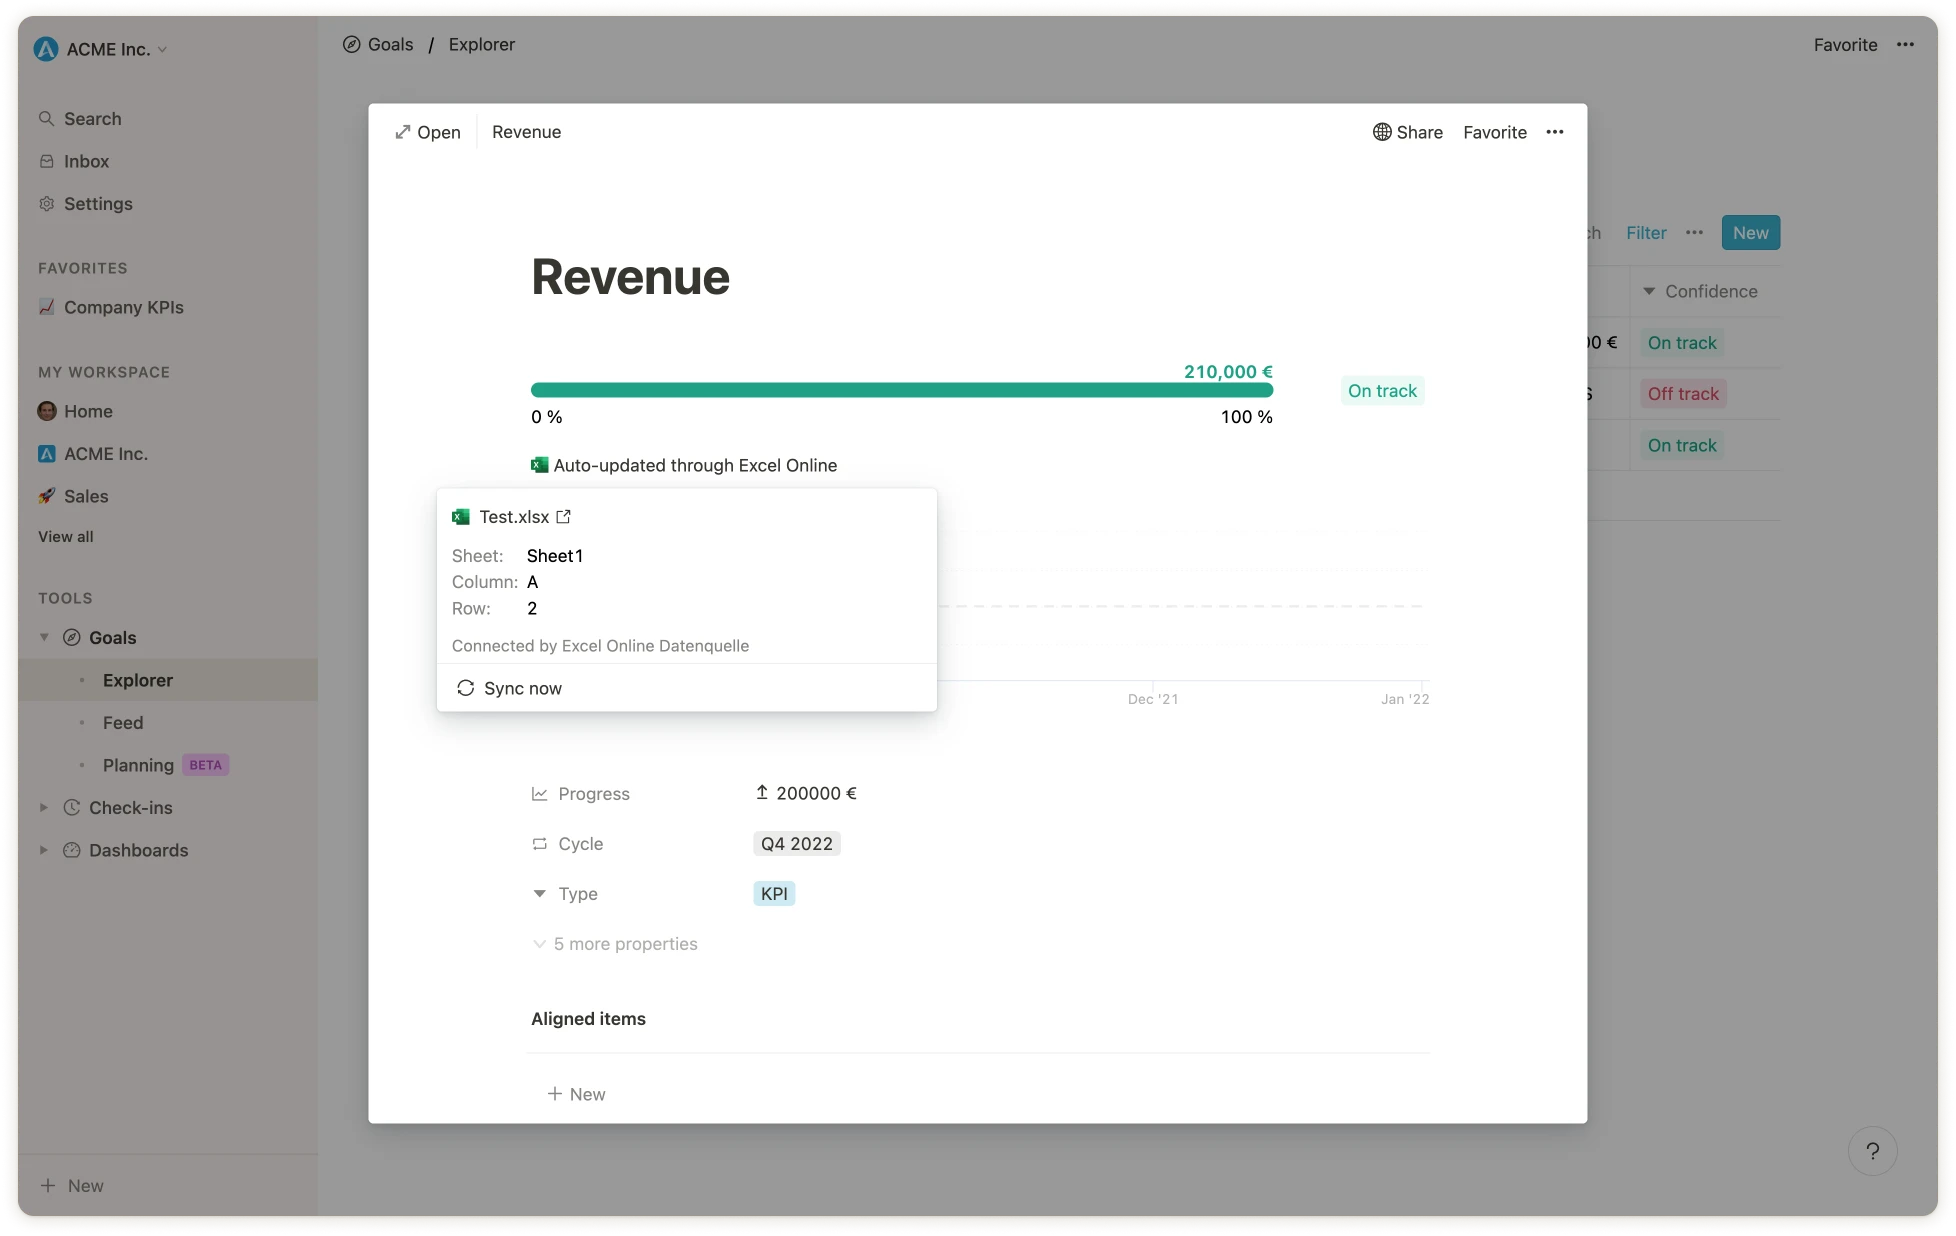
**Done!** 🎉 The data source is now linked to the goal and will be synchronized according to your synchronization settings (usually once per day, editable in `Settings > Integrations > Data Integrations`). You can also manually synchronize the progress of the goal at any time by clicking on the integration indicator below the progress bar.
* **Step 5:** Fill in all the necessary data source-specific information and click on `Save`.
**Done!** 🎉 The data source is now linked to the goal and will be synchronized according to your synchronization settings (usually once per day, editable in `Settings > Integrations > Data Integrations`). You can also manually synchronize the progress of the goal at any time by clicking on the integration indicator below the progress bar.
 Once set up, you can always go back to your data connection through a connected goal and edit the data you want to sync via the ellipsis `...` . Here you can also edit the connection’s **name** as well as its **privacy settings**.
**Note for admins:** It is recommended to set the synchronization schedule for your data integrations to sync once per day (the app then updates the progress daily at 5am CEST). The settings can be found in `Settings > Integrations > Data Integrations`.
# Zugriffsrechte für Ziele
Source: https://mooncamp.com/docs/de/access-rights-for-goals
## Zugriffsrechte für Ziele erklärt
In Mooncamp gibt es zwei verschiedene Möglichkeiten, Zugriffsrechte für Ziele festzulegen. Zum einen als allgemeine **Standardeinstellung** für alle im Account erstellten Ziele, die nur von Administratoren festgelegt werden können. Zum anderen als **individuelle Zugriffsrechte** für einzelne oder mehrere Ziele, die auch von Nicht-Administratoren und Ziel-Erstellern festgelegt werden können und die Standardeinstellung überschreiben können (siehe unten).
## Standardeinstellungen (Administratoren)
**Als Administrator** hast du die Möglichkeit, Standardeinstellungen festzulegen, die für die Erstellung jedes Ziels gelten, unabhängig davon, wer das Ziel erstellt.
💡 **Wichtiger Hinweis für Administratoren:** Wir empfehlen dir, diese Standardeinstellungen festzulegen, bevor Ziele im Account erstellt werden (durch dich oder durch andere Benutzer), da die Einstellungen nur auf nachfolgend erstellte Ziele angewendet werden, nicht aber auf bereits erstellte Ziele.
Du kannst die Standard-Zugriffseinstellungen unter `Einstellungen > Ziele` konfigurieren.
Bitte beachte, dass diese Einstellung wirksam wird, sobald neue Ziele erstellt werden. Die Einstellungen werden nicht rückwirkend auf bereits erstellte Ziele angewendet. Wir empfehlen dir daher, die allgemeinen Standardeinstellungen festzulegen, bevor du deine Ziele in Mooncamp erstellst.
In diesem Video erklären wir das Vorgehen Schritt für Schritt:
## Individuelle Einstellungen (Nicht-Administratoren)
**Als Ersteller (Administrator oder Nicht-Administrator)** eines Ziels kannst du festlegen, welche Zugriffsrechte für dieses Ziel gelten sollen, unabhängig von den Standardeinstellungen. Dies ist nützlich, wenn du andere Zugriffsrechte für deine Ziele festlegen möchtest als die Standardeinstellungen, zum Beispiel wenn du einige Ziele privat oder für bestimmte Benutzer bearbeitbar machen möchtest.
In diesem Video erklären wir das Vorgehen Schritt für Schritt:
# Unterziele erstellen
Source: https://mooncamp.com/docs/de/adding-subgoals
Unterziele zu einem bestehenden Ziel hinzufügen
Es gibt drei Möglichkeiten, Unterziele (z.B. Key Results, Initiativen) zu einem bestehenden Ziel hinzuzufügen.
## 1. Unterziel über den `+` Button neben dem übergeordneten Ziel hinzufügen
## 2. Unterziel in der Detailansicht des übergeordneten Ziels hinzufügen
## 3. Unterziel über den `Neu` Button hinzufügen
In den meisten Fällen empfehlen wir Option 1 oder 2, da der Kontext hier leichter ersichtlich ist.
# Erste Schritte für Admins
Source: https://mooncamp.com/docs/de/admins-introduction
Lerne, wie du als Admin mit Mooncamp startest
Once set up, you can always go back to your data connection through a connected goal and edit the data you want to sync via the ellipsis `...` . Here you can also edit the connection’s **name** as well as its **privacy settings**.
**Note for admins:** It is recommended to set the synchronization schedule for your data integrations to sync once per day (the app then updates the progress daily at 5am CEST). The settings can be found in `Settings > Integrations > Data Integrations`.
# Zugriffsrechte für Ziele
Source: https://mooncamp.com/docs/de/access-rights-for-goals
## Zugriffsrechte für Ziele erklärt
In Mooncamp gibt es zwei verschiedene Möglichkeiten, Zugriffsrechte für Ziele festzulegen. Zum einen als allgemeine **Standardeinstellung** für alle im Account erstellten Ziele, die nur von Administratoren festgelegt werden können. Zum anderen als **individuelle Zugriffsrechte** für einzelne oder mehrere Ziele, die auch von Nicht-Administratoren und Ziel-Erstellern festgelegt werden können und die Standardeinstellung überschreiben können (siehe unten).
## Standardeinstellungen (Administratoren)
**Als Administrator** hast du die Möglichkeit, Standardeinstellungen festzulegen, die für die Erstellung jedes Ziels gelten, unabhängig davon, wer das Ziel erstellt.
💡 **Wichtiger Hinweis für Administratoren:** Wir empfehlen dir, diese Standardeinstellungen festzulegen, bevor Ziele im Account erstellt werden (durch dich oder durch andere Benutzer), da die Einstellungen nur auf nachfolgend erstellte Ziele angewendet werden, nicht aber auf bereits erstellte Ziele.
Du kannst die Standard-Zugriffseinstellungen unter `Einstellungen > Ziele` konfigurieren.
Bitte beachte, dass diese Einstellung wirksam wird, sobald neue Ziele erstellt werden. Die Einstellungen werden nicht rückwirkend auf bereits erstellte Ziele angewendet. Wir empfehlen dir daher, die allgemeinen Standardeinstellungen festzulegen, bevor du deine Ziele in Mooncamp erstellst.
In diesem Video erklären wir das Vorgehen Schritt für Schritt:
## Individuelle Einstellungen (Nicht-Administratoren)
**Als Ersteller (Administrator oder Nicht-Administrator)** eines Ziels kannst du festlegen, welche Zugriffsrechte für dieses Ziel gelten sollen, unabhängig von den Standardeinstellungen. Dies ist nützlich, wenn du andere Zugriffsrechte für deine Ziele festlegen möchtest als die Standardeinstellungen, zum Beispiel wenn du einige Ziele privat oder für bestimmte Benutzer bearbeitbar machen möchtest.
In diesem Video erklären wir das Vorgehen Schritt für Schritt:
# Unterziele erstellen
Source: https://mooncamp.com/docs/de/adding-subgoals
Unterziele zu einem bestehenden Ziel hinzufügen
Es gibt drei Möglichkeiten, Unterziele (z.B. Key Results, Initiativen) zu einem bestehenden Ziel hinzuzufügen.
## 1. Unterziel über den `+` Button neben dem übergeordneten Ziel hinzufügen
## 2. Unterziel in der Detailansicht des übergeordneten Ziels hinzufügen
## 3. Unterziel über den `Neu` Button hinzufügen
In den meisten Fällen empfehlen wir Option 1 oder 2, da der Kontext hier leichter ersichtlich ist.
# Erste Schritte für Admins
Source: https://mooncamp.com/docs/de/admins-introduction
Lerne, wie du als Admin mit Mooncamp startest
 ## Willkommen bei Mooncamp 👋
Dieser Guide hilft dir beim Start mit Mooncamp. Am Ende wirst du
* die Kernfunktionen von Mooncamp kennen
* deinen Workspace, Teamspaces und Berechtigungen eingerichtet haben
* deine Integrationen eingerichtet haben
* dein Strategie-Framework etabliert haben
* Mitarbeiter eingeladen haben
Um mehr darüber zu erfahren, was Mooncamp ist und wie es die Art und Weise transformiert, wie du Strategie umsetzt, besuche bitte die [Übersichtsseite](/de/overview).
## Schritt 1: Mache dich mit der Mooncamp-Plattform vertraut
### Workspace-Navigation
* [Seitenleiste](/de/sidebar)
* [Homepage](/de/homepage)
* [Teamspaces](/de/teamspaces)
### Kernfunktionen
* [Ziele](/de/goals-overview)
* [Benutzerdefinierte Dashboards](/de/dashboards), [Progress-Dashboard](/de/progress-dashboard) und [Health-Dashboard](/de/health-dashboard)
* [Berichte](/de/reports)
* [Check-ins](/de/check-ins)
* [Integrationen](/de/data-integrations)
* [Plannings](/de/planning-spaces)
## Schritt 2: Richte deinen Workspace, Teamspaces und Berechtigungen ein
1. [ ] [Lösche deine Testdaten](/de/clearing-your-trial-data)
2. [ ] [Aktualisiere Workspace-Name und Logo](/de/workspace-settings)
3. [ ] [Erstelle Teamspaces](/de/teamspaces)
4. [ ] [Verwalte Mitarbeiterberechtigungen](/de/rights-and-access-control)
5. [ ] [Richte Standard-Zugriffsrechte für Ziele ein](/de/access-rights-for-goals)
[Standard-Zugriffsrechte](/de/access-rights-for-goals) gelten für alle **neu** erstellten Ziele und wirken sich nicht auf bereits bestehende Ziele aus. Daher ist es sinnvoll, diese vor der Erstellung deiner ersten Ziele festzulegen.
## Schritt 3: Richte deine Integrationen ein
1. [ ] [Richte Datenintegrationen](/de/data-integrations) für automatische Ziel-Updates ein
2. [ ] [Richte die MS Teams](/de/microsoft-teams-integration) oder [Slack](/de/slack-integration) Integration ein
## Schritt 4: Etabliere dein Strategie-Framework
1. [ ] [Richte deine Zyklen ein](/de/cycles)
2. [ ] [Richte Zieleigenschaften](/de/properties) im Property-System ein
3. [ ] [Konfiguriere Zielstatus](/de/goal-statuses)
4. [ ] [Lege Regeln für Ziele und OKRs fest](/de/goal-rules)
## Schritt 5: Lade Mitarbeiter ein
1. [ ] Single-Sign On: [Richte SSO ein](/de/sso) oder [SAML-basiertes SSO](/de/saml-sso)
2. [ ] Entweder [lade Mitarbeiter manuell ein](/de/managing-employees), [teile einen Einladungslink](/de/managing-employees#einladungs-link) mit ihnen (*nachdem* du sie in Mooncamp erstellt hast) oder richte SCIM ein (z.B. [über Azure AD](/de/scim-azure)), um Mitarbeiter automatisch zu importieren
Für einen reibungslosen Start mit Mooncamp kannst du deine Kollegen unterstützen, indem du ihnen den [Einführungsleitfaden für Mitarbeiter](/de/employees-introduction) zur Verfügung stellst.
# Asana Integration
Source: https://mooncamp.com/docs/de/asana-integration
Lerne, wie du Asana mit Mooncamp-Zielen verbindest
Du kannst die Asana-Integration nutzen, um deine Ziele/OKRs in Mooncamp mit Asana-Aufgaben oder -Projekten zu verknüpfen und automatisch zu aktualisieren.
## Integration aktivieren
Bevor du ein Ziel mit Asana verknüpfst, stelle sicher, dass die Asana-Integration für dein Konto aktiviert ist. Als Administrator findest du die für dein Konto aktivierten Integrationen unter *Einstellungen > Integrationen*.
## Ein Asana-Projekt oder eine Aufgabe mit einem Ziel verknüpfen
Sobald die Asana-Integration aktiviert ist, folge diesen Schritten, um ein Ziel mit Asana zu verknüpfen:
### Schritt 1: Öffne ein Ziel, das du über Asana aktualisieren möchtest
### Schritt 2: Wähle die Option `Start- und Zielwert` oder `Grenzwert` unter `Messart`
### Schritt 3: Klicke auf `Mit Datenquelle verbinden`
### Schritt 4: Wähle eine bestehende Asana-Datenverbindung aus oder erstelle eine neue
Wenn du eine neue Datenverbindung erstellst und Mooncamp noch nicht mit Asana verbunden hast, musst du dies zunächst tun, indem du auf `Asana hinzufügen` und dann auf `Mit Asana anmelden` klickst.
Wähle dann das Projekt aus deinem Asana-Konto aus, das du verbinden möchtest. Es gibt drei Möglichkeiten, den Fortschritt deines Mooncamp-Ziels zu messen:
**Gesamtfortschritt**
Messe den Gesamtfortschritt (%) bestimmter Aufgaben im Verhältnis zu allen Aufgaben.
1. Im ersten Schritt wählst du unter "Ausgewählte Aufgaben" aus, welche Aufgaben den Fortschritt des Projekts bestimmen. Wenn du nur die Aufgaben bestimmter Personen einbeziehen möchtest, kannst du das hier angeben (andernfalls lasse das Feld "Zugewiesen an" leer). Wähle dann den Abschnitt (z.B. "Erledigt") und Status (z.B. "Beliebig" oder "Abgeschlossen") aus, der angibt, welche Aufgaben für den Fortschritt des Ziels gemessen werden sollen. Wenn du weitere Abschnitte in die Messung einbeziehen möchtest, kannst du unten neue Abschnitte hinzufügen.
2. Im zweiten Schritt wählst du unter "Gesamtaufgaben" die Gesamtmenge der Aufgaben aus, damit das Verhältnis bzw. der Fortschrittsprozentsatz berechnet werden kann. Wenn du alle Aufgaben einbeziehen möchtest, kannst du die Felder "Zugewiesen an" und darunter "Abschnitt" und "Status" auf "Beliebig" belassen. Wenn du weitere Abschnitte in die Messung einbeziehen möchtest, kannst du darunter neue Abschnitte hinzufügen.
Beispiel: Messe den Gesamtfortschritt eines "Website-Redesign"-Projekts, indem du alle Aufgaben zählst, die sich im Abschnitt "Erledigt" befinden. Belasse die Felder für die Angabe der Gesamtmenge der Aufgaben auf "Alle", damit alle Aufgaben innerhalb des Projekts einbezogen werden.
**Anzahl an Aufgaben**
Gibt die Anzahl bestimmter Aufgaben zurück.
1. Wähle zunächst aus, ob alle Aufgaben gezählt werden sollen oder nur Aufgaben, die bestimmten verantwortlichen Personen zugewiesen sind.
2. Wähle dann den Abschnitt (z.B. "Erledigt") und Status (z.B. "Beliebig" oder "Abgeschlossen") aus, der angibt, welche Aufgaben gezählt werden sollen. Wenn du weitere Abschnitte in die Messung einbeziehen möchtest, kannst du unten neue Abschnitte hinzufügen.
Beispiel: Angenommen, du arbeitest im Marketing und möchtest in einem Mooncamp-Ziel verfolgen, wie viele Blogbeiträge du veröffentlicht hast. Wähle dich selbst im Feld "Zugewiesen an" aus und messe den Fortschritt über die Anzahl aller Blogbeitrag-Aufgaben im Abschnitt "Veröffentlicht".
**Einzelne Aufgabe**
1. Verfolge die Fertigstellung einer einzelnen Aufgabe.
2. Wähle dann den Abschnitt (z.B. "Erledigt") und den Status (z.B. "Beliebig" oder "Abgeschlossen") aus, der angibt, wann die betreffende Aufgabe als abgeschlossen gelten soll. Wenn du weitere Abschnitte in die Messung einbeziehen möchtest, kannst du unten neue Abschnitte hinzufügen.
### Schritt 5: Klicke jetzt auf "Speichern" und Asana ist mit dem Ziel verknüpft 🎉
## Synchronisierung, Bearbeitung und Löschen der Verbindung
Sobald ein Ziel mit Asana verbunden ist, kannst du die Verbindung am Ziel unter "Fortschritt" einsehen, bearbeiten und löschen oder das Ziel manuell synchronisieren. Andernfalls wird das Ziel einmal täglich mit Asana synchronisiert.
💡 Tipp für Administratoren: Gehe zu `Einstellungen > Integrationen > Asana` und stelle sicher, dass unter `Synchronisierung` jeder Tag ausgewählt ist.
# Check-ins
Source: https://mooncamp.com/docs/de/check-ins
Ein Überblick über Check-ins
## Was sind Check-ins?
Ein Check-in ist eine Update über den Arbeitsfortschritt eines Mitarbeiters. Mitarbeiter können zum Beispiel in einem wöchentlichen Zyklus Updates zu ihren Zielen/OKRs eingeben, diese kommentieren und auch verschiedene Fragen beantworten, wie zum Beispiel:
* Woran hast du letzte Woche gearbeitet?
* Was sind deine Prioritäten für diese Woche?
## Warum solltest du Check-ins nutzen?
(Wöchentliche) Check-ins sind ein einfaches Werkzeug, um Ziele und OKRs im Blick zu behalten, allen zu zeigen, woran andere arbeiten, Fortschritte und neue Erkenntnisse zu diskutieren und herauszufinden, wo gegenseitige Unterstützung benötigt wird. Es gewährleistet kontinuierliches Feedback und Lernen sowie ein hohes Maß an Beteiligung und Verantwortlichkeit in Teams.
## Wie können Check-ins erstellt werden?
Check-ins können erstellt werden durch:
* Klicken auf `Neu` unter dem `Check-ins`-Tab auf deiner Homepage oder Teamspaces
* Navigation zu Check-ins unter Tools und Klicken auf `Neu`
## Vorlagen für Check-ins erstellen
Du kannst Vorlagen für deine Check-ins mit spezifischen Fragen erstellen, die die Check-in-Empfänger beantworten sollen. Außerdem kannst du Infos oder Anweisungen hinzufügen, wie die Empfänger ihren Check-in ausfüllen sollen. Um eine neue Vorlage zu erstellen, navigiere zum `Check-ins`-Tool und klicke auf den Tab `Vorlagen`.
**Schritt 1:** Klicke auf den `Neu`-Button, um eine neue Vorlage zu erstellen.
**Schritt 2:** Gib der neuen Vorlage einen Titel und füge ein Icon hinzu, wenn du möchtest.
**Schritt 3:** Falls du die Vorlage nur für Check-ins eines oder mehrerer bestimmter Teams verwenden möchtest, wähle diese aus deiner Liste aus.
**Schritt 4:** *Beginne mit der Eingabe* von Fragen, die deine Check-in-Empfänger bei jedem Versand beantworten sollen. Außerdem kannst du Anweisungen notieren, wie die Empfänger ihren Check-in ausfüllen sollen.
**Schritt 5:** Verwende den *Zugriff*-Button oben rechts, um weiteren Kollegen die Ansicht oder Bearbeitung der Vorlage zu ermöglichen, z.B. falls sie zu einem späteren Zeitpunkt angepasst werden muss.
**Schritt 6:** Navigiere zum Tab *Zeitpläne*, um den Zeitpunkt und die Häufigkeit festzulegen, mit der dein Check-in inklusive Vorlage verschickt werden soll.
## Zeitpläne für Check-ins erstellen
Um einen neuen Zeitplan zu erstellen, navigiere zum Check-ins-Tool und klicke auf den Tab `Zeitpläne`.
**Schritt 1:** Benenne den neuen Zeitplan.
**Schritt 2:** Lege den Rhythmus fest, in dem der Check-in verschickt werden soll.
**Schritt 3:** Wähle die Personen aus, die den Check-in erhalten sollen.
**Schritt 4:** Lege Zeit und Häufigkeit der Erinnerungen fest.
**Schritt 5:** Wähle die Vorlage für die Erinnerung aus.
Jede Zeitplan-Seite enthält auch einen Überblick über alle Teilnehmer und deren Teilnahme pro Check-in sowie die Teilnahmequote im Zeitverlauf.
**Wichtiger Hinweis:** Bitte beachte, dass in der **Teilnahmeübersicht einer Zeitplan-Seite** ein Check-in nur als "Erledigt" markiert wird, wenn ein Teilnehmer ihn über seine E-Mail-, MS Teams- oder Slack-Benachrichtigung ausgefüllt hat, da diese einen **direkten Link zum Check-in-Zeitplan** enthalten. Eine andere Möglichkeit wäre über den *Check-in-Explorer > Neu > und dann den entsprechenden Zeitplan* (z.B. "Wöchentlicher Check-in"). Wenn ein Teilnehmer den Weg über den Check-in-Explorer wählt und *+ Neu ohne Zeitplan* verwendet, wird sein Check-in auf keiner Zeitplan-Seite als "Erledigt" markiert, da er mit keinem Zeitplan verknüpft ist.
# Testdaten löschen
Source: https://mooncamp.com/docs/de/clearing-your-trial-data
Lösche die Testdaten Deines Kontos, um mit der Einrichtung der OKRs Deines Unternehmens zu beginnen
Unter `Einstellungen > Allgemein` kannst Du Dein Konto zurücksetzen, um vorhandene Daten wie Demo- oder Testdaten zu löschen.
Im Zurücksetzmenü hast Du die Möglichkeit zu wählen, was Du entfernen möchtest. Du kannst entweder alle Ziele, alle Check-ins oder alle Demo-Benutzer einzeln entfernen, nur zwei dieser Optionen wählen oder alles auf einmal löschen.
# Wie du ein Ziel erstellst und bearbeitest
Source: https://mooncamp.com/docs/de/create-and-edit-goals
Eine Schritt-für-Schritt-Anleitung zum Erstellen von Zielen
Du kannst ein Ziel über `Neu` auf den folgenden Seiten erstellen:
* Homepage
* Teamspaces
* Ziel-Explorer
**Bitte beachte**: Ziele werden automatisch gespeichert, d.h. du musst nirgendwo auf "Speichern" klicken. Sobald du auf `Neu` klickst, wird das Ziel erstellt. Wenn du den Entwurf lieber verwerfen möchtest, kannst du das Ziel einfach in der oberen rechten Ecke des Fensters löschen.
## Ziel erstellen
Um ein Ziel zu erstellen, klicke auf `Neu` an einer der folgenden Stellen:
Nach dem Klick auf `Neu` öffnet sich die Detailansicht eines neuen Ziels:
### Schritt 1: Füge einen Titel für das Ziel hinzu
Optional kannst du auch eine Beschreibung und ein Symbol hinzufügen.
### Schritt 2: Lege fest, wie der Fortschritt des Ziels gemessen werden soll
Vier Optionen stehen zur Verfügung, um den Fortschritt zu messen:
* `Start- und Zielwert`: Metrik mit oder ohne Einheit festlegen (z.B. 5 EUR, 20%, 10 Kunden)
* `Aggregation`: Fortschritt wird durch Unterziele gemessen und in Prozent ausgedrückt (0 - 100%)
* `Grenzwert`: Das Ziel soll einen bestimmten Grenzwert nicht über- oder unterschreiten
* `Offen/Erledigt`: ein Ziel, das entweder erledigt ist oder nicht
* `Keine`: Das Ziel misst keinen Fortschritt (z.B. nützlich für rein qualitative Ziele)
Weitere Informationen zu den jeweiligen Optionen und ihrer Anwendung findest du in [diesem Artikel](/de/progress-measurement).
**Tipp:** Schritt 1 sowie 3 bis 8 **können ganz einfach direkt in der Kaskadenansicht** erledigt werden, ohne dass eine Ziel-Detailseite geöffnet werden muss. Du kannst die verschiedenen Eigenschaften, den Zielfortschritt und -status einfach über die Spalten der Tabelle bearbeiten. Auch der **Zieltitel** kann direkt bearbeitet werden, indem du mit der Maus über den Titel fährst und das Bearbeiten-Symbol am rechten Ende der Spalte verwendest.
### Schritt 3: Wähle ein übergeordnetes Ziel aus
Hier wählst du aus, mit welchem Ziel das betreffende Ziel verbunden ist. Wenn es sich zum Beispiel um ein Unternehmensziel auf der ersten Ebene handelt, kann dieses Feld auch leer bleiben.
### Schritt 4: Weise das Ziel einem Zyklus zu
Wähle den Zyklus (z.B. Q1 2026 oder H2 2026) aus, dem das Ziel zugeordnet werden soll.
### Schritt 5: Wähle den Typ des Ziels
Die Typen eines Ziels sind für Administratoren unter `Einstellungen > Eigenschaften` frei konfigurierbar.
Standardmäßig sind folgende Typen eingestellt:
* `Objective`
* `Key Result`
* `Initiative`
### Schritt 6: Fülle gegebenenfalls zusätzliche Felder/Eigenschaften des Ziels aus
Jede zusätzliche Eigenschaft für Ziele, die von Administratoren unter `Einstellungen > Eigenschaften` erstellt wurde, erscheint hier.
Typische zusätzliche Eigenschaften sind *Verantwortlicher* oder *Team*, um anzuzeigen, wer oder welches Team für das Ziel verantwortlich ist.
### Schritt 7: Erstelle bei Bedarf zusätzliche Unterziele für das jeweilige Ziel
Bei der Erstellung eines Ziels kannst du im gleichen Schritt Unterziele (z.B. Key Results oder Initiativen) erstellen. Klicke dazu einfach unter *Unterelemente* auf `Neu` und es öffnet sich ein neues Fenster für das Unterziel.
### Schritt 8: Prüfe und passe gegebenenfalls an, wer Zugriff auf das Ziel haben soll
Wenn du das Ziel nur für bestimmte Personengruppen zugänglich machen oder Lese- und Schreibrechte anpassen möchtest, kannst du den Zugriff über `Teilen` konfigurieren.
**Hinweis**: Als Administrator kannst du festlegen, welche Zugriffseinstellungen standardmäßig bei der Erstellung eines Ziels ausgewählt werden sollen (`Einstellungen > Ziele`).
**Fertig! 🎉**
# KPIs in Mooncamp erstellen
Source: https://mooncamp.com/docs/de/create-kpis-in-mooncamp
Eine Anleitung, wie du KPIs (Key Performance Indicators) in Mooncamp erstellen kannst
Als Admin findest du unter `Einstellungen > Ziele > Typen und Regeln` alle angelegten Zieltypen in deinem OKR- bzw. Zielmanagement-System, wie z.B. `Objective`, `Key Result` oder `Initiative`.
### Schritt 1: Füge KPI als Zieltyp hinzu (Admin-Funktion)
Um einen KPI (Key Performance Indicator) in Mooncamp anzulegen, navigiere zu den Zieltypen in den Einstellungen und klicke auf `Neu`, benenne den Typ (z.B. `KPI`) und klicke auf `Speichern`.
## Willkommen bei Mooncamp 👋
Dieser Guide hilft dir beim Start mit Mooncamp. Am Ende wirst du
* die Kernfunktionen von Mooncamp kennen
* deinen Workspace, Teamspaces und Berechtigungen eingerichtet haben
* deine Integrationen eingerichtet haben
* dein Strategie-Framework etabliert haben
* Mitarbeiter eingeladen haben
Um mehr darüber zu erfahren, was Mooncamp ist und wie es die Art und Weise transformiert, wie du Strategie umsetzt, besuche bitte die [Übersichtsseite](/de/overview).
## Schritt 1: Mache dich mit der Mooncamp-Plattform vertraut
### Workspace-Navigation
* [Seitenleiste](/de/sidebar)
* [Homepage](/de/homepage)
* [Teamspaces](/de/teamspaces)
### Kernfunktionen
* [Ziele](/de/goals-overview)
* [Benutzerdefinierte Dashboards](/de/dashboards), [Progress-Dashboard](/de/progress-dashboard) und [Health-Dashboard](/de/health-dashboard)
* [Berichte](/de/reports)
* [Check-ins](/de/check-ins)
* [Integrationen](/de/data-integrations)
* [Plannings](/de/planning-spaces)
## Schritt 2: Richte deinen Workspace, Teamspaces und Berechtigungen ein
1. [ ] [Lösche deine Testdaten](/de/clearing-your-trial-data)
2. [ ] [Aktualisiere Workspace-Name und Logo](/de/workspace-settings)
3. [ ] [Erstelle Teamspaces](/de/teamspaces)
4. [ ] [Verwalte Mitarbeiterberechtigungen](/de/rights-and-access-control)
5. [ ] [Richte Standard-Zugriffsrechte für Ziele ein](/de/access-rights-for-goals)
[Standard-Zugriffsrechte](/de/access-rights-for-goals) gelten für alle **neu** erstellten Ziele und wirken sich nicht auf bereits bestehende Ziele aus. Daher ist es sinnvoll, diese vor der Erstellung deiner ersten Ziele festzulegen.
## Schritt 3: Richte deine Integrationen ein
1. [ ] [Richte Datenintegrationen](/de/data-integrations) für automatische Ziel-Updates ein
2. [ ] [Richte die MS Teams](/de/microsoft-teams-integration) oder [Slack](/de/slack-integration) Integration ein
## Schritt 4: Etabliere dein Strategie-Framework
1. [ ] [Richte deine Zyklen ein](/de/cycles)
2. [ ] [Richte Zieleigenschaften](/de/properties) im Property-System ein
3. [ ] [Konfiguriere Zielstatus](/de/goal-statuses)
4. [ ] [Lege Regeln für Ziele und OKRs fest](/de/goal-rules)
## Schritt 5: Lade Mitarbeiter ein
1. [ ] Single-Sign On: [Richte SSO ein](/de/sso) oder [SAML-basiertes SSO](/de/saml-sso)
2. [ ] Entweder [lade Mitarbeiter manuell ein](/de/managing-employees), [teile einen Einladungslink](/de/managing-employees#einladungs-link) mit ihnen (*nachdem* du sie in Mooncamp erstellt hast) oder richte SCIM ein (z.B. [über Azure AD](/de/scim-azure)), um Mitarbeiter automatisch zu importieren
Für einen reibungslosen Start mit Mooncamp kannst du deine Kollegen unterstützen, indem du ihnen den [Einführungsleitfaden für Mitarbeiter](/de/employees-introduction) zur Verfügung stellst.
# Asana Integration
Source: https://mooncamp.com/docs/de/asana-integration
Lerne, wie du Asana mit Mooncamp-Zielen verbindest
Du kannst die Asana-Integration nutzen, um deine Ziele/OKRs in Mooncamp mit Asana-Aufgaben oder -Projekten zu verknüpfen und automatisch zu aktualisieren.
## Integration aktivieren
Bevor du ein Ziel mit Asana verknüpfst, stelle sicher, dass die Asana-Integration für dein Konto aktiviert ist. Als Administrator findest du die für dein Konto aktivierten Integrationen unter *Einstellungen > Integrationen*.
## Ein Asana-Projekt oder eine Aufgabe mit einem Ziel verknüpfen
Sobald die Asana-Integration aktiviert ist, folge diesen Schritten, um ein Ziel mit Asana zu verknüpfen:
### Schritt 1: Öffne ein Ziel, das du über Asana aktualisieren möchtest
### Schritt 2: Wähle die Option `Start- und Zielwert` oder `Grenzwert` unter `Messart`
### Schritt 3: Klicke auf `Mit Datenquelle verbinden`
### Schritt 4: Wähle eine bestehende Asana-Datenverbindung aus oder erstelle eine neue
Wenn du eine neue Datenverbindung erstellst und Mooncamp noch nicht mit Asana verbunden hast, musst du dies zunächst tun, indem du auf `Asana hinzufügen` und dann auf `Mit Asana anmelden` klickst.
Wähle dann das Projekt aus deinem Asana-Konto aus, das du verbinden möchtest. Es gibt drei Möglichkeiten, den Fortschritt deines Mooncamp-Ziels zu messen:
**Gesamtfortschritt**
Messe den Gesamtfortschritt (%) bestimmter Aufgaben im Verhältnis zu allen Aufgaben.
1. Im ersten Schritt wählst du unter "Ausgewählte Aufgaben" aus, welche Aufgaben den Fortschritt des Projekts bestimmen. Wenn du nur die Aufgaben bestimmter Personen einbeziehen möchtest, kannst du das hier angeben (andernfalls lasse das Feld "Zugewiesen an" leer). Wähle dann den Abschnitt (z.B. "Erledigt") und Status (z.B. "Beliebig" oder "Abgeschlossen") aus, der angibt, welche Aufgaben für den Fortschritt des Ziels gemessen werden sollen. Wenn du weitere Abschnitte in die Messung einbeziehen möchtest, kannst du unten neue Abschnitte hinzufügen.
2. Im zweiten Schritt wählst du unter "Gesamtaufgaben" die Gesamtmenge der Aufgaben aus, damit das Verhältnis bzw. der Fortschrittsprozentsatz berechnet werden kann. Wenn du alle Aufgaben einbeziehen möchtest, kannst du die Felder "Zugewiesen an" und darunter "Abschnitt" und "Status" auf "Beliebig" belassen. Wenn du weitere Abschnitte in die Messung einbeziehen möchtest, kannst du darunter neue Abschnitte hinzufügen.
Beispiel: Messe den Gesamtfortschritt eines "Website-Redesign"-Projekts, indem du alle Aufgaben zählst, die sich im Abschnitt "Erledigt" befinden. Belasse die Felder für die Angabe der Gesamtmenge der Aufgaben auf "Alle", damit alle Aufgaben innerhalb des Projekts einbezogen werden.
**Anzahl an Aufgaben**
Gibt die Anzahl bestimmter Aufgaben zurück.
1. Wähle zunächst aus, ob alle Aufgaben gezählt werden sollen oder nur Aufgaben, die bestimmten verantwortlichen Personen zugewiesen sind.
2. Wähle dann den Abschnitt (z.B. "Erledigt") und Status (z.B. "Beliebig" oder "Abgeschlossen") aus, der angibt, welche Aufgaben gezählt werden sollen. Wenn du weitere Abschnitte in die Messung einbeziehen möchtest, kannst du unten neue Abschnitte hinzufügen.
Beispiel: Angenommen, du arbeitest im Marketing und möchtest in einem Mooncamp-Ziel verfolgen, wie viele Blogbeiträge du veröffentlicht hast. Wähle dich selbst im Feld "Zugewiesen an" aus und messe den Fortschritt über die Anzahl aller Blogbeitrag-Aufgaben im Abschnitt "Veröffentlicht".
**Einzelne Aufgabe**
1. Verfolge die Fertigstellung einer einzelnen Aufgabe.
2. Wähle dann den Abschnitt (z.B. "Erledigt") und den Status (z.B. "Beliebig" oder "Abgeschlossen") aus, der angibt, wann die betreffende Aufgabe als abgeschlossen gelten soll. Wenn du weitere Abschnitte in die Messung einbeziehen möchtest, kannst du unten neue Abschnitte hinzufügen.
### Schritt 5: Klicke jetzt auf "Speichern" und Asana ist mit dem Ziel verknüpft 🎉
## Synchronisierung, Bearbeitung und Löschen der Verbindung
Sobald ein Ziel mit Asana verbunden ist, kannst du die Verbindung am Ziel unter "Fortschritt" einsehen, bearbeiten und löschen oder das Ziel manuell synchronisieren. Andernfalls wird das Ziel einmal täglich mit Asana synchronisiert.
💡 Tipp für Administratoren: Gehe zu `Einstellungen > Integrationen > Asana` und stelle sicher, dass unter `Synchronisierung` jeder Tag ausgewählt ist.
# Check-ins
Source: https://mooncamp.com/docs/de/check-ins
Ein Überblick über Check-ins
## Was sind Check-ins?
Ein Check-in ist eine Update über den Arbeitsfortschritt eines Mitarbeiters. Mitarbeiter können zum Beispiel in einem wöchentlichen Zyklus Updates zu ihren Zielen/OKRs eingeben, diese kommentieren und auch verschiedene Fragen beantworten, wie zum Beispiel:
* Woran hast du letzte Woche gearbeitet?
* Was sind deine Prioritäten für diese Woche?
## Warum solltest du Check-ins nutzen?
(Wöchentliche) Check-ins sind ein einfaches Werkzeug, um Ziele und OKRs im Blick zu behalten, allen zu zeigen, woran andere arbeiten, Fortschritte und neue Erkenntnisse zu diskutieren und herauszufinden, wo gegenseitige Unterstützung benötigt wird. Es gewährleistet kontinuierliches Feedback und Lernen sowie ein hohes Maß an Beteiligung und Verantwortlichkeit in Teams.
## Wie können Check-ins erstellt werden?
Check-ins können erstellt werden durch:
* Klicken auf `Neu` unter dem `Check-ins`-Tab auf deiner Homepage oder Teamspaces
* Navigation zu Check-ins unter Tools und Klicken auf `Neu`
## Vorlagen für Check-ins erstellen
Du kannst Vorlagen für deine Check-ins mit spezifischen Fragen erstellen, die die Check-in-Empfänger beantworten sollen. Außerdem kannst du Infos oder Anweisungen hinzufügen, wie die Empfänger ihren Check-in ausfüllen sollen. Um eine neue Vorlage zu erstellen, navigiere zum `Check-ins`-Tool und klicke auf den Tab `Vorlagen`.
**Schritt 1:** Klicke auf den `Neu`-Button, um eine neue Vorlage zu erstellen.
**Schritt 2:** Gib der neuen Vorlage einen Titel und füge ein Icon hinzu, wenn du möchtest.
**Schritt 3:** Falls du die Vorlage nur für Check-ins eines oder mehrerer bestimmter Teams verwenden möchtest, wähle diese aus deiner Liste aus.
**Schritt 4:** *Beginne mit der Eingabe* von Fragen, die deine Check-in-Empfänger bei jedem Versand beantworten sollen. Außerdem kannst du Anweisungen notieren, wie die Empfänger ihren Check-in ausfüllen sollen.
**Schritt 5:** Verwende den *Zugriff*-Button oben rechts, um weiteren Kollegen die Ansicht oder Bearbeitung der Vorlage zu ermöglichen, z.B. falls sie zu einem späteren Zeitpunkt angepasst werden muss.
**Schritt 6:** Navigiere zum Tab *Zeitpläne*, um den Zeitpunkt und die Häufigkeit festzulegen, mit der dein Check-in inklusive Vorlage verschickt werden soll.
## Zeitpläne für Check-ins erstellen
Um einen neuen Zeitplan zu erstellen, navigiere zum Check-ins-Tool und klicke auf den Tab `Zeitpläne`.
**Schritt 1:** Benenne den neuen Zeitplan.
**Schritt 2:** Lege den Rhythmus fest, in dem der Check-in verschickt werden soll.
**Schritt 3:** Wähle die Personen aus, die den Check-in erhalten sollen.
**Schritt 4:** Lege Zeit und Häufigkeit der Erinnerungen fest.
**Schritt 5:** Wähle die Vorlage für die Erinnerung aus.
Jede Zeitplan-Seite enthält auch einen Überblick über alle Teilnehmer und deren Teilnahme pro Check-in sowie die Teilnahmequote im Zeitverlauf.
**Wichtiger Hinweis:** Bitte beachte, dass in der **Teilnahmeübersicht einer Zeitplan-Seite** ein Check-in nur als "Erledigt" markiert wird, wenn ein Teilnehmer ihn über seine E-Mail-, MS Teams- oder Slack-Benachrichtigung ausgefüllt hat, da diese einen **direkten Link zum Check-in-Zeitplan** enthalten. Eine andere Möglichkeit wäre über den *Check-in-Explorer > Neu > und dann den entsprechenden Zeitplan* (z.B. "Wöchentlicher Check-in"). Wenn ein Teilnehmer den Weg über den Check-in-Explorer wählt und *+ Neu ohne Zeitplan* verwendet, wird sein Check-in auf keiner Zeitplan-Seite als "Erledigt" markiert, da er mit keinem Zeitplan verknüpft ist.
# Testdaten löschen
Source: https://mooncamp.com/docs/de/clearing-your-trial-data
Lösche die Testdaten Deines Kontos, um mit der Einrichtung der OKRs Deines Unternehmens zu beginnen
Unter `Einstellungen > Allgemein` kannst Du Dein Konto zurücksetzen, um vorhandene Daten wie Demo- oder Testdaten zu löschen.
Im Zurücksetzmenü hast Du die Möglichkeit zu wählen, was Du entfernen möchtest. Du kannst entweder alle Ziele, alle Check-ins oder alle Demo-Benutzer einzeln entfernen, nur zwei dieser Optionen wählen oder alles auf einmal löschen.
# Wie du ein Ziel erstellst und bearbeitest
Source: https://mooncamp.com/docs/de/create-and-edit-goals
Eine Schritt-für-Schritt-Anleitung zum Erstellen von Zielen
Du kannst ein Ziel über `Neu` auf den folgenden Seiten erstellen:
* Homepage
* Teamspaces
* Ziel-Explorer
**Bitte beachte**: Ziele werden automatisch gespeichert, d.h. du musst nirgendwo auf "Speichern" klicken. Sobald du auf `Neu` klickst, wird das Ziel erstellt. Wenn du den Entwurf lieber verwerfen möchtest, kannst du das Ziel einfach in der oberen rechten Ecke des Fensters löschen.
## Ziel erstellen
Um ein Ziel zu erstellen, klicke auf `Neu` an einer der folgenden Stellen:
Nach dem Klick auf `Neu` öffnet sich die Detailansicht eines neuen Ziels:
### Schritt 1: Füge einen Titel für das Ziel hinzu
Optional kannst du auch eine Beschreibung und ein Symbol hinzufügen.
### Schritt 2: Lege fest, wie der Fortschritt des Ziels gemessen werden soll
Vier Optionen stehen zur Verfügung, um den Fortschritt zu messen:
* `Start- und Zielwert`: Metrik mit oder ohne Einheit festlegen (z.B. 5 EUR, 20%, 10 Kunden)
* `Aggregation`: Fortschritt wird durch Unterziele gemessen und in Prozent ausgedrückt (0 - 100%)
* `Grenzwert`: Das Ziel soll einen bestimmten Grenzwert nicht über- oder unterschreiten
* `Offen/Erledigt`: ein Ziel, das entweder erledigt ist oder nicht
* `Keine`: Das Ziel misst keinen Fortschritt (z.B. nützlich für rein qualitative Ziele)
Weitere Informationen zu den jeweiligen Optionen und ihrer Anwendung findest du in [diesem Artikel](/de/progress-measurement).
**Tipp:** Schritt 1 sowie 3 bis 8 **können ganz einfach direkt in der Kaskadenansicht** erledigt werden, ohne dass eine Ziel-Detailseite geöffnet werden muss. Du kannst die verschiedenen Eigenschaften, den Zielfortschritt und -status einfach über die Spalten der Tabelle bearbeiten. Auch der **Zieltitel** kann direkt bearbeitet werden, indem du mit der Maus über den Titel fährst und das Bearbeiten-Symbol am rechten Ende der Spalte verwendest.
### Schritt 3: Wähle ein übergeordnetes Ziel aus
Hier wählst du aus, mit welchem Ziel das betreffende Ziel verbunden ist. Wenn es sich zum Beispiel um ein Unternehmensziel auf der ersten Ebene handelt, kann dieses Feld auch leer bleiben.
### Schritt 4: Weise das Ziel einem Zyklus zu
Wähle den Zyklus (z.B. Q1 2026 oder H2 2026) aus, dem das Ziel zugeordnet werden soll.
### Schritt 5: Wähle den Typ des Ziels
Die Typen eines Ziels sind für Administratoren unter `Einstellungen > Eigenschaften` frei konfigurierbar.
Standardmäßig sind folgende Typen eingestellt:
* `Objective`
* `Key Result`
* `Initiative`
### Schritt 6: Fülle gegebenenfalls zusätzliche Felder/Eigenschaften des Ziels aus
Jede zusätzliche Eigenschaft für Ziele, die von Administratoren unter `Einstellungen > Eigenschaften` erstellt wurde, erscheint hier.
Typische zusätzliche Eigenschaften sind *Verantwortlicher* oder *Team*, um anzuzeigen, wer oder welches Team für das Ziel verantwortlich ist.
### Schritt 7: Erstelle bei Bedarf zusätzliche Unterziele für das jeweilige Ziel
Bei der Erstellung eines Ziels kannst du im gleichen Schritt Unterziele (z.B. Key Results oder Initiativen) erstellen. Klicke dazu einfach unter *Unterelemente* auf `Neu` und es öffnet sich ein neues Fenster für das Unterziel.
### Schritt 8: Prüfe und passe gegebenenfalls an, wer Zugriff auf das Ziel haben soll
Wenn du das Ziel nur für bestimmte Personengruppen zugänglich machen oder Lese- und Schreibrechte anpassen möchtest, kannst du den Zugriff über `Teilen` konfigurieren.
**Hinweis**: Als Administrator kannst du festlegen, welche Zugriffseinstellungen standardmäßig bei der Erstellung eines Ziels ausgewählt werden sollen (`Einstellungen > Ziele`).
**Fertig! 🎉**
# KPIs in Mooncamp erstellen
Source: https://mooncamp.com/docs/de/create-kpis-in-mooncamp
Eine Anleitung, wie du KPIs (Key Performance Indicators) in Mooncamp erstellen kannst
Als Admin findest du unter `Einstellungen > Ziele > Typen und Regeln` alle angelegten Zieltypen in deinem OKR- bzw. Zielmanagement-System, wie z.B. `Objective`, `Key Result` oder `Initiative`.
### Schritt 1: Füge KPI als Zieltyp hinzu (Admin-Funktion)
Um einen KPI (Key Performance Indicator) in Mooncamp anzulegen, navigiere zu den Zieltypen in den Einstellungen und klicke auf `Neu`, benenne den Typ (z.B. `KPI`) und klicke auf `Speichern`.
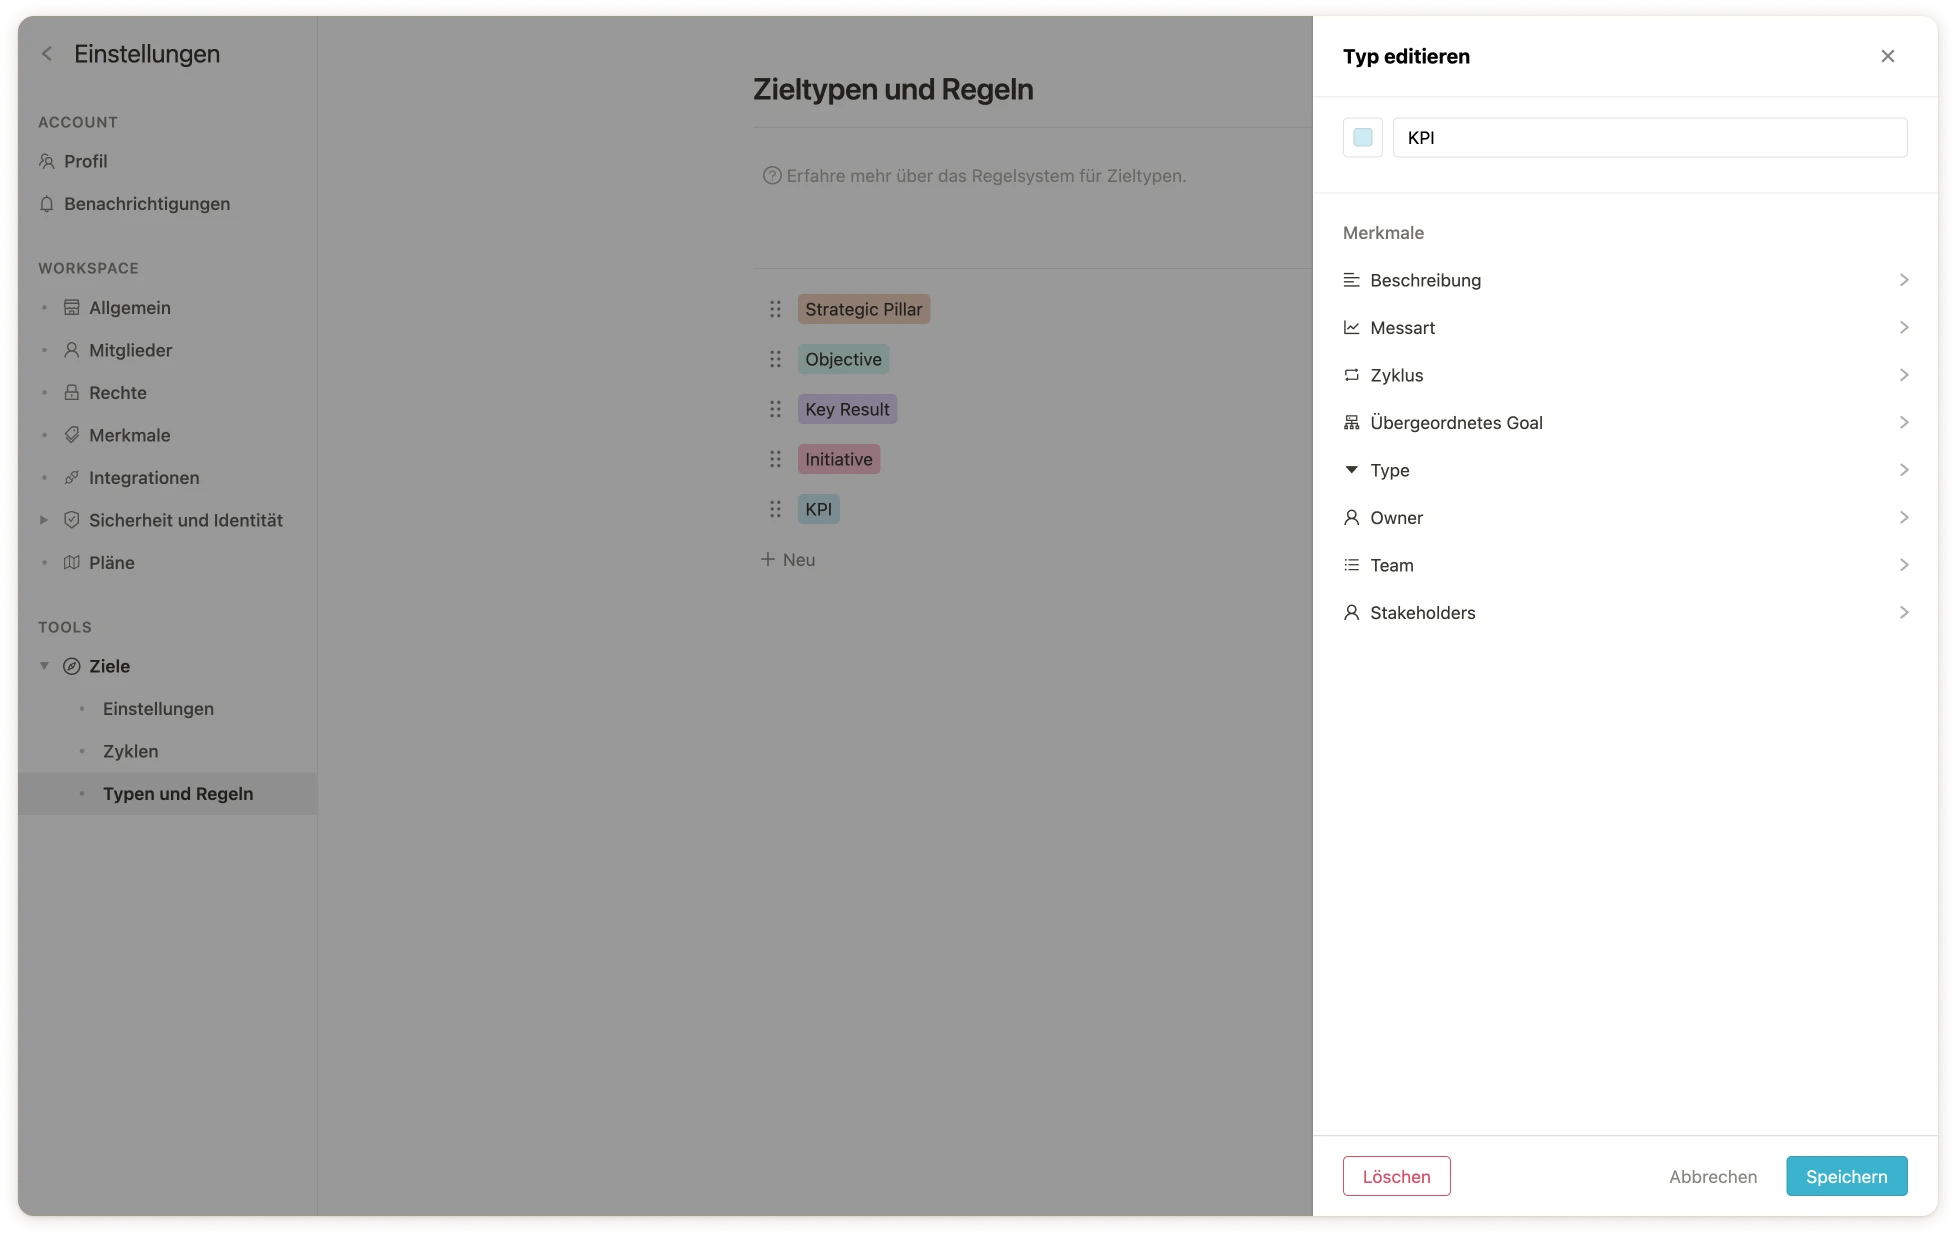 ### Schritt 2: Erstelle eine neue Ansicht für deine KPIs
Navigiere zum Ziel-Explorer `1` und erstelle eine neue Ansicht für deine KPIs. Klicke dazu auf Ansicht hinzufügen `2`, benenne die Ansicht und wähle aus, ob die Ansicht nur für dich oder für alle im Account sichtbar sein soll `3`.
### Schritt 2: Erstelle eine neue Ansicht für deine KPIs
Navigiere zum Ziel-Explorer `1` und erstelle eine neue Ansicht für deine KPIs. Klicke dazu auf Ansicht hinzufügen `2`, benenne die Ansicht und wähle aus, ob die Ansicht nur für dich oder für alle im Account sichtbar sein soll `3`.
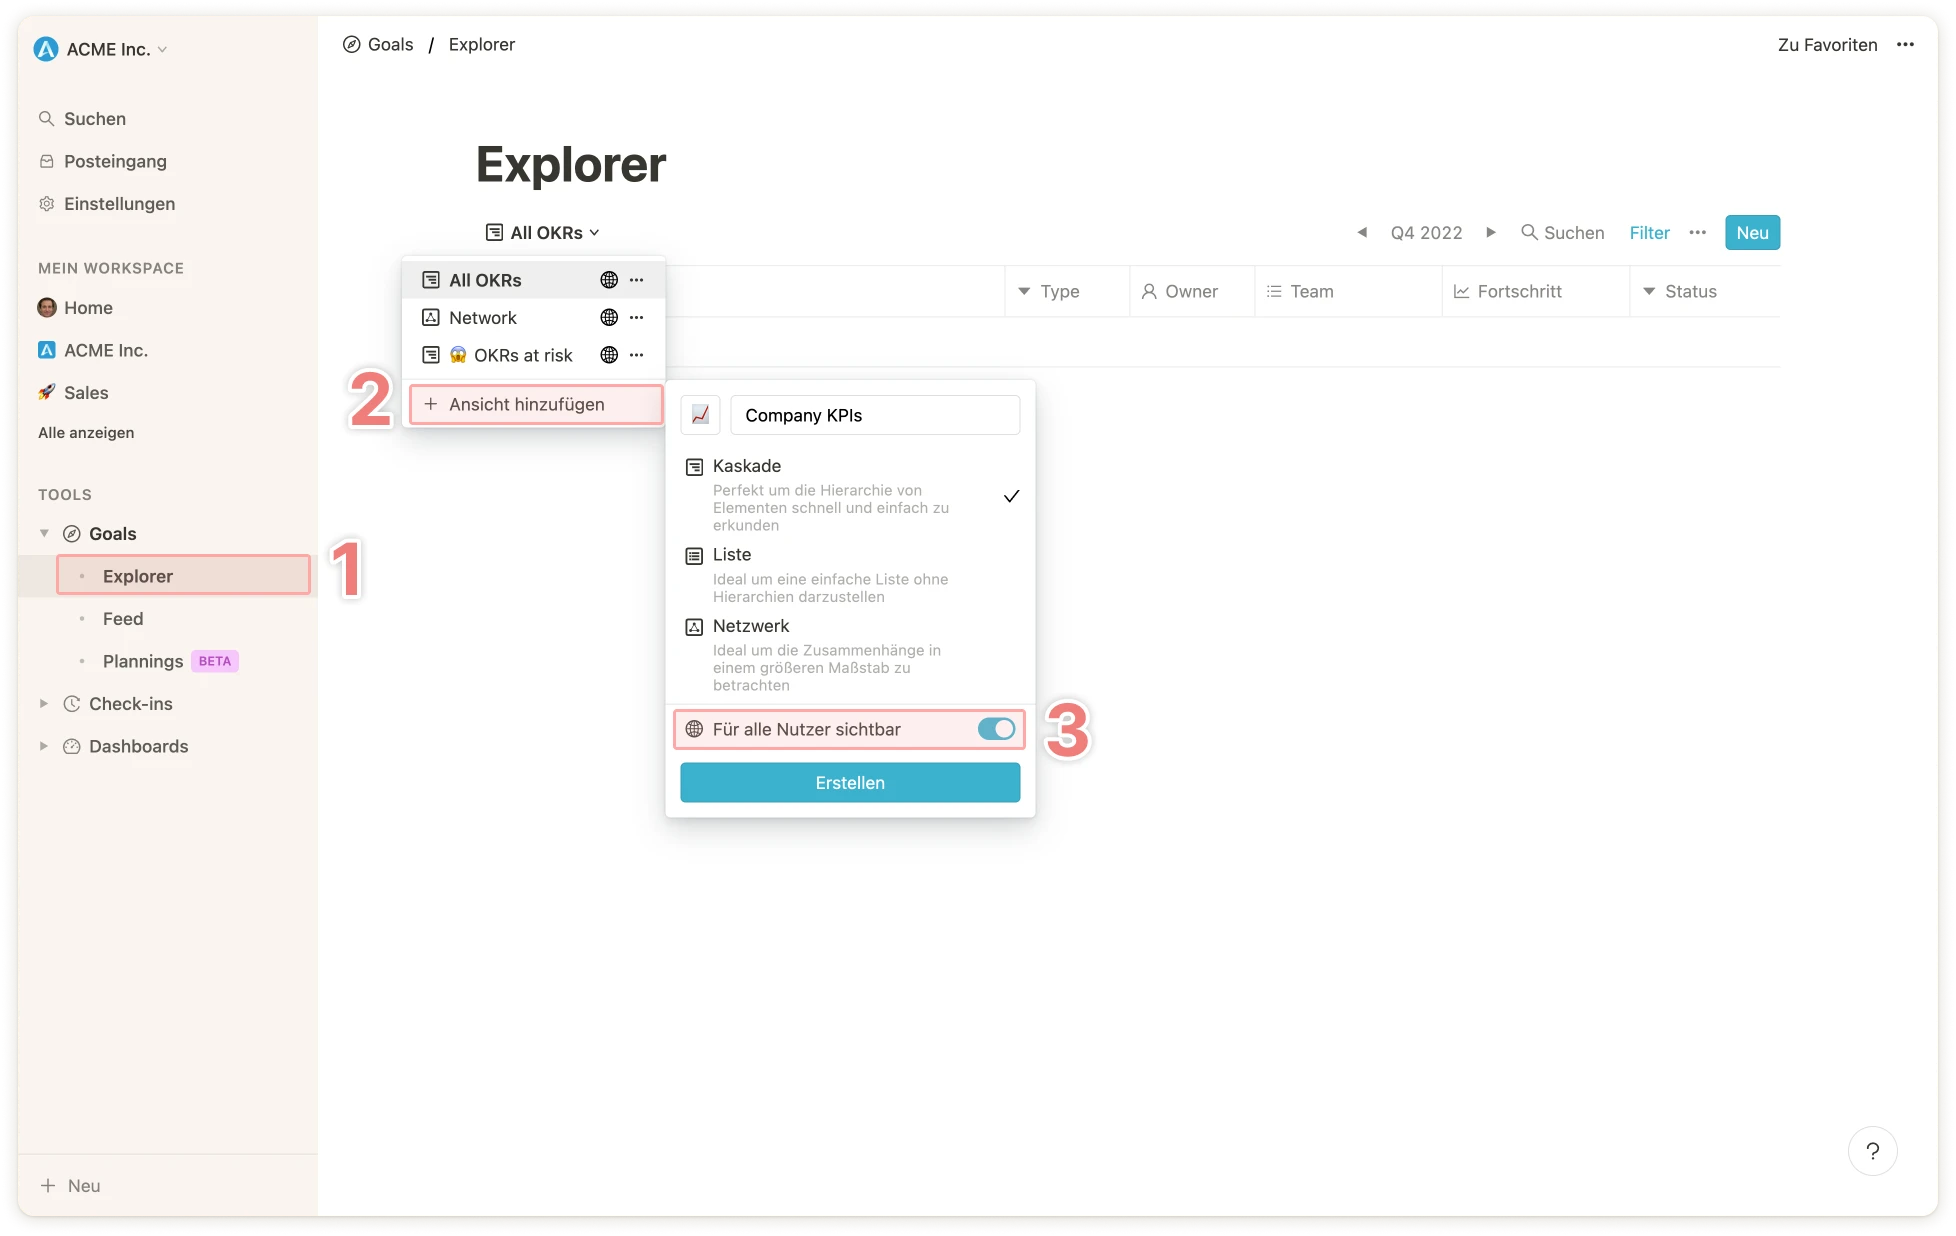 Filtere anschließend den Zieltyp nach `KPI`.
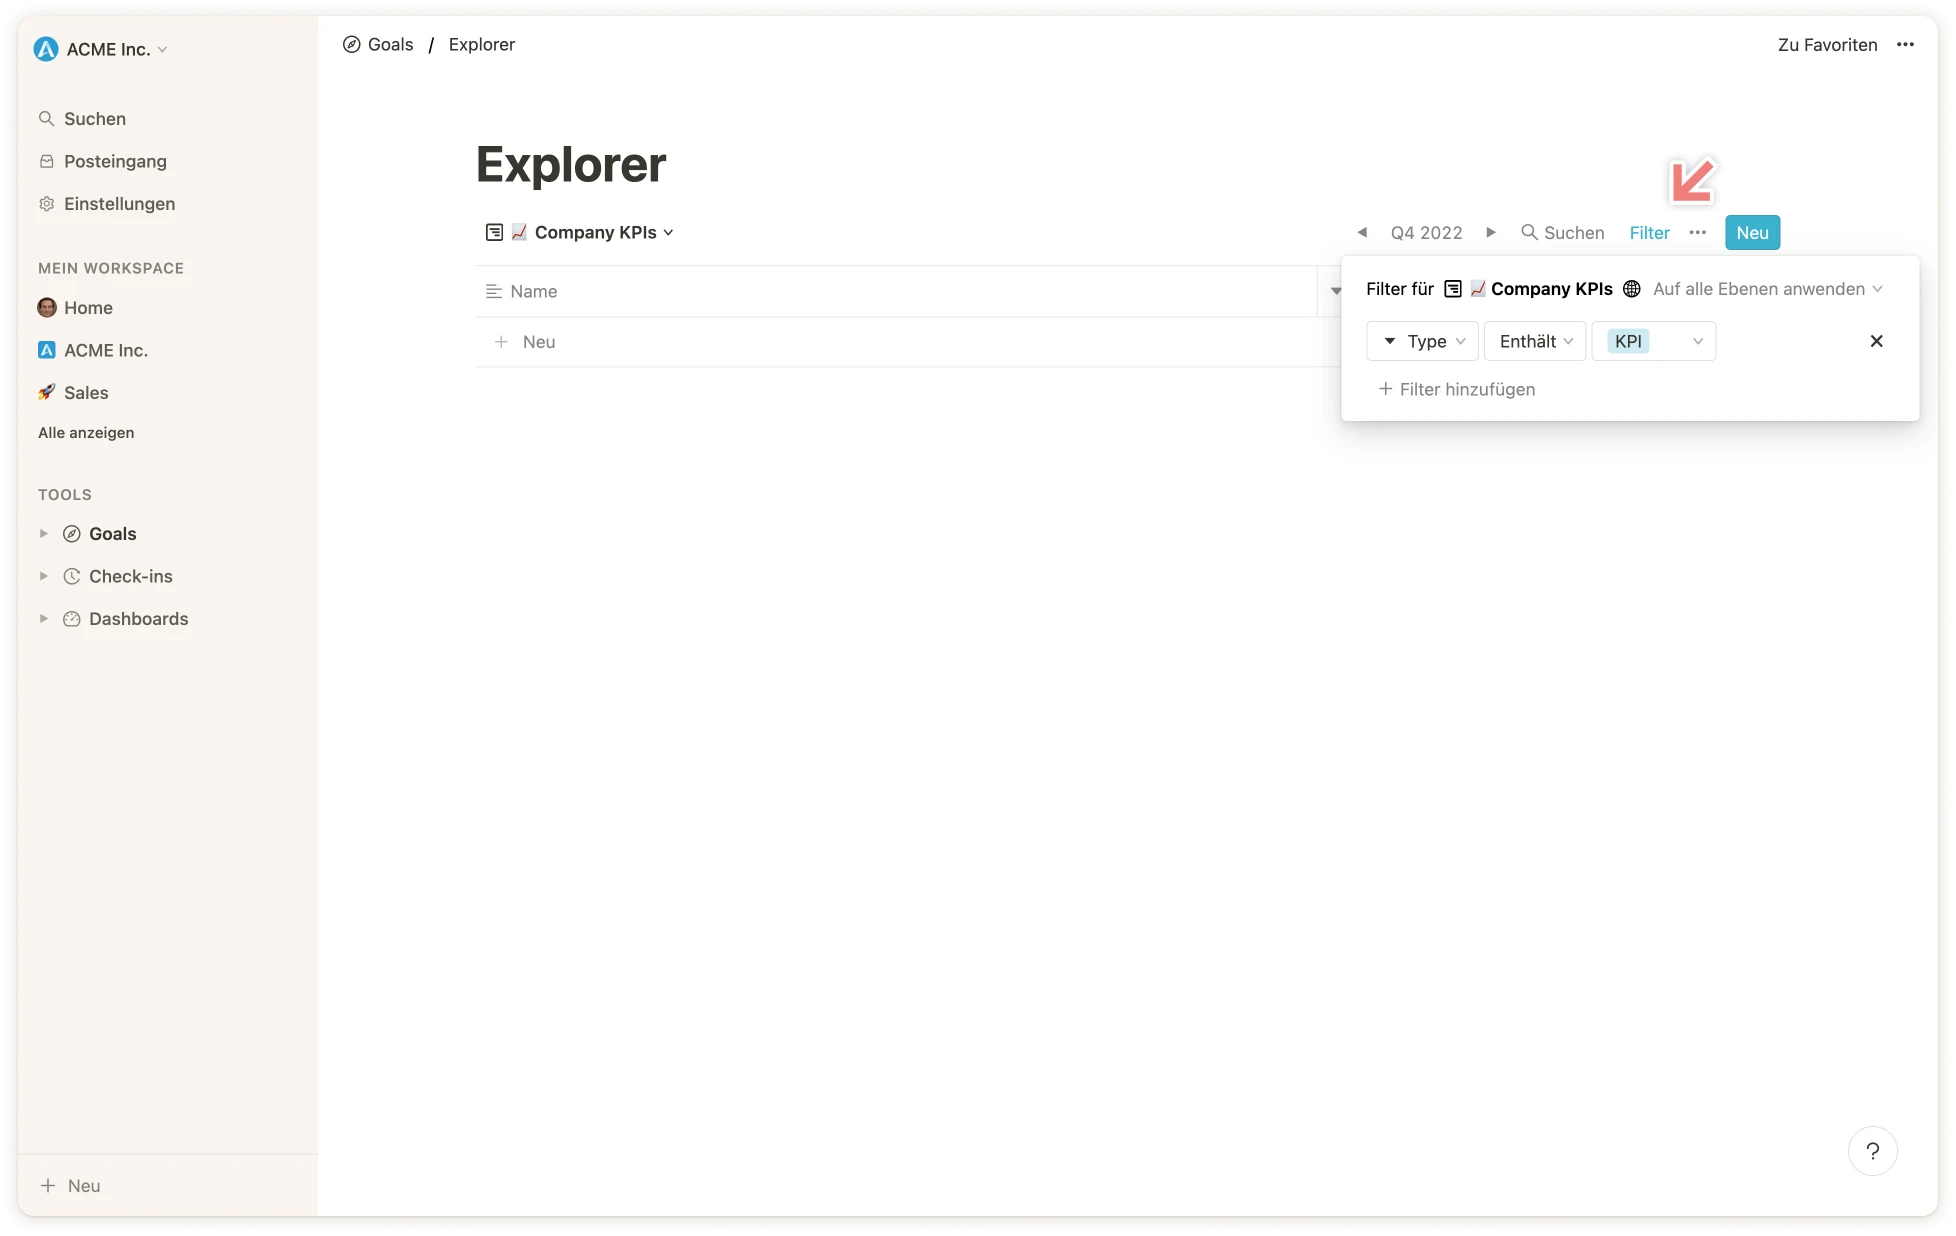 ### Schritt 3: Erstelle die KPIs
Klicke auf `Neu`, um einen neuen KPI zu erstellen. Für KPIs bietet es sich an, unter `Messart` die Option `Grenzwert` auszuwählen. Hier kann angegeben werden, ob der zugehörige KPI oberhalb oder unterhalb von einem bestimmten Wert liegen soll. Entsprechend verändert sich der Status des KPIs.
### Schritt 3: Erstelle die KPIs
Klicke auf `Neu`, um einen neuen KPI zu erstellen. Für KPIs bietet es sich an, unter `Messart` die Option `Grenzwert` auszuwählen. Hier kann angegeben werden, ob der zugehörige KPI oberhalb oder unterhalb von einem bestimmten Wert liegen soll. Entsprechend verändert sich der Status des KPIs.
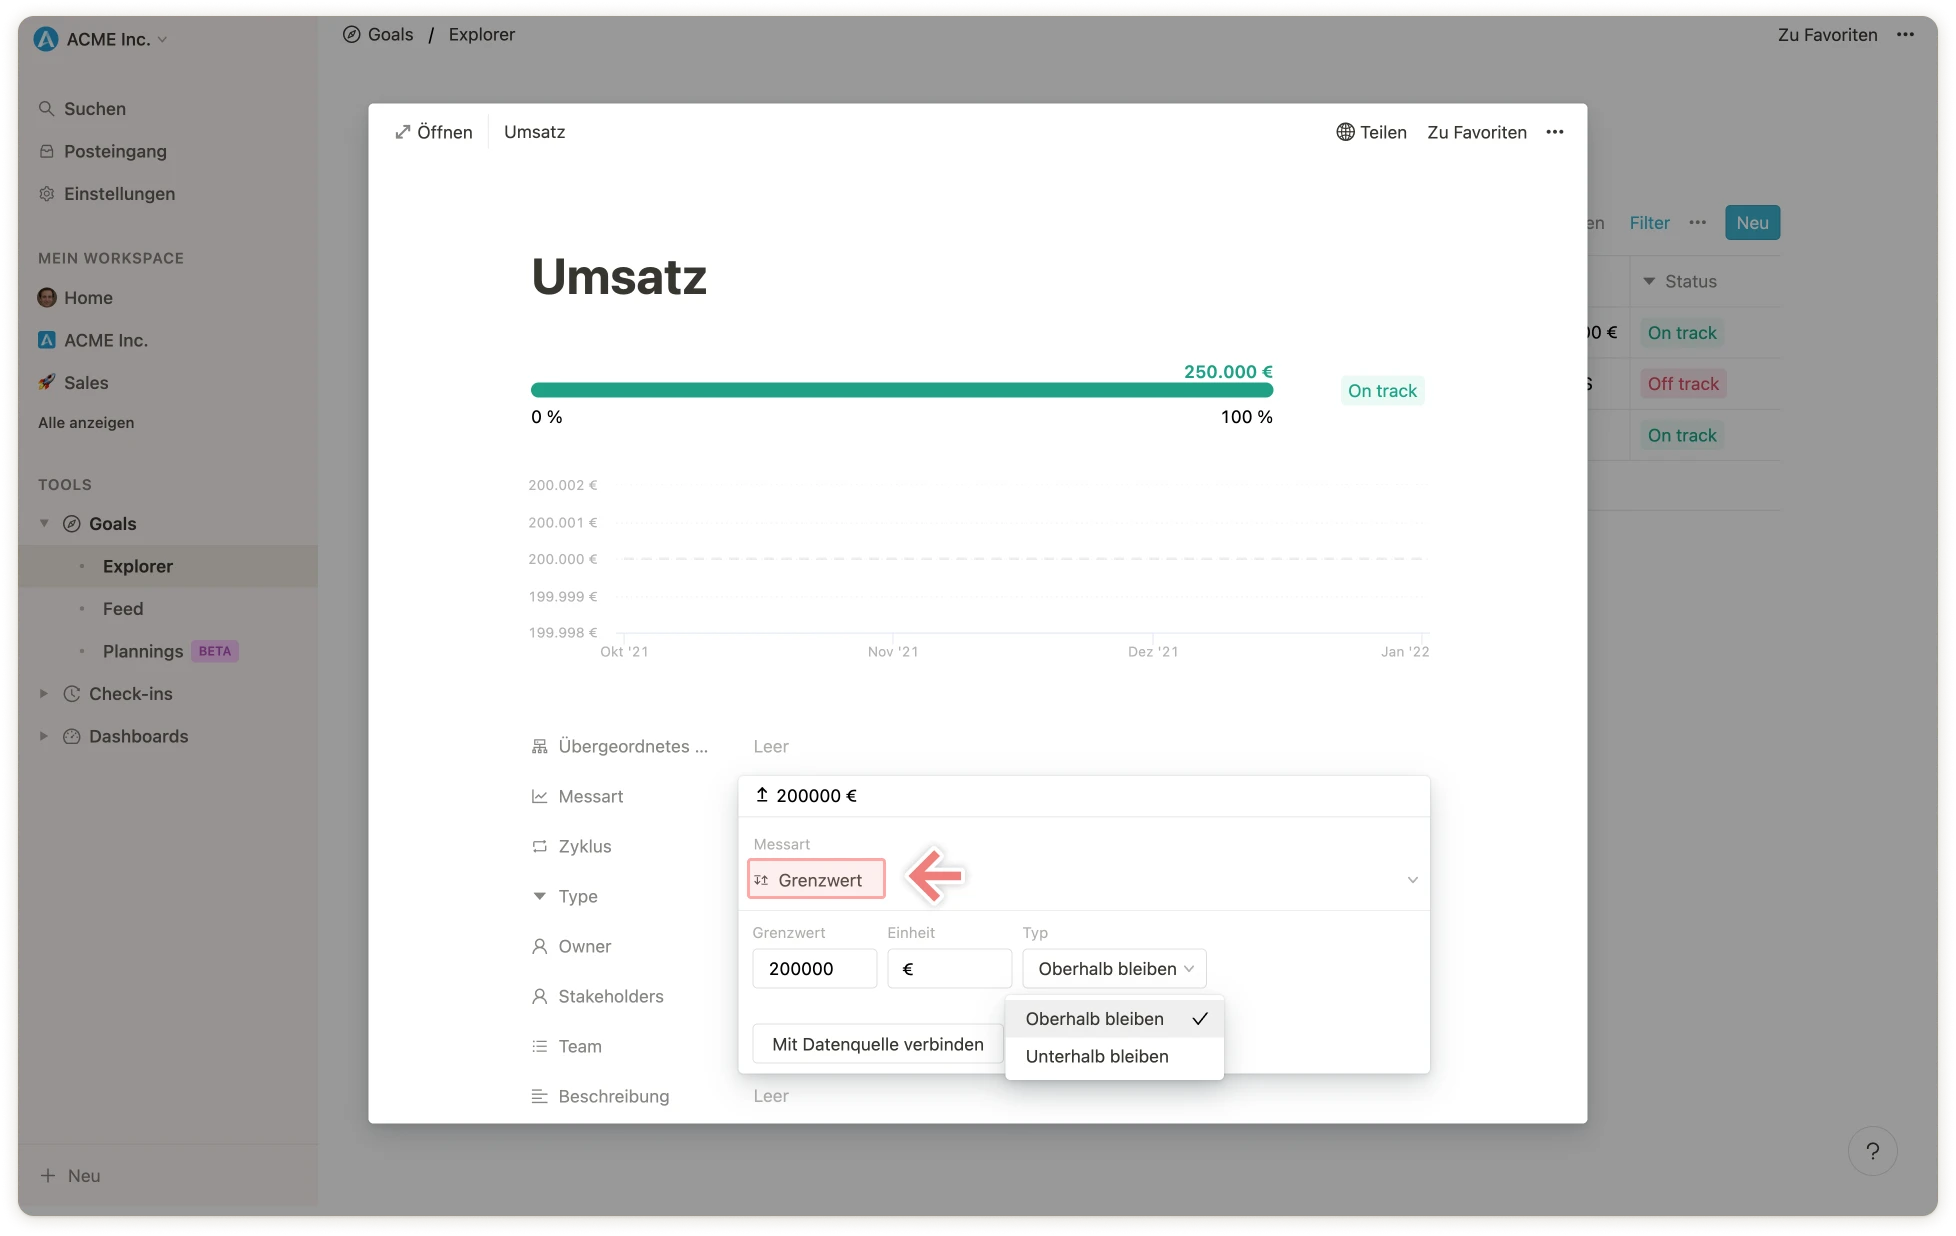
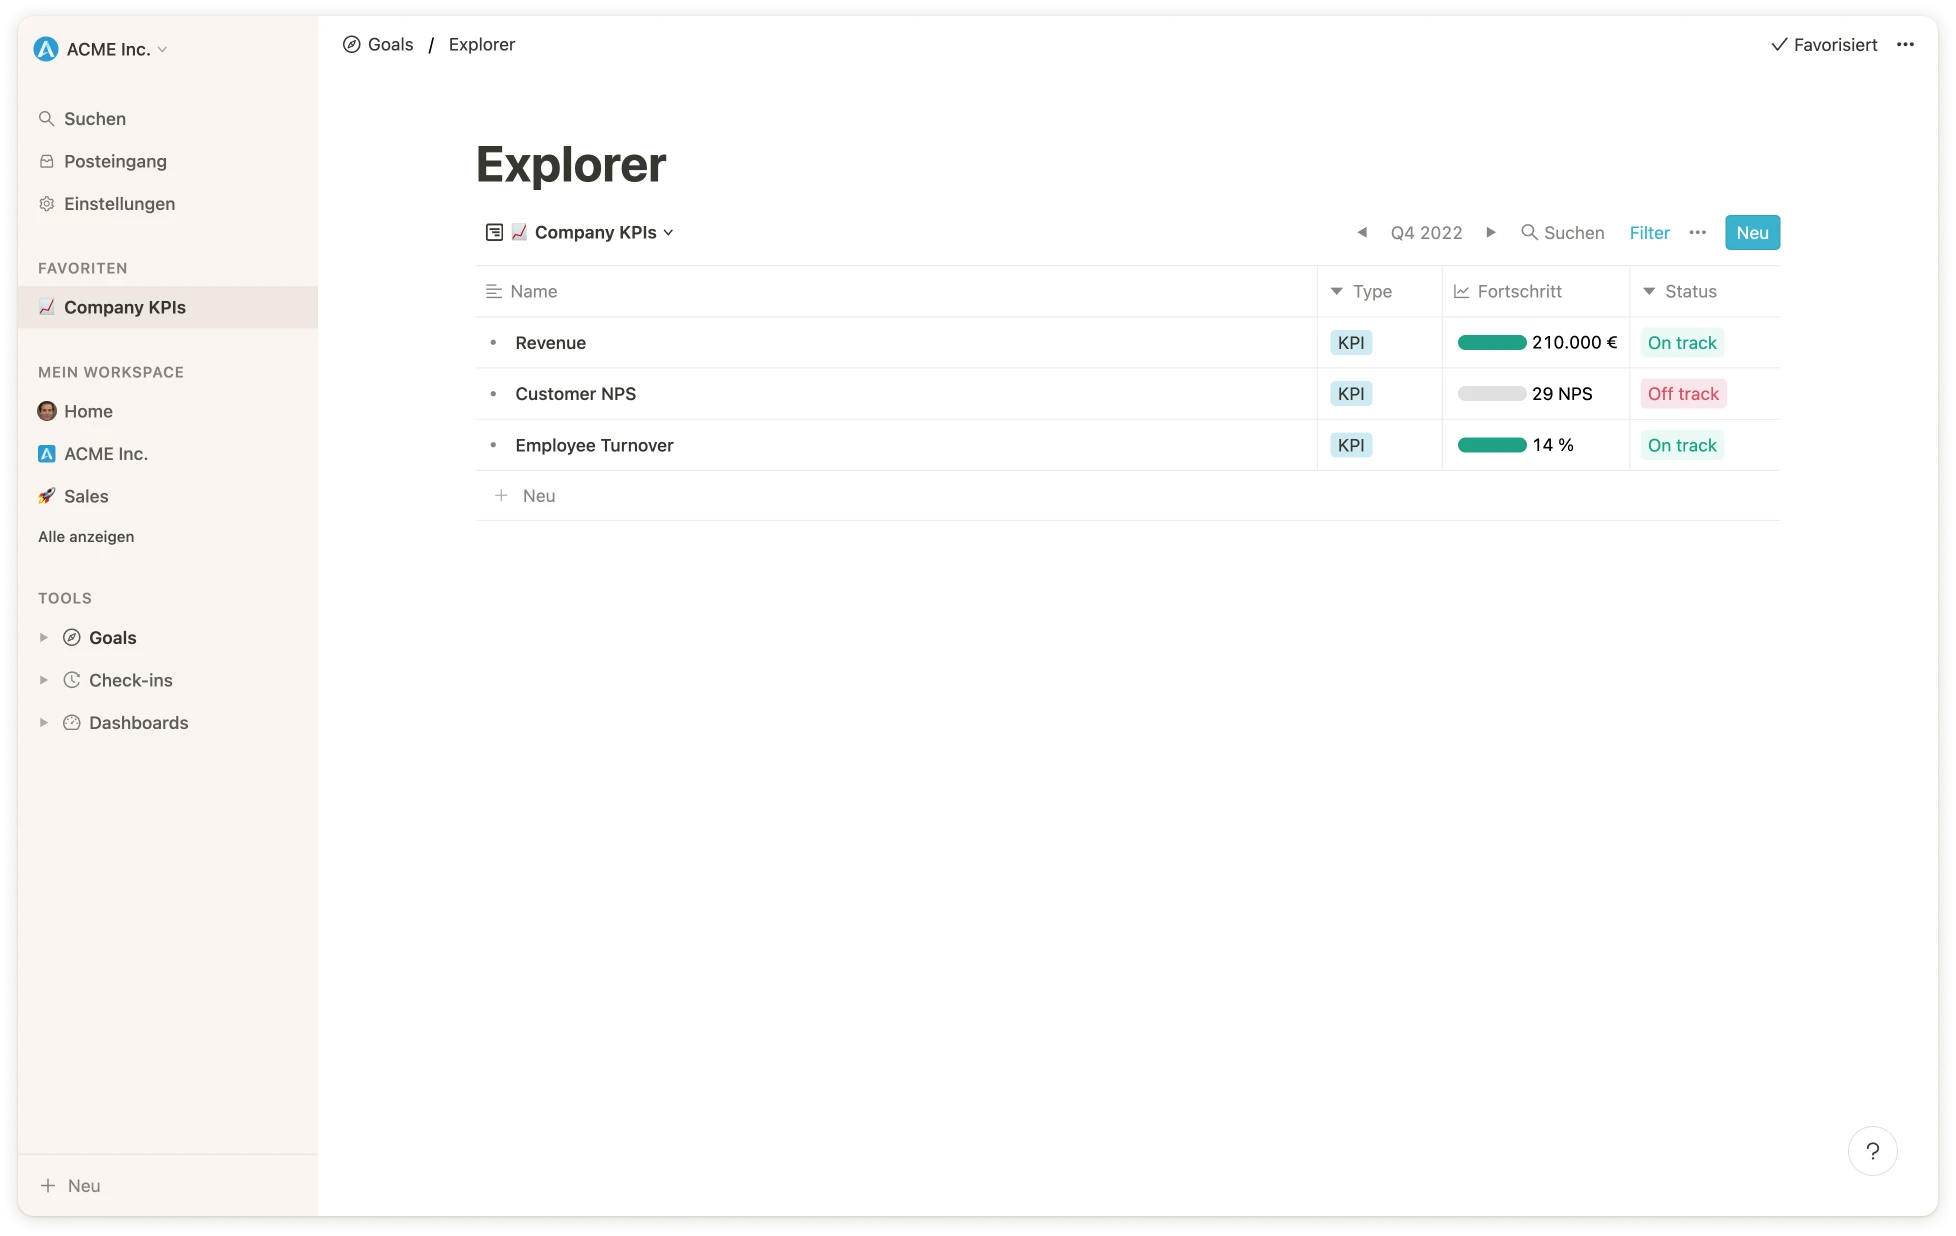 **Hinweis:** Falls nur die Metrik des KPIs und nicht der Status angezeigt werden soll, kann die Spalte für den Status in der Ansicht ausgeblendet werden.
### Schritt 4: Aktualisiere die KPIs
Im Anschluss können die KPIs entweder manuell oder per Integration aktualisiert werden.
**Manuelle Aktualisierung**
Genau wie bei anderen Zieltypen auch, können die KPIs über die Kaskadenansicht oder auf der Detailseite des Ziels aktualisiert werden. Mehr dazu findest du in diesem Helpcenter-Artikel:
[Fortschritt von Zielen aktualisieren](/de/how-to-update-a-goal)
**Automatische Aktualisierung per Integration**
Die KPIs können auch automatisch aktualisiert werden, indem diese mit anderen Services wie Excel, Jira oder Google Sheets verknüpft werden. Mehr dazu findest du in diesem Helpcenter-Artikel:
[Datenintegrationen mit Zielen und OKRs verknüpfen](/de/data-integrations)
**Hinweis:** Falls nur die Metrik des KPIs und nicht der Status angezeigt werden soll, kann die Spalte für den Status in der Ansicht ausgeblendet werden.
### Schritt 4: Aktualisiere die KPIs
Im Anschluss können die KPIs entweder manuell oder per Integration aktualisiert werden.
**Manuelle Aktualisierung**
Genau wie bei anderen Zieltypen auch, können die KPIs über die Kaskadenansicht oder auf der Detailseite des Ziels aktualisiert werden. Mehr dazu findest du in diesem Helpcenter-Artikel:
[Fortschritt von Zielen aktualisieren](/de/how-to-update-a-goal)
**Automatische Aktualisierung per Integration**
Die KPIs können auch automatisch aktualisiert werden, indem diese mit anderen Services wie Excel, Jira oder Google Sheets verknüpft werden. Mehr dazu findest du in diesem Helpcenter-Artikel:
[Datenintegrationen mit Zielen und OKRs verknüpfen](/de/data-integrations)
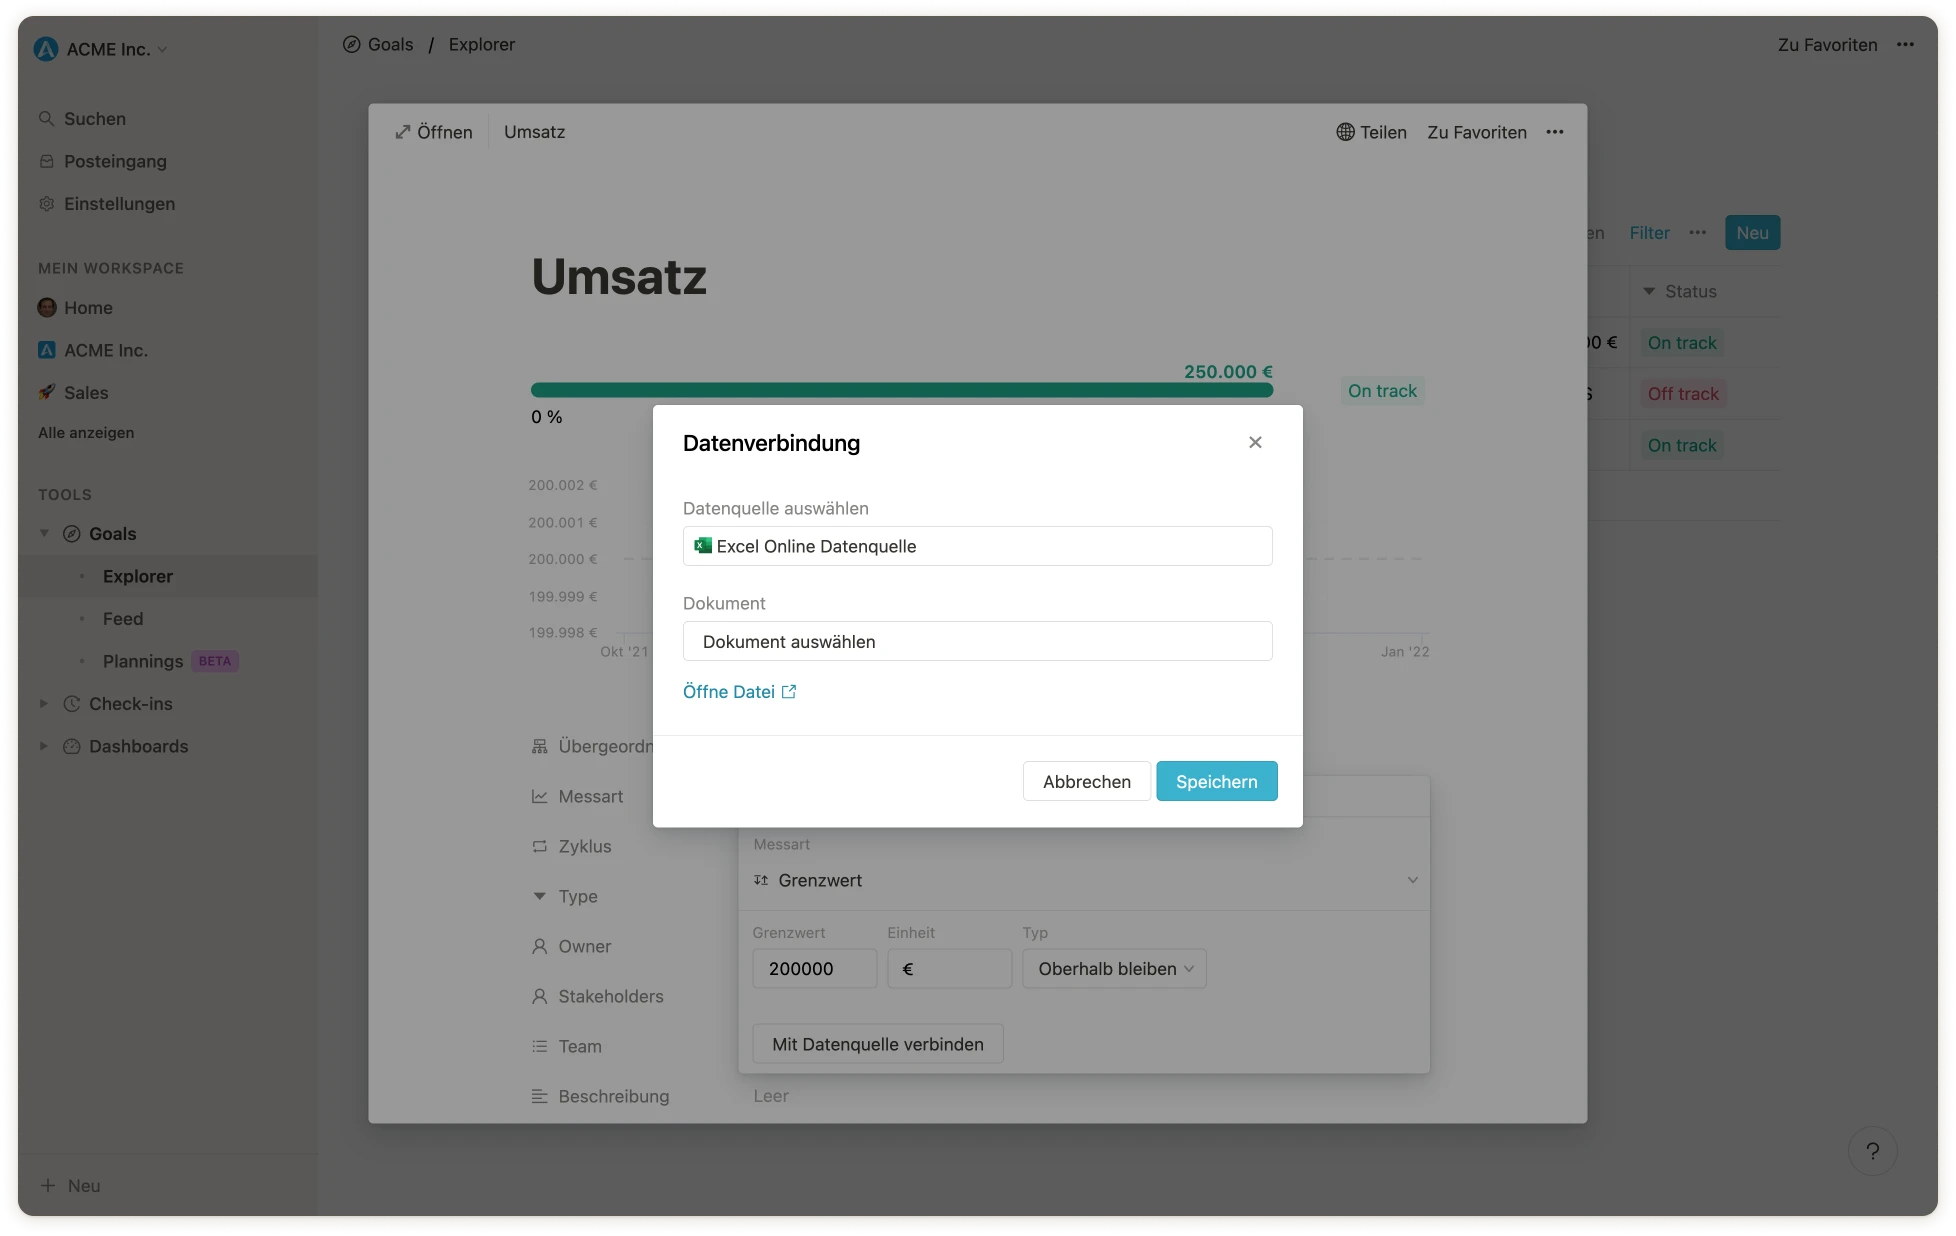
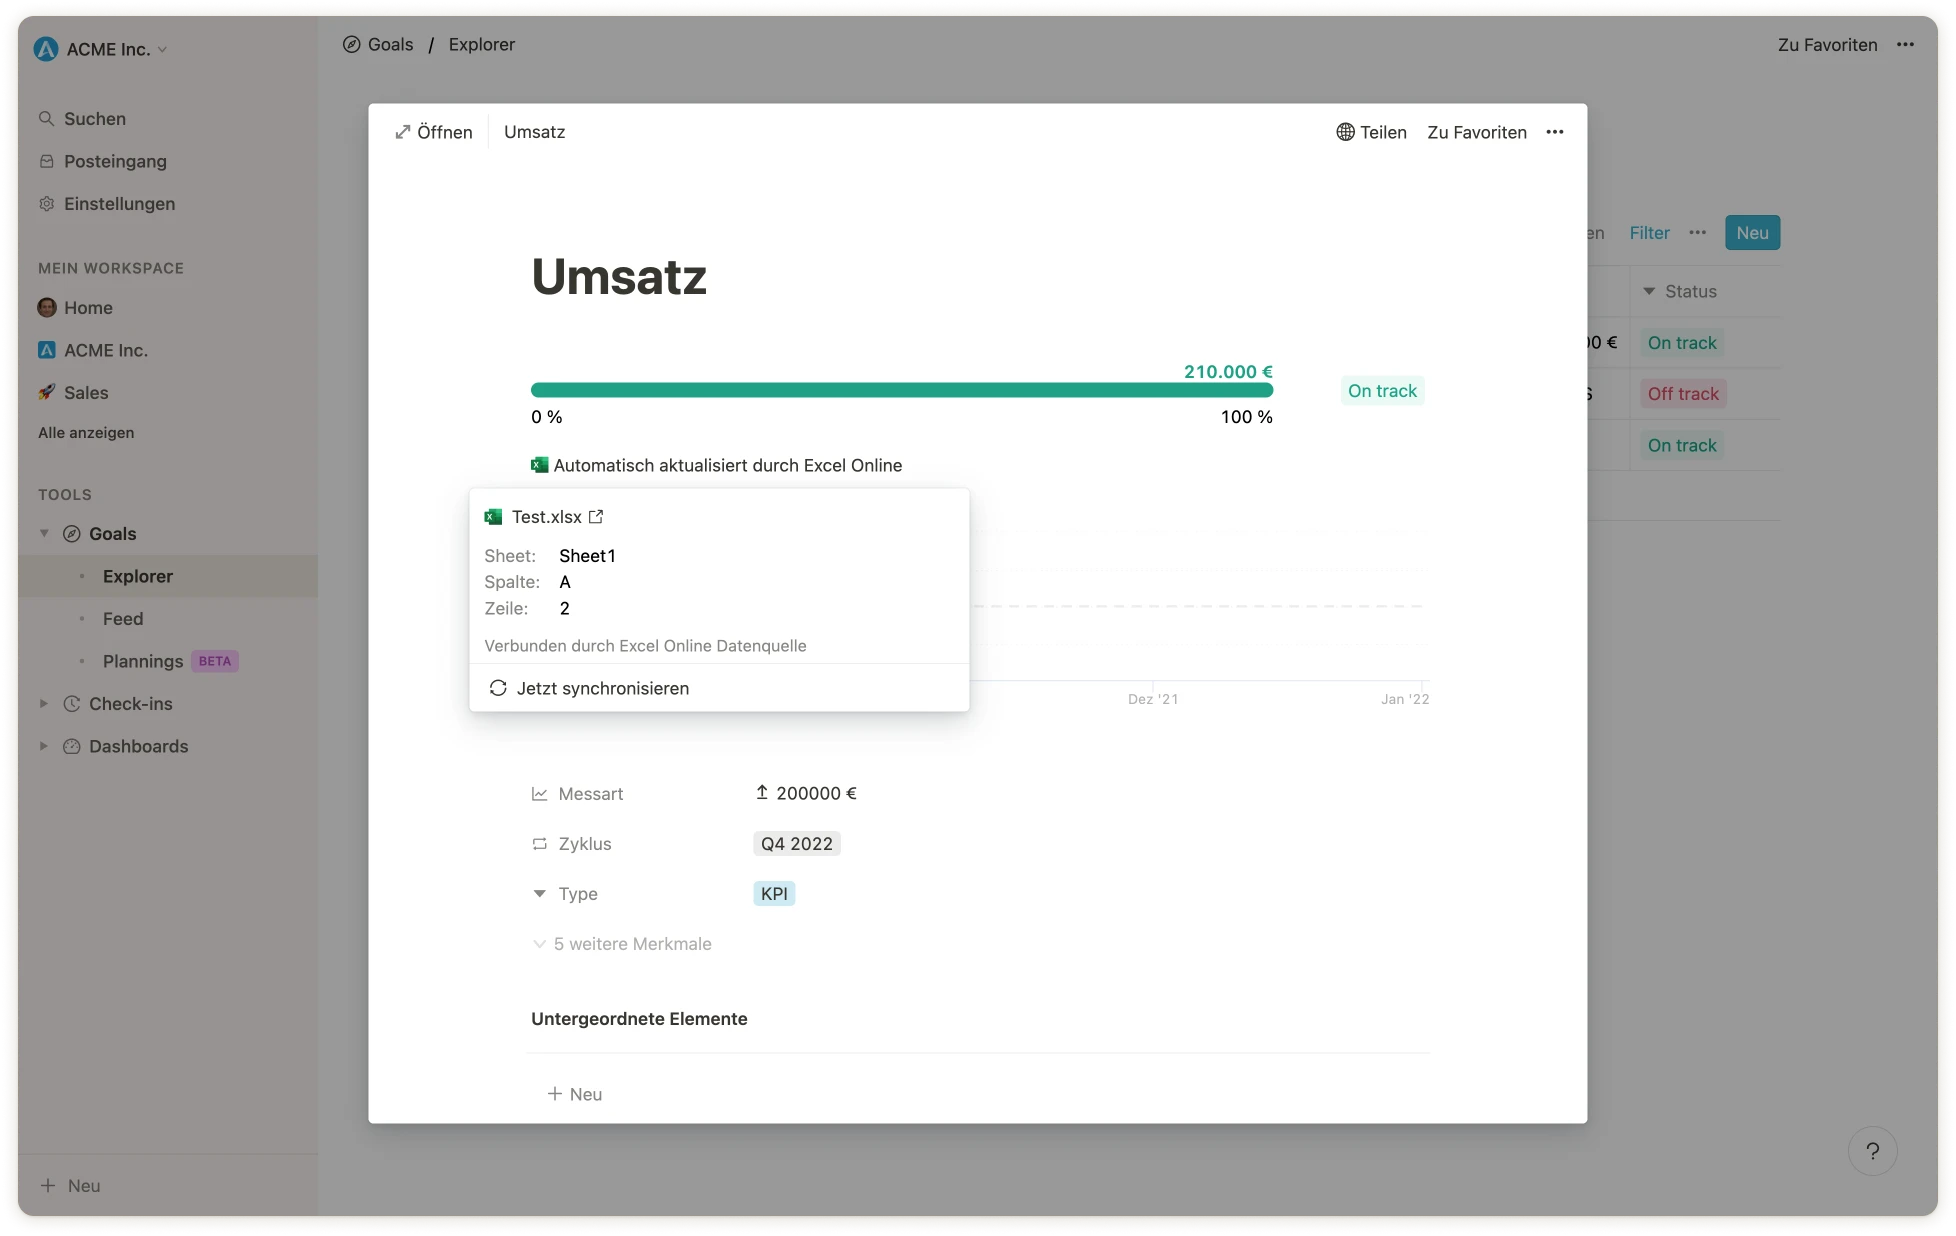 ### (Optional) **Schritt 5: Füge die Ansicht deinen Favoriten hinzu**
Um die wichtigsten KPIs schnell zugänglich zu haben, können diese als Favorit zur Seitenleiste hinzugefügt werden.
### (Optional) **Schritt 5: Füge die Ansicht deinen Favoriten hinzu**
Um die wichtigsten KPIs schnell zugänglich zu haben, können diese als Favorit zur Seitenleiste hinzugefügt werden.
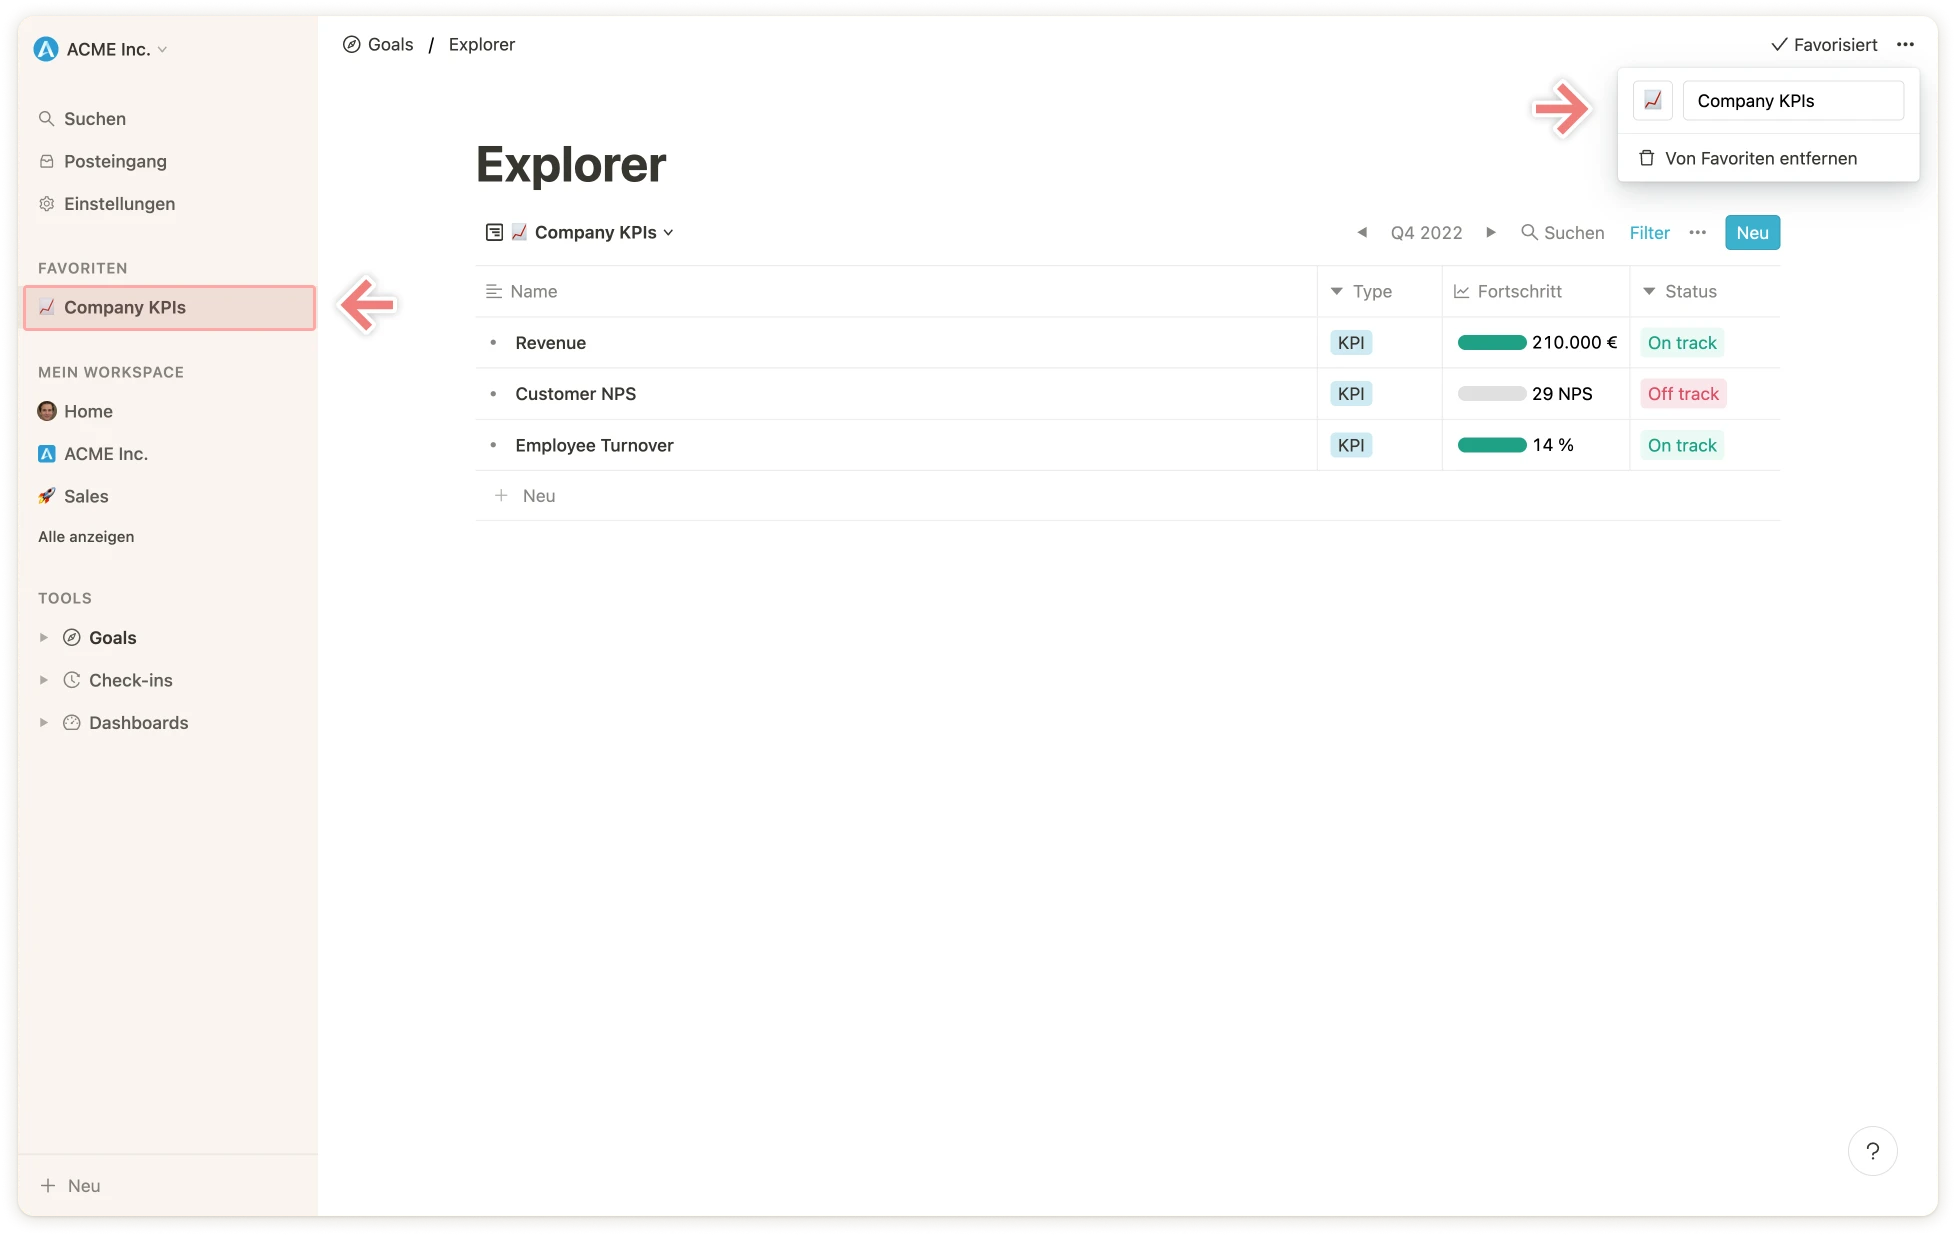 Selbstverständlich können mit der gleichen Vorgehensweise auch unterschiedliche Ansichten für bestimmte Nutzer:innen oder Teams erstellt werden. Als Beispiel würde man für `Marketing KPIs` entsprechend einen Filter für das Team Marketing setzen.
### (Optional) **Schritt 6: Exportiere deine KPIs**
Um die Daten einer Ansicht zu exportieren, navigiere zu der betreffenden Ansicht und klicke oben rechts auf die Ellipsis `...` und wähle `CSV exportieren` aus.
Selbstverständlich können mit der gleichen Vorgehensweise auch unterschiedliche Ansichten für bestimmte Nutzer:innen oder Teams erstellt werden. Als Beispiel würde man für `Marketing KPIs` entsprechend einen Filter für das Team Marketing setzen.
### (Optional) **Schritt 6: Exportiere deine KPIs**
Um die Daten einer Ansicht zu exportieren, navigiere zu der betreffenden Ansicht und klicke oben rechts auf die Ellipsis `...` und wähle `CSV exportieren` aus.
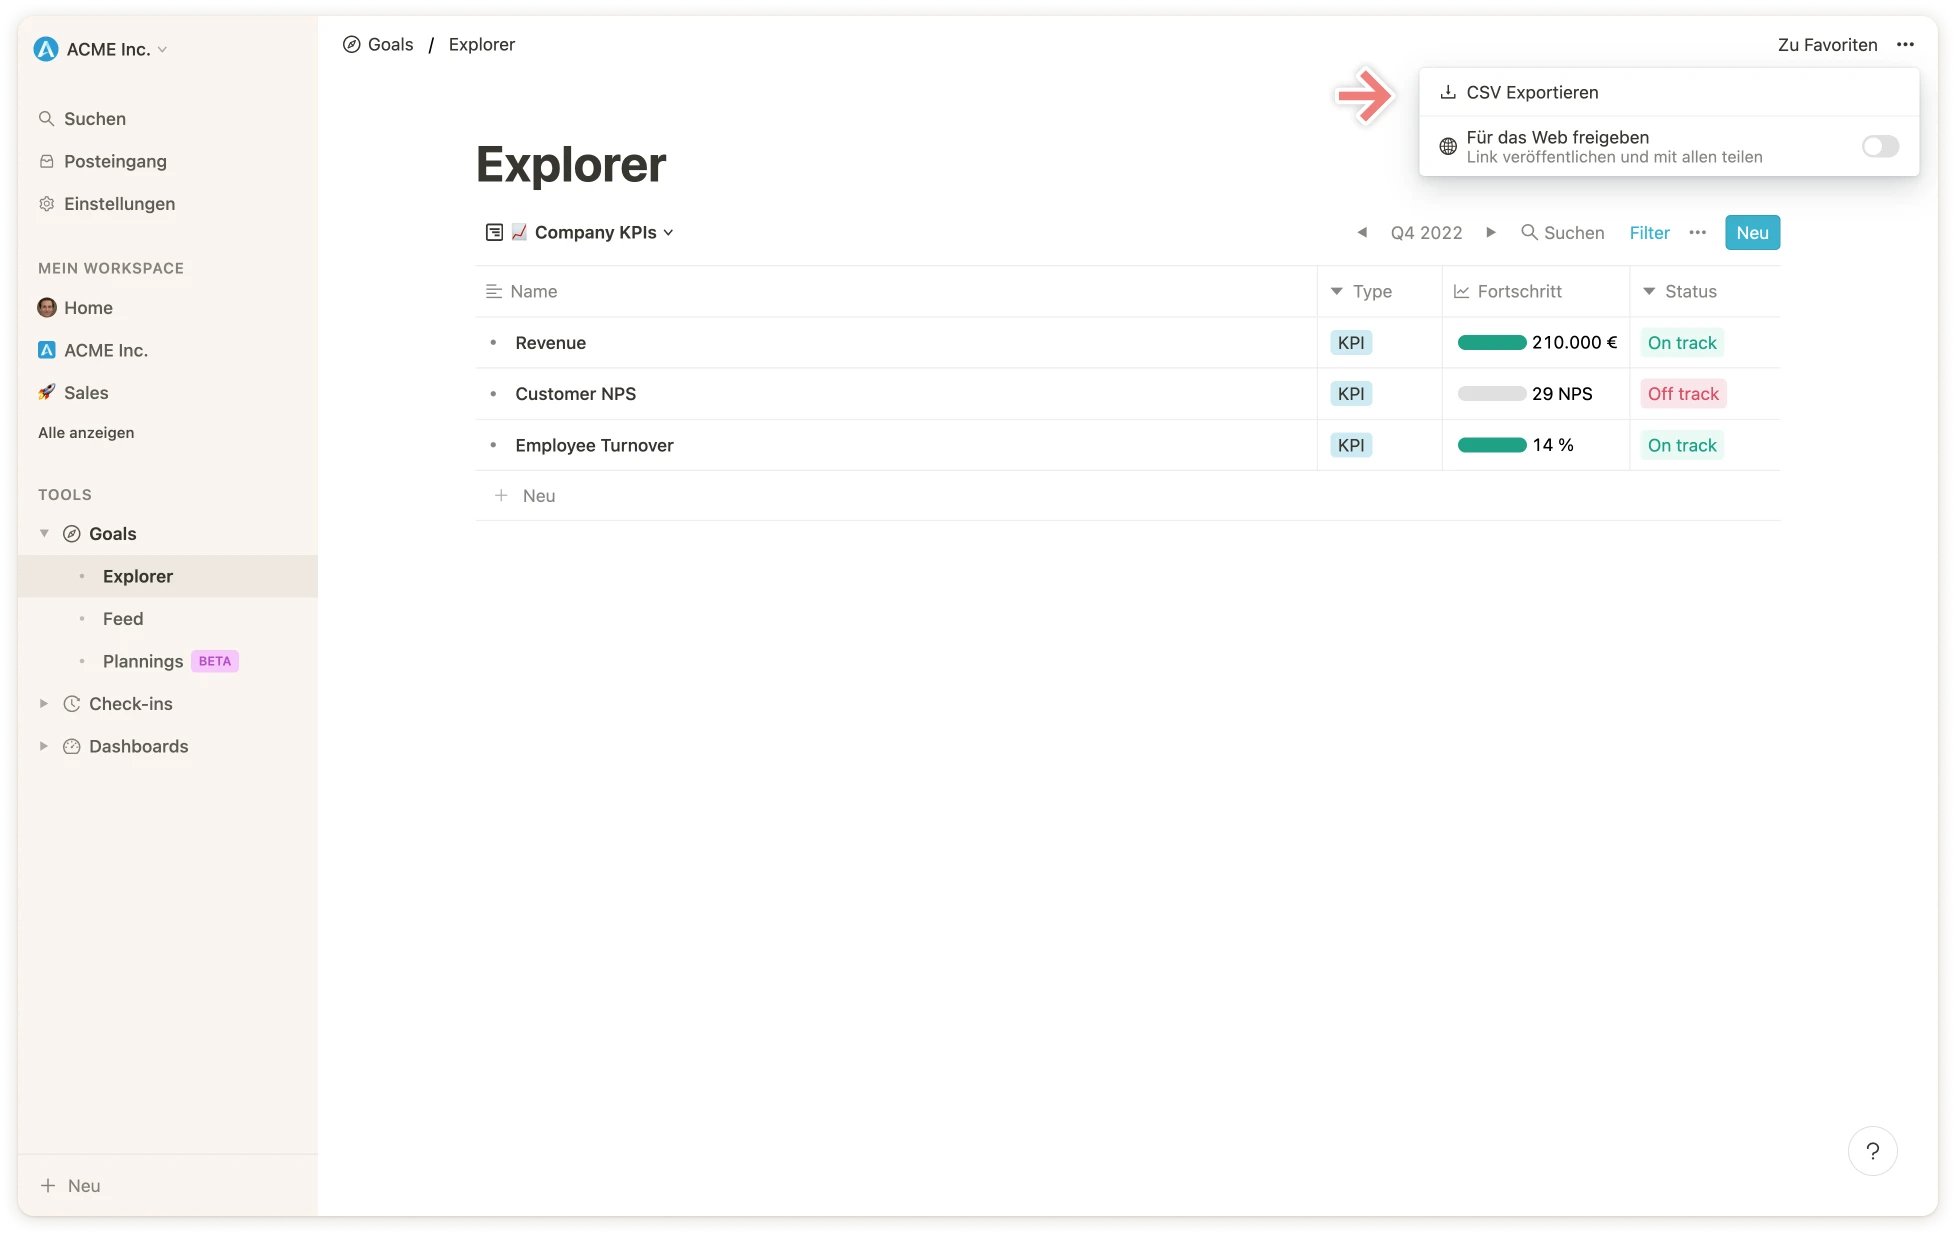 Die CSV-Datei wird im Anschluss heruntergeladen.
# Zyklen
Source: https://mooncamp.com/docs/de/cycles
Ein Überblick über Mooncamps flexible Zyklen
## Video-Tutorial
Falls du keine Lust zum Lesen hast, hier ist ein Video-Tutorial, das die Zyklen erklärt.
## Wie du Zyklen erstellst
Navigiere zunächst zu den Einstellungen, wo du unten einen Tab für `Zyklen` findest.
Sobald du dort bist, klickst du auf den `Neu`-Button, wie im Screenshot oben gezeigt. Dann gibst du einfach den Namen des Zyklus ein, wählst den Zeitraum und klickst auf `Speichern`.
## Zyklen Zielen zuordnen
Nachdem du deine Zyklen erstellt hast, kannst du deine Ziele diesen zuordnen. Dies geschieht normalerweise automatisch durch das System, wenn du ein Ziel erstellst. Hier ist ein Beispiel:
## Den Zyklus-Picker verwenden
Dies ist ein wichtiger Teil der Navigation in Mooncamp, da die Ziele, die du sehen kannst, auf dem ausgewählten Zyklus basieren. Den Zyklus-Picker findest du in der oberen rechten Ecke jeder Ansicht, wie im Screenshot unten gezeigt.
Falls du eine Übersicht über Ziele aus verschiedenen Zyklen erstellen möchtest, kannst du im Zyklus-Picker einfach mehrere Zyklen gleichzeitig auswählen. Um dann in dieser Ansicht zu unterscheiden, welches Ziel zu welchem Zyklus gehört, kannst du den Zyklus als Spalte in der Tabelle anzeigen lassen. Klicke dazu auf die drei Punkte `...` in der oberen rechten Ecke > `Eigenschaften` > `Zyklus` und aktiviere den Button.
**Bitte beachte:** Die **Einstellungen des Zyklus-Pickers wirken sich universell** in der gesamten App aus (für dein Benutzerkonto), d.h. sowohl in Zielansichten als auch in den Fortschritts- und Gesundheits-Dashboards.
Du kannst jedoch einen Zyklus innerhalb einer Ansicht sperren, um sicherzustellen, dass Benutzer genau die Daten sehen, die du ihnen in Zieltabellen oder Dashboards zeigen möchtest. Wenn kein Zyklus gesperrt ist, wird automatisch der aktuell ausgewählte Zyklus für jeden Benutzer angewendet.
💡 **Tipp:** Es kann vorkommen, dass **eines deiner Ziele aus deiner Ansicht verschwindet** oder du es nicht mehr finden kannst. Ein möglicher Grund kann sein, dass du entweder **dein Ziel nicht mit einem Zyklus gekennzeichnet** hast oder du **deinen Zyklus nicht im Zyklus-Picker** angegeben hast. Außerdem könnte dir die Suchfunktion oben in deiner Seitenleiste in diesem Fall helfen.
# Dashboards
Source: https://mooncamp.com/docs/de/dashboards
Ein Überblick über Dashboards für Ziele und OKR-Reporting.
Dashboards sind für Kunden im `Pro` und `Enterprise` Plan verfügbar. Das [Progress-Dashboard](/de/progress-dashboard) ist in allen Plänen frei verfügbar.
## Dashboards erklärt
Dashboards können frei konfiguriert werden und dienen der Visualisierung jeglicher Daten innerhalb von Mooncamp für das Reporting deiner Strategie, Ziele und darüber hinaus. Dashboards können öffentlich oder privat angezeigt und mit ausgewählten Zugangsgruppen geteilt werden. Daher sind sie besonders hilfreich für die Durchführung von Management- oder Abteilungsmeetings oder andere Anwendungsfälle, die Privatsphäre erfordern. Dies könnte zum Beispiel ein Unternehmens-Cockpit mit allgemeinen Informationen über das Unternehmen sein, ein Quarterly Business Review über die Erfolge, Herausforderungen und OKR-Fortschritte des Unternehmens, ein wöchentlicher Management-Report, eine Abteilungsübersicht oder ein persönliches Dashboard für einzelne Benutzer (weitere Details und Screenshots zu diesen Anwendungsfällen findest du weiter unten unter 'Beispiele für Dashboards').
## Wie du Dashboards nutzt
Im folgenden Video zeigen wir dir die wichtigsten Funktionen der Dashboards. Du lernst:
* Wie du Dashboards erstellst und anpasst, einschließlich verschiedener Arten von Metriken, Textfeldern, Aufzählungslisten und Bildern
* Wie du Elemente auf dem Dashboard per Drag & Drop in der Größe änderst und neu anordnest
* Wie du Filter innerhalb einer Liste anwendest und neue Inhalte wie Ziele und Metriken erstellst
Außerdem ist es möglich, einzelne Karten als Teile des Dashboards sowie ganze Dashboards zu duplizieren, um sie als Vorlage für weitere Teams, Abteilungen oder Meetings zu verwenden. Um ein **Dashboard zu duplizieren**, navigiere über `Tools > Dashboards` zur Übersicht, die eine Liste aller deiner Dashboards zeigt. Fahre mit der Maus über das Dashboard, das du duplizieren möchtest, und nutze den Rechtsklick dafür. Um eine **Karte zu duplizieren**, kannst du das Menü in der oberen rechten Ecke jeder Karte verwenden.
Natürlich kannst du auch individuelle Dashboards zu deiner Seitenleiste hinzufügen, um deine wichtigsten Daten immer mit einem Klick verfügbar zu haben.
Über die Ellipse `…` in der oberen rechten Ecke des Bildschirms kann ein Dashboard als **PDF-Datei** exportiert werden.
## Beispiele für Dashboards
Hier sind einige von vielen möglichen Anwendungsfällen:
* **Unternehmens-Cockpit:** Eine Zusammenfassung der Vision, Mission und Werte des Unternehmens sowie der wichtigsten KPIs und des gesamten OKR-Fortschritts.
* **Quarterly Business Review (QBR):** Eine detaillierte Analyse der vierteljährlichen Erfolge, des Wachstums, der Herausforderungen, strategischen Initiativen sowie der OKR-Highlights und -Lowlights.
* **Wöchentlicher Management-Report:** Ein Bericht, der die wichtigsten Erfolge, Herausforderungen und Schwerpunktbereiche der Woche hervorhebt und die kurzfristige Entscheidungsfindung und Planung unterstützt.
* **Abteilungsübersicht:** Ein umfassender Überblick über die Mission einer Abteilung, wichtige Metriken, Ziele, Teammitglieder und andere mögliche Berichte wie OKR-Bestenlisten.
* **Persönliches Dashboard:** Eine maßgeschneiderte Ansicht mit individuellen OKRs, deinen Check-ins, persönlichen Notizen, relevanten Dateien und Schnellzugriff auf die öffentlichen Profile deiner Teammitglieder.
## iframe-Einbettung
Die Datenintegration über iframe ermöglicht es dir, externe Inhalte direkt in deine individuellen Dashboards einzubetten. Es ist möglich, Live-Ansichten aus fast jedem Tool wie Power BI, Tableau, Miro, Excel, Google Sheets und Docs, Looker Studio, Powerpoint oder Google Slides und vielen mehr hinzuzufügen.
Du kannst iframe-Einbettungen verwenden, um Kontext hinzuzufügen und Echtzeit-Daten auf deinen Dashboards anzuzeigen. Auf diese Weise hast du alle deine wichtigsten Daten und Erkenntnisse an einem Ort, ohne zwischen Apps wechseln zu müssen.
### Wie du eine iframe-Einbettung einrichtest
Jeder Benutzer mit dem Recht, individuelle Dashboards zu erstellen, kann eine iframe-Einbettung mit diesen Schritten aktivieren:
1. Greife über deine Seitenleiste unter `Tools` auf den Dashboards-Bereich zu.
2. Öffne eines deiner Dashboards aus der Liste oder erstelle ein neues.
3. Klicke auf den `+Inhalt hinzufügen` Button und wähle die `<>` Einbetten-Option aus der Liste.
4. Füge deine URL der Originaldaten oder den Einbettungscode ein, um deinen gewünschten Inhalt einzubinden.
### Automatische Aktualisierungen
Sobald der iframe eingebettet ist, aktualisiert Mooncamp deine Daten automatisch basierend auf Änderungen im Ursprungstool.
# Datenintegrationen 101
Source: https://mooncamp.com/docs/de/data-integrations
Lerne, wie du deine Daten mit Zielen in Mooncamp verbindest
Du kannst Ziele mit verschiedenen Datenquellen/Diensten verbinden, um sie automatisch zu aktualisieren und dir manuelle Arbeit zu sparen.
**Info für Administratoren:** Bevor deine Mitarbeiter eine Datenintegration nutzen können, muss diese im Einstellungsbereich unter `Einstellungen > Integrationen > Datenintegrationen` aktiviert und der Schalter eingeschaltet werden. Wenn du auf `Verwalten` und dann auf `+ Hinzufügen` unter `Verbindungen` klickst, kannst du deine Datenverbindung einrichten.
Hier sind einige Beispiele für verfügbare Integrationen:
* Jira
* Google Sheets
* Microsoft Excel
* Asana
* Hubspot
* Salesforce
* MS Planner
* MS Power BI
* …
**Vermisst du eine bestimmte Integration?** Schreib uns einfach an [support@mooncamp.com](mailto:support@mooncamp.com)
* **Schritt 1:** Navigiere zu einem Ziel, dessen Fortschritt du über eine Datenintegration aktualisieren möchtest.
* **Schritt 2:** Wähle bei der Fortschrittseigenschaft des Ziels die Option `Start- und Zielwert` oder `Grenzwert`.
* **Schritt 3:** Klicke auf `Mit Datenquelle verbinden`.
* **Schritt 4:** Wähle eine bestehende Datenverbindung aus oder erstelle eine neue über `+ Hinzufügen` am Ende der Liste.
**Wichtiger Hinweis:** Wenn du **eine neue Datenverbindung hinzufügst**, wirst du aufgefordert, dich mit deinem Benutzerkonto bei der entsprechenden Datenquelle anzumelden. Anschließend öffnet sich ein Fenster, in dem du den Namen der Verbindung sowie die **Sichtbarkeit** bearbeiten kannst (siehe Screenshot unten). Wenn du *deine Verbindung mit allen Benutzern teilst*, **können alle Mitglieder deines Mooncamp-Kontos alle mit der Datenquelle verbundenen Dokumente sehen**, auch wenn diese Mitglieder keinen Zugriff auf das Dokument am ursprünglichen Speicherort haben.
* **Schritt 5:** Fülle alle erforderlichen datenquellenspezifischen Informationen aus und klicke auf `Speichern`.
**Fertig!** 🎉 Die Datenquelle ist jetzt mit dem Ziel verknüpft und wird entsprechend deiner Synchronisationseinstellungen synchronisiert (normalerweise einmal täglich, änderbar unter `Einstellungen > Integrationen > Datenintegrationen`). Du kannst den Fortschritt des Ziels auch jederzeit manuell synchronisieren, indem du auf den Integrationsindikator unter der Fortschrittsleiste klickst.
Nach der Einrichtung kannst du über ein verbundenes Ziel jederzeit zu deiner Datenverbindung zurückkehren und die zu synchronisierenden Daten über die Auslassungspunkte `...` bearbeiten. Hier kannst du auch den **Namen** sowie die **Sichtbarkeit** der Verbindung bearbeiten.
**Hinweis für Administratoren:** Es wird empfohlen, die Synchronisierung für deine Datenintegrationen auf einmal täglich einzustellen (die App aktualisiert den Fortschritt dann täglich um 5 Uhr MESZ). Die Einstellungen findest du unter `Einstellungen > Integrationen > Datenintegrationen`.
# How to Delete a Goal
Source: https://mooncamp.com/docs/de/deleting-goals
Different ways to delete goals
There are two ways to delete goals:
* Delete a goal from the Goals Cascade view
* Delete a goal from the detail view of a goal
## Delete a goal from the Goals Cascade View
You can right-click on a goal on the cascade view to delete it. If you want to delete several goals at once, you can click and hold and drag to select all the goals you want to delete, and then right-click again to bring up the menu to delete the goals.
## Delete a goal from the Detail View of a Goal
On the detail view of a goal you can click on the ellipsis icon in the upper right corner and delete the goal from there.
## Restoring goals from the trash
In case you have accidentally deleted one or several goals, you can easily get these back via the trash button on the sidebar. When you navigate to the trash bin, a modal opens and shows all recently deleted goals including a deletion date and time stamp. Next to each goal you find two buttons, one to restore the item, one to delete it permanently. Via the search bar you can also search for specific goals that might have been deleted longer ago. A goal can be restored or permanently deleted by every user who had edit access rights to the goal, irrespective of who has deleted it.
Die CSV-Datei wird im Anschluss heruntergeladen.
# Zyklen
Source: https://mooncamp.com/docs/de/cycles
Ein Überblick über Mooncamps flexible Zyklen
## Video-Tutorial
Falls du keine Lust zum Lesen hast, hier ist ein Video-Tutorial, das die Zyklen erklärt.
## Wie du Zyklen erstellst
Navigiere zunächst zu den Einstellungen, wo du unten einen Tab für `Zyklen` findest.
Sobald du dort bist, klickst du auf den `Neu`-Button, wie im Screenshot oben gezeigt. Dann gibst du einfach den Namen des Zyklus ein, wählst den Zeitraum und klickst auf `Speichern`.
## Zyklen Zielen zuordnen
Nachdem du deine Zyklen erstellt hast, kannst du deine Ziele diesen zuordnen. Dies geschieht normalerweise automatisch durch das System, wenn du ein Ziel erstellst. Hier ist ein Beispiel:
## Den Zyklus-Picker verwenden
Dies ist ein wichtiger Teil der Navigation in Mooncamp, da die Ziele, die du sehen kannst, auf dem ausgewählten Zyklus basieren. Den Zyklus-Picker findest du in der oberen rechten Ecke jeder Ansicht, wie im Screenshot unten gezeigt.
Falls du eine Übersicht über Ziele aus verschiedenen Zyklen erstellen möchtest, kannst du im Zyklus-Picker einfach mehrere Zyklen gleichzeitig auswählen. Um dann in dieser Ansicht zu unterscheiden, welches Ziel zu welchem Zyklus gehört, kannst du den Zyklus als Spalte in der Tabelle anzeigen lassen. Klicke dazu auf die drei Punkte `...` in der oberen rechten Ecke > `Eigenschaften` > `Zyklus` und aktiviere den Button.
**Bitte beachte:** Die **Einstellungen des Zyklus-Pickers wirken sich universell** in der gesamten App aus (für dein Benutzerkonto), d.h. sowohl in Zielansichten als auch in den Fortschritts- und Gesundheits-Dashboards.
Du kannst jedoch einen Zyklus innerhalb einer Ansicht sperren, um sicherzustellen, dass Benutzer genau die Daten sehen, die du ihnen in Zieltabellen oder Dashboards zeigen möchtest. Wenn kein Zyklus gesperrt ist, wird automatisch der aktuell ausgewählte Zyklus für jeden Benutzer angewendet.
💡 **Tipp:** Es kann vorkommen, dass **eines deiner Ziele aus deiner Ansicht verschwindet** oder du es nicht mehr finden kannst. Ein möglicher Grund kann sein, dass du entweder **dein Ziel nicht mit einem Zyklus gekennzeichnet** hast oder du **deinen Zyklus nicht im Zyklus-Picker** angegeben hast. Außerdem könnte dir die Suchfunktion oben in deiner Seitenleiste in diesem Fall helfen.
# Dashboards
Source: https://mooncamp.com/docs/de/dashboards
Ein Überblick über Dashboards für Ziele und OKR-Reporting.
Dashboards sind für Kunden im `Pro` und `Enterprise` Plan verfügbar. Das [Progress-Dashboard](/de/progress-dashboard) ist in allen Plänen frei verfügbar.
## Dashboards erklärt
Dashboards können frei konfiguriert werden und dienen der Visualisierung jeglicher Daten innerhalb von Mooncamp für das Reporting deiner Strategie, Ziele und darüber hinaus. Dashboards können öffentlich oder privat angezeigt und mit ausgewählten Zugangsgruppen geteilt werden. Daher sind sie besonders hilfreich für die Durchführung von Management- oder Abteilungsmeetings oder andere Anwendungsfälle, die Privatsphäre erfordern. Dies könnte zum Beispiel ein Unternehmens-Cockpit mit allgemeinen Informationen über das Unternehmen sein, ein Quarterly Business Review über die Erfolge, Herausforderungen und OKR-Fortschritte des Unternehmens, ein wöchentlicher Management-Report, eine Abteilungsübersicht oder ein persönliches Dashboard für einzelne Benutzer (weitere Details und Screenshots zu diesen Anwendungsfällen findest du weiter unten unter 'Beispiele für Dashboards').
## Wie du Dashboards nutzt
Im folgenden Video zeigen wir dir die wichtigsten Funktionen der Dashboards. Du lernst:
* Wie du Dashboards erstellst und anpasst, einschließlich verschiedener Arten von Metriken, Textfeldern, Aufzählungslisten und Bildern
* Wie du Elemente auf dem Dashboard per Drag & Drop in der Größe änderst und neu anordnest
* Wie du Filter innerhalb einer Liste anwendest und neue Inhalte wie Ziele und Metriken erstellst
Außerdem ist es möglich, einzelne Karten als Teile des Dashboards sowie ganze Dashboards zu duplizieren, um sie als Vorlage für weitere Teams, Abteilungen oder Meetings zu verwenden. Um ein **Dashboard zu duplizieren**, navigiere über `Tools > Dashboards` zur Übersicht, die eine Liste aller deiner Dashboards zeigt. Fahre mit der Maus über das Dashboard, das du duplizieren möchtest, und nutze den Rechtsklick dafür. Um eine **Karte zu duplizieren**, kannst du das Menü in der oberen rechten Ecke jeder Karte verwenden.
Natürlich kannst du auch individuelle Dashboards zu deiner Seitenleiste hinzufügen, um deine wichtigsten Daten immer mit einem Klick verfügbar zu haben.
Über die Ellipse `…` in der oberen rechten Ecke des Bildschirms kann ein Dashboard als **PDF-Datei** exportiert werden.
## Beispiele für Dashboards
Hier sind einige von vielen möglichen Anwendungsfällen:
* **Unternehmens-Cockpit:** Eine Zusammenfassung der Vision, Mission und Werte des Unternehmens sowie der wichtigsten KPIs und des gesamten OKR-Fortschritts.
* **Quarterly Business Review (QBR):** Eine detaillierte Analyse der vierteljährlichen Erfolge, des Wachstums, der Herausforderungen, strategischen Initiativen sowie der OKR-Highlights und -Lowlights.
* **Wöchentlicher Management-Report:** Ein Bericht, der die wichtigsten Erfolge, Herausforderungen und Schwerpunktbereiche der Woche hervorhebt und die kurzfristige Entscheidungsfindung und Planung unterstützt.
* **Abteilungsübersicht:** Ein umfassender Überblick über die Mission einer Abteilung, wichtige Metriken, Ziele, Teammitglieder und andere mögliche Berichte wie OKR-Bestenlisten.
* **Persönliches Dashboard:** Eine maßgeschneiderte Ansicht mit individuellen OKRs, deinen Check-ins, persönlichen Notizen, relevanten Dateien und Schnellzugriff auf die öffentlichen Profile deiner Teammitglieder.
## iframe-Einbettung
Die Datenintegration über iframe ermöglicht es dir, externe Inhalte direkt in deine individuellen Dashboards einzubetten. Es ist möglich, Live-Ansichten aus fast jedem Tool wie Power BI, Tableau, Miro, Excel, Google Sheets und Docs, Looker Studio, Powerpoint oder Google Slides und vielen mehr hinzuzufügen.
Du kannst iframe-Einbettungen verwenden, um Kontext hinzuzufügen und Echtzeit-Daten auf deinen Dashboards anzuzeigen. Auf diese Weise hast du alle deine wichtigsten Daten und Erkenntnisse an einem Ort, ohne zwischen Apps wechseln zu müssen.
### Wie du eine iframe-Einbettung einrichtest
Jeder Benutzer mit dem Recht, individuelle Dashboards zu erstellen, kann eine iframe-Einbettung mit diesen Schritten aktivieren:
1. Greife über deine Seitenleiste unter `Tools` auf den Dashboards-Bereich zu.
2. Öffne eines deiner Dashboards aus der Liste oder erstelle ein neues.
3. Klicke auf den `+Inhalt hinzufügen` Button und wähle die `<>` Einbetten-Option aus der Liste.
4. Füge deine URL der Originaldaten oder den Einbettungscode ein, um deinen gewünschten Inhalt einzubinden.
### Automatische Aktualisierungen
Sobald der iframe eingebettet ist, aktualisiert Mooncamp deine Daten automatisch basierend auf Änderungen im Ursprungstool.
# Datenintegrationen 101
Source: https://mooncamp.com/docs/de/data-integrations
Lerne, wie du deine Daten mit Zielen in Mooncamp verbindest
Du kannst Ziele mit verschiedenen Datenquellen/Diensten verbinden, um sie automatisch zu aktualisieren und dir manuelle Arbeit zu sparen.
**Info für Administratoren:** Bevor deine Mitarbeiter eine Datenintegration nutzen können, muss diese im Einstellungsbereich unter `Einstellungen > Integrationen > Datenintegrationen` aktiviert und der Schalter eingeschaltet werden. Wenn du auf `Verwalten` und dann auf `+ Hinzufügen` unter `Verbindungen` klickst, kannst du deine Datenverbindung einrichten.
Hier sind einige Beispiele für verfügbare Integrationen:
* Jira
* Google Sheets
* Microsoft Excel
* Asana
* Hubspot
* Salesforce
* MS Planner
* MS Power BI
* …
**Vermisst du eine bestimmte Integration?** Schreib uns einfach an [support@mooncamp.com](mailto:support@mooncamp.com)
* **Schritt 1:** Navigiere zu einem Ziel, dessen Fortschritt du über eine Datenintegration aktualisieren möchtest.
* **Schritt 2:** Wähle bei der Fortschrittseigenschaft des Ziels die Option `Start- und Zielwert` oder `Grenzwert`.
* **Schritt 3:** Klicke auf `Mit Datenquelle verbinden`.
* **Schritt 4:** Wähle eine bestehende Datenverbindung aus oder erstelle eine neue über `+ Hinzufügen` am Ende der Liste.
**Wichtiger Hinweis:** Wenn du **eine neue Datenverbindung hinzufügst**, wirst du aufgefordert, dich mit deinem Benutzerkonto bei der entsprechenden Datenquelle anzumelden. Anschließend öffnet sich ein Fenster, in dem du den Namen der Verbindung sowie die **Sichtbarkeit** bearbeiten kannst (siehe Screenshot unten). Wenn du *deine Verbindung mit allen Benutzern teilst*, **können alle Mitglieder deines Mooncamp-Kontos alle mit der Datenquelle verbundenen Dokumente sehen**, auch wenn diese Mitglieder keinen Zugriff auf das Dokument am ursprünglichen Speicherort haben.
* **Schritt 5:** Fülle alle erforderlichen datenquellenspezifischen Informationen aus und klicke auf `Speichern`.
**Fertig!** 🎉 Die Datenquelle ist jetzt mit dem Ziel verknüpft und wird entsprechend deiner Synchronisationseinstellungen synchronisiert (normalerweise einmal täglich, änderbar unter `Einstellungen > Integrationen > Datenintegrationen`). Du kannst den Fortschritt des Ziels auch jederzeit manuell synchronisieren, indem du auf den Integrationsindikator unter der Fortschrittsleiste klickst.
Nach der Einrichtung kannst du über ein verbundenes Ziel jederzeit zu deiner Datenverbindung zurückkehren und die zu synchronisierenden Daten über die Auslassungspunkte `...` bearbeiten. Hier kannst du auch den **Namen** sowie die **Sichtbarkeit** der Verbindung bearbeiten.
**Hinweis für Administratoren:** Es wird empfohlen, die Synchronisierung für deine Datenintegrationen auf einmal täglich einzustellen (die App aktualisiert den Fortschritt dann täglich um 5 Uhr MESZ). Die Einstellungen findest du unter `Einstellungen > Integrationen > Datenintegrationen`.
# How to Delete a Goal
Source: https://mooncamp.com/docs/de/deleting-goals
Different ways to delete goals
There are two ways to delete goals:
* Delete a goal from the Goals Cascade view
* Delete a goal from the detail view of a goal
## Delete a goal from the Goals Cascade View
You can right-click on a goal on the cascade view to delete it. If you want to delete several goals at once, you can click and hold and drag to select all the goals you want to delete, and then right-click again to bring up the menu to delete the goals.
## Delete a goal from the Detail View of a Goal
On the detail view of a goal you can click on the ellipsis icon in the upper right corner and delete the goal from there.
## Restoring goals from the trash
In case you have accidentally deleted one or several goals, you can easily get these back via the trash button on the sidebar. When you navigate to the trash bin, a modal opens and shows all recently deleted goals including a deletion date and time stamp. Next to each goal you find two buttons, one to restore the item, one to delete it permanently. Via the search bar you can also search for specific goals that might have been deleted longer ago. A goal can be restored or permanently deleted by every user who had edit access rights to the goal, irrespective of who has deleted it.
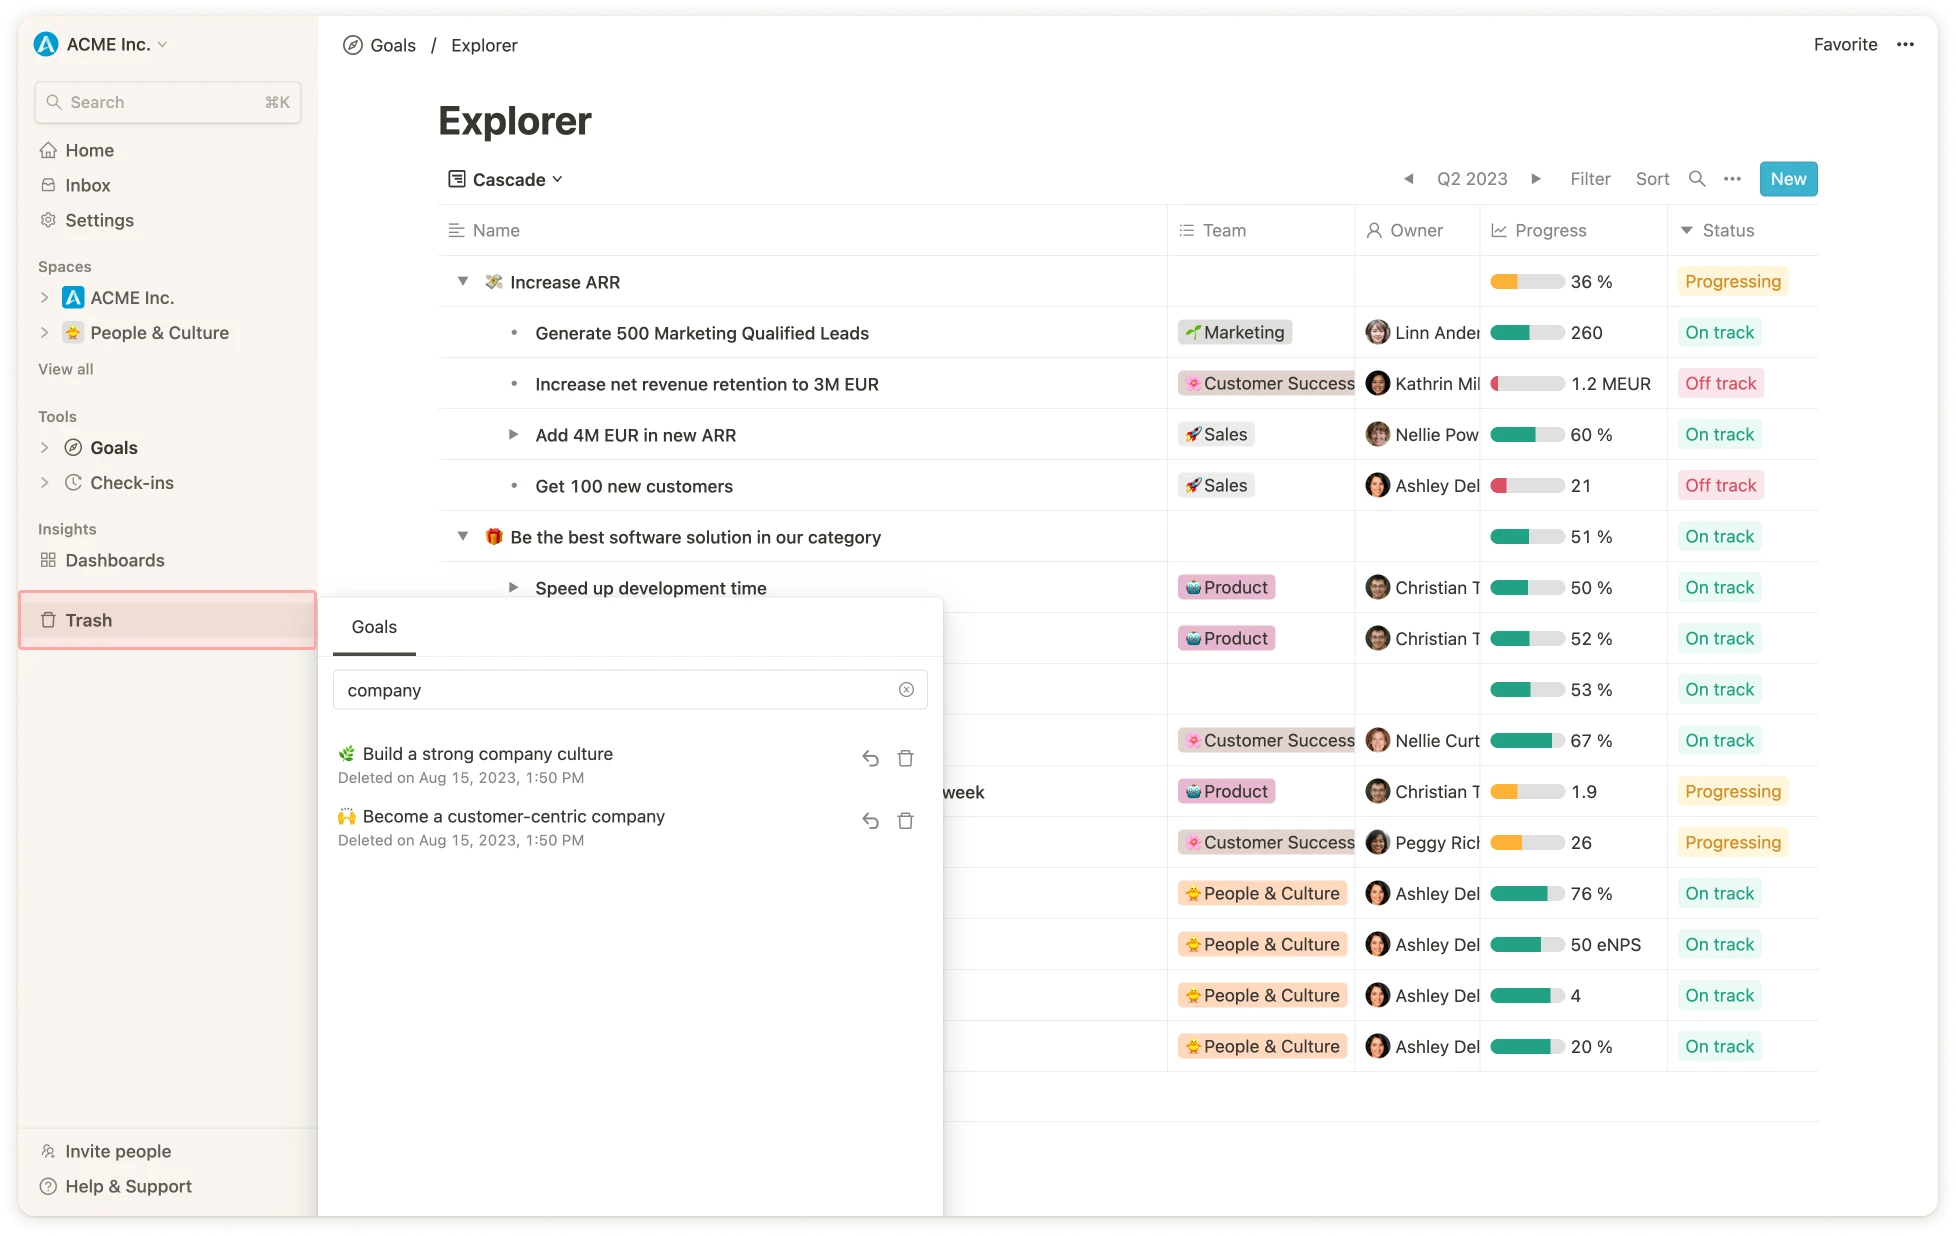 # Erste Schritte für Mitarbeiter
Source: https://mooncamp.com/docs/de/employees-introduction
Lerne, wie du als Mitarbeiter mit Mooncamp startest
# Erste Schritte für Mitarbeiter
Source: https://mooncamp.com/docs/de/employees-introduction
Lerne, wie du als Mitarbeiter mit Mooncamp startest
 ## Willkommen bei Mooncamp 👋
Mooncamp wurde gerade in deiner Organisation eingeführt? Dieser Leitfaden hilft dir dabei
* dich mit den Funktionen von Mooncamp vertraut zu machen
* dein Profil zu bearbeiten, die Anzeigesprache zu ändern und ein Profilbild hochzuladen
* deine Benachrichtigungen zu konfigurieren
* zu lernen, wie du Ziele erstellst, bearbeitest und aktualisierst
Um mehr darüber zu erfahren, was Mooncamp ist und wie es die Art und Weise deiner Strategiearbeit transformieren wird, kannst du die [Übersichtsseite](/de/overview) besuchen.
## Schritt 1: Mache dich mit der Mooncamp-Plattform vertraut
### Navigation im Workspace
* [Seitenleiste](/de/sidebar)
* [Homepage](/de/homepage)
* [Teamspaces](/de/teamspaces)
### Kernfunktionen
* [Ziele](/de/goals-overview)
* [Check-ins](/de/check-ins)
* [Dashboards](/de/dashboards), [Progress-Dashboard](/de/progress-dashboard) und [Health-Dashboard](/de/health-dashboard)
* [Reporting](/de/reports)
* [Integrationen](/de/data-integrations)
* [Plannings](/de/planning-spaces)
## Schritt 2: Richte dein Profil und deine Benachrichtigungen ein
* [Füge deine persönlichen Informationen hinzu](/de/profile-settings)
* [Konfiguriere deine Benachrichtigungen](/de/personal-notifications)
## Schritt 3: Lerne, wie du Ziele erstellst, bearbeitest und aktualisierst
* [Ziele erstellen](/de/create-and-edit-goals)
* [Den richtigen Messtyp festlegen](/de/progress-measurement) für deine Ziele
* [Ziele aktualisieren](/de/updating-goals)
* [Unterziele hinzufügen](/de/adding-subgoals) (z.B. Key Results)
* [Ziele löschen und wiederherstellen](/de/deleting-goals)
* [Durch bestehende Ziele navigieren](/de/goals-overview)
## Gut gemacht, du bist startklar! 🚀
Für einen reibungslosen Start mit Mooncamp kannst du dir auch unseren [Video-Leitfaden](https://mooncamp.com/de/watch-demo/) ansehen.
# Dashboards als PDF exportieren
Source: https://mooncamp.com/docs/de/exporting-dashboards-as-pdf
Navigiere zum Fortschritts-, Gesundheits- oder einem benutzerdefinierten Dashboard, das Du exportieren möchtest.
Wende die entsprechende Ansicht oder Filter an, damit Du nur die benötigten Daten exportierst.
Klicke auf die drei Punkte `...` in der oberen rechten Ecke des Bildschirms und wähle "Als PDF speichern", um die PDF-Datei herunterzuladen.
# Ziele als CSV exportieren
Source: https://mooncamp.com/docs/de/exporting-goals-as-csv
Navigiere zum Ziele-Explorer.
Wende die entsprechende Ansicht oder Filter an, damit du nur die gewünschten Ziele exportierst.
Klicke auf die Ellipse `...` in der oberen rechten Ecke und wähle "CSV exportieren", um die CSV-Datei herunterzuladen.
# FAQs
Source: https://mooncamp.com/docs/de/faqs
Antworten auf häufige Fragen zu Mooncamp
## Willkommen bei Mooncamp 👋
Mooncamp wurde gerade in deiner Organisation eingeführt? Dieser Leitfaden hilft dir dabei
* dich mit den Funktionen von Mooncamp vertraut zu machen
* dein Profil zu bearbeiten, die Anzeigesprache zu ändern und ein Profilbild hochzuladen
* deine Benachrichtigungen zu konfigurieren
* zu lernen, wie du Ziele erstellst, bearbeitest und aktualisierst
Um mehr darüber zu erfahren, was Mooncamp ist und wie es die Art und Weise deiner Strategiearbeit transformieren wird, kannst du die [Übersichtsseite](/de/overview) besuchen.
## Schritt 1: Mache dich mit der Mooncamp-Plattform vertraut
### Navigation im Workspace
* [Seitenleiste](/de/sidebar)
* [Homepage](/de/homepage)
* [Teamspaces](/de/teamspaces)
### Kernfunktionen
* [Ziele](/de/goals-overview)
* [Check-ins](/de/check-ins)
* [Dashboards](/de/dashboards), [Progress-Dashboard](/de/progress-dashboard) und [Health-Dashboard](/de/health-dashboard)
* [Reporting](/de/reports)
* [Integrationen](/de/data-integrations)
* [Plannings](/de/planning-spaces)
## Schritt 2: Richte dein Profil und deine Benachrichtigungen ein
* [Füge deine persönlichen Informationen hinzu](/de/profile-settings)
* [Konfiguriere deine Benachrichtigungen](/de/personal-notifications)
## Schritt 3: Lerne, wie du Ziele erstellst, bearbeitest und aktualisierst
* [Ziele erstellen](/de/create-and-edit-goals)
* [Den richtigen Messtyp festlegen](/de/progress-measurement) für deine Ziele
* [Ziele aktualisieren](/de/updating-goals)
* [Unterziele hinzufügen](/de/adding-subgoals) (z.B. Key Results)
* [Ziele löschen und wiederherstellen](/de/deleting-goals)
* [Durch bestehende Ziele navigieren](/de/goals-overview)
## Gut gemacht, du bist startklar! 🚀
Für einen reibungslosen Start mit Mooncamp kannst du dir auch unseren [Video-Leitfaden](https://mooncamp.com/de/watch-demo/) ansehen.
# Dashboards als PDF exportieren
Source: https://mooncamp.com/docs/de/exporting-dashboards-as-pdf
Navigiere zum Fortschritts-, Gesundheits- oder einem benutzerdefinierten Dashboard, das Du exportieren möchtest.
Wende die entsprechende Ansicht oder Filter an, damit Du nur die benötigten Daten exportierst.
Klicke auf die drei Punkte `...` in der oberen rechten Ecke des Bildschirms und wähle "Als PDF speichern", um die PDF-Datei herunterzuladen.
# Ziele als CSV exportieren
Source: https://mooncamp.com/docs/de/exporting-goals-as-csv
Navigiere zum Ziele-Explorer.
Wende die entsprechende Ansicht oder Filter an, damit du nur die gewünschten Ziele exportierst.
Klicke auf die Ellipse `...` in der oberen rechten Ecke und wähle "CSV exportieren", um die CSV-Datei herunterzuladen.
# FAQs
Source: https://mooncamp.com/docs/de/faqs
Antworten auf häufige Fragen zu Mooncamp
 ## Allgemeine Tipps
## Rechtsklick-Funktion erklärt
Wenn Du in Mooncamp arbeitest und eine Liste Deiner Ziele ansiehst, kannst Du mit der Maus über ein Ziel fahren und dann rechtsklicken. Dir wird dann ein Menü mit verschiedenen Auswahlmöglichkeiten angezeigt. Du hast auch die Möglichkeit, mehrere Ziele gleichzeitig auszuwählen, um die Rechtsklick-Funktion für die Massenbearbeitung Deiner Ziele zu nutzen. Das ist sehr praktisch, da Du das Ziel nicht öffnen musst, um Änderungen vorzunehmen.
## So verwendest Du die Rechtsklick-Funktion
Wie oben beschrieben, fahre mit der Maus über ein Ziel in Deiner Zielliste und klicke rechts. Dir werden dann folgende Optionen angezeigt:
* Löschen
* Duplizieren - erstelle eine Kopie des Ziels
* In Zyklus duplizieren - kopiere ein Ziel in einen zukünftigen Zyklus
* Unterziel erstellen - erstelle ein untergeordnetes oder abhängiges Ziel
* Eigenschaft bearbeiten - bearbeite die Eigenschaften z.B. Zyklus, übergeordnete Ausrichtung, Verantwortlicher etc.
* Zugriffsrechte bearbeiten - bearbeite, wer welche Zugriffsebene auf das Ziel hat
## Allgemeine Tipps
## Rechtsklick-Funktion erklärt
Wenn Du in Mooncamp arbeitest und eine Liste Deiner Ziele ansiehst, kannst Du mit der Maus über ein Ziel fahren und dann rechtsklicken. Dir wird dann ein Menü mit verschiedenen Auswahlmöglichkeiten angezeigt. Du hast auch die Möglichkeit, mehrere Ziele gleichzeitig auszuwählen, um die Rechtsklick-Funktion für die Massenbearbeitung Deiner Ziele zu nutzen. Das ist sehr praktisch, da Du das Ziel nicht öffnen musst, um Änderungen vorzunehmen.
## So verwendest Du die Rechtsklick-Funktion
Wie oben beschrieben, fahre mit der Maus über ein Ziel in Deiner Zielliste und klicke rechts. Dir werden dann folgende Optionen angezeigt:
* Löschen
* Duplizieren - erstelle eine Kopie des Ziels
* In Zyklus duplizieren - kopiere ein Ziel in einen zukünftigen Zyklus
* Unterziel erstellen - erstelle ein untergeordnetes oder abhängiges Ziel
* Eigenschaft bearbeiten - bearbeite die Eigenschaften z.B. Zyklus, übergeordnete Ausrichtung, Verantwortlicher etc.
* Zugriffsrechte bearbeiten - bearbeite, wer welche Zugriffsebene auf das Ziel hat
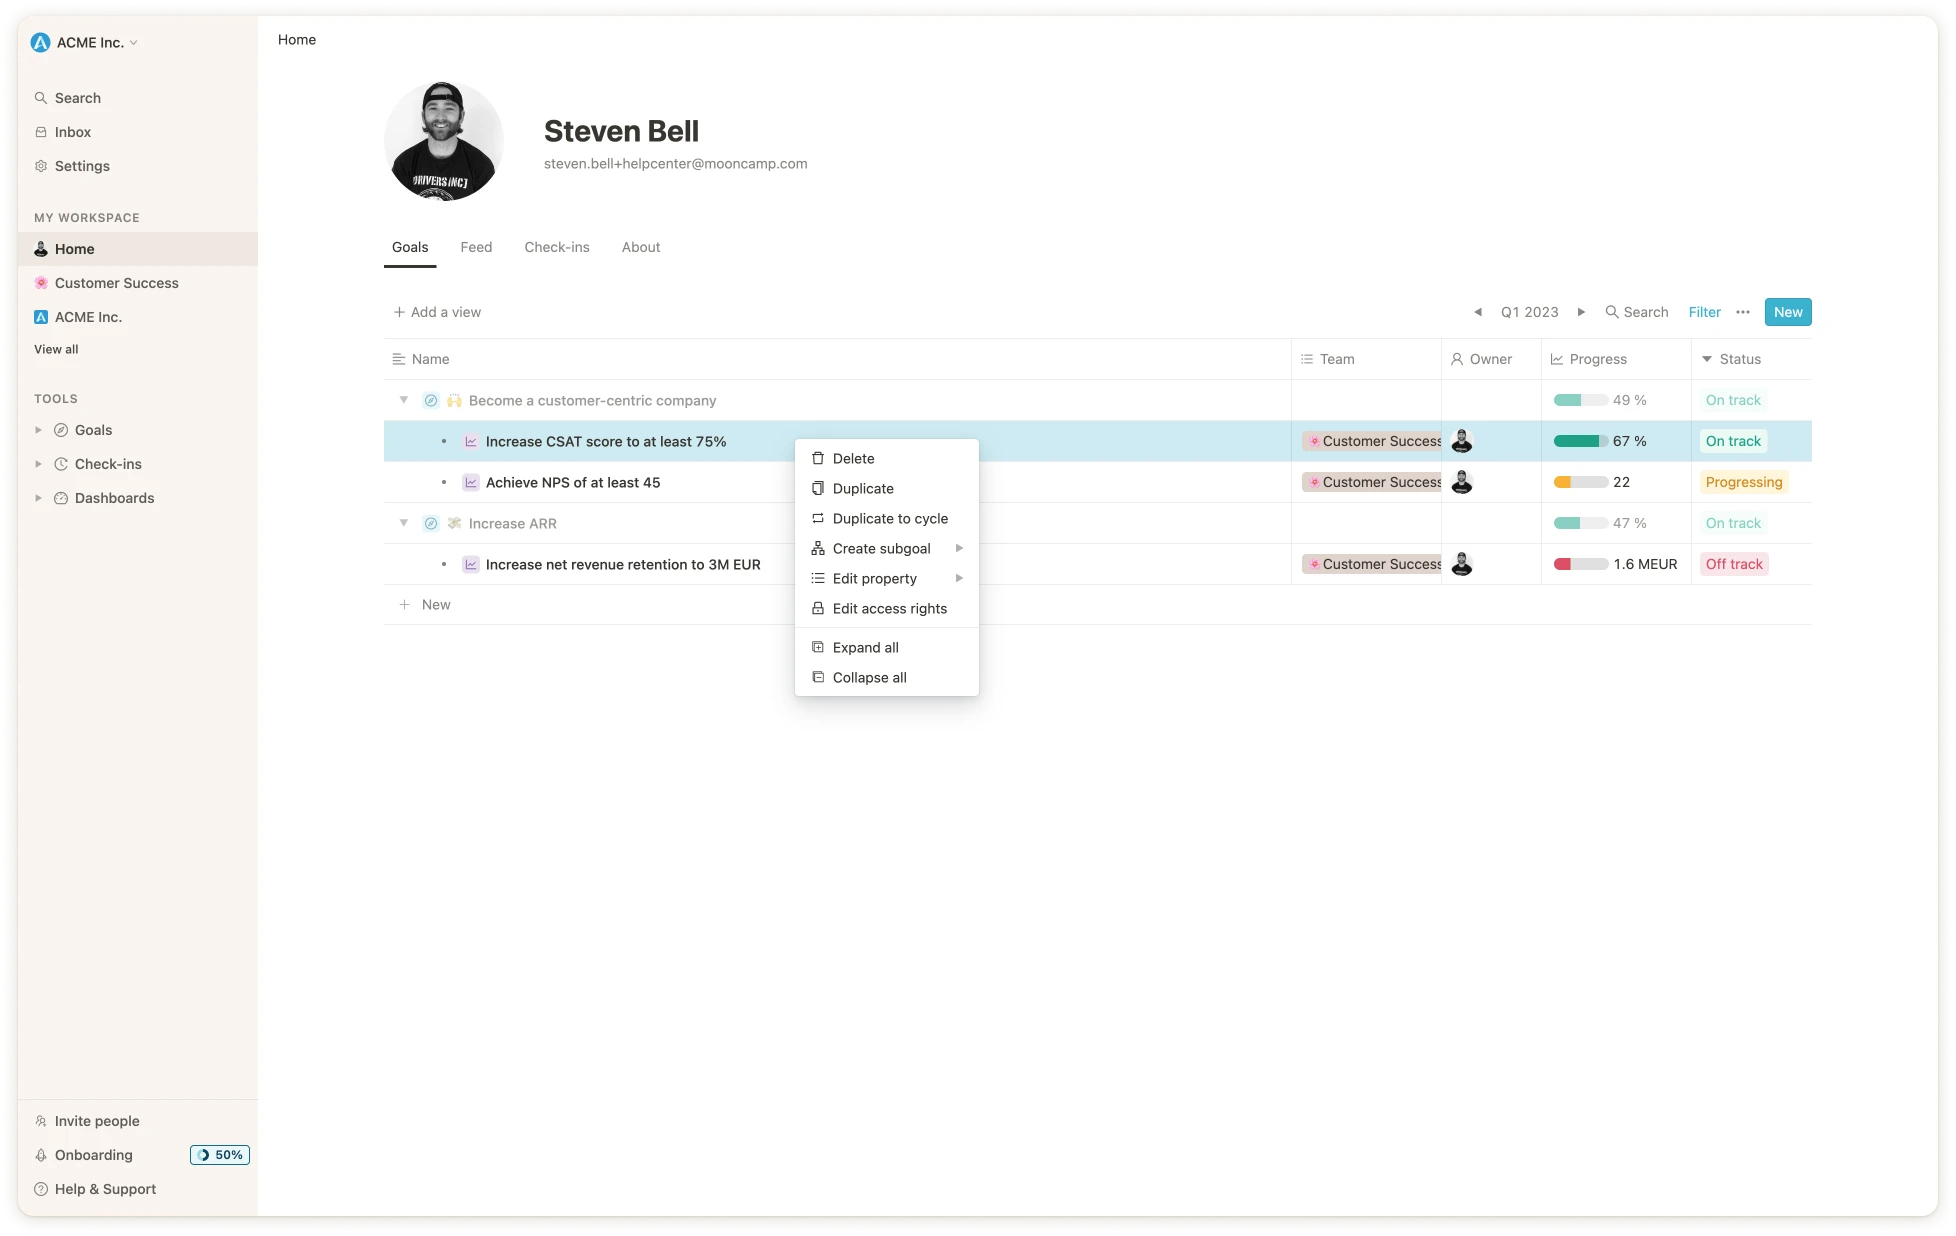 Bei der Mehrfachauswahl hast Du die gleichen Möglichkeiten, außer "Unterziel erstellen".
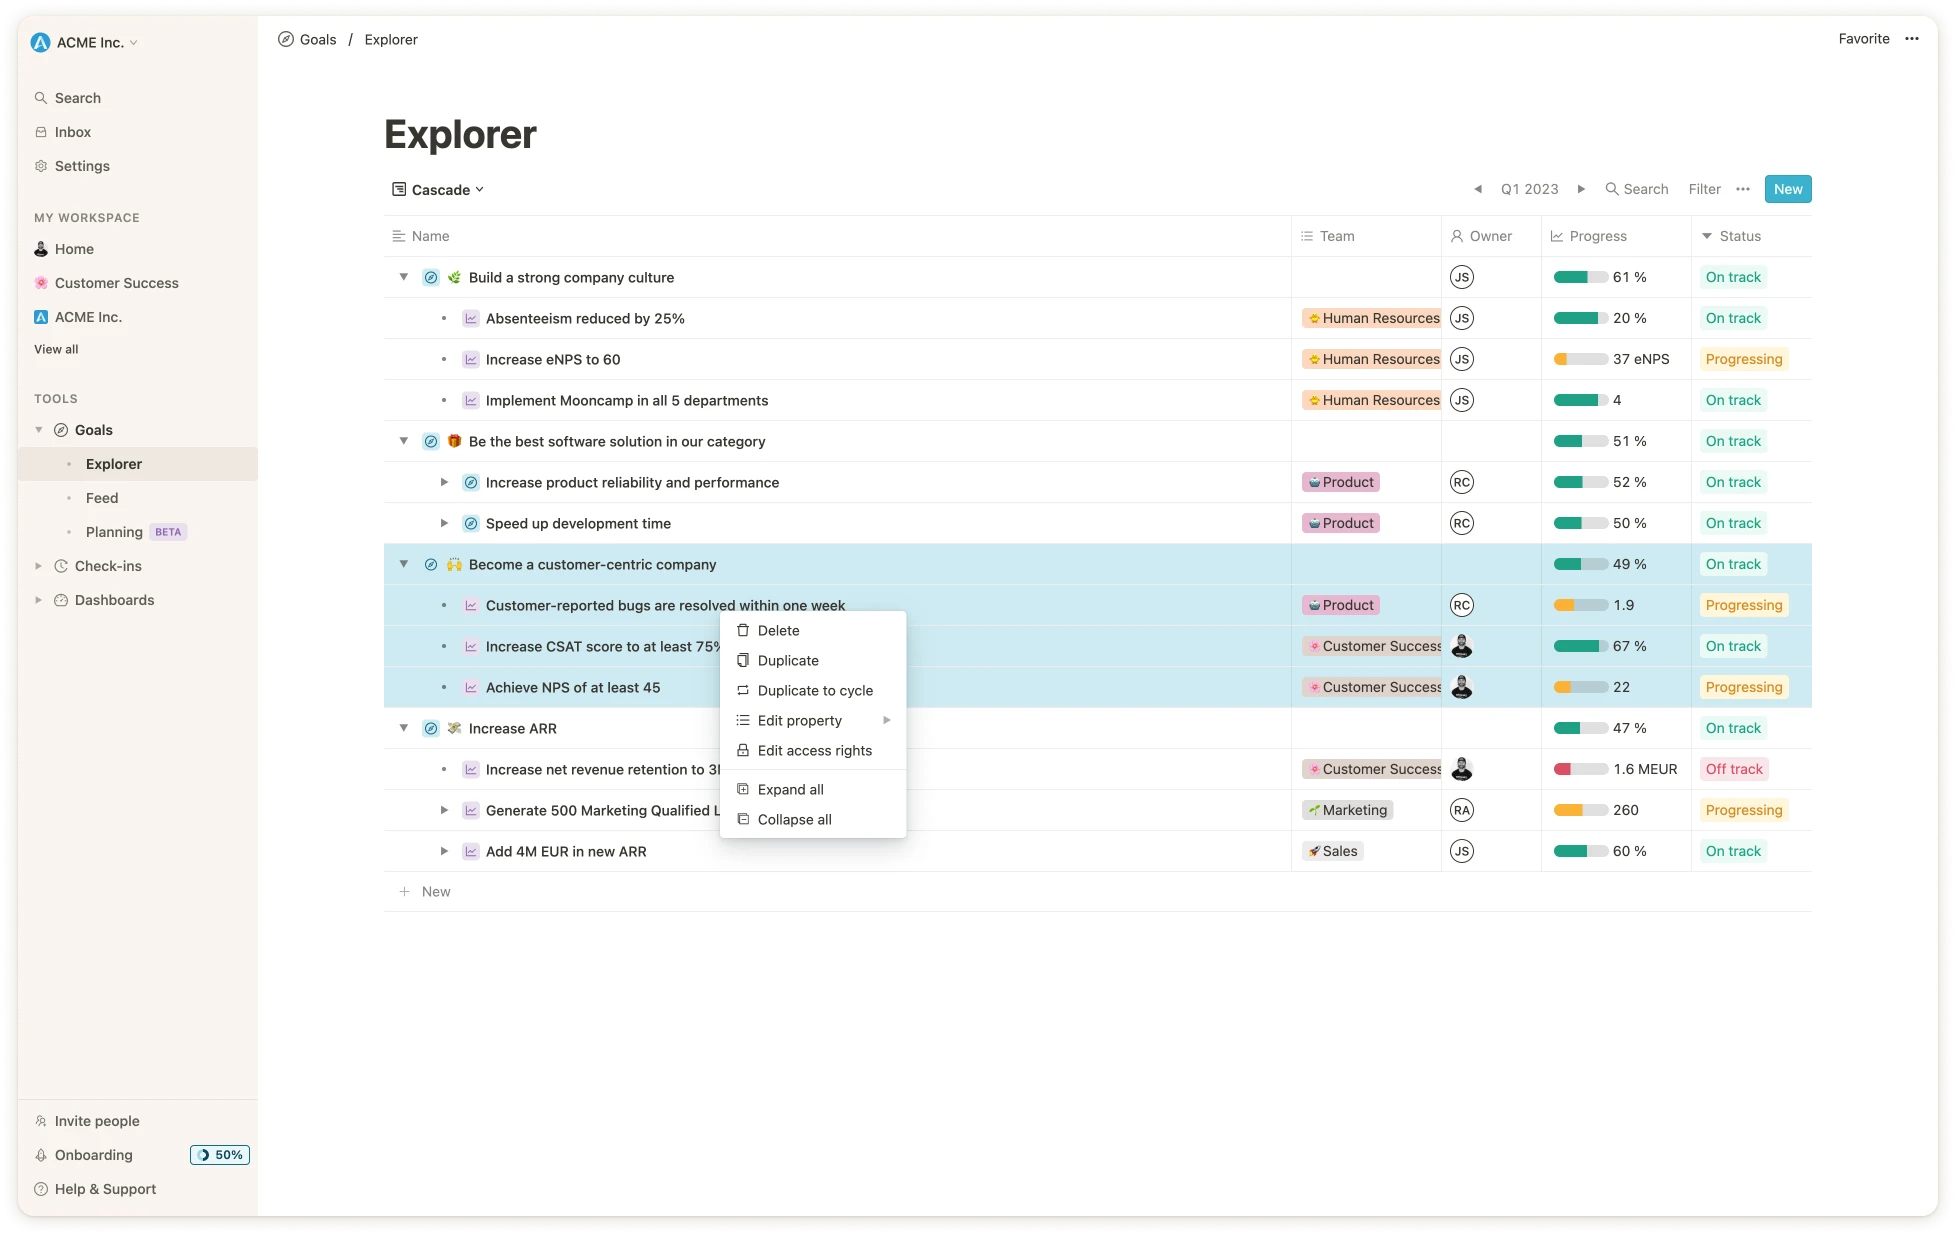 ## Team- & Benutzerverwaltung
## Integrationen
## Einstellungen & Anpassung
## Zielmanagement
# Ziele-Explorer
Source: https://mooncamp.com/docs/de/goal-explorer
Ein Überblick über den Mooncamp Ziele-Explorer
Der Ziele-Explorer ist ein Tool, das **vier Hauptzwecke** erfüllt:
Administratoren oder Workspace-Besitzer können spezifische Ansichten erstellen, die allen Mitarbeitern zur Verfügung stehen sollen.
Benutzer mit entsprechenden Berechtigungen können Ansichten als [öffentliche Links](/de/public-links) veröffentlichen, die für Personen außerhalb des Workspaces zugänglich sind.
Benutzer mit entsprechenden Berechtigungen können Ansichten in andere Apps einbetten.
Benutzer können gefilterte Ziele als CSV-Dateien exportieren.
Um auf den Ziele-Explorer zuzugreifen, navigiere zum Tab **Ziele-Explorer** in der linken Seitenleiste. Wenn Du eine bestimmte gefilterte Ansicht Deiner Ziele als CSV-Datei exportieren möchtest, kannst Du dies tun, indem Du auf die Auslassungspunkte `...` in der oberen rechten Ecke des Ziele-Explorers klickst und **CSV exportieren** auswählst (`1`). Ebenso kannst Du eine bestimmte Ansicht als [öffentlichen Link](/de/public-links) veröffentlichen oder sie in andere Apps einbetten, indem Du den `Für das Web freigeben`-Schalter aktivierst und den Link oder Einbettungscode kopierst (`2`).
## Team- & Benutzerverwaltung
## Integrationen
## Einstellungen & Anpassung
## Zielmanagement
# Ziele-Explorer
Source: https://mooncamp.com/docs/de/goal-explorer
Ein Überblick über den Mooncamp Ziele-Explorer
Der Ziele-Explorer ist ein Tool, das **vier Hauptzwecke** erfüllt:
Administratoren oder Workspace-Besitzer können spezifische Ansichten erstellen, die allen Mitarbeitern zur Verfügung stehen sollen.
Benutzer mit entsprechenden Berechtigungen können Ansichten als [öffentliche Links](/de/public-links) veröffentlichen, die für Personen außerhalb des Workspaces zugänglich sind.
Benutzer mit entsprechenden Berechtigungen können Ansichten in andere Apps einbetten.
Benutzer können gefilterte Ziele als CSV-Dateien exportieren.
Um auf den Ziele-Explorer zuzugreifen, navigiere zum Tab **Ziele-Explorer** in der linken Seitenleiste. Wenn Du eine bestimmte gefilterte Ansicht Deiner Ziele als CSV-Datei exportieren möchtest, kannst Du dies tun, indem Du auf die Auslassungspunkte `...` in der oberen rechten Ecke des Ziele-Explorers klickst und **CSV exportieren** auswählst (`1`). Ebenso kannst Du eine bestimmte Ansicht als [öffentlichen Link](/de/public-links) veröffentlichen oder sie in andere Apps einbetten, indem Du den `Für das Web freigeben`-Schalter aktivierst und den Link oder Einbettungscode kopierst (`2`).
 # Regeln für Ziele
Source: https://mooncamp.com/docs/de/goal-rules
Ein Überblick über Mooncamps anpassbares Regelsystem für Ziele und OKRs
### Was sind "Regeln für Ziele"?
Unter `Einstellungen > Ziele > Typen` findest du alle erstellten Zieltypen in deinem OKR- oder Zielmanagement-System, wie zum Beispiel `Objective`, `Key Result` oder `Initiative`.
Für jeden dieser Zieltypen kannst du spezifische *Regeln* definieren, z.B. dass `Key Results` nur an `Objectives` ausgerichtet werden dürfen oder dass alle `Key Results` einen `Verantwortlichen` haben müssen.
# Regeln für Ziele
Source: https://mooncamp.com/docs/de/goal-rules
Ein Überblick über Mooncamps anpassbares Regelsystem für Ziele und OKRs
### Was sind "Regeln für Ziele"?
Unter `Einstellungen > Ziele > Typen` findest du alle erstellten Zieltypen in deinem OKR- oder Zielmanagement-System, wie zum Beispiel `Objective`, `Key Result` oder `Initiative`.
Für jeden dieser Zieltypen kannst du spezifische *Regeln* definieren, z.B. dass `Key Results` nur an `Objectives` ausgerichtet werden dürfen oder dass alle `Key Results` einen `Verantwortlichen` haben müssen.
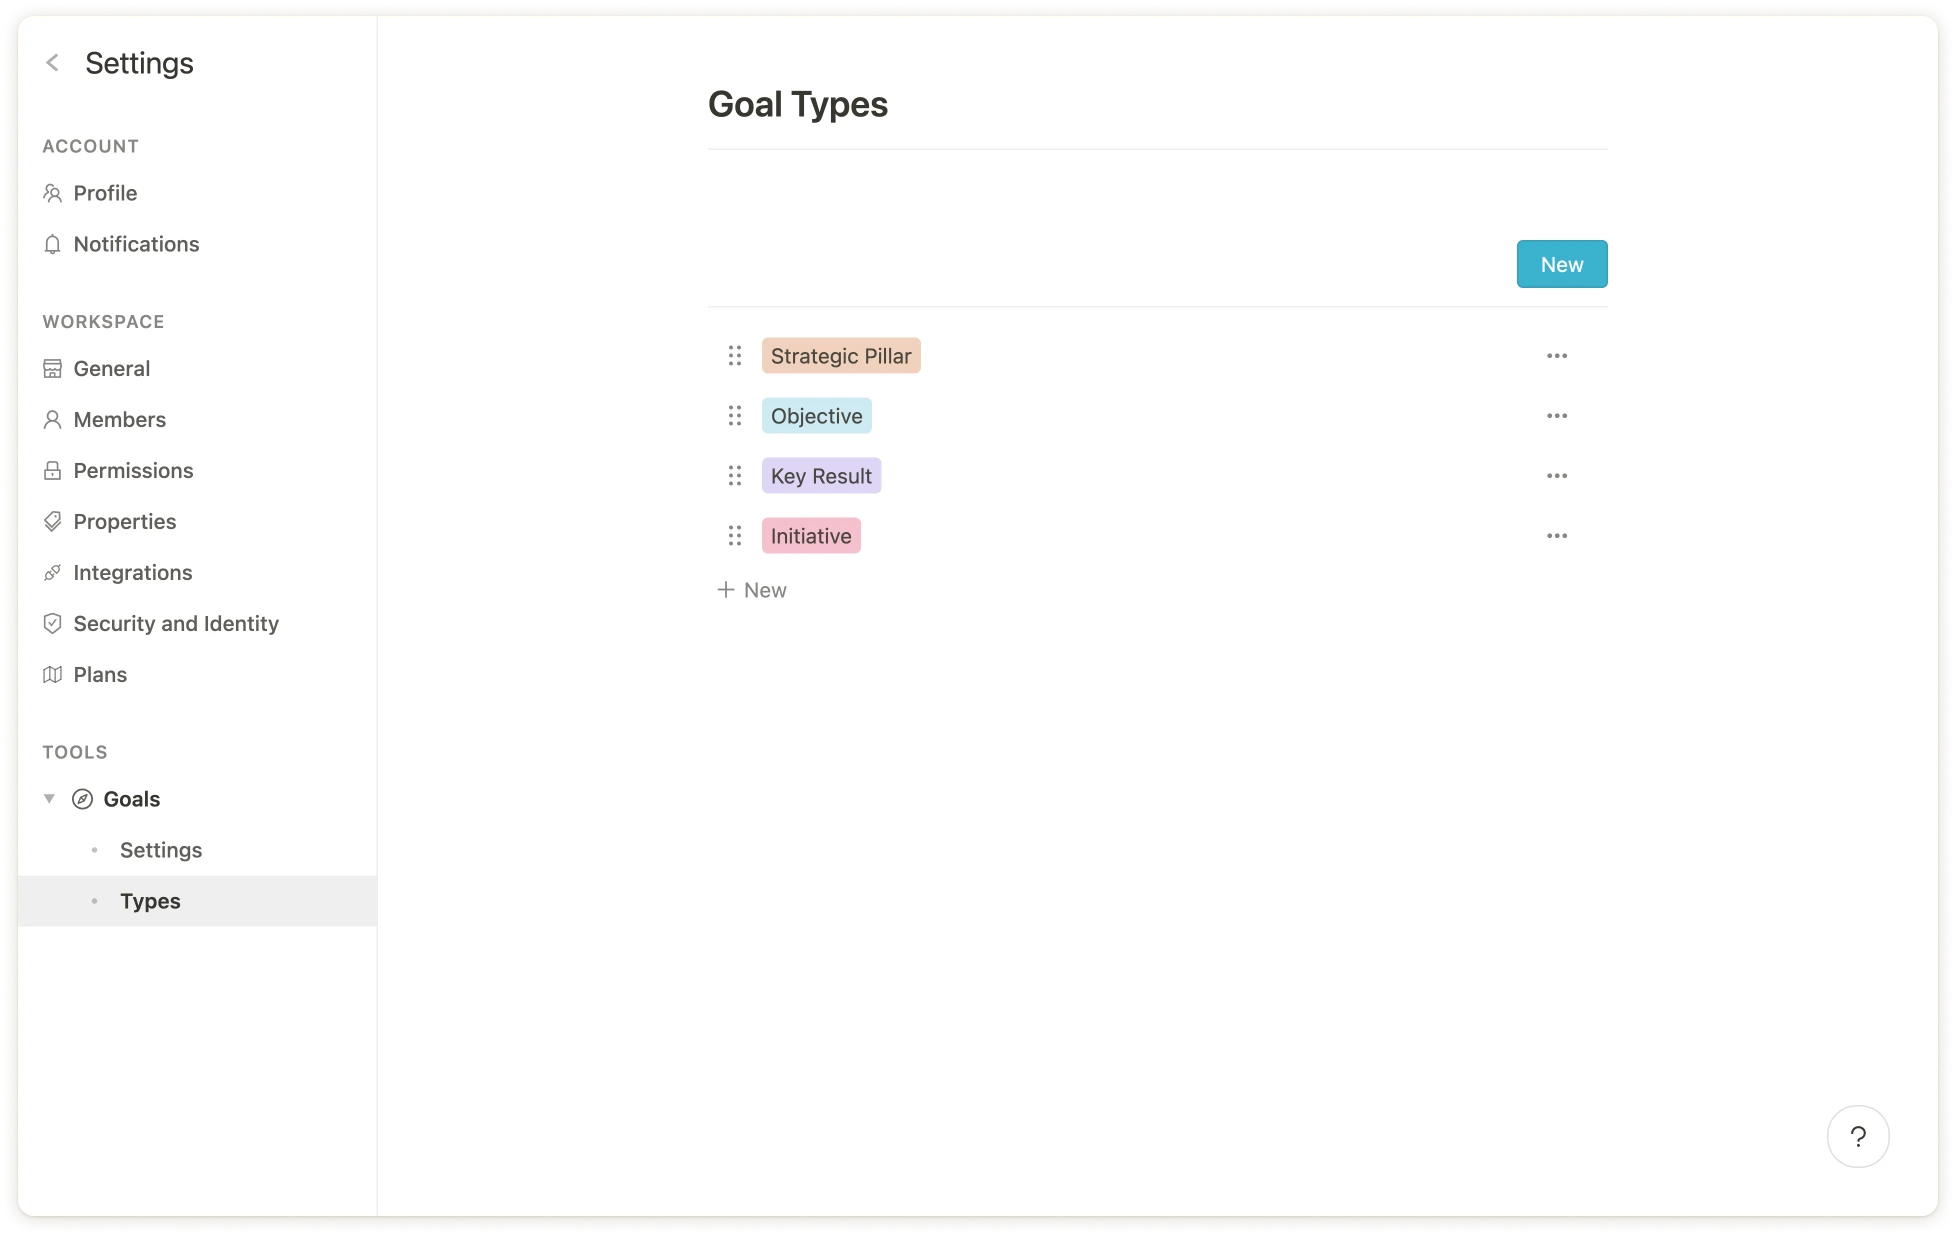 Die folgenden Regeln können individuell pro Zieltyp festgelegt werden:
* **Aufbau der Zielhierarchie**: An welche Zieltypen darf der jeweilige Zieltyp ausgerichtet werden?
* **Sichtbarkeit** von Eigenschaften des Zieltyps (z.B. können alle Beschreibungsfelder ausgeblendet werden, wenn sie leer sind).
* Festlegung erlaubter **Fortschrittsmessarten** (`Professional` und `Enterprise` Plan)
* Definition von **Pflichtfeldern** (`Professional` und `Enterprise` Plan)
Details zu den spezifischen Einstellungen findest du weiter unten im Artikel.
### Warum Regeln für Ziele verwenden?
Regeln ermöglichen es dir, das Zielsystem deiner Organisation vollständig nach deinen Bedürfnissen anzupassen. Dies bietet unter anderem folgende Vorteile:
**1. Aufbau deiner individuellen Zielhierarchie**
Mit dem flexiblen Regelsystem kannst du selbst entscheiden, wie die Hierarchie deiner Ziele und OKRs strukturiert sein soll. Zum Beispiel können folgende Regeln angewendet werden:
* Ziele vom Typ `Unternehmensziel` dürfen nur zu `Strategischen Säulen` beitragen
* `Strategische Säulen` dürfen nicht an andere Zieltypen ausgerichtet werden (d.h. sie stehen immer ganz oben)
* Ziele vom Typ `Teamziel` dürfen nur an `Unternehmensziele` ausgerichtet werden
* `Key Results` dürfen nur an `Unternehmensziele` oder `Teamziele` ausgerichtet werden
* `Initiativen` dürfen nur an `Teamziele` oder `Key Results` ausgerichtet werden
**2. Chaos im Zielsystem vermeiden**
Regeln für die hierarchische Struktur bieten Leitplanken für alle Mitarbeiter, sodass das Zielsystem auf natürliche Weise der vorgegebenen Struktur folgt. Falsch ausgerichtete Ziele werden außerdem hervorgehoben, damit sie entsprechend angepasst werden können.
**3. Korrekte Dateneingabe sicherstellen**
Besonders wenn viele Teams in Mooncamp arbeiten, steigt die Wahrscheinlichkeit von "menschlichen Fehlern" bei der Dateneingabe. Daher können Eigenschaften eines Zieltyps, wie `Verantwortlicher` oder `Team`, als Pflichtfelder markiert werden.
### Konfiguration der Zielhierarchie
Unter *Einstellungen > Ziele > Typen* sind alle Zieltypen aufgelistet. Wenn du zum Beispiel eine Regel für den Zieltyp `Key Result` erstellen möchtest, dass dieser nur an `Objectives` ausgerichtet werden kann, klicke zunächst auf den entsprechenden Zieltyp.
Es öffnet sich ein Fenster, in dem alle Zieleigenschaften aufgelistet sind. Klicke nun auf `Übergeordnete Ausrichtung`.
Die folgenden Regeln können individuell pro Zieltyp festgelegt werden:
* **Aufbau der Zielhierarchie**: An welche Zieltypen darf der jeweilige Zieltyp ausgerichtet werden?
* **Sichtbarkeit** von Eigenschaften des Zieltyps (z.B. können alle Beschreibungsfelder ausgeblendet werden, wenn sie leer sind).
* Festlegung erlaubter **Fortschrittsmessarten** (`Professional` und `Enterprise` Plan)
* Definition von **Pflichtfeldern** (`Professional` und `Enterprise` Plan)
Details zu den spezifischen Einstellungen findest du weiter unten im Artikel.
### Warum Regeln für Ziele verwenden?
Regeln ermöglichen es dir, das Zielsystem deiner Organisation vollständig nach deinen Bedürfnissen anzupassen. Dies bietet unter anderem folgende Vorteile:
**1. Aufbau deiner individuellen Zielhierarchie**
Mit dem flexiblen Regelsystem kannst du selbst entscheiden, wie die Hierarchie deiner Ziele und OKRs strukturiert sein soll. Zum Beispiel können folgende Regeln angewendet werden:
* Ziele vom Typ `Unternehmensziel` dürfen nur zu `Strategischen Säulen` beitragen
* `Strategische Säulen` dürfen nicht an andere Zieltypen ausgerichtet werden (d.h. sie stehen immer ganz oben)
* Ziele vom Typ `Teamziel` dürfen nur an `Unternehmensziele` ausgerichtet werden
* `Key Results` dürfen nur an `Unternehmensziele` oder `Teamziele` ausgerichtet werden
* `Initiativen` dürfen nur an `Teamziele` oder `Key Results` ausgerichtet werden
**2. Chaos im Zielsystem vermeiden**
Regeln für die hierarchische Struktur bieten Leitplanken für alle Mitarbeiter, sodass das Zielsystem auf natürliche Weise der vorgegebenen Struktur folgt. Falsch ausgerichtete Ziele werden außerdem hervorgehoben, damit sie entsprechend angepasst werden können.
**3. Korrekte Dateneingabe sicherstellen**
Besonders wenn viele Teams in Mooncamp arbeiten, steigt die Wahrscheinlichkeit von "menschlichen Fehlern" bei der Dateneingabe. Daher können Eigenschaften eines Zieltyps, wie `Verantwortlicher` oder `Team`, als Pflichtfelder markiert werden.
### Konfiguration der Zielhierarchie
Unter *Einstellungen > Ziele > Typen* sind alle Zieltypen aufgelistet. Wenn du zum Beispiel eine Regel für den Zieltyp `Key Result` erstellen möchtest, dass dieser nur an `Objectives` ausgerichtet werden kann, klicke zunächst auf den entsprechenden Zieltyp.
Es öffnet sich ein Fenster, in dem alle Zieleigenschaften aufgelistet sind. Klicke nun auf `Übergeordnete Ausrichtung`.
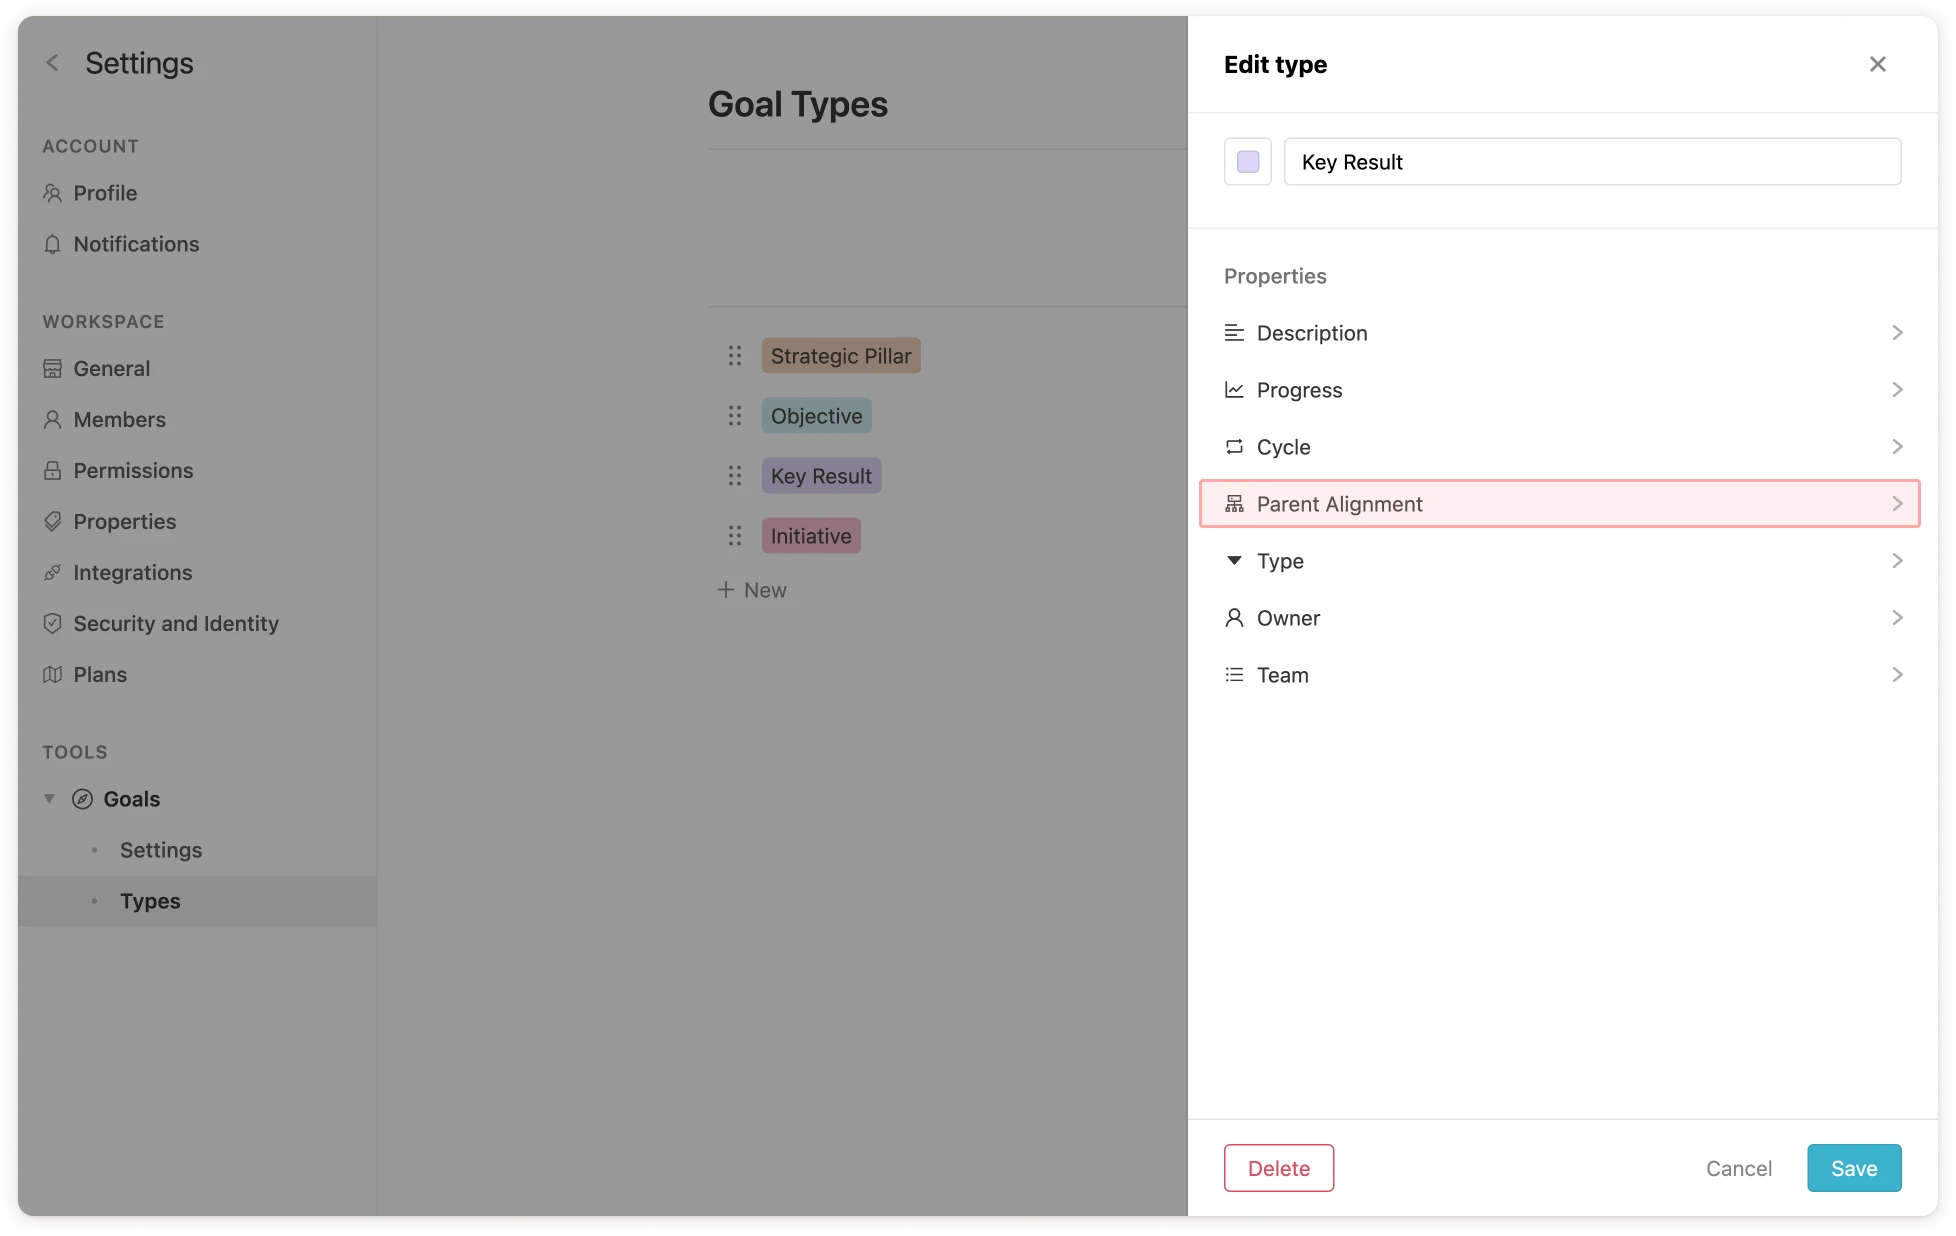 Die Einstellungen für die Eigenschaft `Übergeordnete Ausrichtung` des Zieltyps `Key Result` öffnen sich. Unter dem Punkt `Kann Kind sein von` kann nun der Zieltyp `Objective` ausgewählt werden, alle anderen Zieltypen sollten deaktiviert werden.
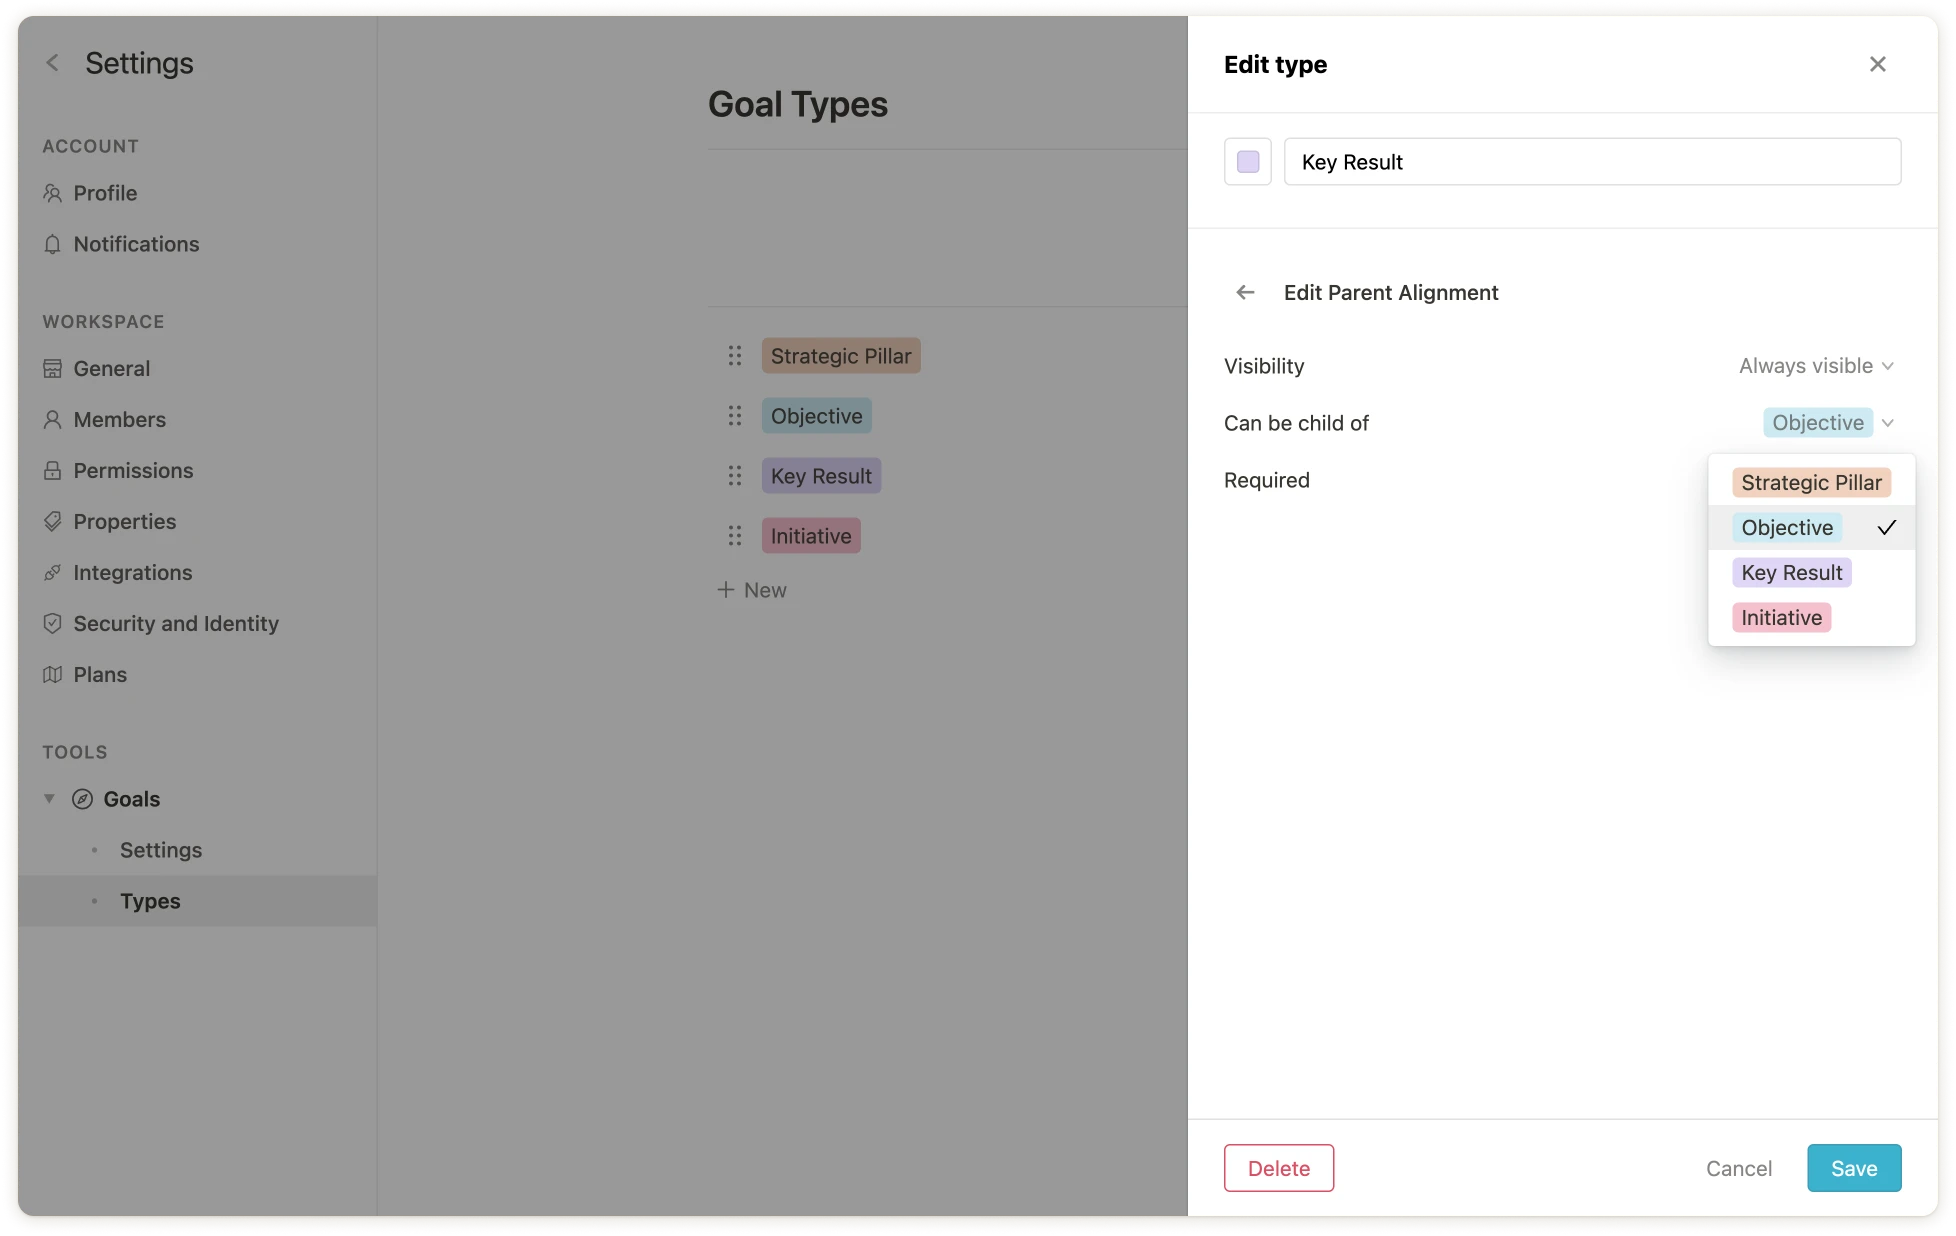 Et voilà - `Key Results` können nun nur noch an `Objectives` ausgerichtet werden.
Bestehende oder neu erstellte Ziele, die dieser Regel nicht folgen, werden von nun an mit Warnungen (`!`) gekennzeichnet. Außerdem stehen bei der Erstellung von Unterzielen nur noch erlaubte Zieltypen zur Auswahl.
### Erlaubte Fortschrittsmessarten pro Zieltyp festlegen
Es kann sinnvoll sein, die Fortschrittsmessarten je nach Zieltyp anzupassen. Typische Anwendungsfälle sind zum Beispiel:
* `Strategische Säulen` sollten keinen Messungstyp haben (`Keine`), es sollte also kein Fortschrittsmaß mit dem Zieltyp verbunden sein
* `Objectives` sollten nur `Aggregation` als Messungstyp haben
* `Key Results` dürfen jeden Messungstyp außer `Offen/Erledigt` haben
* `Initiativen` können nur den Messungstyp `Offen/Erledigt` haben
Um die erlaubten Messarten zu konfigurieren, klicke auf den entsprechenden Zieltyp und dann auf `Fortschritt`. Unter dem Punkt `Messung` können die erlaubten Messarten ausgewählt werden.
Et voilà - `Key Results` können nun nur noch an `Objectives` ausgerichtet werden.
Bestehende oder neu erstellte Ziele, die dieser Regel nicht folgen, werden von nun an mit Warnungen (`!`) gekennzeichnet. Außerdem stehen bei der Erstellung von Unterzielen nur noch erlaubte Zieltypen zur Auswahl.
### Erlaubte Fortschrittsmessarten pro Zieltyp festlegen
Es kann sinnvoll sein, die Fortschrittsmessarten je nach Zieltyp anzupassen. Typische Anwendungsfälle sind zum Beispiel:
* `Strategische Säulen` sollten keinen Messungstyp haben (`Keine`), es sollte also kein Fortschrittsmaß mit dem Zieltyp verbunden sein
* `Objectives` sollten nur `Aggregation` als Messungstyp haben
* `Key Results` dürfen jeden Messungstyp außer `Offen/Erledigt` haben
* `Initiativen` können nur den Messungstyp `Offen/Erledigt` haben
Um die erlaubten Messarten zu konfigurieren, klicke auf den entsprechenden Zieltyp und dann auf `Fortschritt`. Unter dem Punkt `Messung` können die erlaubten Messarten ausgewählt werden.
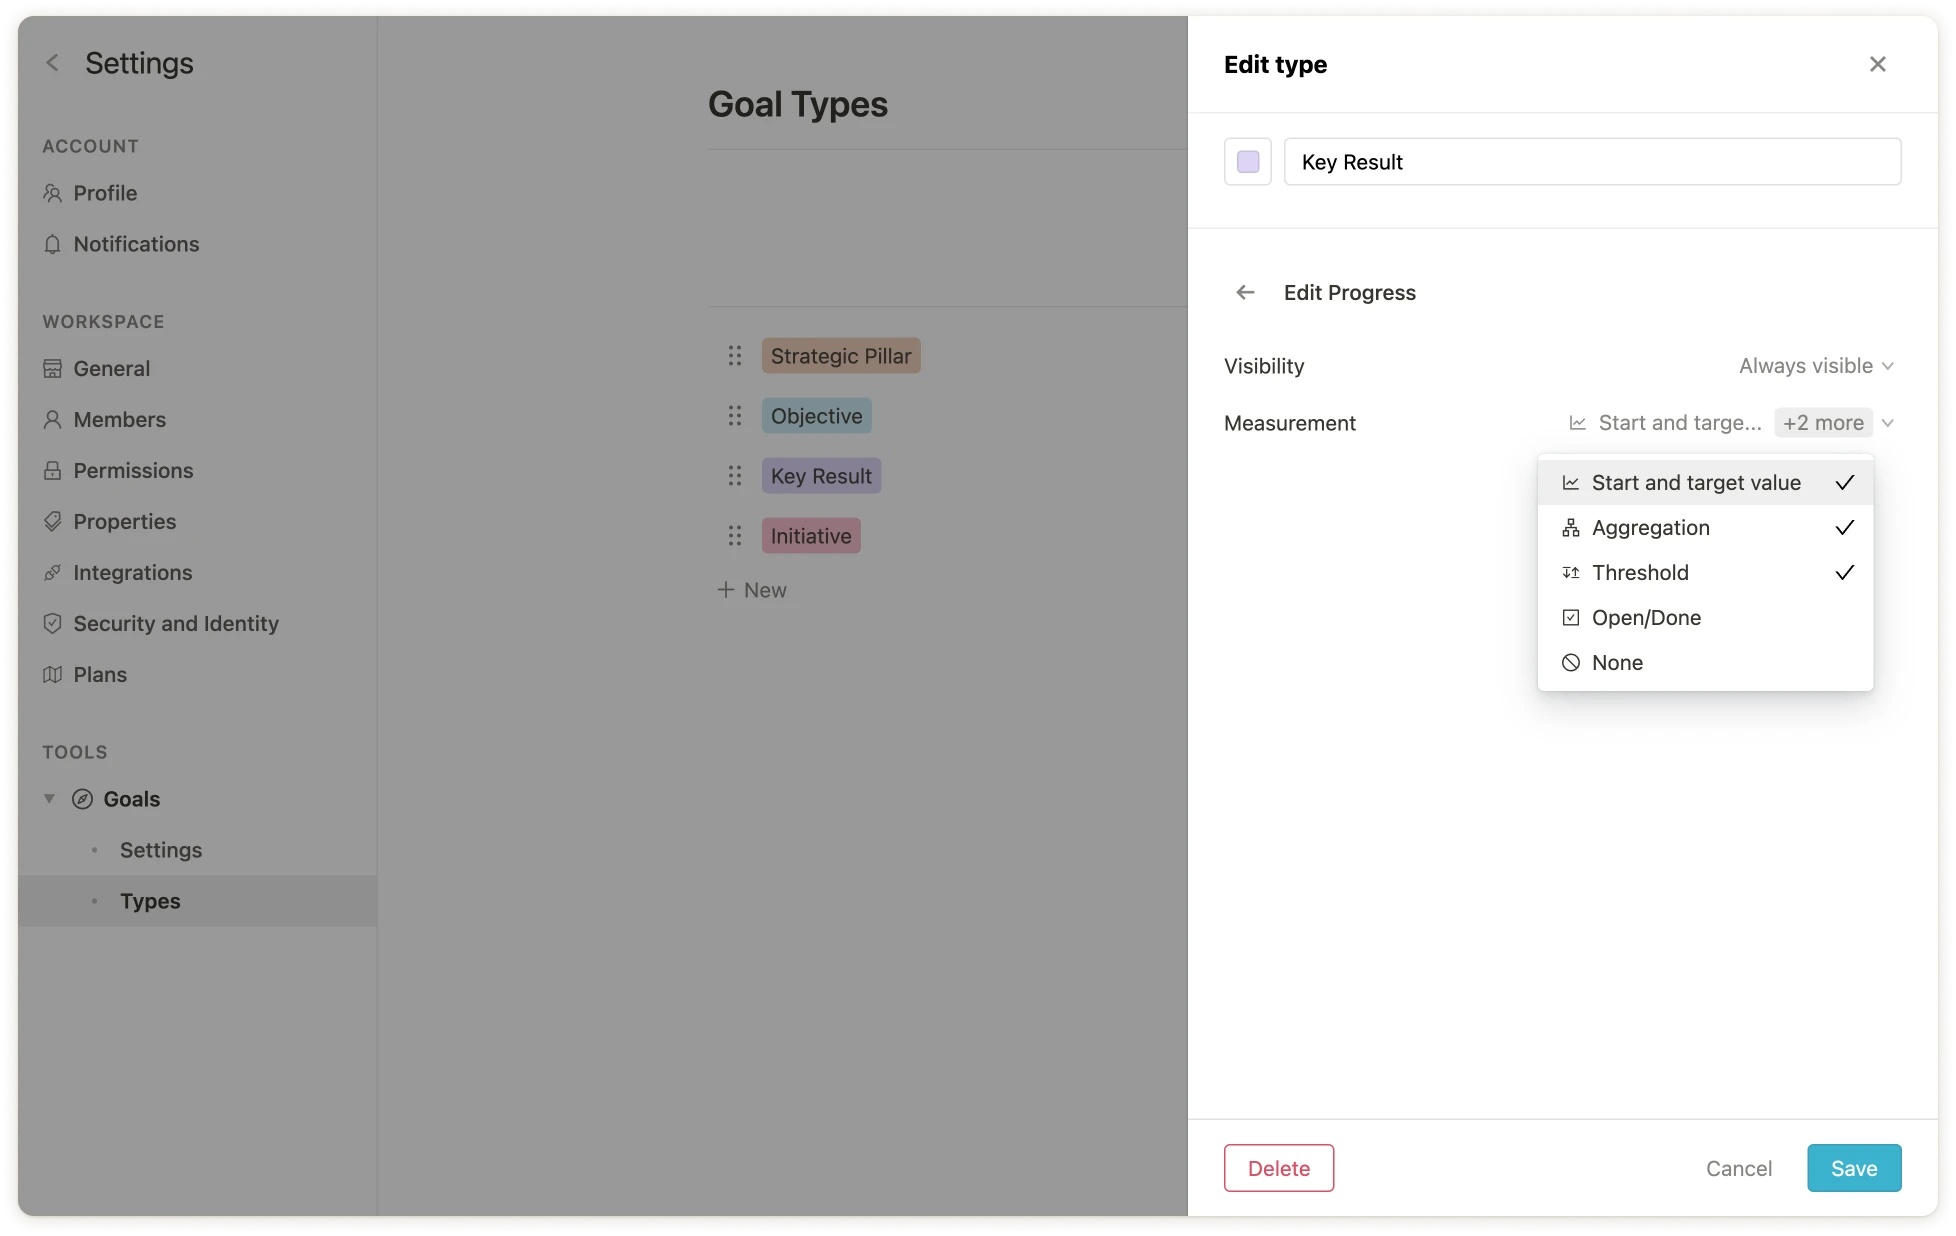 💡 **Hinweis**: Die Festlegung von Fortschrittsmessarten ist nur im `Pro` oder `Enterprise Plan` von Mooncamp verfügbar. [Kontaktiere unser Sales-Team für weitere Informationen](mailto:sales@mooncamp.com)
### Eigenschaften als Pflichtfelder markieren
Im `Enterprise Plan` kannst du Eigenschaften *für jeden Zieltyp* als Pflichtfelder markieren. Wenn zum Beispiel `Key Results` immer einen `Verantwortlichen` haben sollen, klicke in der Liste auf den Zieltyp `Key Results`, wähle `Verantwortlicher` aus und markiere dies als Pflichtfeld.
💡 **Hinweis**: Die Festlegung von Fortschrittsmessarten ist nur im `Pro` oder `Enterprise Plan` von Mooncamp verfügbar. [Kontaktiere unser Sales-Team für weitere Informationen](mailto:sales@mooncamp.com)
### Eigenschaften als Pflichtfelder markieren
Im `Enterprise Plan` kannst du Eigenschaften *für jeden Zieltyp* als Pflichtfelder markieren. Wenn zum Beispiel `Key Results` immer einen `Verantwortlichen` haben sollen, klicke in der Liste auf den Zieltyp `Key Results`, wähle `Verantwortlicher` aus und markiere dies als Pflichtfeld.
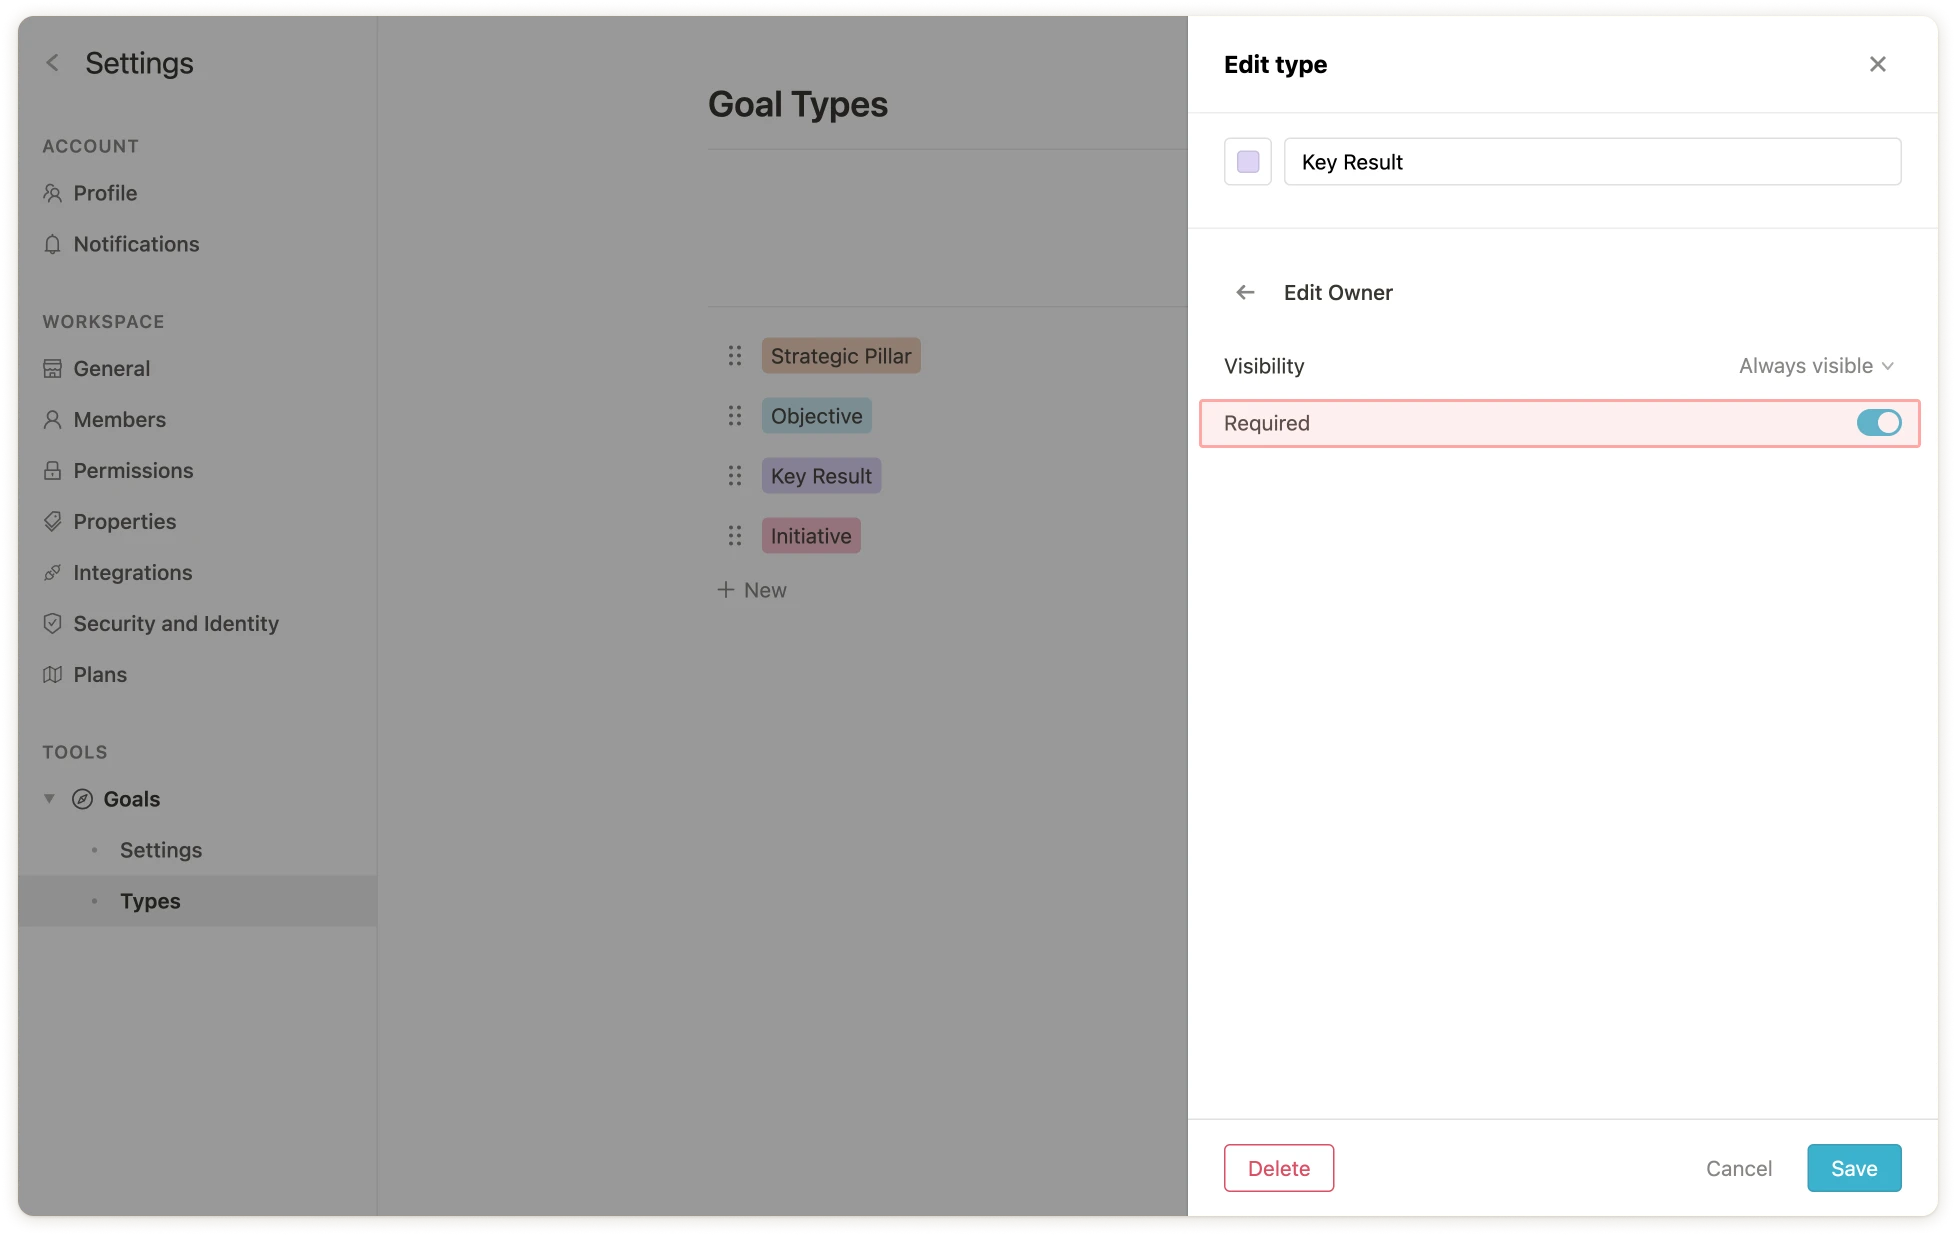 Bestehende oder neu erstellte Ziele, die dieser Regel nicht folgen, werden nun mit Warnungen gekennzeichnet.
💡
**Hinweis**: Pflichtfelder sind nur im `Pro` oder `Enterprise Plan` von Mooncamp verfügbar. [Kontaktiere unser Sales-Team für weitere Informationen](mailto:sales@mooncamp.com)
### Probleme beheben
Ziele, die gegen eine oder mehrere Regeln verstoßen, werden in der Kaskadenansicht hervorgehoben. Auf den Detailseiten der betreffenden Ziele werden auch die Eigenschaften hervorgehoben, die gegen die Regeln verstoßen.
Bestehende oder neu erstellte Ziele, die dieser Regel nicht folgen, werden nun mit Warnungen gekennzeichnet.
💡
**Hinweis**: Pflichtfelder sind nur im `Pro` oder `Enterprise Plan` von Mooncamp verfügbar. [Kontaktiere unser Sales-Team für weitere Informationen](mailto:sales@mooncamp.com)
### Probleme beheben
Ziele, die gegen eine oder mehrere Regeln verstoßen, werden in der Kaskadenansicht hervorgehoben. Auf den Detailseiten der betreffenden Ziele werden auch die Eigenschaften hervorgehoben, die gegen die Regeln verstoßen.

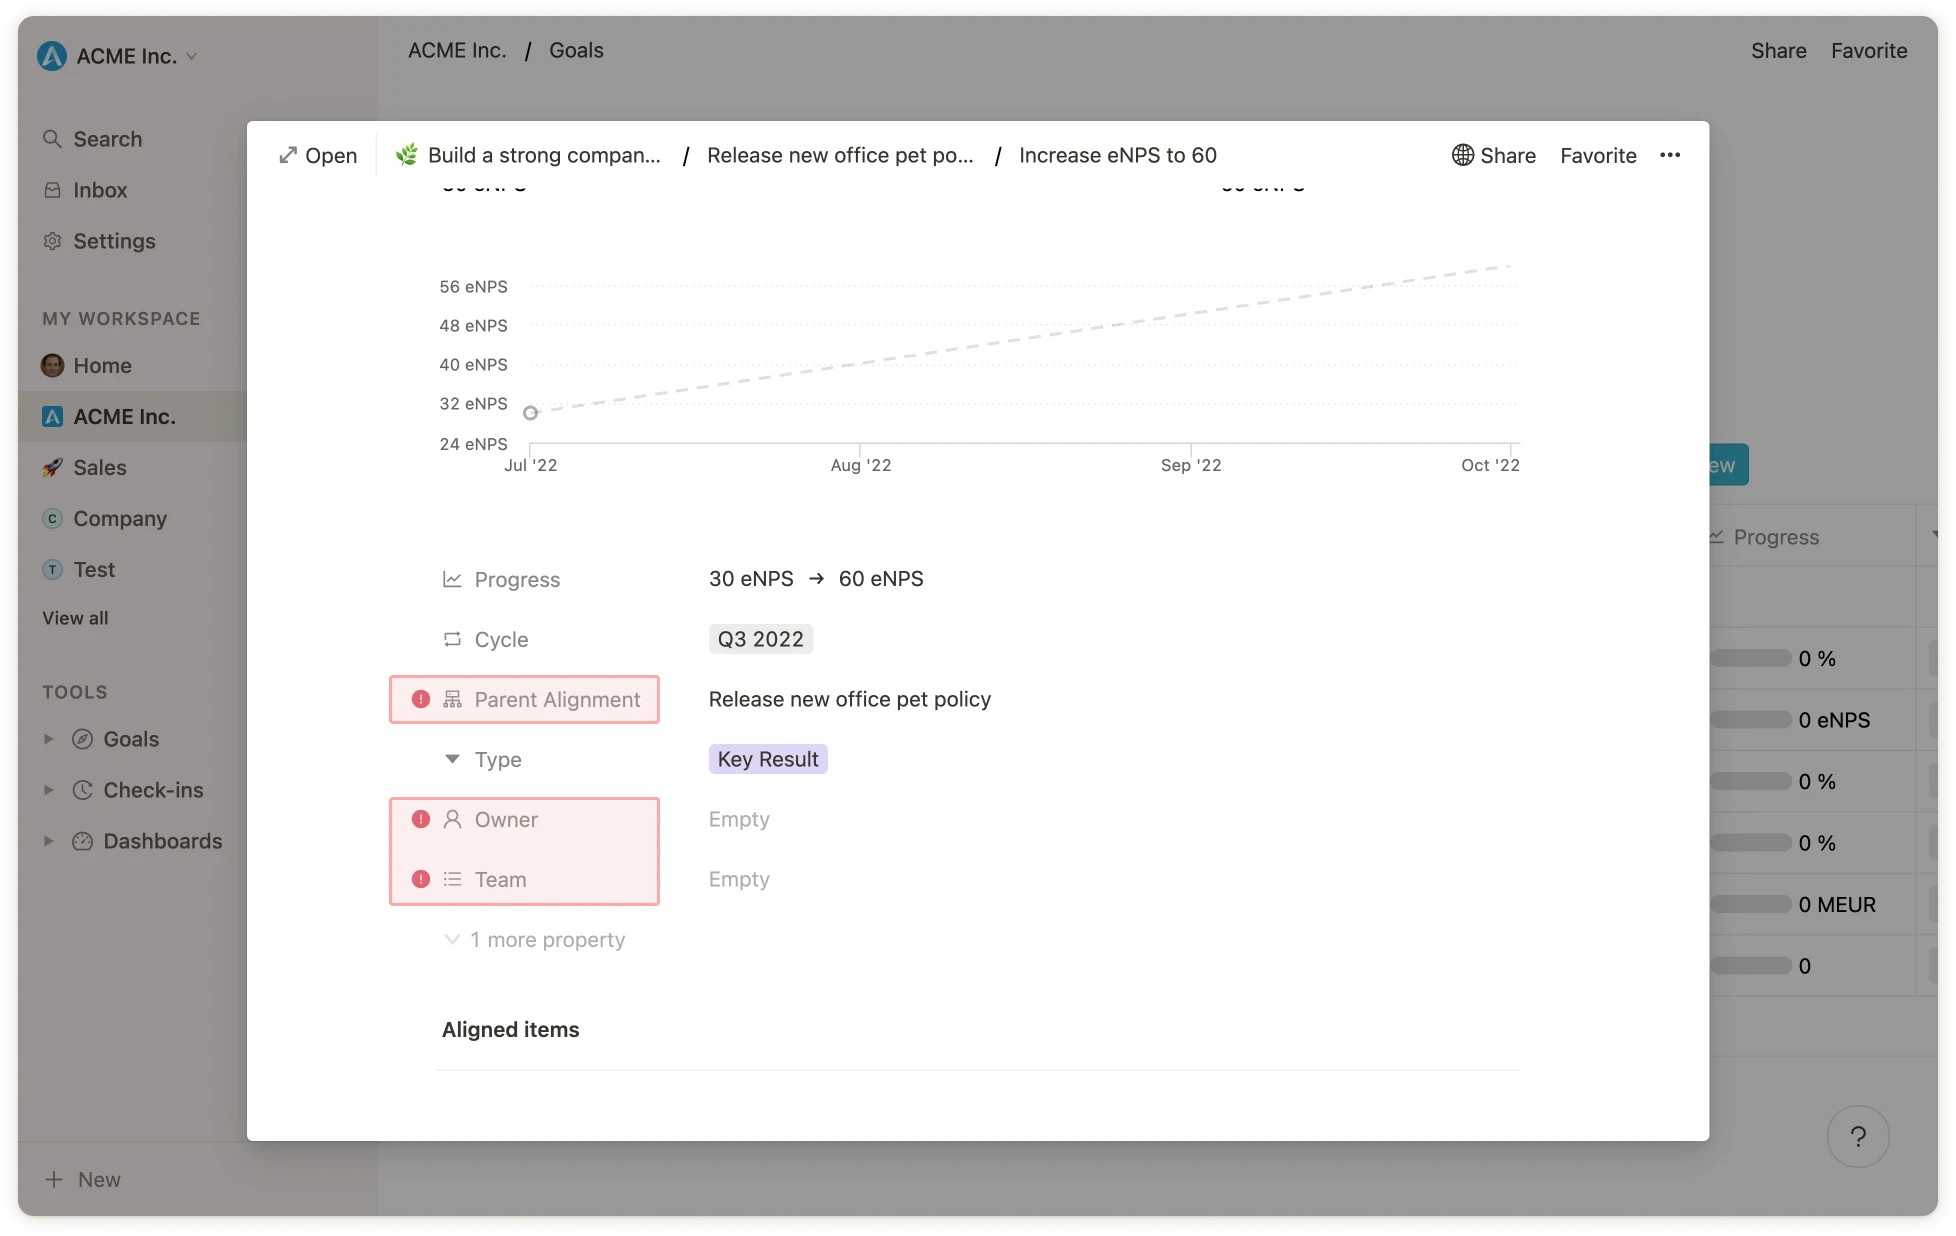 Um die Probleme schnell zu beheben, ohne auf die Detailseite jedes Ziels gehen zu müssen, kannst du einfach auf den roten Button in der Kaskadenansicht klicken und die betroffenen Felder anpassen.
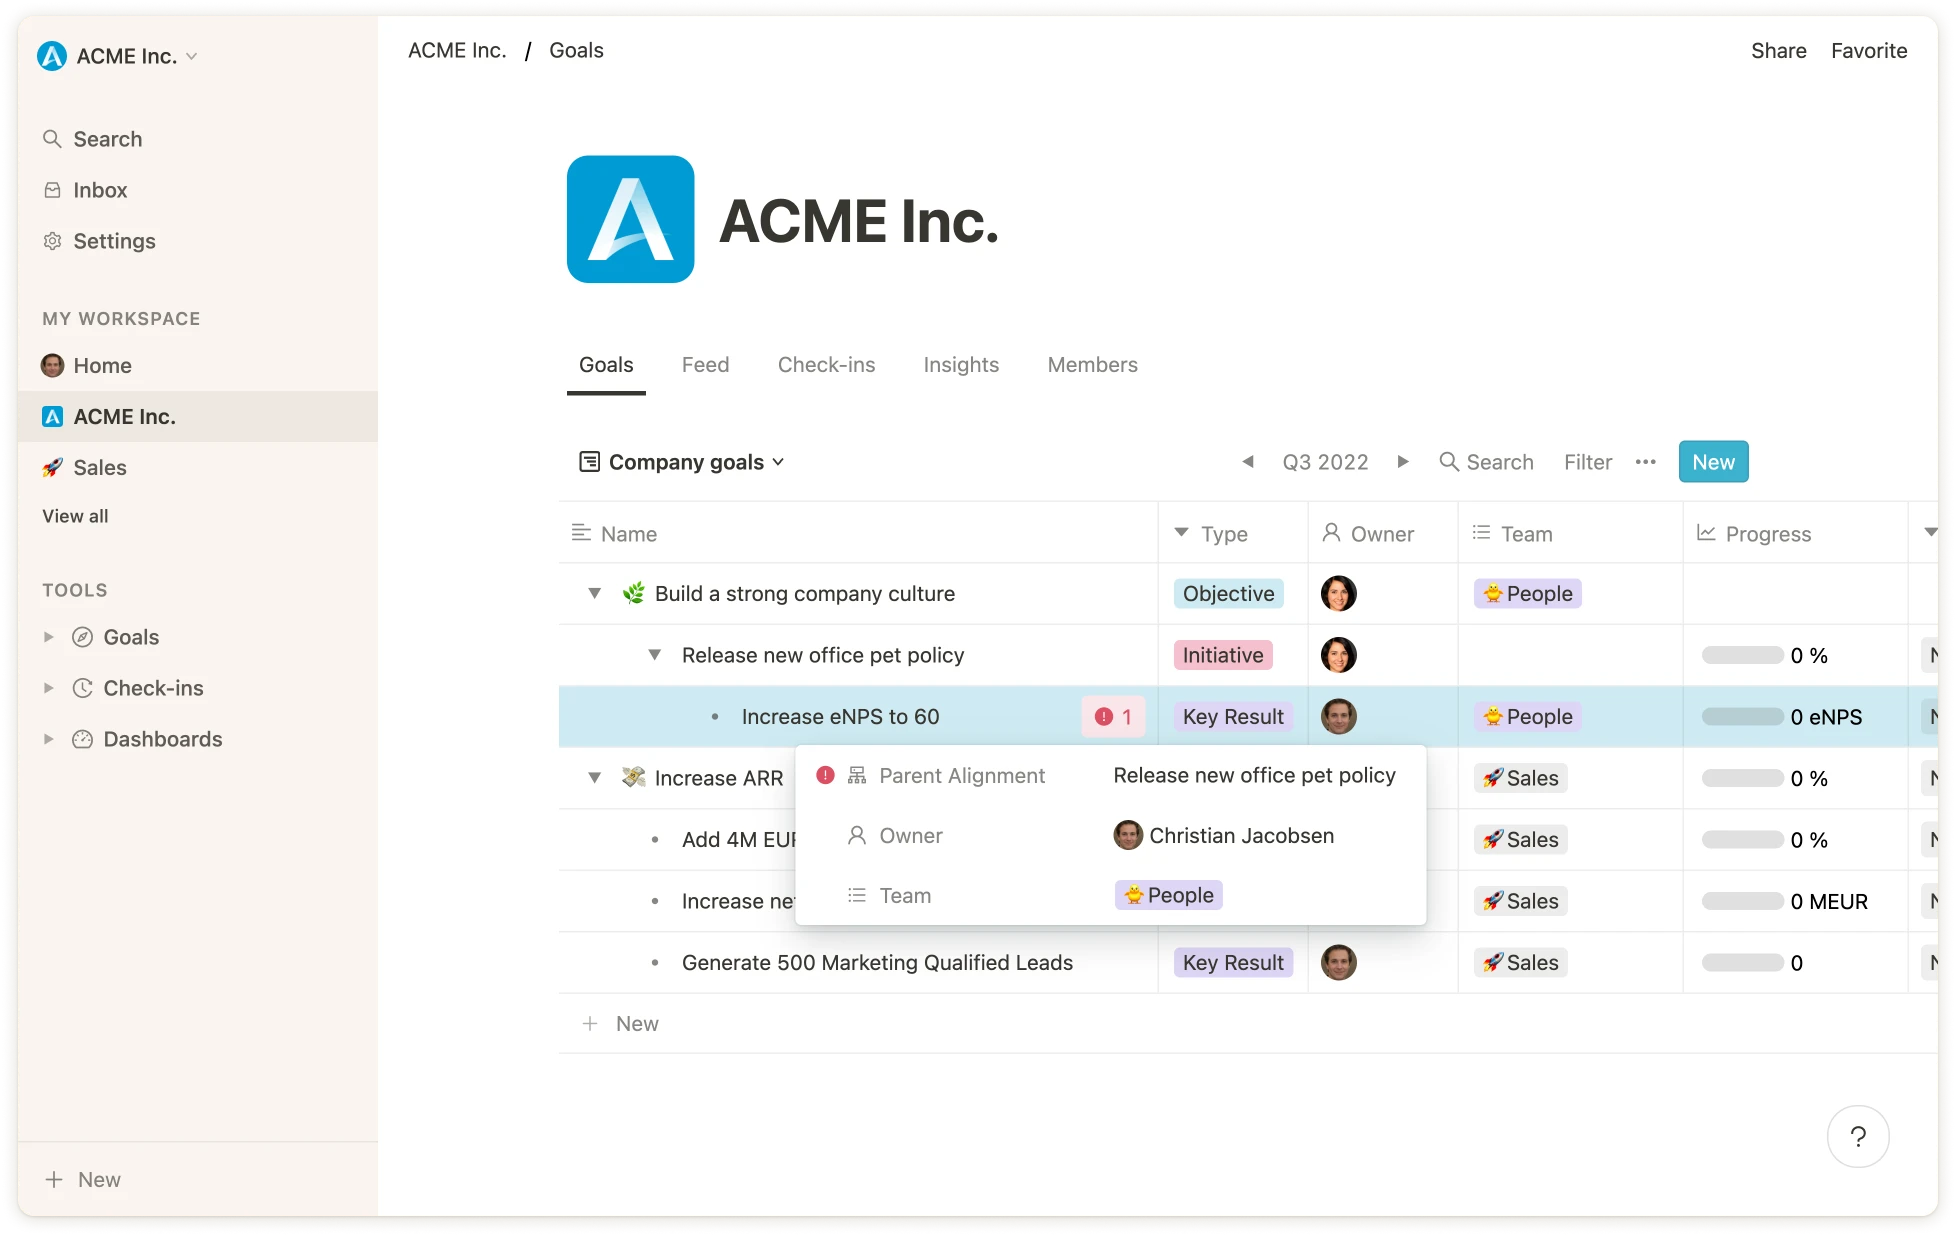 # Zielstatus
Source: https://mooncamp.com/docs/de/goal-statuses
Ein Überblick über Zielstatus
## Erklärung der Zielstatus
Du kannst die Zielstatus so konfigurieren, dass sie perfekt zu den Prozessen und dem Zielsystem deines Unternehmens passen. Im Tool findest du einige gängige voreingestellte Status, aber du kannst sie einfach umbenennen oder eigene Status hinzufügen, um deine Ziele am effektivsten zu verfolgen.
Zusätzlich kannst du deine Status in "Aktiv" und "Abgeschlossen" kategorisieren. Ziele mit einem "Aktiven" Status sind solche, an denen noch gearbeitet wird, während "Abgeschlossene" Ziele bereits erreicht oder beendet wurden.
## Verwendung von Zielstatus
Navigiere zunächst zu `Einstellungen > Ziele > Status`. Am oberen Rand der Seite kannst du einen allgemeinen Namen für die Status-Eigenschaft festlegen. Am häufigsten wird `Status` verwendet (im OKR-Kontext ist `Konfidenz` ebenfalls eine gängige Alternative).
# Zielstatus
Source: https://mooncamp.com/docs/de/goal-statuses
Ein Überblick über Zielstatus
## Erklärung der Zielstatus
Du kannst die Zielstatus so konfigurieren, dass sie perfekt zu den Prozessen und dem Zielsystem deines Unternehmens passen. Im Tool findest du einige gängige voreingestellte Status, aber du kannst sie einfach umbenennen oder eigene Status hinzufügen, um deine Ziele am effektivsten zu verfolgen.
Zusätzlich kannst du deine Status in "Aktiv" und "Abgeschlossen" kategorisieren. Ziele mit einem "Aktiven" Status sind solche, an denen noch gearbeitet wird, während "Abgeschlossene" Ziele bereits erreicht oder beendet wurden.
## Verwendung von Zielstatus
Navigiere zunächst zu `Einstellungen > Ziele > Status`. Am oberen Rand der Seite kannst du einen allgemeinen Namen für die Status-Eigenschaft festlegen. Am häufigsten wird `Status` verwendet (im OKR-Kontext ist `Konfidenz` ebenfalls eine gängige Alternative).
 Darunter findest du eine Liste von Status; einige gängige sind bereits in deinem Account verfügbar, sodass du sofort mit der Zielverfolgung beginnen kannst. Status sind anpassbar, sodass du weitere Status hinzufügen sowie bestehende bearbeiten oder löschen kannst. Standardmäßig sind folgende Status mit ihren jeweiligen Schwellenwerten in deinem Account eingerichtet:
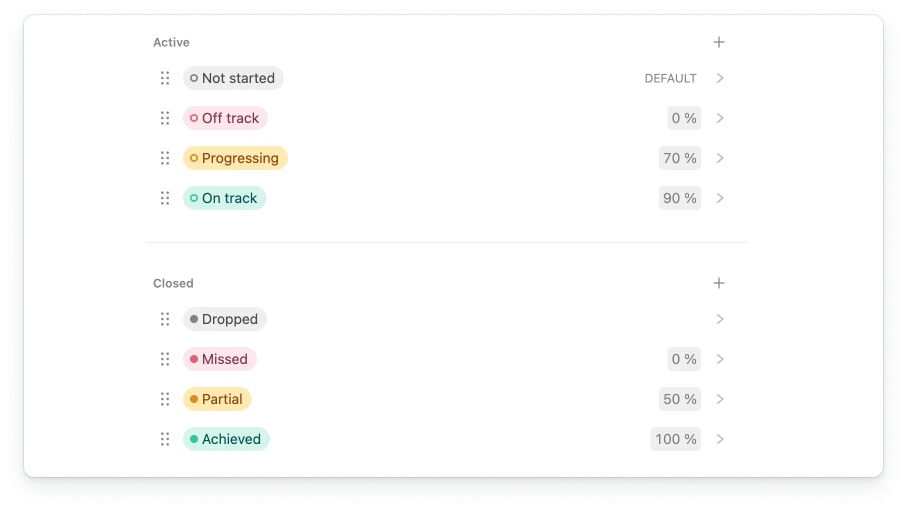 Die vorhandenen Status sind in zwei Gruppen unterteilt: "Aktiv" und "Abgeschlossen". Der Status `Nicht gestartet` unter `Aktiv` ist als `Standard` markiert. Dieser Standardstatus wird allen neu erstellten Zielen zugewiesen, die noch keine Fortschrittsaktualisierungen haben. Er ist ebenfalls vollständig anpassbar (weitere Informationen zu Bewertungen, Gruppen und Standards findest du unten). Du kannst diese Status innerhalb ihrer jeweiligen Gruppen einfach durch Ziehen und Ablegen neu anordnen. Durch Klicken auf den Pfeil auf der rechten Seite kannst du die Einstellungen eines Status anzeigen und bearbeiten:
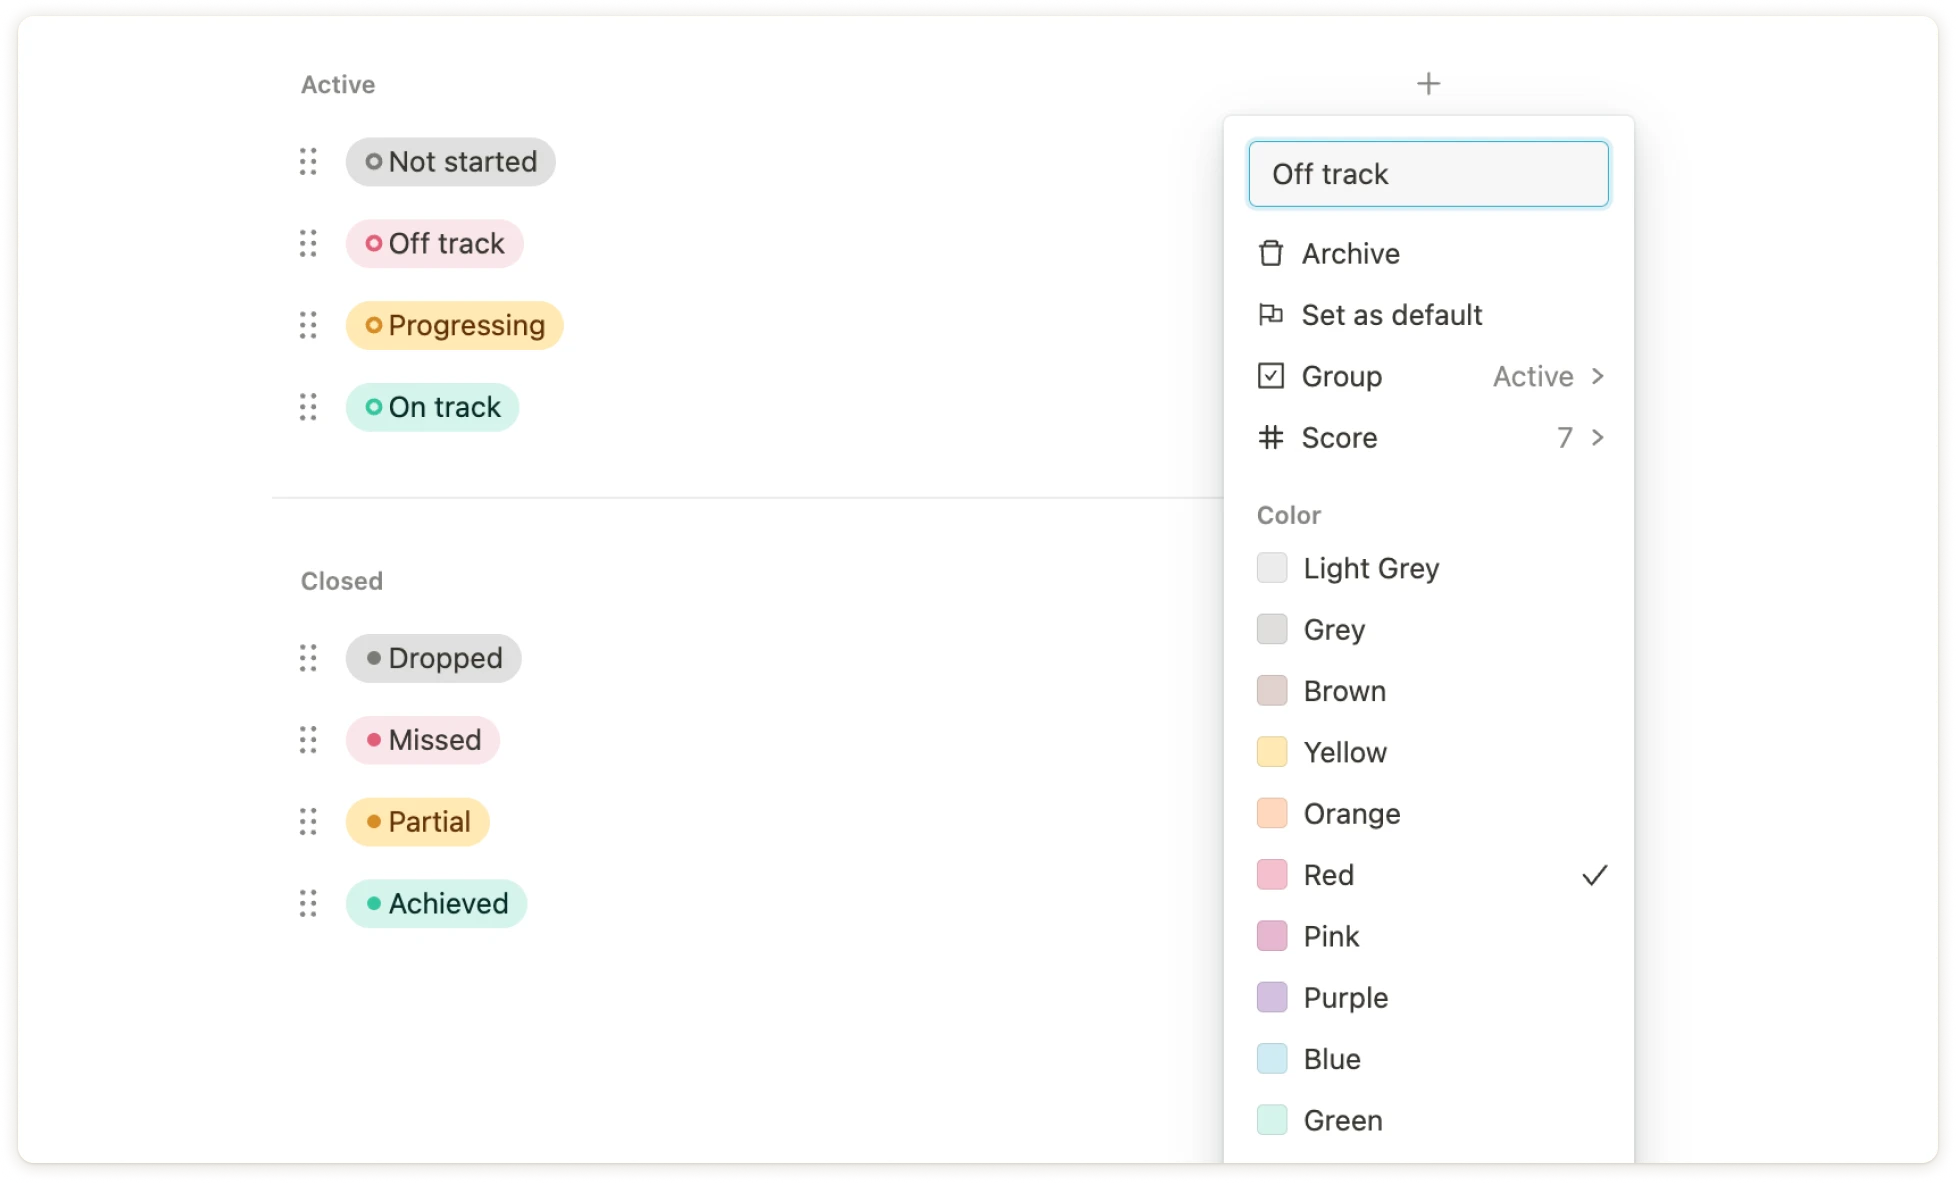 ### Name
Lege einen Titel für deinen Status fest, wenn du einige der voreingestellten Titel umbenennen oder einen neuen erstellen möchtest.
### Archivieren
Zusätzlich kannst du einen Status archivieren, der dann im Archivbereich darunter angezeigt wird. Hier können Einträge entweder wiederhergestellt oder endgültig gelöscht werden. Eine endgültige Löschung ist jedoch nur möglich, solange ein Status nicht in einer Zielaktualisierung in deinem Account verwendet wird.
### Als Standard festlegen
Mit dieser Funktion kannst du einen Status als Standard festlegen. Ein Standardstatus wird automatisch ausgewählt, wenn ein Ziel noch keine Aktualisierungen hat.
Ein Standardstatus kann nicht archiviert werden. Er muss zuerst in einen Nicht-Standard-Status geändert werden.
### Gruppe
Ein Status ist immer einer Gruppe zugeordnet. Hier hast du die Optionen "Aktiv" oder "Abgeschlossen". Aktive Ziele sind solche, an denen aktuell aktiv gearbeitet wird, während abgeschlossene Ziele bereits beendet wurden. Standardmäßig kannst du Ziele abschließen, indem du sie als "Erreicht", "Teilweise", "Verfehlt" oder "Abgebrochen" markierst (falls du beschließt, sie nicht weiter zu verfolgen). Natürlich kannst du auch eigene "Abgeschlossen"-Status definieren.
Beachte, dass abgeschlossene Ziele bei Bedarf noch bearbeitet werden können.
### Schwellenwerte
Du kannst jedem deiner Status einen Schwellenwert zuweisen. Es gibt bereits voreingestellte Vorschläge, wie 0% für `Nicht auf Kurs`, 70% für `In Bearbeitung`, 90% für `Auf Kurs` und 100% für `Erreicht`, 50% für teilweise erreichte Ziele oder 0% für `Verfehlt`. Diese sind alle anpassbar, und du kannst im Grunde jede Zahl zuweisen, um die Status an dein individuelles Zielsystem und deine Prozesse anzupassen. Es wäre zum Beispiel auch möglich, eine Konfidenzskala von 0 bis 10 abzubilden, da diese in der OKR-Welt häufig verwendet wird.
Schwellenwerte kommen in zwei verschiedenen Szenarien zum Tragen. Erstens wird bei jeder neuen Zielaktualisierung eine Statusempfehlung angezeigt. Diese Empfehlung basiert auf dem von dir eingegebenen Wert und dem in den Statuseinstellungen festgelegten Schwellenwert. In der Praxis bedeutet dies, dass bei einer Aktualisierung eines Ziels auf 30% Fortschritt (relativ zur verstrichenen Zeit innerhalb des zugewiesenen Zyklus) das System automatisch den Status vorschlägt, dessen Schwellenwert kleiner oder gleich 30% ist und 30% am nächsten kommt.
Der zeitgewichtete Fortschritt misst, wie weit ein Ziel im Verhältnis zur verstrichenen Zeit vorangekommen ist. Zum Beispiel entsprechen 30% Fortschritt bei 50% der Zeit einem zeitgewichteten Fortschritt von 30% / 0,5 = 60%.
### Name
Lege einen Titel für deinen Status fest, wenn du einige der voreingestellten Titel umbenennen oder einen neuen erstellen möchtest.
### Archivieren
Zusätzlich kannst du einen Status archivieren, der dann im Archivbereich darunter angezeigt wird. Hier können Einträge entweder wiederhergestellt oder endgültig gelöscht werden. Eine endgültige Löschung ist jedoch nur möglich, solange ein Status nicht in einer Zielaktualisierung in deinem Account verwendet wird.
### Als Standard festlegen
Mit dieser Funktion kannst du einen Status als Standard festlegen. Ein Standardstatus wird automatisch ausgewählt, wenn ein Ziel noch keine Aktualisierungen hat.
Ein Standardstatus kann nicht archiviert werden. Er muss zuerst in einen Nicht-Standard-Status geändert werden.
### Gruppe
Ein Status ist immer einer Gruppe zugeordnet. Hier hast du die Optionen "Aktiv" oder "Abgeschlossen". Aktive Ziele sind solche, an denen aktuell aktiv gearbeitet wird, während abgeschlossene Ziele bereits beendet wurden. Standardmäßig kannst du Ziele abschließen, indem du sie als "Erreicht", "Teilweise", "Verfehlt" oder "Abgebrochen" markierst (falls du beschließt, sie nicht weiter zu verfolgen). Natürlich kannst du auch eigene "Abgeschlossen"-Status definieren.
Beachte, dass abgeschlossene Ziele bei Bedarf noch bearbeitet werden können.
### Schwellenwerte
Du kannst jedem deiner Status einen Schwellenwert zuweisen. Es gibt bereits voreingestellte Vorschläge, wie 0% für `Nicht auf Kurs`, 70% für `In Bearbeitung`, 90% für `Auf Kurs` und 100% für `Erreicht`, 50% für teilweise erreichte Ziele oder 0% für `Verfehlt`. Diese sind alle anpassbar, und du kannst im Grunde jede Zahl zuweisen, um die Status an dein individuelles Zielsystem und deine Prozesse anzupassen. Es wäre zum Beispiel auch möglich, eine Konfidenzskala von 0 bis 10 abzubilden, da diese in der OKR-Welt häufig verwendet wird.
Schwellenwerte kommen in zwei verschiedenen Szenarien zum Tragen. Erstens wird bei jeder neuen Zielaktualisierung eine Statusempfehlung angezeigt. Diese Empfehlung basiert auf dem von dir eingegebenen Wert und dem in den Statuseinstellungen festgelegten Schwellenwert. In der Praxis bedeutet dies, dass bei einer Aktualisierung eines Ziels auf 30% Fortschritt (relativ zur verstrichenen Zeit innerhalb des zugewiesenen Zyklus) das System automatisch den Status vorschlägt, dessen Schwellenwert kleiner oder gleich 30% ist und 30% am nächsten kommt.
Der zeitgewichtete Fortschritt misst, wie weit ein Ziel im Verhältnis zur verstrichenen Zeit vorangekommen ist. Zum Beispiel entsprechen 30% Fortschritt bei 50% der Zeit einem zeitgewichteten Fortschritt von 30% / 0,5 = 60%.
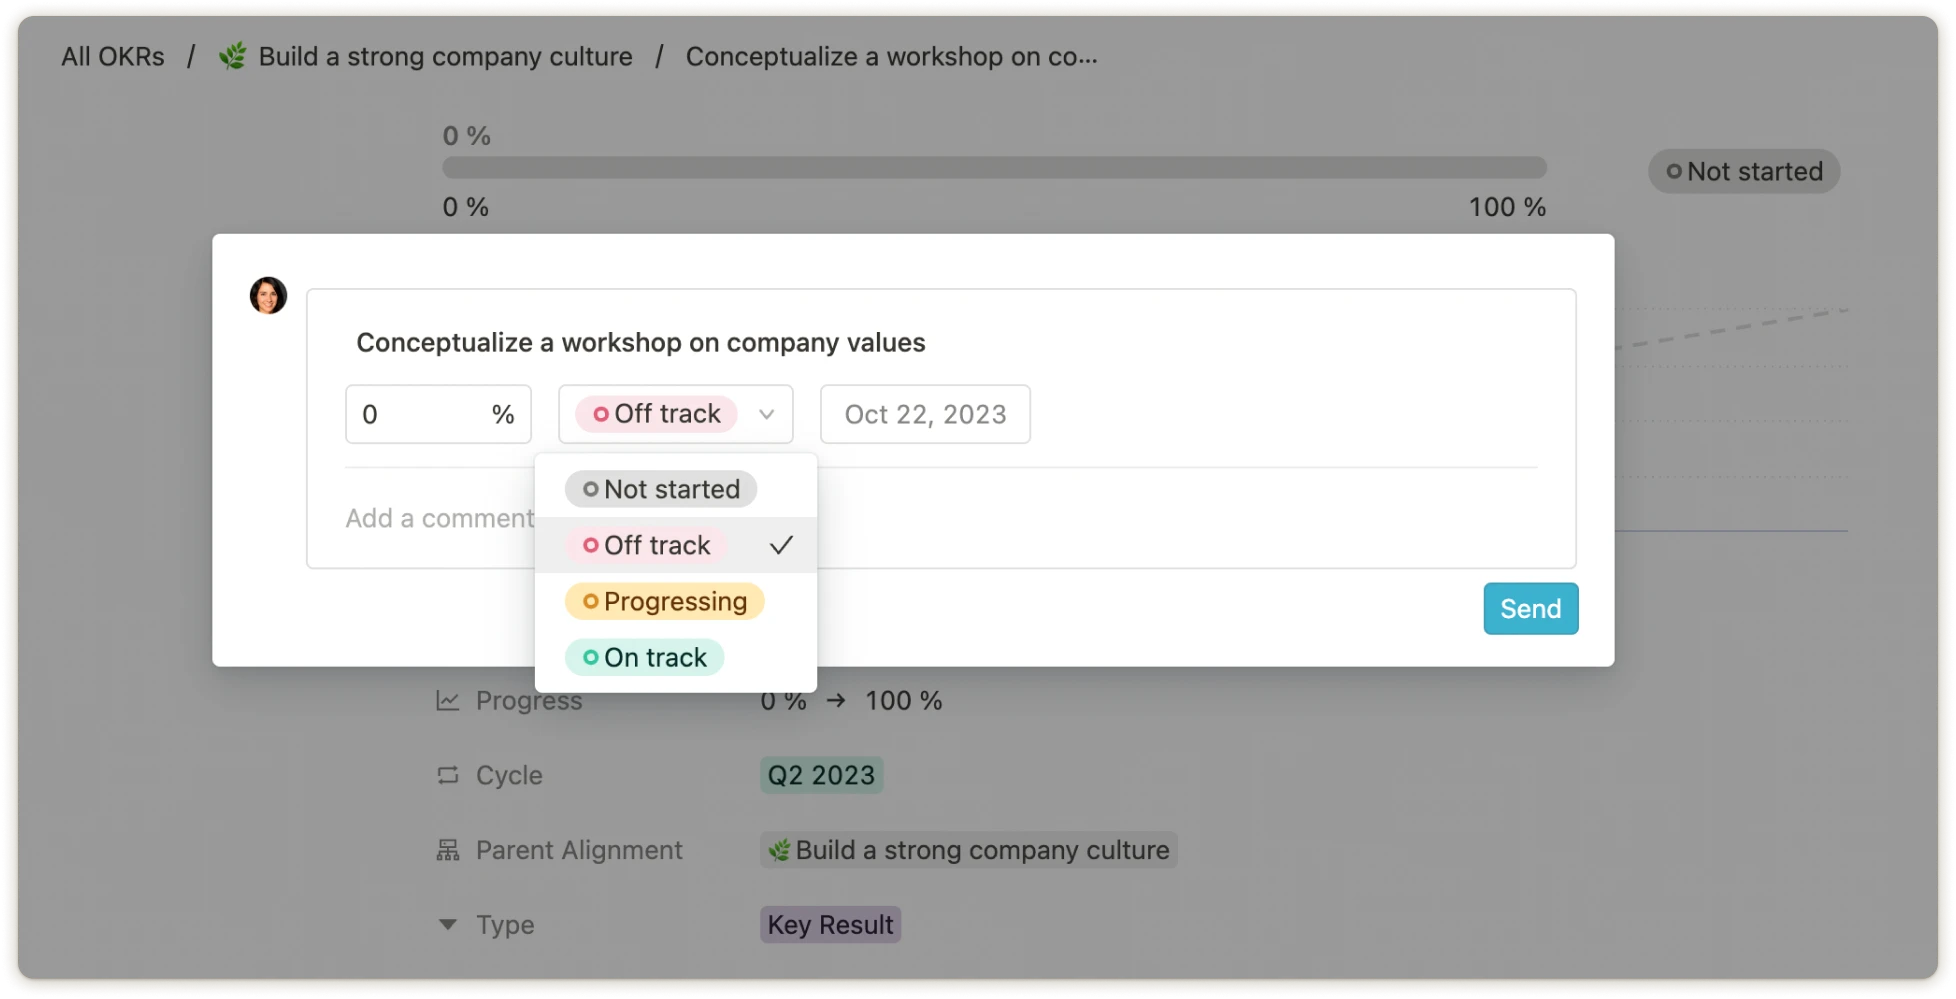 Zweitens zeigen die Diagramme im [Progress-Dashboard](/de/progress-dashboard) einen Durchschnittswert basierend auf der Bewertung der Zielstatus an. Hier hast du die Möglichkeit, entweder den Durchschnitt oder die Verteilung der Status anzuzeigen.
### Farbe
Verschiedene Farben können einem Status zugewiesen werden. Wie wir in den Voreinstellungen vorschlagen, ist es durchaus üblich, Ampelfarben zu verwenden, um verschiedene Fortschrittsstufen von Zielen anzuzeigen. Wenn also der Fortschritt eines Ziels begonnen hat, kann es sinnvoll sein, eine Änderung wie folgt darzustellen: rot für Ziele, die hinter dem Zeitplan liegen, gelb für allgemein fortschreitende Ziele und grün für solche, die planmäßig fortschreiten. Wenn ein Ziel inaktiv ist, weil es nicht weiter verfolgt wird, kann es ausgegraut werden.
Bitte beachte, dass die Farben, die zur visuellen Darstellung des Fortschritts in deinem [Progress-Dashboard](/de/progress-dashboard) und in der [Netzwerkansicht](/de/views) verwendet werden, nicht von den Statusfarben stammen. Stattdessen entsprechen sie deinen Einstellungen unter `Einstellungen > Ziele > Schwellenwerte Fortschrittsindikator`. Hier kann der Fortschritt für das Progress-Dashboard und die Netzwerkansicht in drei verschiedenen Stufen voreingestellt werden: rot, gelb und grün. Du kannst die Prozentschwellen für diese Stufen frei definieren.
# Zielbaum
Source: https://mooncamp.com/docs/de/goal-tree
Ein Überblick über die Zielbaum-Ansicht
Die Zielbaum-Ansicht ist für Kunden im `Pro` und `Enterprise` Plan verfügbar.
## Die Zielbaum-Ansicht erklärt
Die Zielbaum-Ansicht bietet die visuellste Art, Ziele und OKRs darzustellen. Sie kann als Zeichenbrett genutzt werden, um all deine strategischen Säulen, Fokusgebiete, Ziele und Initiativen in einer hierarchischen Ansicht abzubilden. Sie gibt einen Überblick über die Unternehmensstrategie, wobei jedes ausgerichtete Ziel als Karte mit allen relevanten Informationen in einer Ansicht dargestellt wird. Die Karten sind als hierarchische Zweige verbunden und können per Drag & Drop einfach verschoben und neu ausgerichtet werden. Du kannst bestimmte OKR-Sets oder Fokusgebiete heranzoomen sowie isolierte Ziele schnell erkennen und korrekt ausrichten.
Wenn du nicht so viel lesen möchtest, schau dir das Video-Tutorial unten an. Es gibt einen allgemeinen Überblick über die Zielbaum-Ansicht.
## Wie du die Zielbaum-Ansicht nutzt
Mit der Zielbaum-Ansicht hast du verschiedene Möglichkeiten, bequem mit deinen Zielen und OKRs zu arbeiten.
Zunächst kannst du, wie aus der Kaskaden-Ansicht bekannt, ganz einfach deinen Zieltitel, Eigenschaften und Fortschritt **inline bearbeiten**. Über den Bearbeiten-Button in der oberen rechten Ecke einer Zielkarte kannst du den Bearbeitungsmodus aufrufen, ohne die Seite zu verlassen. Mit einem weiteren Klick auf diesen Button kannst du die **Detailseite** des Ziels als Modal oder als ganze Seite öffnen.
Über die Auslassungspunkte `...` ebenfalls in der oberen rechten Ecke einer Zielkarte hast du alle Funktionen, die normalerweise mit dem Rechtsklick im Ziel-Explorer verfügbar sind, wie das Löschen oder Duplizieren eines Ziels, das Erstellen von Unterzielen, das Bearbeiten von Zugriffsrechten oder Eigenschaften. Du kannst auch den Rechtsklick auf eine Zielkarte nutzen, um auf diese Funktionen zuzugreifen.
Auf den Zielkarten siehst du einen "+"-Button auf jeder Seite jeder Karte. Damit kannst du Unter-, Über- oder Geschwisterziele verschiedener Typen in die gewählte
Richtung hinzufügen. Sobald dein Zielbaum mehrere Ebenen hat, gibt es die Funktion, alle Ebenen auf einmal zu **erweitern oder einzuklappen**. Diese findest du über den Rechtsklick oder die Auslassungspunkte `...` in der oberen rechten Ecke einer Zielkarte. Wenn du Ebenen einzeln erweitern oder einklappen möchtest, kannst du die "Nächste Ebene erweitern"-Funktion über die Auslassungspunkte `...` in der oberen rechten Ecke der Zielbaum-Ansicht nutzen. Eine weitere Funktion über das "^1" in der unteren rechten Ecke jeder Zielkarte, die ein Unterziel enthält, ermöglicht es dir, bestimmte Ziele unter jeder Zielkarte zu erweitern.
Dieses Einstellungsmenü enthält außerdem **Eigenschafts- und Kartengrößen-Einstellungen**. Es hilft dir, Eigenschaften einheitlich auf allen angezeigten Zielkarten ein- oder auszublenden. Generell werden leere Eigenschaften auf einer einzelnen Zielkarte nicht angezeigt, sondern nur wenn sie ausgefüllt sind. Auch die Kartenbreite ist auf klein, mittel oder groß einstellbar, um sie kompakter zu machen oder mehr Inhalt anzuzeigen.
Die Sortier- und Filterfunktionen funktionieren genauso wie in der Kaskaden-Ansicht.
### Scroll- und Zoom-Steuerung
Da die Zielbaum-Ansicht eine sehr visuelle Übersicht deiner Ziele und OKRs ist, ist es hilfreich, einige Scroll- und Zoom-Shortcuts zu beherrschen:
* Um **vertikal zu scrollen**, nutze einfach dein Mausrad.
* Um den Inhalt **horizontal** zu verschieben, halte die Umschalttaste auf deiner Tastatur gedrückt und nutze dann das Mausrad. Dies funktioniert mit jeder Maus oder jedem Trackpad.
* Zum **Ein- oder Auszoomen** drücke und halte die Strg-Taste (für Windows oder Linux) oder die Befehlstaste (für macOS) und nutze dann das Mausrad oder Trackpad.
Bitte beachte, dass bei größeren Datensätzen die Daten während des Scrollens geladen werden.
### Auswahlmodus und Handmodus
Mit dem **Auswahlmodus** kannst du mehrere Elemente auswählen und Massenaktionen durchführen.
* Drücke und halte die linke Maustaste, dann ziehe den Cursor, um mehrere Ziele oder Elemente auszuwählen.
* Nutze das Auswahl-Werkzeug, um Massenaktionen für die ausgewählten Elemente durchzuführen.
Der **Handmodus** ermöglicht es dir, den Inhalt durch Ziehen zu verschieben.
* Drücke und halte die linke Maustaste.
* Während du die Taste gedrückt hältst, bewege die Maus, um den Inhalt zu ziehen und zu navigieren.
### Ziele neu ausrichten
Um ein Ziel neu auszurichten, wechsle in den Handmodus und ziehe das entsprechende Ziel einfach per Drag & Drop an eine neue Position, wo es sich automatisch verbindet.
# Zieltypen
Source: https://mooncamp.com/docs/de/goal-types
Ein Überblick über Zieltypen in Mooncamp
## Zieltypen erklärt
Jedes Ziel, das Du in Mooncamp erstellst, wird allgemein als *Ziel* bezeichnet und kann einem Zieltyp zugeordnet werden. Wenn Du die OKR-Methode verwendest, sind die am häufigsten verwendeten Zieltypen Objectives und Key Results. Diese beiden Typen sind in deinem Mooncamp-Account voreingestellt. Im Bereich der OKRs verwenden Organisationen auch andere angepasste Zieltypen, um sich an ihre individuellen Zielsetzungspraktiken anzupassen. Oberhalb der Objective-Ebene werden z.B. *strategische Säulen* oder *Jahresziele* verwendet. Unterhalb der Key Results arbeiten Organisationen mit *Projekten*, *Initiativen* oder *Aufgaben*. Außerdem unterscheiden Organisationen zwischen *Unternehmenszielen* und *Teamzielen* oder verwenden sogar unterschiedliche Begriffe für *Objectives* oder *Key Results*. Daher kannst Du mit Mooncamp flexibel Deine eigenen Zieltypen anpassen und erstellen.
## Wie Du Zieltypen verwendest
**Als Administrator** findest Du unter *Einstellungen > Ziele > Typen und Regeln* die beiden vordefinierten Zieltypen *Objectives* und *Key Results*. Über die Schaltfläche *Neu* kannst Du Deine eigenen Zieltypen hinzufügen, z.B. Strategische Säulen, Initiativen oder Aufgaben. Sobald Du eine längere Liste von Zieltypen hast, hilft Dir das Sechs-Punkte-Symbol auf der linken Seite, diese per Drag & Drop in die gewünschte Hierarchie zu bringen.
Über die Auslassungspunkte `...` neben jedem Zieltyp kannst Du einen Zieltyp entweder bearbeiten, duplizieren oder löschen (die beiden vordefinierten Zieltypen können nicht gelöscht, aber umbenannt werden). Hinter der Bearbeiten-Schaltfläche findest Du eine Reihe von Funktionen. Unter 'Typ bearbeiten' kannst Du einen Namen festlegen sowie ein Symbol und eine Farbe für Deinen Zieltyp hinzufügen. Besonders die Symbole können später in größeren Zielhierarchien sehr hilfreich sein, um die verschiedenen Typen auf einen Blick zu unterscheiden.
Alle Einstellungen unter *Eigenschaften* unterstützen Dich dabei, **Regeln für Deine verschiedenen Zieltypen** zu erstellen. Diese Regeln umfassen Einstellungen zur Hierarchie zwischen Zieltypen, zulässige Messungen für Zieltypen oder die Sichtbarkeit von Eigenschaften auf einer Zieldetailseite für bestimmte Zieltypen (d.h. Eigenschaften können als *erforderlich* oder *nicht erforderlich* oder als *immer sichtbar*, *bei leer ausgeblendet* oder *immer ausgeblendet* festgelegt werden). Detaillierte Informationen findest Du in [diesem Artikel](/de/goal-rules).
## Nützliche Beispiele für Zieltypen
Wie die Abkürzung schon sagt, bestehen die Zieltypen in der gängigen OKR-Methode aus **Objectives** und **Key Results**. Dennoch gibt es viele verschiedene Arten, wie Organisationen die Methode an ihre spezifischen Bedürfnisse anpassen. Organisationen haben möglicherweise den Bedarf an einer weiteren Ebene über ihren vierteljährlichen Objectives und arbeiten mit **Strategischen Säulen** oder **Jahreszielen**, die manche auch **Mittelfristige Ziele** (**MOALs**) nennen. Außerdem kann es notwendig sein, unterhalb der vierteljährlichen Key Results detailliertere Ebenen zu haben, zum Beispiel **Initiativen** oder spezifische **Aufgaben**, die daran angehängt werden können. Hilfreich kann auch sein, eine direkte Verbindung zwischen OKRs, **Projekten** und **KPIs** in einem Tool zu haben, weshalb einige Organisationen diese beiden auch als Zieltypen in Mooncamp verwenden. Für größere Organisationen kann es sinnvoll sein, zwischen Unternehmens-OKRs und Team-OKRs zu unterscheiden und dafür spezifische Zieltypen zu erstellen, also **Unternehmensziele und -Key Results** sowie **Teamziele und -Key Results**.
**Tipp:** Das Festlegen eines **Icons** für jeden Zieltyp kann sehr hilfreich sein, um einen **besseren Überblick** in größeren Zielhierarchien zu behalten und die verschiedenen Typen auf einen Blick zu **unterscheiden**.
# Ziele-Übersicht
Source: https://mooncamp.com/docs/de/goals-overview
Navigation durch Ziele auf Unternehmens-, Team- und individueller Ebene
Du kannst in der Seitenleiste auf verschiedene Ziel-Ansichten zugreifen:
* Der Teamspace deiner Organisation, deines Teams sowie andere Teamspaces
* Deine Homepage
* Ziel-Explorer
### Teamspaces (Organisation und Unterteams)
Zweitens zeigen die Diagramme im [Progress-Dashboard](/de/progress-dashboard) einen Durchschnittswert basierend auf der Bewertung der Zielstatus an. Hier hast du die Möglichkeit, entweder den Durchschnitt oder die Verteilung der Status anzuzeigen.
### Farbe
Verschiedene Farben können einem Status zugewiesen werden. Wie wir in den Voreinstellungen vorschlagen, ist es durchaus üblich, Ampelfarben zu verwenden, um verschiedene Fortschrittsstufen von Zielen anzuzeigen. Wenn also der Fortschritt eines Ziels begonnen hat, kann es sinnvoll sein, eine Änderung wie folgt darzustellen: rot für Ziele, die hinter dem Zeitplan liegen, gelb für allgemein fortschreitende Ziele und grün für solche, die planmäßig fortschreiten. Wenn ein Ziel inaktiv ist, weil es nicht weiter verfolgt wird, kann es ausgegraut werden.
Bitte beachte, dass die Farben, die zur visuellen Darstellung des Fortschritts in deinem [Progress-Dashboard](/de/progress-dashboard) und in der [Netzwerkansicht](/de/views) verwendet werden, nicht von den Statusfarben stammen. Stattdessen entsprechen sie deinen Einstellungen unter `Einstellungen > Ziele > Schwellenwerte Fortschrittsindikator`. Hier kann der Fortschritt für das Progress-Dashboard und die Netzwerkansicht in drei verschiedenen Stufen voreingestellt werden: rot, gelb und grün. Du kannst die Prozentschwellen für diese Stufen frei definieren.
# Zielbaum
Source: https://mooncamp.com/docs/de/goal-tree
Ein Überblick über die Zielbaum-Ansicht
Die Zielbaum-Ansicht ist für Kunden im `Pro` und `Enterprise` Plan verfügbar.
## Die Zielbaum-Ansicht erklärt
Die Zielbaum-Ansicht bietet die visuellste Art, Ziele und OKRs darzustellen. Sie kann als Zeichenbrett genutzt werden, um all deine strategischen Säulen, Fokusgebiete, Ziele und Initiativen in einer hierarchischen Ansicht abzubilden. Sie gibt einen Überblick über die Unternehmensstrategie, wobei jedes ausgerichtete Ziel als Karte mit allen relevanten Informationen in einer Ansicht dargestellt wird. Die Karten sind als hierarchische Zweige verbunden und können per Drag & Drop einfach verschoben und neu ausgerichtet werden. Du kannst bestimmte OKR-Sets oder Fokusgebiete heranzoomen sowie isolierte Ziele schnell erkennen und korrekt ausrichten.
Wenn du nicht so viel lesen möchtest, schau dir das Video-Tutorial unten an. Es gibt einen allgemeinen Überblick über die Zielbaum-Ansicht.
## Wie du die Zielbaum-Ansicht nutzt
Mit der Zielbaum-Ansicht hast du verschiedene Möglichkeiten, bequem mit deinen Zielen und OKRs zu arbeiten.
Zunächst kannst du, wie aus der Kaskaden-Ansicht bekannt, ganz einfach deinen Zieltitel, Eigenschaften und Fortschritt **inline bearbeiten**. Über den Bearbeiten-Button in der oberen rechten Ecke einer Zielkarte kannst du den Bearbeitungsmodus aufrufen, ohne die Seite zu verlassen. Mit einem weiteren Klick auf diesen Button kannst du die **Detailseite** des Ziels als Modal oder als ganze Seite öffnen.
Über die Auslassungspunkte `...` ebenfalls in der oberen rechten Ecke einer Zielkarte hast du alle Funktionen, die normalerweise mit dem Rechtsklick im Ziel-Explorer verfügbar sind, wie das Löschen oder Duplizieren eines Ziels, das Erstellen von Unterzielen, das Bearbeiten von Zugriffsrechten oder Eigenschaften. Du kannst auch den Rechtsklick auf eine Zielkarte nutzen, um auf diese Funktionen zuzugreifen.
Auf den Zielkarten siehst du einen "+"-Button auf jeder Seite jeder Karte. Damit kannst du Unter-, Über- oder Geschwisterziele verschiedener Typen in die gewählte
Richtung hinzufügen. Sobald dein Zielbaum mehrere Ebenen hat, gibt es die Funktion, alle Ebenen auf einmal zu **erweitern oder einzuklappen**. Diese findest du über den Rechtsklick oder die Auslassungspunkte `...` in der oberen rechten Ecke einer Zielkarte. Wenn du Ebenen einzeln erweitern oder einklappen möchtest, kannst du die "Nächste Ebene erweitern"-Funktion über die Auslassungspunkte `...` in der oberen rechten Ecke der Zielbaum-Ansicht nutzen. Eine weitere Funktion über das "^1" in der unteren rechten Ecke jeder Zielkarte, die ein Unterziel enthält, ermöglicht es dir, bestimmte Ziele unter jeder Zielkarte zu erweitern.
Dieses Einstellungsmenü enthält außerdem **Eigenschafts- und Kartengrößen-Einstellungen**. Es hilft dir, Eigenschaften einheitlich auf allen angezeigten Zielkarten ein- oder auszublenden. Generell werden leere Eigenschaften auf einer einzelnen Zielkarte nicht angezeigt, sondern nur wenn sie ausgefüllt sind. Auch die Kartenbreite ist auf klein, mittel oder groß einstellbar, um sie kompakter zu machen oder mehr Inhalt anzuzeigen.
Die Sortier- und Filterfunktionen funktionieren genauso wie in der Kaskaden-Ansicht.
### Scroll- und Zoom-Steuerung
Da die Zielbaum-Ansicht eine sehr visuelle Übersicht deiner Ziele und OKRs ist, ist es hilfreich, einige Scroll- und Zoom-Shortcuts zu beherrschen:
* Um **vertikal zu scrollen**, nutze einfach dein Mausrad.
* Um den Inhalt **horizontal** zu verschieben, halte die Umschalttaste auf deiner Tastatur gedrückt und nutze dann das Mausrad. Dies funktioniert mit jeder Maus oder jedem Trackpad.
* Zum **Ein- oder Auszoomen** drücke und halte die Strg-Taste (für Windows oder Linux) oder die Befehlstaste (für macOS) und nutze dann das Mausrad oder Trackpad.
Bitte beachte, dass bei größeren Datensätzen die Daten während des Scrollens geladen werden.
### Auswahlmodus und Handmodus
Mit dem **Auswahlmodus** kannst du mehrere Elemente auswählen und Massenaktionen durchführen.
* Drücke und halte die linke Maustaste, dann ziehe den Cursor, um mehrere Ziele oder Elemente auszuwählen.
* Nutze das Auswahl-Werkzeug, um Massenaktionen für die ausgewählten Elemente durchzuführen.
Der **Handmodus** ermöglicht es dir, den Inhalt durch Ziehen zu verschieben.
* Drücke und halte die linke Maustaste.
* Während du die Taste gedrückt hältst, bewege die Maus, um den Inhalt zu ziehen und zu navigieren.
### Ziele neu ausrichten
Um ein Ziel neu auszurichten, wechsle in den Handmodus und ziehe das entsprechende Ziel einfach per Drag & Drop an eine neue Position, wo es sich automatisch verbindet.
# Zieltypen
Source: https://mooncamp.com/docs/de/goal-types
Ein Überblick über Zieltypen in Mooncamp
## Zieltypen erklärt
Jedes Ziel, das Du in Mooncamp erstellst, wird allgemein als *Ziel* bezeichnet und kann einem Zieltyp zugeordnet werden. Wenn Du die OKR-Methode verwendest, sind die am häufigsten verwendeten Zieltypen Objectives und Key Results. Diese beiden Typen sind in deinem Mooncamp-Account voreingestellt. Im Bereich der OKRs verwenden Organisationen auch andere angepasste Zieltypen, um sich an ihre individuellen Zielsetzungspraktiken anzupassen. Oberhalb der Objective-Ebene werden z.B. *strategische Säulen* oder *Jahresziele* verwendet. Unterhalb der Key Results arbeiten Organisationen mit *Projekten*, *Initiativen* oder *Aufgaben*. Außerdem unterscheiden Organisationen zwischen *Unternehmenszielen* und *Teamzielen* oder verwenden sogar unterschiedliche Begriffe für *Objectives* oder *Key Results*. Daher kannst Du mit Mooncamp flexibel Deine eigenen Zieltypen anpassen und erstellen.
## Wie Du Zieltypen verwendest
**Als Administrator** findest Du unter *Einstellungen > Ziele > Typen und Regeln* die beiden vordefinierten Zieltypen *Objectives* und *Key Results*. Über die Schaltfläche *Neu* kannst Du Deine eigenen Zieltypen hinzufügen, z.B. Strategische Säulen, Initiativen oder Aufgaben. Sobald Du eine längere Liste von Zieltypen hast, hilft Dir das Sechs-Punkte-Symbol auf der linken Seite, diese per Drag & Drop in die gewünschte Hierarchie zu bringen.
Über die Auslassungspunkte `...` neben jedem Zieltyp kannst Du einen Zieltyp entweder bearbeiten, duplizieren oder löschen (die beiden vordefinierten Zieltypen können nicht gelöscht, aber umbenannt werden). Hinter der Bearbeiten-Schaltfläche findest Du eine Reihe von Funktionen. Unter 'Typ bearbeiten' kannst Du einen Namen festlegen sowie ein Symbol und eine Farbe für Deinen Zieltyp hinzufügen. Besonders die Symbole können später in größeren Zielhierarchien sehr hilfreich sein, um die verschiedenen Typen auf einen Blick zu unterscheiden.
Alle Einstellungen unter *Eigenschaften* unterstützen Dich dabei, **Regeln für Deine verschiedenen Zieltypen** zu erstellen. Diese Regeln umfassen Einstellungen zur Hierarchie zwischen Zieltypen, zulässige Messungen für Zieltypen oder die Sichtbarkeit von Eigenschaften auf einer Zieldetailseite für bestimmte Zieltypen (d.h. Eigenschaften können als *erforderlich* oder *nicht erforderlich* oder als *immer sichtbar*, *bei leer ausgeblendet* oder *immer ausgeblendet* festgelegt werden). Detaillierte Informationen findest Du in [diesem Artikel](/de/goal-rules).
## Nützliche Beispiele für Zieltypen
Wie die Abkürzung schon sagt, bestehen die Zieltypen in der gängigen OKR-Methode aus **Objectives** und **Key Results**. Dennoch gibt es viele verschiedene Arten, wie Organisationen die Methode an ihre spezifischen Bedürfnisse anpassen. Organisationen haben möglicherweise den Bedarf an einer weiteren Ebene über ihren vierteljährlichen Objectives und arbeiten mit **Strategischen Säulen** oder **Jahreszielen**, die manche auch **Mittelfristige Ziele** (**MOALs**) nennen. Außerdem kann es notwendig sein, unterhalb der vierteljährlichen Key Results detailliertere Ebenen zu haben, zum Beispiel **Initiativen** oder spezifische **Aufgaben**, die daran angehängt werden können. Hilfreich kann auch sein, eine direkte Verbindung zwischen OKRs, **Projekten** und **KPIs** in einem Tool zu haben, weshalb einige Organisationen diese beiden auch als Zieltypen in Mooncamp verwenden. Für größere Organisationen kann es sinnvoll sein, zwischen Unternehmens-OKRs und Team-OKRs zu unterscheiden und dafür spezifische Zieltypen zu erstellen, also **Unternehmensziele und -Key Results** sowie **Teamziele und -Key Results**.
**Tipp:** Das Festlegen eines **Icons** für jeden Zieltyp kann sehr hilfreich sein, um einen **besseren Überblick** in größeren Zielhierarchien zu behalten und die verschiedenen Typen auf einen Blick zu **unterscheiden**.
# Ziele-Übersicht
Source: https://mooncamp.com/docs/de/goals-overview
Navigation durch Ziele auf Unternehmens-, Team- und individueller Ebene
Du kannst in der Seitenleiste auf verschiedene Ziel-Ansichten zugreifen:
* Der Teamspace deiner Organisation, deines Teams sowie andere Teamspaces
* Deine Homepage
* Ziel-Explorer
### Teamspaces (Organisation und Unterteams)
 ### Homepage
Hier siehst du alle dir zugewiesenen Ziele auf einen Blick. Du kannst auch Filter verwenden, um festzulegen, welche Ziele auf deiner eigenen Homepage angezeigt werden sollen.
### Homepage
Hier siehst du alle dir zugewiesenen Ziele auf einen Blick. Du kannst auch Filter verwenden, um festzulegen, welche Ziele auf deiner eigenen Homepage angezeigt werden sollen.
 ### Ziel-Explorer
# Ziel-Einstellungen
Source: https://mooncamp.com/docs/de/goals-settings
Ein Überblick über die Ziel-Einstellungsseite in den Einstellungen
Um zu den Ziel-Einstellungen zu gelangen, navigiere zu `Einstellungen` und klicke dann unten auf `Ziele > Einstellungen`.
## Anzeigename
Welchen Namen möchtest du in der App anzeigen lassen, wenn auf deine Ziele verwiesen wird. Die meisten Unternehmen bleiben bei "Ziele", aber einige unserer Kunden verwenden Begriffe wie "OKRs".
### Ziel-Explorer
# Ziel-Einstellungen
Source: https://mooncamp.com/docs/de/goals-settings
Ein Überblick über die Ziel-Einstellungsseite in den Einstellungen
Um zu den Ziel-Einstellungen zu gelangen, navigiere zu `Einstellungen` und klicke dann unten auf `Ziele > Einstellungen`.
## Anzeigename
Welchen Namen möchtest du in der App anzeigen lassen, wenn auf deine Ziele verwiesen wird. Die meisten Unternehmen bleiben bei "Ziele", aber einige unserer Kunden verwenden Begriffe wie "OKRs".
.webp) ## Standardzugriff für deine Ziele
Diese Einstellung definiert die Standard-Zugriffsrechte deiner Ziele bei deren Erstellung. Im Screenshot unten ist der Standardzugriff zum Beispiel so eingestellt, dass wenn ein Benutzer ein Ziel erstellt, er vollen Zugriff hat und alle anderen im Account kommentieren können. Das bedeutet, sie können kommentieren und sogar Updates zum Ziel geben, aber keine Bearbeitungen vornehmen oder Zugriffsrechte vergeben.
Die verschiedenen Zugriffsebenen sind wie folgt definiert:
* Kein Zugriff
* Kann ansehen - bedeutet, sie können das Ziel sehen, aber nicht damit interagieren, nicht einmal einen Kommentar hinterlassen.
* Kann kommentieren - bedeutet, sie können kommentieren und Updates geben
* Kann bearbeiten - bedeutet, sie können Titel und Eigenschaften bearbeiten, aber nicht die Zugriffsrechte.
* Voller Zugriff - alles oben Genannte plus die Möglichkeit, anderen Zugriffsrechte zu geben.
## Standardzugriff für deine Ziele
Diese Einstellung definiert die Standard-Zugriffsrechte deiner Ziele bei deren Erstellung. Im Screenshot unten ist der Standardzugriff zum Beispiel so eingestellt, dass wenn ein Benutzer ein Ziel erstellt, er vollen Zugriff hat und alle anderen im Account kommentieren können. Das bedeutet, sie können kommentieren und sogar Updates zum Ziel geben, aber keine Bearbeitungen vornehmen oder Zugriffsrechte vergeben.
Die verschiedenen Zugriffsebenen sind wie folgt definiert:
* Kein Zugriff
* Kann ansehen - bedeutet, sie können das Ziel sehen, aber nicht damit interagieren, nicht einmal einen Kommentar hinterlassen.
* Kann kommentieren - bedeutet, sie können kommentieren und Updates geben
* Kann bearbeiten - bedeutet, sie können Titel und Eigenschaften bearbeiten, aber nicht die Zugriffsrechte.
* Voller Zugriff - alles oben Genannte plus die Möglichkeit, anderen Zugriffsrechte zu geben.
.webp) ## Schwellenwerte Fortschrittsindikator
Hier kannst du die Schwellenwerte definieren für das, was nicht auf Kurs, in Bearbeitung oder auf Kurs ist. Im Beispiel unten sind die Einstellungen recht ambitioniert. Einige unserer Kunden setzen sie niedriger, damit die Ergebnisse keine negative Auswirkung auf die Mitarbeitermoral haben.
## Schwellenwerte Fortschrittsindikator
Hier kannst du die Schwellenwerte definieren für das, was nicht auf Kurs, in Bearbeitung oder auf Kurs ist. Im Beispiel unten sind die Einstellungen recht ambitioniert. Einige unserer Kunden setzen sie niedriger, damit die Ergebnisse keine negative Auswirkung auf die Mitarbeitermoral haben.
.webp) # Google Sheets Integration
Source: https://mooncamp.com/docs/de/google-sheets-integration
Ein Überblick über die Datenintegration mit Google Sheets.
## Die Google Sheets Integration erklärt
Die Google Sheets Integration ermöglicht es dir, Daten aus einer bestimmten Zelle innerhalb eines Google Sheets-Dokuments zu übernehmen und damit deine Ziele in Mooncamp automatisch zu aktualisieren. Um auf Dokumente über Mooncamp zugreifen zu können, musst du mit deiner E-Mail-Adresse Zugriff auf die Google Sheets-Datei haben. Außerdem musst du eine Verbindung zu Google Sheets erstellen.
## Ziele mit Google Sheets verbinden
Als ersten Schritt muss der Administrator deines Mooncamp-Kontos sicherstellen, dass die Integration über `Einstellungen > Integrationen > Datenintegrationen > Google Sheets` aktiviert ist.
Um eine Verbindung zu Google Sheets herzustellen, lies bitte unseren Artikel über die Verbindung zu Datenintegrationen: [Ziele mit Datenintegrationen verbinden](/de/data-integrations)
Bitte beachte, dass du bei **Google Sheets** nur Dateien aus deinem **persönlichen Google Drive** verbinden kannst und keine Dateien aus gemeinsam genutzten Ordnern. Über die Datenschutzeinstellungen deiner Datenverbindung kannst du deine Dateien jedoch mit anderen Mitgliedern innerhalb deines Mooncamp-Kontos teilen (Details dazu findest du [hier](/de/data-integrations)).
## Eine Zelle auswählen
Nachdem du die Verbindung zu Google Sheets hergestellt hast, ist der nächste Schritt die Auswahl des Dokuments, auf das du dich beziehen möchtest. Wenn du auf das Dokument-Dropdown-Menü klickst, findest du eine Liste der verfügbaren Dokumente. Danach kannst du das richtige Blatt/die richtige Tabelle auswählen und zuletzt die entsprechende Spalte und Zeile eingeben. Ab jetzt wird bei jeder Aktualisierung dieser Zelle automatisch der Wert in Mooncamp aktualisiert.
# Google Sheets Integration
Source: https://mooncamp.com/docs/de/google-sheets-integration
Ein Überblick über die Datenintegration mit Google Sheets.
## Die Google Sheets Integration erklärt
Die Google Sheets Integration ermöglicht es dir, Daten aus einer bestimmten Zelle innerhalb eines Google Sheets-Dokuments zu übernehmen und damit deine Ziele in Mooncamp automatisch zu aktualisieren. Um auf Dokumente über Mooncamp zugreifen zu können, musst du mit deiner E-Mail-Adresse Zugriff auf die Google Sheets-Datei haben. Außerdem musst du eine Verbindung zu Google Sheets erstellen.
## Ziele mit Google Sheets verbinden
Als ersten Schritt muss der Administrator deines Mooncamp-Kontos sicherstellen, dass die Integration über `Einstellungen > Integrationen > Datenintegrationen > Google Sheets` aktiviert ist.
Um eine Verbindung zu Google Sheets herzustellen, lies bitte unseren Artikel über die Verbindung zu Datenintegrationen: [Ziele mit Datenintegrationen verbinden](/de/data-integrations)
Bitte beachte, dass du bei **Google Sheets** nur Dateien aus deinem **persönlichen Google Drive** verbinden kannst und keine Dateien aus gemeinsam genutzten Ordnern. Über die Datenschutzeinstellungen deiner Datenverbindung kannst du deine Dateien jedoch mit anderen Mitgliedern innerhalb deines Mooncamp-Kontos teilen (Details dazu findest du [hier](/de/data-integrations)).
## Eine Zelle auswählen
Nachdem du die Verbindung zu Google Sheets hergestellt hast, ist der nächste Schritt die Auswahl des Dokuments, auf das du dich beziehen möchtest. Wenn du auf das Dokument-Dropdown-Menü klickst, findest du eine Liste der verfügbaren Dokumente. Danach kannst du das richtige Blatt/die richtige Tabelle auswählen und zuletzt die entsprechende Spalte und Zeile eingeben. Ab jetzt wird bei jeder Aktualisierung dieser Zelle automatisch der Wert in Mooncamp aktualisiert.
 Tipp für Administratoren: Gehe zu `Einstellungen > Integrationen` und stelle sicher, dass unter `Synchronisation` jeder Tag ausgewählt ist.
# Health Dashboard
Source: https://mooncamp.com/docs/de/health-dashboard
Ein Überblick über das Health Dashboard für Ziele und OKRs.
Das Health Dashboard ist für Kunden im `Pro` und `Enterprise` Plan verfügbar.
## Das Health Dashboard erklärt
Mit dem Health Dashboard kannst du eine umfassende Gesundheits- und Qualitätsprüfung aller Ziele deiner Organisation durchführen. Betrachte es als ein Cockpit, von dem aus du schnell Probleme mit deinen Zielen erkennen und lösen kannst. Dies hilft sicherzustellen, dass dein gesamter Zielmanagementprozess reibungslos läuft und dass alle die [Ziel- und OKR-Regeln](/de/goal-rules) befolgen, die du im Einstellungsbereich konfiguriert hast.
**Wichtiger Hinweis:** Damit alle Mitglieder Zugriff auf Fortschritts- und Health Dashboards erhalten, muss dies einmalig vom Admin unter `Einstellungen > Zugriffsgruppen > Mitglied > Kann Fortschritts- und Health Dashboards einsehen` eingestellt werden.
## Navigation im Health Dashboard
Das Health Dashboard findest du unter `Dashboards` in der Seitenleiste.
Tipp für Administratoren: Gehe zu `Einstellungen > Integrationen` und stelle sicher, dass unter `Synchronisation` jeder Tag ausgewählt ist.
# Health Dashboard
Source: https://mooncamp.com/docs/de/health-dashboard
Ein Überblick über das Health Dashboard für Ziele und OKRs.
Das Health Dashboard ist für Kunden im `Pro` und `Enterprise` Plan verfügbar.
## Das Health Dashboard erklärt
Mit dem Health Dashboard kannst du eine umfassende Gesundheits- und Qualitätsprüfung aller Ziele deiner Organisation durchführen. Betrachte es als ein Cockpit, von dem aus du schnell Probleme mit deinen Zielen erkennen und lösen kannst. Dies hilft sicherzustellen, dass dein gesamter Zielmanagementprozess reibungslos läuft und dass alle die [Ziel- und OKR-Regeln](/de/goal-rules) befolgen, die du im Einstellungsbereich konfiguriert hast.
**Wichtiger Hinweis:** Damit alle Mitglieder Zugriff auf Fortschritts- und Health Dashboards erhalten, muss dies einmalig vom Admin unter `Einstellungen > Zugriffsgruppen > Mitglied > Kann Fortschritts- und Health Dashboards einsehen` eingestellt werden.
## Navigation im Health Dashboard
Das Health Dashboard findest du unter `Dashboards` in der Seitenleiste.
 Sobald du das Health Dashboard gefunden hast, gibt es einige wichtige Bereiche zu beachten.
1. **Ansicht hinzufügen**: Hier kannst du verschiedene Ansichten in Kombination mit der Filterfunktion erstellen.
2. **Zyklus-Auswahl**: Stelle sicher, dass du den richtigen Zyklus ansiehst, um die relevantesten Daten zu sehen.
3. **Filterfunktion**: Filtere nach allen [Eigenschaften](/de/properties), die du im System hast.
4. **Teilen:** Teile den Link mit deinen Kollegen, die ebenfalls Zugriff auf Mooncamp haben.
5. **Favoriten**: Füge die Ansicht zu deinen Favoriten hinzu, damit du sie in der linken Seitenleiste leicht zugänglich hast.
Sobald du das Health Dashboard gefunden hast, gibt es einige wichtige Bereiche zu beachten.
1. **Ansicht hinzufügen**: Hier kannst du verschiedene Ansichten in Kombination mit der Filterfunktion erstellen.
2. **Zyklus-Auswahl**: Stelle sicher, dass du den richtigen Zyklus ansiehst, um die relevantesten Daten zu sehen.
3. **Filterfunktion**: Filtere nach allen [Eigenschaften](/de/properties), die du im System hast.
4. **Teilen:** Teile den Link mit deinen Kollegen, die ebenfalls Zugriff auf Mooncamp haben.
5. **Favoriten**: Füge die Ansicht zu deinen Favoriten hinzu, damit du sie in der linken Seitenleiste leicht zugänglich hast.
 💡 Über die Ellipsis (…) in der oberen rechten Ecke des Bildschirms kann das Health Dashboard als **PDF-Datei** exportiert werden.
## Überblick
Am oberen Rand der Seite findest du "Überblick" und darunter 3 Metriken. Dies ist der einfachste und schnellste Weg, um einen Überblick darüber zu bekommen, wie viele Ziele Probleme aufweisen.
* **Ziele mit ungültigem übergeordnetem Ziel**: Wenn du auf die Metrik klickst, findest du eine Liste von Zielen mit ungültigem übergeordnetem Ziel. Es gibt drei verschiedene Gründe, warum Ziele hier auftauchen können. `1` Das übergeordnete Ziel ist vom falschen Typ (z.B. ist ein `Key Result` übergeordnet zu einem `Objective`), `2` das übergeordnete Ziel ist leer, obwohl es einen übergeordneten Eintrag haben sollte (z.B. eine Initiative), und `3` das übergeordnete Ziel ist nicht leer, obwohl es kein übergeordnetes Ziel haben sollte (z.B. ein `Strategic Pillar`)
* **Ziele mit fehlenden Eigenschaften**: Wenn du auf die Metrik klickst, findest du eine Liste von Zielen mit fehlenden Eigenschaften. Welche Eigenschaften immer ausgefüllt sein sollten, kann im Einstellungsbereich unter [Typen und Regeln](/de/goal-rules) konfiguriert werden.
* **Ziele mit ungültigen Messarten**: Wenn du auf die Metrik klickst, findest du eine Liste von Zielen mit ungültigen Messarten (z.B. könntest du eine Regel einrichten, dass Initiativen immer die Messart "Offen/Erledigt" haben sollten).
Hier ein Beispiel:
💡 Über die Ellipsis (…) in der oberen rechten Ecke des Bildschirms kann das Health Dashboard als **PDF-Datei** exportiert werden.
## Überblick
Am oberen Rand der Seite findest du "Überblick" und darunter 3 Metriken. Dies ist der einfachste und schnellste Weg, um einen Überblick darüber zu bekommen, wie viele Ziele Probleme aufweisen.
* **Ziele mit ungültigem übergeordnetem Ziel**: Wenn du auf die Metrik klickst, findest du eine Liste von Zielen mit ungültigem übergeordnetem Ziel. Es gibt drei verschiedene Gründe, warum Ziele hier auftauchen können. `1` Das übergeordnete Ziel ist vom falschen Typ (z.B. ist ein `Key Result` übergeordnet zu einem `Objective`), `2` das übergeordnete Ziel ist leer, obwohl es einen übergeordneten Eintrag haben sollte (z.B. eine Initiative), und `3` das übergeordnete Ziel ist nicht leer, obwohl es kein übergeordnetes Ziel haben sollte (z.B. ein `Strategic Pillar`)
* **Ziele mit fehlenden Eigenschaften**: Wenn du auf die Metrik klickst, findest du eine Liste von Zielen mit fehlenden Eigenschaften. Welche Eigenschaften immer ausgefüllt sein sollten, kann im Einstellungsbereich unter [Typen und Regeln](/de/goal-rules) konfiguriert werden.
* **Ziele mit ungültigen Messarten**: Wenn du auf die Metrik klickst, findest du eine Liste von Zielen mit ungültigen Messarten (z.B. könntest du eine Regel einrichten, dass Initiativen immer die Messart "Offen/Erledigt" haben sollten).
Hier ein Beispiel:
 💡 Durch Klicken auf die roten Schaltflächen in der obigen Liste kannst du Probleme mit deinen Zielen einfach lösen.
## Gesundheitsprüfung nach Zieltyp
In diesem Bereich werden die Informationen jedes Zieltyps in bis zu 4 Hauptkategorien aufgeteilt. Nehmen wir ein `Key Result` als Beispiel. Alles ist interaktiv, also klicke ruhig auf die verschiedenen Diagramme, um die gefilterte Liste der Ziele zu sehen.
* **Ziele mit ungültigem vs. gültigem übergeordnetem Ziel**: Dies zeigt, wie viele Ziele das richtige übergeordnete Ziel haben und wie viele das falsche übergeordnete Ziel haben.
* **Ziele mit fehlenden vs. vorhandenen Eigenschaftswerten**: Dies zeigt, wie viele Ziele alle erforderlichen Eigenschaften ausgefüllt haben und wie viele fehlende Eigenschaftswerte haben.
* **Ziele mit ungültigen vs. gültigen Messarten:** Hier findest du, wie viele von jeder Messart verwendet werden. Wenn es Ziele gibt, die die falsche Messart verwenden, werden sie rot angezeigt.
* **Automatisiert vs. manuell**: Dieser Bericht zeigt, wie viele Ziele manuell aktualisiert werden und wie viele Ziele über Datenintegrationen aktualisiert werden. Dies bezieht sich nur auf Ziele, die "Start- und Zielwert" oder "Schwellenwert" als Messart verwenden (nur diese Typen können über Datenintegrationen synchronisiert werden).
💡 Durch Klicken auf die roten Schaltflächen in der obigen Liste kannst du Probleme mit deinen Zielen einfach lösen.
## Gesundheitsprüfung nach Zieltyp
In diesem Bereich werden die Informationen jedes Zieltyps in bis zu 4 Hauptkategorien aufgeteilt. Nehmen wir ein `Key Result` als Beispiel. Alles ist interaktiv, also klicke ruhig auf die verschiedenen Diagramme, um die gefilterte Liste der Ziele zu sehen.
* **Ziele mit ungültigem vs. gültigem übergeordnetem Ziel**: Dies zeigt, wie viele Ziele das richtige übergeordnete Ziel haben und wie viele das falsche übergeordnete Ziel haben.
* **Ziele mit fehlenden vs. vorhandenen Eigenschaftswerten**: Dies zeigt, wie viele Ziele alle erforderlichen Eigenschaften ausgefüllt haben und wie viele fehlende Eigenschaftswerte haben.
* **Ziele mit ungültigen vs. gültigen Messarten:** Hier findest du, wie viele von jeder Messart verwendet werden. Wenn es Ziele gibt, die die falsche Messart verwenden, werden sie rot angezeigt.
* **Automatisiert vs. manuell**: Dieser Bericht zeigt, wie viele Ziele manuell aktualisiert werden und wie viele Ziele über Datenintegrationen aktualisiert werden. Dies bezieht sich nur auf Ziele, die "Start- und Zielwert" oder "Schwellenwert" als Messart verwenden (nur diese Typen können über Datenintegrationen synchronisiert werden).
 💡 **Denk daran**: All diese Informationen basieren auf den Regeln, die du in den Einstellungen festgelegt hast. Schau dir also unbedingt unseren Artikel zu [Regeln](/de/goal-rules) an.
## Aufschlüsselung
Zu guter Letzt haben wir den Aufschlüsselungsbereich am unteren Rand der Seite. In dieser Tabelle ist jedes Team mit seiner Gesamtzahl an Zielen sowie den Zielen aufgeführt, die noch Probleme haben, wie ungültige übergeordnete Ziele, fehlende Eigenschaftswerte oder ungültige Messarten. Auch hier sind die Zahlen interaktiv, sodass du darauf klicken kannst, um die Liste der Ziele zu sehen.
💡 **Denk daran**: All diese Informationen basieren auf den Regeln, die du in den Einstellungen festgelegt hast. Schau dir also unbedingt unseren Artikel zu [Regeln](/de/goal-rules) an.
## Aufschlüsselung
Zu guter Letzt haben wir den Aufschlüsselungsbereich am unteren Rand der Seite. In dieser Tabelle ist jedes Team mit seiner Gesamtzahl an Zielen sowie den Zielen aufgeführt, die noch Probleme haben, wie ungültige übergeordnete Ziele, fehlende Eigenschaftswerte oder ungültige Messarten. Auch hier sind die Zahlen interaktiv, sodass du darauf klicken kannst, um die Liste der Ziele zu sehen.
 # Homepage
Source: https://mooncamp.com/docs/de/homepage
Ein Überblick über deine Homepage
Deine persönliche Startseite ermöglicht dir den direkten Zugriff auf alle Tools deines Arbeitsbereichs.
Auf deiner Startseite kannst du:
1. Deine Ziele ansehen, aktualisieren und neue Ziele erstellen
2. Deine Check-ins ansehen, bearbeiten und neue Check-ins erstellen
3. Öffentliche Profilinformationen über dich einsehen
# Hubspot Integration
Source: https://mooncamp.com/docs/de/hubspot-integration
Ein Überblick über die Datenintegration mit Hubspot.
## Die Hubspot-Integration erklärt
Die Hubspot-Integration ermöglicht es dir, Daten aus bestimmten Metriken innerhalb von Hubspot abzurufen, um deine Ziele in Mooncamp automatisch zu aktualisieren. Dies ist eine Einweg-Integration, was bedeutet, dass du Daten nur aus Hubspot abrufen, aber nicht dorthin senden kannst. Aktuell gibt es eine festgelegte Liste von Metriken, aus denen du wählen kannst, die hauptsächlich marketingbasiert sind. Die verfügbaren Metriken findest du unten.
* Number of raw views
* Number of visits
* Number of visitors
* Number of leads
* Number of contacts
* Number of subscribers
* Number of MQLs
* Number of SQLs
* Number of opportunities
* Number of customers
* Average page views per session
* % bounce rate
* Time per session (in seconds)
* % new sessions
* % session to contact
* % contact to customer
## Verbindung mit Hubspot
Um dich mit Hubspot zu verbinden, lies bitte unseren Artikel über die Verbindung zur Datenintegration unten.
[Ziele mit Datenintegrationen verbinden](/de/data-integrations)
## Auswahl deiner Metrik und des Zeitraums
Sobald du die Verbindung zu Hubspot hergestellt hast, kannst du die gewünschte Metrik und den zu berücksichtigenden Zeitraum auswählen.
# Homepage
Source: https://mooncamp.com/docs/de/homepage
Ein Überblick über deine Homepage
Deine persönliche Startseite ermöglicht dir den direkten Zugriff auf alle Tools deines Arbeitsbereichs.
Auf deiner Startseite kannst du:
1. Deine Ziele ansehen, aktualisieren und neue Ziele erstellen
2. Deine Check-ins ansehen, bearbeiten und neue Check-ins erstellen
3. Öffentliche Profilinformationen über dich einsehen
# Hubspot Integration
Source: https://mooncamp.com/docs/de/hubspot-integration
Ein Überblick über die Datenintegration mit Hubspot.
## Die Hubspot-Integration erklärt
Die Hubspot-Integration ermöglicht es dir, Daten aus bestimmten Metriken innerhalb von Hubspot abzurufen, um deine Ziele in Mooncamp automatisch zu aktualisieren. Dies ist eine Einweg-Integration, was bedeutet, dass du Daten nur aus Hubspot abrufen, aber nicht dorthin senden kannst. Aktuell gibt es eine festgelegte Liste von Metriken, aus denen du wählen kannst, die hauptsächlich marketingbasiert sind. Die verfügbaren Metriken findest du unten.
* Number of raw views
* Number of visits
* Number of visitors
* Number of leads
* Number of contacts
* Number of subscribers
* Number of MQLs
* Number of SQLs
* Number of opportunities
* Number of customers
* Average page views per session
* % bounce rate
* Time per session (in seconds)
* % new sessions
* % session to contact
* % contact to customer
## Verbindung mit Hubspot
Um dich mit Hubspot zu verbinden, lies bitte unseren Artikel über die Verbindung zur Datenintegration unten.
[Ziele mit Datenintegrationen verbinden](/de/data-integrations)
## Auswahl deiner Metrik und des Zeitraums
Sobald du die Verbindung zu Hubspot hergestellt hast, kannst du die gewünschte Metrik und den zu berücksichtigenden Zeitraum auswählen.
.webp) Tipp für Administratoren: Gehe zu `Einstellungen > Integrationen` und stelle sicher, dass unter `Synchronisation` jeder Tag ausgewählt ist.
# Info-Seite
Source: https://mooncamp.com/docs/de/info-page
Eine Seite zum Teilen allgemeiner Informationen über das Unternehmen, OKR-Prozesse oder andere wichtige Details
Die Info-Seite ist für Kunden im `Pro` und `Enterprise` Plan verfügbar.
Unter `Einstellungen > Allgemein` kannst du eine Info-Seite erstellen, die für alle Mitarbeiter zugänglich ist. Der Inhalt dieser Seite kann frei gestaltet werden; typischerweise werden hier interne Ansprechpartner, Benutzervereinbarungen, rechtliche Informationen oder allgemeine Informationen zum OKR-Prozess kommuniziert. Die Info-Seite kann besonders für neue Teammitglieder, die Deiner Organisation beitreten, hilfreich sein. Du kannst festlegen, ob die Seite im Hilfebereich angezeigt werden soll, neuen Mitarbeitern während ihres Mooncamp-Onboardings oder beides.
Tipp für Administratoren: Gehe zu `Einstellungen > Integrationen` und stelle sicher, dass unter `Synchronisation` jeder Tag ausgewählt ist.
# Info-Seite
Source: https://mooncamp.com/docs/de/info-page
Eine Seite zum Teilen allgemeiner Informationen über das Unternehmen, OKR-Prozesse oder andere wichtige Details
Die Info-Seite ist für Kunden im `Pro` und `Enterprise` Plan verfügbar.
Unter `Einstellungen > Allgemein` kannst du eine Info-Seite erstellen, die für alle Mitarbeiter zugänglich ist. Der Inhalt dieser Seite kann frei gestaltet werden; typischerweise werden hier interne Ansprechpartner, Benutzervereinbarungen, rechtliche Informationen oder allgemeine Informationen zum OKR-Prozess kommuniziert. Die Info-Seite kann besonders für neue Teammitglieder, die Deiner Organisation beitreten, hilfreich sein. Du kannst festlegen, ob die Seite im Hilfebereich angezeigt werden soll, neuen Mitarbeitern während ihres Mooncamp-Onboardings oder beides.
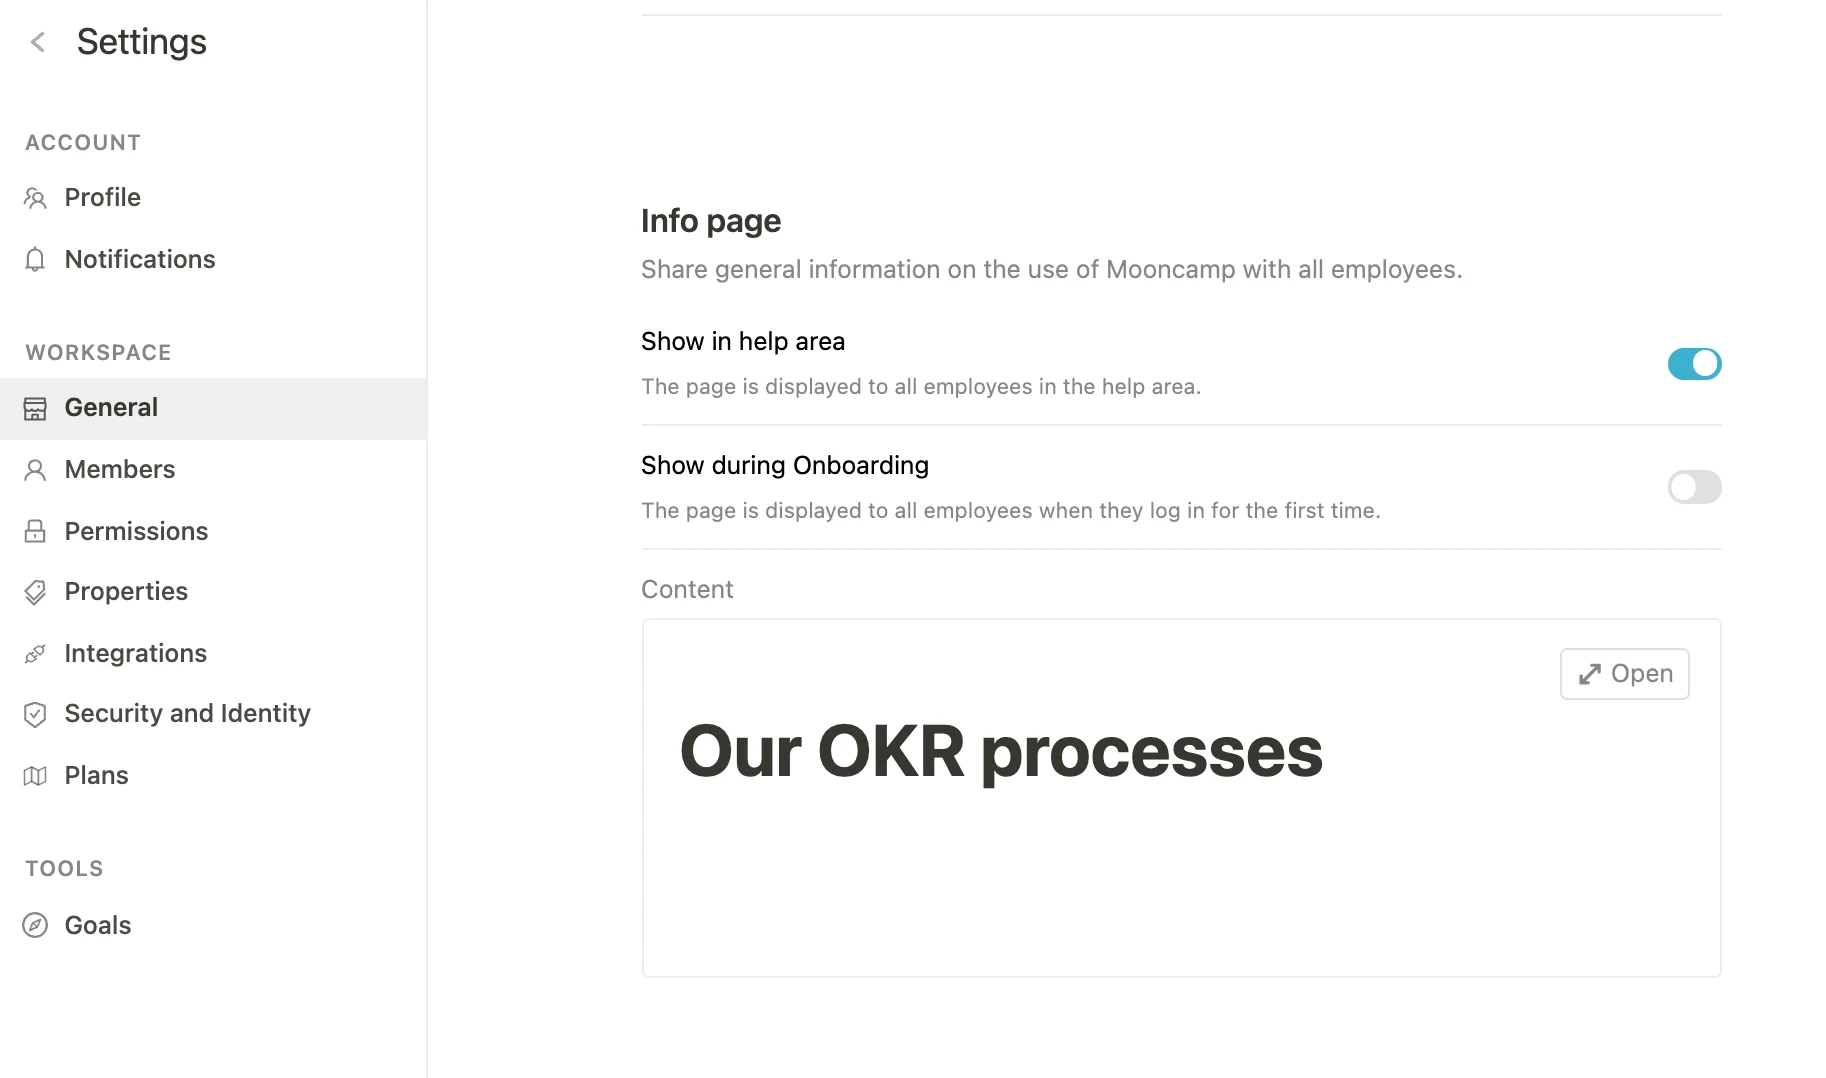 # Jira Integration
Source: https://mooncamp.com/docs/de/jira-integration
Lerne, wie du Jira mit Zielen in Mooncamp verbindest
## Jira Integration beschrieben
Mit Mooncamp's Jira-Integration kannst du ganz einfach alle Issues, User Stories oder Epics in Jira mit Zielen in Mooncamp verknüpfen. Der Fortschritt der Ziele in Mooncamp kann dadurch automatisch aktualisiert werden.
## Für Administratoren
### Vor der Einrichtung (erforderlich für On-Premise-Hosting)
Wenn deine Jira-Instanz On-Premise (selbst verwaltet) gehostet wird, solltest du deinen IT/Jira-Administrator bitten, einen [Application Link](https://confluence.atlassian.com/adminjiraserver/using-applinks-to-link-to-other-applications-938846918.html) in Jira einzurichten.
Bitte beachte, dass die Jira-Verbindung fehlschlagen wird, wenn der Application Link in deiner Jira-Instanz nicht konfiguriert ist.
### Erstelle eine neue Jira-Verbindung
**Schritt 1:** Verknüpfe ein Ziel mit Jira, indem du unter `Fortschritt` auf `Start- und Zielwert` und dann auf `Mit Datenquelle verbinden` klickst. Es öffnet sich ein Fenster, in dem du Informationen zur Integration angeben musst.
# Jira Integration
Source: https://mooncamp.com/docs/de/jira-integration
Lerne, wie du Jira mit Zielen in Mooncamp verbindest
## Jira Integration beschrieben
Mit Mooncamp's Jira-Integration kannst du ganz einfach alle Issues, User Stories oder Epics in Jira mit Zielen in Mooncamp verknüpfen. Der Fortschritt der Ziele in Mooncamp kann dadurch automatisch aktualisiert werden.
## Für Administratoren
### Vor der Einrichtung (erforderlich für On-Premise-Hosting)
Wenn deine Jira-Instanz On-Premise (selbst verwaltet) gehostet wird, solltest du deinen IT/Jira-Administrator bitten, einen [Application Link](https://confluence.atlassian.com/adminjiraserver/using-applinks-to-link-to-other-applications-938846918.html) in Jira einzurichten.
Bitte beachte, dass die Jira-Verbindung fehlschlagen wird, wenn der Application Link in deiner Jira-Instanz nicht konfiguriert ist.
### Erstelle eine neue Jira-Verbindung
**Schritt 1:** Verknüpfe ein Ziel mit Jira, indem du unter `Fortschritt` auf `Start- und Zielwert` und dann auf `Mit Datenquelle verbinden` klickst. Es öffnet sich ein Fenster, in dem du Informationen zur Integration angeben musst.
 **Schritt 2:** Passe bei Bedarf den Namen der Jira-Verbindung an und wähle aus, ob alle Benutzer dieses Kontos in Mooncamp auf die Verbindung zugreifen können sollen.
**Schritt 3:** Wähle aus, ob deine Jira-Instanz selbst verwaltet (On-Premise) oder in der Cloud gehostet wird. Wenn du dir nicht sicher bist, welchen Typ deine Instanz hat, frage deinen IT/Jira-Administrator.
**Schritt 4:** Füge deine Server-URL hinzu. Hier ist es wichtig, dass du dich an folgendes Format hältst: `[deinedomain.atlassian.net](http://clientdomain.atlassian.net)` (also ohne `https://` am Anfang und ohne `/jira/` am Ende).
**Schritt 5: Verbinde dich mit Jira**
* Für selbst verwaltete Instanzen klicke auf den Button `Mit Jira anmelden` und folge den Anweisungen.
* Für Cloud-Instanzen gib die E-Mail-Adresse und den API-Token deines Jira-Kontos ein. Die Anleitung zur Erstellung eines API-Tokens für dein Jira Cloud-Konto findest du [hier](https://confluence.atlassian.com/cloud/api-tokens-938839638.html).
**Fertig!** 🎉 Du kannst jetzt Ziele in Mooncamp automatisch über die von dir erstellte Verbindung mit Jira aktualisieren lassen.
💡 Tipp für Administratoren: Gehe zu Einstellungen → Integrationen → und stelle sicher, dass unter "Synchronisation" jeder Tag ausgewählt ist.
## Für Mitarbeiter (Nicht-Administratoren)
### Ziele mit Jira aktualisieren
**Schritt 2:** Passe bei Bedarf den Namen der Jira-Verbindung an und wähle aus, ob alle Benutzer dieses Kontos in Mooncamp auf die Verbindung zugreifen können sollen.
**Schritt 3:** Wähle aus, ob deine Jira-Instanz selbst verwaltet (On-Premise) oder in der Cloud gehostet wird. Wenn du dir nicht sicher bist, welchen Typ deine Instanz hat, frage deinen IT/Jira-Administrator.
**Schritt 4:** Füge deine Server-URL hinzu. Hier ist es wichtig, dass du dich an folgendes Format hältst: `[deinedomain.atlassian.net](http://clientdomain.atlassian.net)` (also ohne `https://` am Anfang und ohne `/jira/` am Ende).
**Schritt 5: Verbinde dich mit Jira**
* Für selbst verwaltete Instanzen klicke auf den Button `Mit Jira anmelden` und folge den Anweisungen.
* Für Cloud-Instanzen gib die E-Mail-Adresse und den API-Token deines Jira-Kontos ein. Die Anleitung zur Erstellung eines API-Tokens für dein Jira Cloud-Konto findest du [hier](https://confluence.atlassian.com/cloud/api-tokens-938839638.html).
**Fertig!** 🎉 Du kannst jetzt Ziele in Mooncamp automatisch über die von dir erstellte Verbindung mit Jira aktualisieren lassen.
💡 Tipp für Administratoren: Gehe zu Einstellungen → Integrationen → und stelle sicher, dass unter "Synchronisation" jeder Tag ausgewählt ist.
## Für Mitarbeiter (Nicht-Administratoren)
### Ziele mit Jira aktualisieren
 **Schritt 1**: Du kannst zwischen zwei Messarten wählen:
* `Gesamtfortschritt`, ausgedrückt als Verhältnis zweier Jira-Issue-Sets (z.B. das Verhältnis aller Issues mit Status `Erledigt` geteilt durch alle Issues im Projekt)
* `Anzahl der Issues`, erfasst durch die JQL-Abfrage
**Schritt 2:** Definiere die JQL-Abfragen, indem du die Felder für "[JQL](https://www.atlassian.com/blog/jira-software/jql-the-most-flexible-way-to-search-jira-14)" ausfüllst. Die Jira-Issues werden über eine JQL-Abfrage abgefragt. Eine JQL-Abfrage kann aus Jira kopiert werden.
**Hinweis:** Weitere Informationen darüber, wie JIRA Zeit und Fortschritt verfolgt, findest du in diesem [Jira-Artikel](https://confluence.atlassian.com/jiraportfolioserver0326/tracking-progress-and-status-1005330901.html).
# Mitarbeiter verwalten
Source: https://mooncamp.com/docs/de/managing-employees
Mitarbeiter in Mooncamp hinzufügen und verwalten
Als Administrator kannst Du neue Mitarbeiter (Teammitglieder) in Deinem Workspace hinzufügen oder bestehende unter `Einstellungen > Mitglieder` bearbeiten.
Auf der Mitgliederverwaltungsseite kannst Du:
* Mitarbeiter manuell hinzufügen
* Mehrere Mitarbeiter per CSV-Import hinzufügen oder per CSV-Export exportieren
* Mitarbeiterinformationen bearbeiten (Name, E-Mail, Sprache, ...)
* Mitarbeiter aus Mooncamp entfernen
* Einladungen zu Mooncamp per E-Mail an einzelne Mitarbeiter senden
## Mitarbeiter manuell hinzufügen
**Schritt 1**: Du kannst zwischen zwei Messarten wählen:
* `Gesamtfortschritt`, ausgedrückt als Verhältnis zweier Jira-Issue-Sets (z.B. das Verhältnis aller Issues mit Status `Erledigt` geteilt durch alle Issues im Projekt)
* `Anzahl der Issues`, erfasst durch die JQL-Abfrage
**Schritt 2:** Definiere die JQL-Abfragen, indem du die Felder für "[JQL](https://www.atlassian.com/blog/jira-software/jql-the-most-flexible-way-to-search-jira-14)" ausfüllst. Die Jira-Issues werden über eine JQL-Abfrage abgefragt. Eine JQL-Abfrage kann aus Jira kopiert werden.
**Hinweis:** Weitere Informationen darüber, wie JIRA Zeit und Fortschritt verfolgt, findest du in diesem [Jira-Artikel](https://confluence.atlassian.com/jiraportfolioserver0326/tracking-progress-and-status-1005330901.html).
# Mitarbeiter verwalten
Source: https://mooncamp.com/docs/de/managing-employees
Mitarbeiter in Mooncamp hinzufügen und verwalten
Als Administrator kannst Du neue Mitarbeiter (Teammitglieder) in Deinem Workspace hinzufügen oder bestehende unter `Einstellungen > Mitglieder` bearbeiten.
Auf der Mitgliederverwaltungsseite kannst Du:
* Mitarbeiter manuell hinzufügen
* Mehrere Mitarbeiter per CSV-Import hinzufügen oder per CSV-Export exportieren
* Mitarbeiterinformationen bearbeiten (Name, E-Mail, Sprache, ...)
* Mitarbeiter aus Mooncamp entfernen
* Einladungen zu Mooncamp per E-Mail an einzelne Mitarbeiter senden
## Mitarbeiter manuell hinzufügen
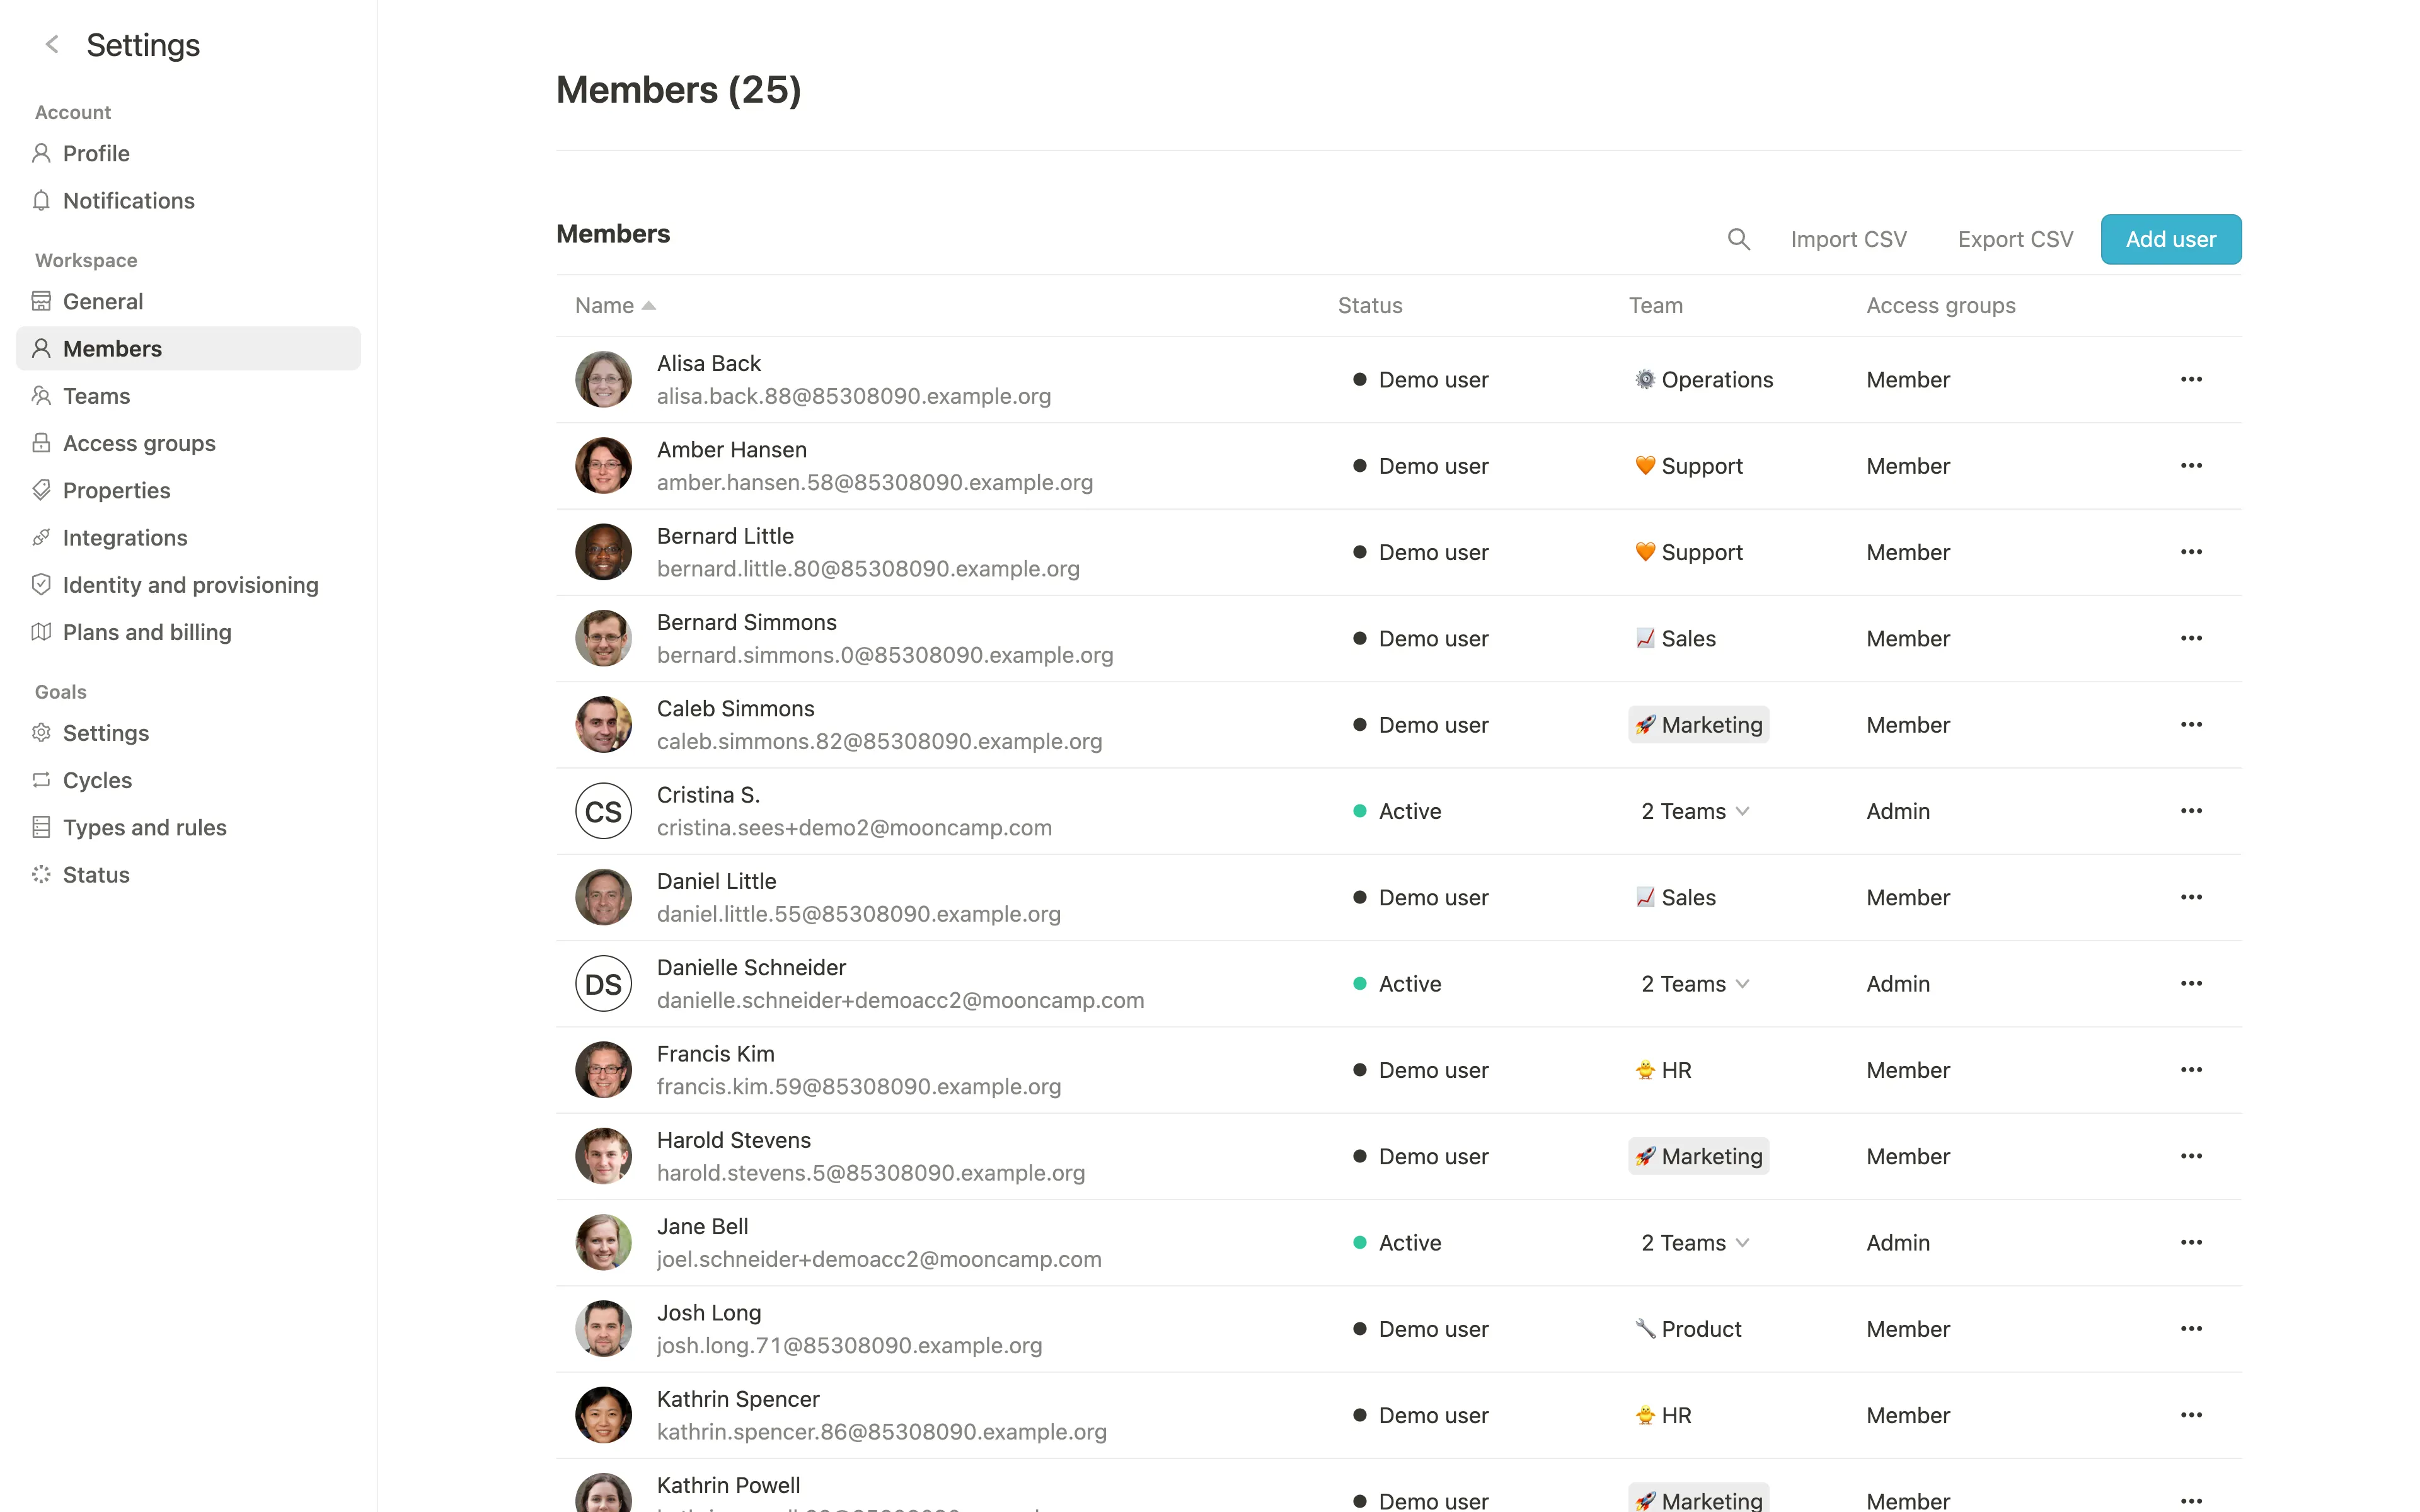 Durch Klicken auf `Benutzer hinzufügen` kannst Du einen neuen Benutzer erstellen und Name, E-Mail, Kontosprache sowie weitere benutzerdefinierte Eigenschaften festlegen.
 Wenn Du beim Hinzufügen eines neuen Mitarbeiters das Kästchen `Einladungs-E-Mail senden` aktivierst, erhält der Mitarbeiter eine Einladung per E-Mail.
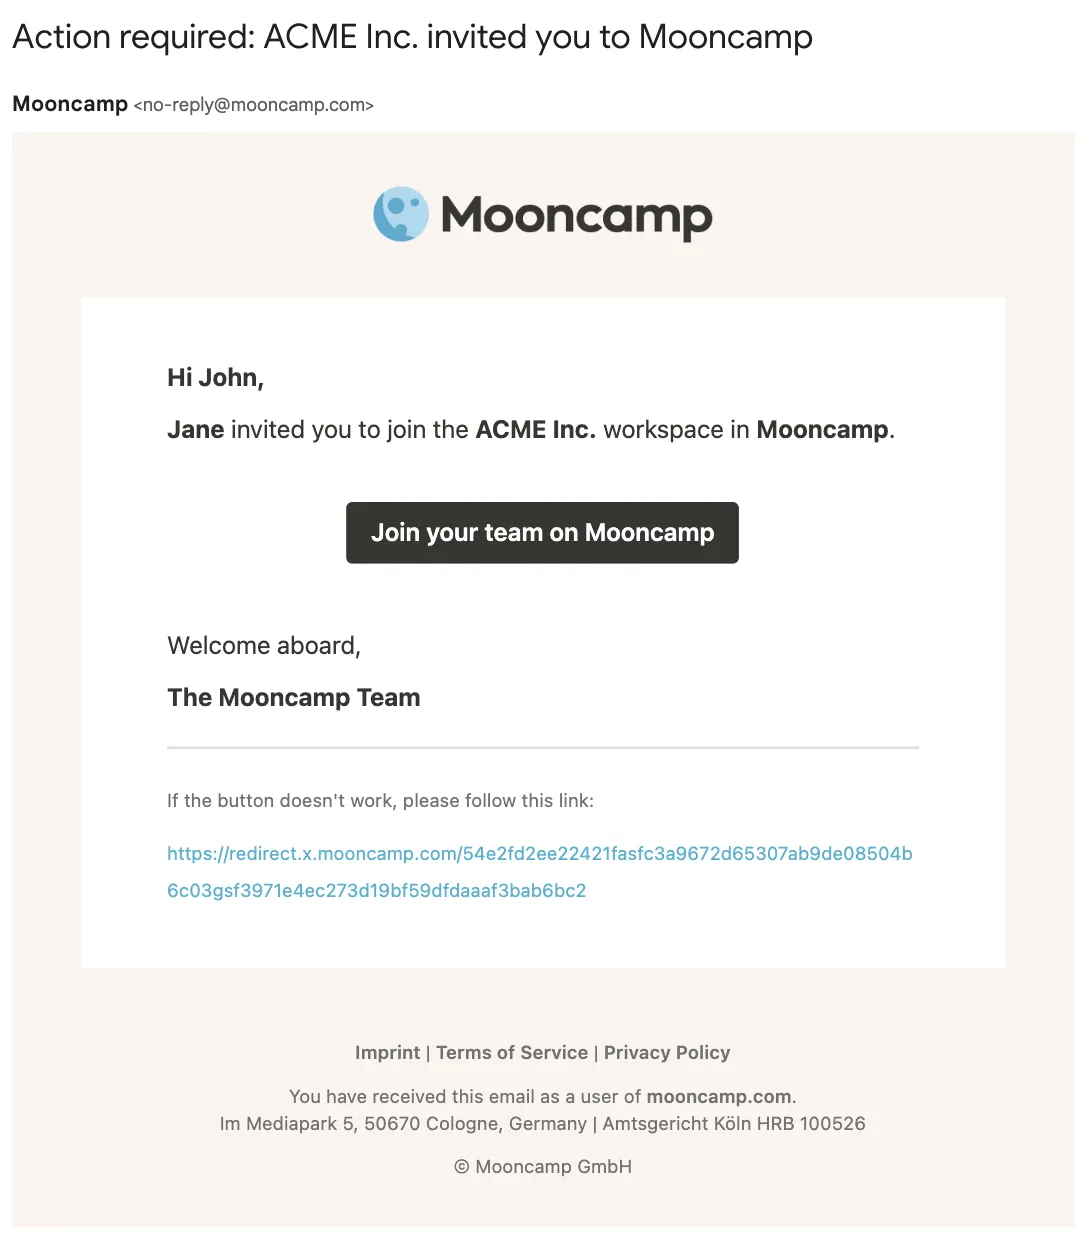 ## Mitarbeiter per CSV importieren
Durch Klicken auf `CSV importieren` kannst Du eine CSV-Datei (Comma Separated Value) mit allen Mitarbeitern hochladen. Hier kannst Du auch eine CSV-Datei als Vorlage herunterladen.
Für jede neue Zeile in der CSV-Datei wird ein neuer Mitarbeiter hinzugefügt.
## Einladungs-Link
Nachdem alle Mitarbeiter erfolgreich hinzugefügt wurden, kannst Du den Einladungs-Link verwenden, um bestehende Benutzer gemeinsam zu Mooncamp einzuladen. Der Link befindet sich unter `Einstellungen > Allgemein` und kann dort kopiert werden. Mitarbeiter können sich über den Link einfach registrieren; wichtige Voraussetzung dafür ist, dass sie bereits innerhalb von Mooncamp unter `Einstellungen > Mitglieder` angelegt wurden.
## Mitarbeiter per CSV importieren
Durch Klicken auf `CSV importieren` kannst Du eine CSV-Datei (Comma Separated Value) mit allen Mitarbeitern hochladen. Hier kannst Du auch eine CSV-Datei als Vorlage herunterladen.
Für jede neue Zeile in der CSV-Datei wird ein neuer Mitarbeiter hinzugefügt.
## Einladungs-Link
Nachdem alle Mitarbeiter erfolgreich hinzugefügt wurden, kannst Du den Einladungs-Link verwenden, um bestehende Benutzer gemeinsam zu Mooncamp einzuladen. Der Link befindet sich unter `Einstellungen > Allgemein` und kann dort kopiert werden. Mitarbeiter können sich über den Link einfach registrieren; wichtige Voraussetzung dafür ist, dass sie bereits innerhalb von Mooncamp unter `Einstellungen > Mitglieder` angelegt wurden.
 # Microsoft Excel Integration
Source: https://mooncamp.com/docs/de/microsoft-excel-integration
Ein Überblick über die Datenintegration mit Microsoft Excel.
Bitte beachte, dass die Integration nur mit der Webversion von Microsoft Excel funktioniert.
## Die Microsoft Excel Integration erklärt
Die Microsoft Excel Integration ermöglicht es dir, Daten aus einer bestimmten Zelle innerhalb eines Microsoft Excel-Dokuments zu übernehmen und damit deine Ziele in Mooncamp automatisch zu aktualisieren. Um auf Dokumente über Mooncamp zugreifen zu können, musst du mit deiner E-Mail-Adresse Zugriff auf die Excel Online-Datei haben. Außerdem musst du eine Verbindung zu Excel Online erstellen.
## Ziele mit Microsoft Excel verbinden
Als ersten Schritt muss der Administrator deines Mooncamp-Kontos sicherstellen, dass die Integration über `Einstellungen > Integrationen > Datenintegrationen > Microsoft Excel` aktiviert ist.
Um eine Verbindung zu Microsoft Excel herzustellen, lies bitte unseren Artikel über die Verbindung zu Datenintegrationen: [Ziele mit Datenintegrationen verbinden](/de/data-integrations)
Bitte beachte, dass du bei **Microsoft Excel** nur Dateien aus deinem **OneDrive** verbinden kannst, nicht aus SharePoint. Über die Datenschutzeinstellungen deiner Datenverbindung kannst du deine Dateien jedoch mit anderen Mitgliedern innerhalb deines Mooncamp-Kontos teilen (Details dazu findest du [hier](/de/data-integrations)).
## Deine Zelle auswählen
Nachdem du die Verbindung zu Excel Online hergestellt hast, ist der nächste Schritt die Auswahl des Dokuments, auf das du dich beziehen möchtest. Wenn du auf das Dokument-Dropdown-Menü klickst, findest du eine Liste der verfügbaren Dokumente. Danach kannst du die richtige Tabelle auswählen und zuletzt die entsprechende Spalte und Zeile eingeben. Ab jetzt wird bei jeder Aktualisierung dieser Zelle der Wert in Mooncamp automatisch aktualisiert.
Tipp für die Administratoren: Gehe zu `Einstellungen > Integrationen` und stelle sicher, dass unter `Synchronisation` jeder Tag ausgewählt ist.
# Microsoft Planner Integration
Source: https://mooncamp.com/docs/de/microsoft-planner-integration
Ein Überblick über die Microsoft Planner Datenintegration
## Überblick
Die Microsoft Planner Integration aktualisiert deinen Zielfortschritt automatisch basierend auf der Aufgabenerfüllung in Planner.
Die Planner Integration ist für Kunden der **Pro** und **Enterprise** Pläne verfügbar.
## Wie du die Integration einrichtest
Account-Administratoren können die Planner Integration mit diesen Schritten aktivieren:
1. **Zugriff auf Integrationen:**
Gehe zu deinen Mooncamp Workspace-Einstellungen und öffne den Integrationen-Bereich.
2. **Microsoft Planner aktivieren:**
Suche Microsoft Planner und schalte die Integration ein.
3. **Mit Microsoft Planner verbinden:**
Jeder Benutzer kann sich dann mit seinem Microsoft-Konto anmelden und Zugriff auf Planner gewähren. Nach der Autorisierung können Benutzer ihre Mooncamp-Ziele mit ihren Plänen in Microsoft Planner verknüpfen.
## Microsoft Planner zur Zielverfolgung nutzen
Um den Fortschritt eines Ziels automatisch mit Microsoft Planner zu verfolgen, führe diese Schritte aus:
1. **Ziel erstellen oder bearbeiten:**
Gehe zur Fortschritt-Eigenschaft und wähle einen Messungstyp, der die Verbindung zu einer Datenquelle erlaubt.
2. **Automatische Fortschrittsverfolgung auswählen:**
Klicke auf *Mit Datenquelle verbinden* und wähle **Planner** aus der Liste der verfügbaren Integrationen.
3. **Fortschrittsverfolgung:**
Wähle je nach Fortschrittstyp (numerisch oder prozentual), wie der Fortschritt verfolgt werden soll:
# Microsoft Excel Integration
Source: https://mooncamp.com/docs/de/microsoft-excel-integration
Ein Überblick über die Datenintegration mit Microsoft Excel.
Bitte beachte, dass die Integration nur mit der Webversion von Microsoft Excel funktioniert.
## Die Microsoft Excel Integration erklärt
Die Microsoft Excel Integration ermöglicht es dir, Daten aus einer bestimmten Zelle innerhalb eines Microsoft Excel-Dokuments zu übernehmen und damit deine Ziele in Mooncamp automatisch zu aktualisieren. Um auf Dokumente über Mooncamp zugreifen zu können, musst du mit deiner E-Mail-Adresse Zugriff auf die Excel Online-Datei haben. Außerdem musst du eine Verbindung zu Excel Online erstellen.
## Ziele mit Microsoft Excel verbinden
Als ersten Schritt muss der Administrator deines Mooncamp-Kontos sicherstellen, dass die Integration über `Einstellungen > Integrationen > Datenintegrationen > Microsoft Excel` aktiviert ist.
Um eine Verbindung zu Microsoft Excel herzustellen, lies bitte unseren Artikel über die Verbindung zu Datenintegrationen: [Ziele mit Datenintegrationen verbinden](/de/data-integrations)
Bitte beachte, dass du bei **Microsoft Excel** nur Dateien aus deinem **OneDrive** verbinden kannst, nicht aus SharePoint. Über die Datenschutzeinstellungen deiner Datenverbindung kannst du deine Dateien jedoch mit anderen Mitgliedern innerhalb deines Mooncamp-Kontos teilen (Details dazu findest du [hier](/de/data-integrations)).
## Deine Zelle auswählen
Nachdem du die Verbindung zu Excel Online hergestellt hast, ist der nächste Schritt die Auswahl des Dokuments, auf das du dich beziehen möchtest. Wenn du auf das Dokument-Dropdown-Menü klickst, findest du eine Liste der verfügbaren Dokumente. Danach kannst du die richtige Tabelle auswählen und zuletzt die entsprechende Spalte und Zeile eingeben. Ab jetzt wird bei jeder Aktualisierung dieser Zelle der Wert in Mooncamp automatisch aktualisiert.
Tipp für die Administratoren: Gehe zu `Einstellungen > Integrationen` und stelle sicher, dass unter `Synchronisation` jeder Tag ausgewählt ist.
# Microsoft Planner Integration
Source: https://mooncamp.com/docs/de/microsoft-planner-integration
Ein Überblick über die Microsoft Planner Datenintegration
## Überblick
Die Microsoft Planner Integration aktualisiert deinen Zielfortschritt automatisch basierend auf der Aufgabenerfüllung in Planner.
Die Planner Integration ist für Kunden der **Pro** und **Enterprise** Pläne verfügbar.
## Wie du die Integration einrichtest
Account-Administratoren können die Planner Integration mit diesen Schritten aktivieren:
1. **Zugriff auf Integrationen:**
Gehe zu deinen Mooncamp Workspace-Einstellungen und öffne den Integrationen-Bereich.
2. **Microsoft Planner aktivieren:**
Suche Microsoft Planner und schalte die Integration ein.
3. **Mit Microsoft Planner verbinden:**
Jeder Benutzer kann sich dann mit seinem Microsoft-Konto anmelden und Zugriff auf Planner gewähren. Nach der Autorisierung können Benutzer ihre Mooncamp-Ziele mit ihren Plänen in Microsoft Planner verknüpfen.
## Microsoft Planner zur Zielverfolgung nutzen
Um den Fortschritt eines Ziels automatisch mit Microsoft Planner zu verfolgen, führe diese Schritte aus:
1. **Ziel erstellen oder bearbeiten:**
Gehe zur Fortschritt-Eigenschaft und wähle einen Messungstyp, der die Verbindung zu einer Datenquelle erlaubt.
2. **Automatische Fortschrittsverfolgung auswählen:**
Klicke auf *Mit Datenquelle verbinden* und wähle **Planner** aus der Liste der verfügbaren Integrationen.
3. **Fortschrittsverfolgung:**
Wähle je nach Fortschrittstyp (numerisch oder prozentual), wie der Fortschritt verfolgt werden soll:
 Es gibt zwei Möglichkeiten, die zu verfolgenden Aufgaben auszuwählen: `Filter` (Filtern einer Gruppe von Aufgaben eines Plans nach Buckets und Labels) und `Einzelne Aufgaben` (manuelle Auswahl bestimmter Aufgaben aus einem Plan).
* **Fortschritt der Aufgaben:**
Dies ist eine der beliebtesten Optionen. Sie ermöglicht es dir, den Fortschritt eines Plans mit einem deiner Ziele in Mooncamp zu verknüpfen. Nach der Auswahl siehst du den Prozentsatz der abgeschlossenen Aufgaben unter den ausgewählten. Fortschrittsaktualisierungen erfolgen, wenn Aufgaben als `In Bearbeitung` oder `Abgeschlossen` markiert werden. Aufgaben in Bearbeitung werden als 50% abgeschlossen gewertet, vollständig abgeschlossene Aufgaben als 100%.
Beispiel: Wenn dein Plan 10 Aufgaben hat, davon 3 abgeschlossen und 2 in Bearbeitung sind, beträgt der Gesamtfortschritt 40%.
* **Fortschritt der Checklistenpunkte:**
Dies zeigt den Prozentsatz der abgeschlossenen Checklistenpunkte an.
Beispiel: Wenn es 10 Checklistenpunkte gibt und 3 davon abgeschlossen sind, beträgt der Gesamtfortschritt 30%.
* **Anzahl abgeschlossener Aufgaben:**
Diese Option gibt die Anzahl der abgeschlossenen Aufgaben zurück. Das ist nützlich, wenn du im Voraus weißt, wie viele Aufgaben du abschließen musst, zum Beispiel bei Meilensteinen. Du kannst dein Ziel auf die Gesamtzahl der Aufgaben ausrichten.
* **Anzahl abgeschlossener Checklistenpunkte:**
Diese Option gibt die Anzahl der abgeschlossenen Checklistenpunkte zurück.
* **Fortschritt der Aufgaben:**
Dies misst den Fortschritt einer oder mehrerer ausgewählter Aufgaben.
* **Fortschritt der Checklistenpunkte:**
Dies zeigt den Prozentsatz der abgeschlossenen Checklistenpunkte der ausgewählten Aufgaben an.
* **Anzahl abgeschlossener Aufgaben:**
Diese Option gibt die Anzahl der abgeschlossenen Aufgaben unter den ausgewählten Aufgaben zurück.
* **Anzahl abgeschlossener Checklistenpunkte:**
Diese Option gibt die Anzahl der abgeschlossenen Checklistenpunkte unter den ausgewählten Aufgaben zurück.
4. **Plan auswählen:**
Wähle den Plan aus, den du mit deinem Ziel verknüpfen möchtest.
5. **Aufgaben auswählen (optional, standardmäßig sind alle Aufgaben ausgewählt)**
Filtere Aufgaben nach Buckets oder wähle bestimmte Aufgaben aus, siehe Erklärung oben.
6. **Verbindung speichern:**
Nach der Konfiguration deiner Tracking-Einstellungen klicke auf *Speichern*. Das Planner-Symbol erscheint neben deinem Ziel und zeigt an, dass es mit Microsoft Planner synchronisiert ist.
### Automatische Fortschrittsaktualisierungen
Sobald die Integration aktiv ist, aktualisiert Mooncamp deine Ziele automatisch basierend auf Änderungen in MS Planner.
Tipp für Administratoren: Gehe zu `Einstellungen > Integrationen` und stelle sicher, dass unter `Synchronisation` jeder Tag ausgewählt ist.
# Microsoft Power BI Integration
Source: https://mooncamp.com/docs/de/microsoft-power-bi-integration
Ein Überblick über die Microsoft Power BI Datenintegration
## Überblick
Die Microsoft Power BI Integration aktualisiert automatisch den Fortschritt deiner Mooncamp-Ziele basierend auf Berichten in Power BI.
Die MS Power BI Integration ist für Kunden der `Pro` und `Enterprise` Pläne verfügbar.
## Wie du die Integration einrichtest
Account-Administratoren können die Power BI Integration mit diesen Schritten aktivieren:
1. **Zugriff auf Integrationen:**
Gehe zu deinen Mooncamp Workspace-Einstellungen und öffne den Bereich Integrationen.
2. **Microsoft Power BI aktivieren:**
Suche nach Microsoft Power BI und aktiviere die Integration.
3. **Mit Microsoft Power BI verbinden:**
Jeder Benutzer kann sich dann mit seinem Microsoft-Konto anmelden und den Zugriff auf Power BI gewähren. Nach der Autorisierung können Benutzer ihre Mooncamp-Ziele mit ihren Datenbanken in Microsoft Power BI verknüpfen.
## Microsoft Power BI zur Zielverfolgung nutzen
Um den Fortschritt eines Ziels automatisch mit Microsoft Power BI zu verfolgen, gehe wie folgt vor:
1. **Ziel erstellen oder bearbeiten:**
Gehe zur Fortschritts-Eigenschaft und wähle einen Messtyp, der die Verbindung zu einer Datenquelle erlaubt.
2. **Automatische Fortschrittsverfolgung auswählen:**
Klicke auf `Mit Datenquelle verbinden` und wähle `Power BI` aus der Liste der verfügbaren Integrationen.
3. **Fortschrittsverfolgung mit DAX-Abfragen:**
Du siehst einen Bildschirm, auf dem du einen Workspace, einen Datensatz und eine DAX-Abfrage definieren kannst.
Es gibt zwei Möglichkeiten, die zu verfolgenden Aufgaben auszuwählen: `Filter` (Filtern einer Gruppe von Aufgaben eines Plans nach Buckets und Labels) und `Einzelne Aufgaben` (manuelle Auswahl bestimmter Aufgaben aus einem Plan).
* **Fortschritt der Aufgaben:**
Dies ist eine der beliebtesten Optionen. Sie ermöglicht es dir, den Fortschritt eines Plans mit einem deiner Ziele in Mooncamp zu verknüpfen. Nach der Auswahl siehst du den Prozentsatz der abgeschlossenen Aufgaben unter den ausgewählten. Fortschrittsaktualisierungen erfolgen, wenn Aufgaben als `In Bearbeitung` oder `Abgeschlossen` markiert werden. Aufgaben in Bearbeitung werden als 50% abgeschlossen gewertet, vollständig abgeschlossene Aufgaben als 100%.
Beispiel: Wenn dein Plan 10 Aufgaben hat, davon 3 abgeschlossen und 2 in Bearbeitung sind, beträgt der Gesamtfortschritt 40%.
* **Fortschritt der Checklistenpunkte:**
Dies zeigt den Prozentsatz der abgeschlossenen Checklistenpunkte an.
Beispiel: Wenn es 10 Checklistenpunkte gibt und 3 davon abgeschlossen sind, beträgt der Gesamtfortschritt 30%.
* **Anzahl abgeschlossener Aufgaben:**
Diese Option gibt die Anzahl der abgeschlossenen Aufgaben zurück. Das ist nützlich, wenn du im Voraus weißt, wie viele Aufgaben du abschließen musst, zum Beispiel bei Meilensteinen. Du kannst dein Ziel auf die Gesamtzahl der Aufgaben ausrichten.
* **Anzahl abgeschlossener Checklistenpunkte:**
Diese Option gibt die Anzahl der abgeschlossenen Checklistenpunkte zurück.
* **Fortschritt der Aufgaben:**
Dies misst den Fortschritt einer oder mehrerer ausgewählter Aufgaben.
* **Fortschritt der Checklistenpunkte:**
Dies zeigt den Prozentsatz der abgeschlossenen Checklistenpunkte der ausgewählten Aufgaben an.
* **Anzahl abgeschlossener Aufgaben:**
Diese Option gibt die Anzahl der abgeschlossenen Aufgaben unter den ausgewählten Aufgaben zurück.
* **Anzahl abgeschlossener Checklistenpunkte:**
Diese Option gibt die Anzahl der abgeschlossenen Checklistenpunkte unter den ausgewählten Aufgaben zurück.
4. **Plan auswählen:**
Wähle den Plan aus, den du mit deinem Ziel verknüpfen möchtest.
5. **Aufgaben auswählen (optional, standardmäßig sind alle Aufgaben ausgewählt)**
Filtere Aufgaben nach Buckets oder wähle bestimmte Aufgaben aus, siehe Erklärung oben.
6. **Verbindung speichern:**
Nach der Konfiguration deiner Tracking-Einstellungen klicke auf *Speichern*. Das Planner-Symbol erscheint neben deinem Ziel und zeigt an, dass es mit Microsoft Planner synchronisiert ist.
### Automatische Fortschrittsaktualisierungen
Sobald die Integration aktiv ist, aktualisiert Mooncamp deine Ziele automatisch basierend auf Änderungen in MS Planner.
Tipp für Administratoren: Gehe zu `Einstellungen > Integrationen` und stelle sicher, dass unter `Synchronisation` jeder Tag ausgewählt ist.
# Microsoft Power BI Integration
Source: https://mooncamp.com/docs/de/microsoft-power-bi-integration
Ein Überblick über die Microsoft Power BI Datenintegration
## Überblick
Die Microsoft Power BI Integration aktualisiert automatisch den Fortschritt deiner Mooncamp-Ziele basierend auf Berichten in Power BI.
Die MS Power BI Integration ist für Kunden der `Pro` und `Enterprise` Pläne verfügbar.
## Wie du die Integration einrichtest
Account-Administratoren können die Power BI Integration mit diesen Schritten aktivieren:
1. **Zugriff auf Integrationen:**
Gehe zu deinen Mooncamp Workspace-Einstellungen und öffne den Bereich Integrationen.
2. **Microsoft Power BI aktivieren:**
Suche nach Microsoft Power BI und aktiviere die Integration.
3. **Mit Microsoft Power BI verbinden:**
Jeder Benutzer kann sich dann mit seinem Microsoft-Konto anmelden und den Zugriff auf Power BI gewähren. Nach der Autorisierung können Benutzer ihre Mooncamp-Ziele mit ihren Datenbanken in Microsoft Power BI verknüpfen.
## Microsoft Power BI zur Zielverfolgung nutzen
Um den Fortschritt eines Ziels automatisch mit Microsoft Power BI zu verfolgen, gehe wie folgt vor:
1. **Ziel erstellen oder bearbeiten:**
Gehe zur Fortschritts-Eigenschaft und wähle einen Messtyp, der die Verbindung zu einer Datenquelle erlaubt.
2. **Automatische Fortschrittsverfolgung auswählen:**
Klicke auf `Mit Datenquelle verbinden` und wähle `Power BI` aus der Liste der verfügbaren Integrationen.
3. **Fortschrittsverfolgung mit DAX-Abfragen:**
Du siehst einen Bildschirm, auf dem du einen Workspace, einen Datensatz und eine DAX-Abfrage definieren kannst.
 DAX (Data Analysis Expressions) ist eine Power BI-spezifische Abfragesprache, mit der du bestimmte Werte oder ganze Datensätze extrahieren kannst. Die Verwendung von DAX erfordert ein gewisses Maß an technischem Fachwissen und Vertrautheit mit der Power BI-Administration.
Im folgenden Abschnitt findest du Anweisungen, wie du eine DAX-Abfrage aus bestimmten Berichtsdaten abrufen kannst.
Bitte beachte, dass die **DAX-Abfrage einen einzigen Wert zurückgeben muss**. Dieser Wert wird als Fortschritt deines Ziels angezeigt.
4. **Verbindung speichern:**
Nach der Konfiguration deiner Tracking-Einstellungen klicke auf `Speichern`. Das Power BI-Symbol erscheint neben deinem Ziel und zeigt an, dass es mit Microsoft Power BI synchronisiert ist.
### Automatische Fortschrittsaktualisierungen
Sobald die Integration aktiv ist, aktualisiert Mooncamp deine Ziele automatisch basierend auf Änderungen in MS Power BI.
Tipp für Administratoren: Gehe zu `Einstellungen > Integrationen` und stelle sicher, dass unter `Synchronisation` jeder Tag ausgewählt ist.
## Wie du eine DAX-Abfrage für einen bestimmten Bericht erhältst
Um die DAX-Abfrage zu erhalten, die einen bestimmten Wert in einem Power BI-Bericht generiert, folge diesen Schritten:
1. **Performance Analyzer aktivieren**:
* Öffne deinen Power BI-Bericht entweder in Power BI Desktop oder Power BI Service.
* Gehe zum `Ansicht`-Tab im Menüband und klicke auf `Performance Analyzer`.
2. **Aufzeichnung starten**:
* Klicke im Performance Analyzer-Bereich auf `Aufzeichnung starten`.
* Interagiere mit der Visualisierung oder dem Berichtsabschnitt, in dem sich der gewünschte Wert befindet. Wähle zum Beispiel die Visualisierung aus oder filtere sie, um die Berechnung auszulösen.
3. **Abfrage erfassen**:
* Gehe nach der Interaktion mit dem Bericht zurück zum Performance Analyzer-Bereich und klicke auf `Aufzeichnung stoppen`.
* Suche die spezifische Visualisierung, die den gewünschten Wert enthält. Klicke auf den entsprechenden Eintrag im Performance Analyzer-Bereich und dann auf `Abfrage kopieren`.
4. **DAX-Abfrage abrufen**:
* Diese Aktion kopiert die DAX-Abfrage hinter dieser spezifischen Visualisierung in deine Zwischenablage. Du kannst die DAX-Abfrage dann in einen beliebigen Texteditor einfügen, um sie zu überprüfen oder weiter zu analysieren.
Diese Methode gibt dir die exakte DAX-Abfrage, die Power BI zur Berechnung des Wertes für diese Visualisierung verwendet.
# Microsoft Teams Integration
Source: https://mooncamp.com/docs/de/microsoft-teams-integration
Lerne, wie du Mooncamp mit deinem Microsoft Teams verbindest
**Hinweis für Administratoren:** Damit Benutzer die Integration nutzen können, muss diese zunächst in den Admin-Einstellungen unter `Einstellungen > Integrationen > Messaging` aktiviert werden.
**Bitte beachte:** In manchen Fällen muss dein Microsoft Teams Systemadministrator die App erst freischalten, damit sie in der Suche erscheint. Den offiziellen Link zur Mooncamp App im Microsoft App Store findest du [**hier**](https://appsource.microsoft.com/en-us/product/office/wa200002080).
### Installation des Mooncamp Bots
Um Mooncamp in Microsoft Teams zu installieren, klicke auf das `...` Symbol (Ellipsis) in der linken Seitenleiste, suche nach "Mooncamp" und klicke auf die Mooncamp App in der Liste der Suchergebnisse.
Auf der Mooncamp App-Detailseite kannst du auf den `Hinzufügen` Button klicken, um den Mooncamp Bot zu deinem Workspace hinzuzufügen. Sobald Mooncamp zu Microsoft Teams hinzugefügt wurde, wird dich der Bot durch die nächsten Schritte führen.
Wenn du auf den `Mit Mooncamp verbinden` Button klickst, leitet dich der Bot zu deinem Mooncamp Account weiter. Der Bot wird dir auch mitteilen, dass die Verbindung erfolgreich hergestellt wurde.
**Fertig! 🎉**
# Mooncamp auf dem Smartphone
Source: https://mooncamp.com/docs/de/mobile-app
Eine Anleitung zur Nutzung von Mooncamp als mobile App
Mooncamp ist als sogenannte "Progressive Web App" entwickelt. Das bedeutet, dass unser Produktteam bei der Entwicklung und Verbesserung von Mooncamp ständig darauf achtet, dass alle Funktionen auch in der mobilen Version genutzt werden können. Du kannst Mooncamp mit den folgenden Schritten als mobile App nutzen:
1. Öffne die URL [app.mooncamp.com](http://app.mooncamp.com) im Browser deines Smartphones.
2. Wenn du ein Apple-Gerät mit iOS verwendest, klicke in deinem Browser auf "Teilen" und dann auf "Zum Home-Bildschirm hinzufügen"; bei Android klicke auf die drei Punkte in der oberen rechten Ecke des Browsers und dann auf "Zum Startbildschirm hinzufügen".
3. Mooncamp erscheint automatisch auf deinem Home-Bildschirm und du kannst jetzt deine Ziele auch unterwegs schnell überprüfen und aktualisieren.
# Willkommen bei Mooncamp
Source: https://mooncamp.com/docs/de/overview
Deine zentrale Plattform für Strategieumsetzung und Zielmanagement
DAX (Data Analysis Expressions) ist eine Power BI-spezifische Abfragesprache, mit der du bestimmte Werte oder ganze Datensätze extrahieren kannst. Die Verwendung von DAX erfordert ein gewisses Maß an technischem Fachwissen und Vertrautheit mit der Power BI-Administration.
Im folgenden Abschnitt findest du Anweisungen, wie du eine DAX-Abfrage aus bestimmten Berichtsdaten abrufen kannst.
Bitte beachte, dass die **DAX-Abfrage einen einzigen Wert zurückgeben muss**. Dieser Wert wird als Fortschritt deines Ziels angezeigt.
4. **Verbindung speichern:**
Nach der Konfiguration deiner Tracking-Einstellungen klicke auf `Speichern`. Das Power BI-Symbol erscheint neben deinem Ziel und zeigt an, dass es mit Microsoft Power BI synchronisiert ist.
### Automatische Fortschrittsaktualisierungen
Sobald die Integration aktiv ist, aktualisiert Mooncamp deine Ziele automatisch basierend auf Änderungen in MS Power BI.
Tipp für Administratoren: Gehe zu `Einstellungen > Integrationen` und stelle sicher, dass unter `Synchronisation` jeder Tag ausgewählt ist.
## Wie du eine DAX-Abfrage für einen bestimmten Bericht erhältst
Um die DAX-Abfrage zu erhalten, die einen bestimmten Wert in einem Power BI-Bericht generiert, folge diesen Schritten:
1. **Performance Analyzer aktivieren**:
* Öffne deinen Power BI-Bericht entweder in Power BI Desktop oder Power BI Service.
* Gehe zum `Ansicht`-Tab im Menüband und klicke auf `Performance Analyzer`.
2. **Aufzeichnung starten**:
* Klicke im Performance Analyzer-Bereich auf `Aufzeichnung starten`.
* Interagiere mit der Visualisierung oder dem Berichtsabschnitt, in dem sich der gewünschte Wert befindet. Wähle zum Beispiel die Visualisierung aus oder filtere sie, um die Berechnung auszulösen.
3. **Abfrage erfassen**:
* Gehe nach der Interaktion mit dem Bericht zurück zum Performance Analyzer-Bereich und klicke auf `Aufzeichnung stoppen`.
* Suche die spezifische Visualisierung, die den gewünschten Wert enthält. Klicke auf den entsprechenden Eintrag im Performance Analyzer-Bereich und dann auf `Abfrage kopieren`.
4. **DAX-Abfrage abrufen**:
* Diese Aktion kopiert die DAX-Abfrage hinter dieser spezifischen Visualisierung in deine Zwischenablage. Du kannst die DAX-Abfrage dann in einen beliebigen Texteditor einfügen, um sie zu überprüfen oder weiter zu analysieren.
Diese Methode gibt dir die exakte DAX-Abfrage, die Power BI zur Berechnung des Wertes für diese Visualisierung verwendet.
# Microsoft Teams Integration
Source: https://mooncamp.com/docs/de/microsoft-teams-integration
Lerne, wie du Mooncamp mit deinem Microsoft Teams verbindest
**Hinweis für Administratoren:** Damit Benutzer die Integration nutzen können, muss diese zunächst in den Admin-Einstellungen unter `Einstellungen > Integrationen > Messaging` aktiviert werden.
**Bitte beachte:** In manchen Fällen muss dein Microsoft Teams Systemadministrator die App erst freischalten, damit sie in der Suche erscheint. Den offiziellen Link zur Mooncamp App im Microsoft App Store findest du [**hier**](https://appsource.microsoft.com/en-us/product/office/wa200002080).
### Installation des Mooncamp Bots
Um Mooncamp in Microsoft Teams zu installieren, klicke auf das `...` Symbol (Ellipsis) in der linken Seitenleiste, suche nach "Mooncamp" und klicke auf die Mooncamp App in der Liste der Suchergebnisse.
Auf der Mooncamp App-Detailseite kannst du auf den `Hinzufügen` Button klicken, um den Mooncamp Bot zu deinem Workspace hinzuzufügen. Sobald Mooncamp zu Microsoft Teams hinzugefügt wurde, wird dich der Bot durch die nächsten Schritte führen.
Wenn du auf den `Mit Mooncamp verbinden` Button klickst, leitet dich der Bot zu deinem Mooncamp Account weiter. Der Bot wird dir auch mitteilen, dass die Verbindung erfolgreich hergestellt wurde.
**Fertig! 🎉**
# Mooncamp auf dem Smartphone
Source: https://mooncamp.com/docs/de/mobile-app
Eine Anleitung zur Nutzung von Mooncamp als mobile App
Mooncamp ist als sogenannte "Progressive Web App" entwickelt. Das bedeutet, dass unser Produktteam bei der Entwicklung und Verbesserung von Mooncamp ständig darauf achtet, dass alle Funktionen auch in der mobilen Version genutzt werden können. Du kannst Mooncamp mit den folgenden Schritten als mobile App nutzen:
1. Öffne die URL [app.mooncamp.com](http://app.mooncamp.com) im Browser deines Smartphones.
2. Wenn du ein Apple-Gerät mit iOS verwendest, klicke in deinem Browser auf "Teilen" und dann auf "Zum Home-Bildschirm hinzufügen"; bei Android klicke auf die drei Punkte in der oberen rechten Ecke des Browsers und dann auf "Zum Startbildschirm hinzufügen".
3. Mooncamp erscheint automatisch auf deinem Home-Bildschirm und du kannst jetzt deine Ziele auch unterwegs schnell überprüfen und aktualisieren.
# Willkommen bei Mooncamp
Source: https://mooncamp.com/docs/de/overview
Deine zentrale Plattform für Strategieumsetzung und Zielmanagement
 ## Was ist Mooncamp?
Mooncamp ist eine umfassende Plattform für Strategieumsetzung, die die strategische Vision, Ziele und das Tagesgeschäft deiner Organisation an einem Ort zusammenbringt. Durch die Verbindung von strategischer Planung mit der Umsetzung hilft Mooncamp Organisationen dabei, ihre Vision in messbare Ergebnisse umzuwandeln.
## Warum Mooncamp? Herausforderungen heutiger Organisationen
Organisationen stehen vor entscheidenden Herausforderungen, die über ihren Erfolg bestimmen:
Teams arbeiten isoliert mit unverbundenen Plänen und Prioritäten
Wichtige Informationen sind über mehrere Systeme und Tools verstreut
Trennung zwischen übergeordneter Strategie und Tagesgeschäft
Suboptimale Verteilung von Zeit, Budget und Talent
Mangel an klarer, einheitlicher Kommunikation über strategische Prioritäten
Schwierigkeiten bei der Messung und Überwachung strategischer Initiativergebnisse
## Mooncamp löst diese Herausforderungen durch fünf zentrale Vorteile:
Du kannst diese Vorteile als Meilensteine oder Bausteine betrachten, um deine Strategieumsetzung zu verbessern.
**Mit jeder Stufe erschließt du neue Vorteile auf dem Weg zur strategischen und operativen Exzellenz.**
Gewinne vollständige Einblicke in deine Strategieumsetzung und Unternehmensgesundheit. Identifiziere Risiken frühzeitig, verfolge Fortschritte in Echtzeit und triff fundierte Entscheidungen auf Basis echter Daten. Stelle sicher, dass jeder Mitarbeiter die Strategie durch klare Kommunikation versteht und fördere Transparenz in der gesamten Organisation.
Eliminiere Aktivitäten, die keine Ergebnisse bringen. Priorisiere strategische Initiativen und stelle sicher, dass Ressourcen dort eingesetzt werden, wo sie am wichtigsten sind.
Brich Silos zwischen Teams auf und schaffe klare Verbindungen zwischen Unternehmensstrategie und täglicher Arbeit. Stelle sicher, dass jeder versteht, wie seine Bemühungen zum Unternehmenserfolg beitragen.
Etabliere klare Verantwortlichkeiten für Ziele und Initiativen mit transparenter Verfolgung und Fortschrittsaktualisierungen. Ermögliche datengesteuerte Messung von Ergebnissen.
Verbessere die Fähigkeit deiner Organisation, sich schnell an Veränderungen anzupassen und Chancen zu nutzen. Optimiere Prozesse, um die Umsetzung zu beschleunigen und schnellere Ergebnisse zu erzielen.
## Erreiche Exzellenz in der Strategieumsetzung mit Mooncamp
Nachfolgend findest du die Kernfunktionen der Mooncamp-Plattform, die dir helfen, Schritt für Schritt Transparenz, Fokus, Ausrichtung, Verantwortlichkeit und Umsetzungsgeschwindigkeit zu erreichen.
Richte deine strategische Struktur ein: Definiere deine Fokusgebiete, Ziele, OKRs und Initiativen an einem Ort, damit alle auf dem gleichen Stand sind.
Vollständig anpassbare Dashboards und Berichte zur Verfolgung deiner Strategieleistung oder OKR-Prozesse. Plane wiederkehrende Berichte, um alle auf dem Laufenden zu halten.
Nutze Check-ins, um Teamausrichtung zu schaffen, alle an die Aktualisierung ihrer Ziele zu erinnern, durchdachte Kommunikation zu ermöglichen und die Produktivität zu steigern.
Erhalte einen Überblick und verfolge, wie gut deine Ziele und Initiativen mit der Unternehmensstrategie übereinstimmen. Identifiziere schnell Synergien oder nicht ausgerichtete Initiativen.
## Starte mit Mooncamp
Lerne, wie du dein Konto einrichtest, Benutzer einlädst und dein Strategieframework anpasst.
Lerne, wie du als Teammitglied mit Mooncamp startest.
# Benachrichtigungen
Source: https://mooncamp.com/docs/de/personal-notifications
Wähle aus, über welche Kanäle und für welche Ereignisse du Benachrichtigungen erhalten möchtest
Unter *Einstellungen > Benachrichtigungen* kannst du für dich festlegen, über welche Kanäle du benachrichtigt werden möchtest und über welche Ereignisse du Benachrichtigungen erhältst.
## Was ist Mooncamp?
Mooncamp ist eine umfassende Plattform für Strategieumsetzung, die die strategische Vision, Ziele und das Tagesgeschäft deiner Organisation an einem Ort zusammenbringt. Durch die Verbindung von strategischer Planung mit der Umsetzung hilft Mooncamp Organisationen dabei, ihre Vision in messbare Ergebnisse umzuwandeln.
## Warum Mooncamp? Herausforderungen heutiger Organisationen
Organisationen stehen vor entscheidenden Herausforderungen, die über ihren Erfolg bestimmen:
Teams arbeiten isoliert mit unverbundenen Plänen und Prioritäten
Wichtige Informationen sind über mehrere Systeme und Tools verstreut
Trennung zwischen übergeordneter Strategie und Tagesgeschäft
Suboptimale Verteilung von Zeit, Budget und Talent
Mangel an klarer, einheitlicher Kommunikation über strategische Prioritäten
Schwierigkeiten bei der Messung und Überwachung strategischer Initiativergebnisse
## Mooncamp löst diese Herausforderungen durch fünf zentrale Vorteile:
Du kannst diese Vorteile als Meilensteine oder Bausteine betrachten, um deine Strategieumsetzung zu verbessern.
**Mit jeder Stufe erschließt du neue Vorteile auf dem Weg zur strategischen und operativen Exzellenz.**
Gewinne vollständige Einblicke in deine Strategieumsetzung und Unternehmensgesundheit. Identifiziere Risiken frühzeitig, verfolge Fortschritte in Echtzeit und triff fundierte Entscheidungen auf Basis echter Daten. Stelle sicher, dass jeder Mitarbeiter die Strategie durch klare Kommunikation versteht und fördere Transparenz in der gesamten Organisation.
Eliminiere Aktivitäten, die keine Ergebnisse bringen. Priorisiere strategische Initiativen und stelle sicher, dass Ressourcen dort eingesetzt werden, wo sie am wichtigsten sind.
Brich Silos zwischen Teams auf und schaffe klare Verbindungen zwischen Unternehmensstrategie und täglicher Arbeit. Stelle sicher, dass jeder versteht, wie seine Bemühungen zum Unternehmenserfolg beitragen.
Etabliere klare Verantwortlichkeiten für Ziele und Initiativen mit transparenter Verfolgung und Fortschrittsaktualisierungen. Ermögliche datengesteuerte Messung von Ergebnissen.
Verbessere die Fähigkeit deiner Organisation, sich schnell an Veränderungen anzupassen und Chancen zu nutzen. Optimiere Prozesse, um die Umsetzung zu beschleunigen und schnellere Ergebnisse zu erzielen.
## Erreiche Exzellenz in der Strategieumsetzung mit Mooncamp
Nachfolgend findest du die Kernfunktionen der Mooncamp-Plattform, die dir helfen, Schritt für Schritt Transparenz, Fokus, Ausrichtung, Verantwortlichkeit und Umsetzungsgeschwindigkeit zu erreichen.
Richte deine strategische Struktur ein: Definiere deine Fokusgebiete, Ziele, OKRs und Initiativen an einem Ort, damit alle auf dem gleichen Stand sind.
Vollständig anpassbare Dashboards und Berichte zur Verfolgung deiner Strategieleistung oder OKR-Prozesse. Plane wiederkehrende Berichte, um alle auf dem Laufenden zu halten.
Nutze Check-ins, um Teamausrichtung zu schaffen, alle an die Aktualisierung ihrer Ziele zu erinnern, durchdachte Kommunikation zu ermöglichen und die Produktivität zu steigern.
Erhalte einen Überblick und verfolge, wie gut deine Ziele und Initiativen mit der Unternehmensstrategie übereinstimmen. Identifiziere schnell Synergien oder nicht ausgerichtete Initiativen.
## Starte mit Mooncamp
Lerne, wie du dein Konto einrichtest, Benutzer einlädst und dein Strategieframework anpasst.
Lerne, wie du als Teammitglied mit Mooncamp startest.
# Benachrichtigungen
Source: https://mooncamp.com/docs/de/personal-notifications
Wähle aus, über welche Kanäle und für welche Ereignisse du Benachrichtigungen erhalten möchtest
Unter *Einstellungen > Benachrichtigungen* kannst du für dich festlegen, über welche Kanäle du benachrichtigt werden möchtest und über welche Ereignisse du Benachrichtigungen erhältst.
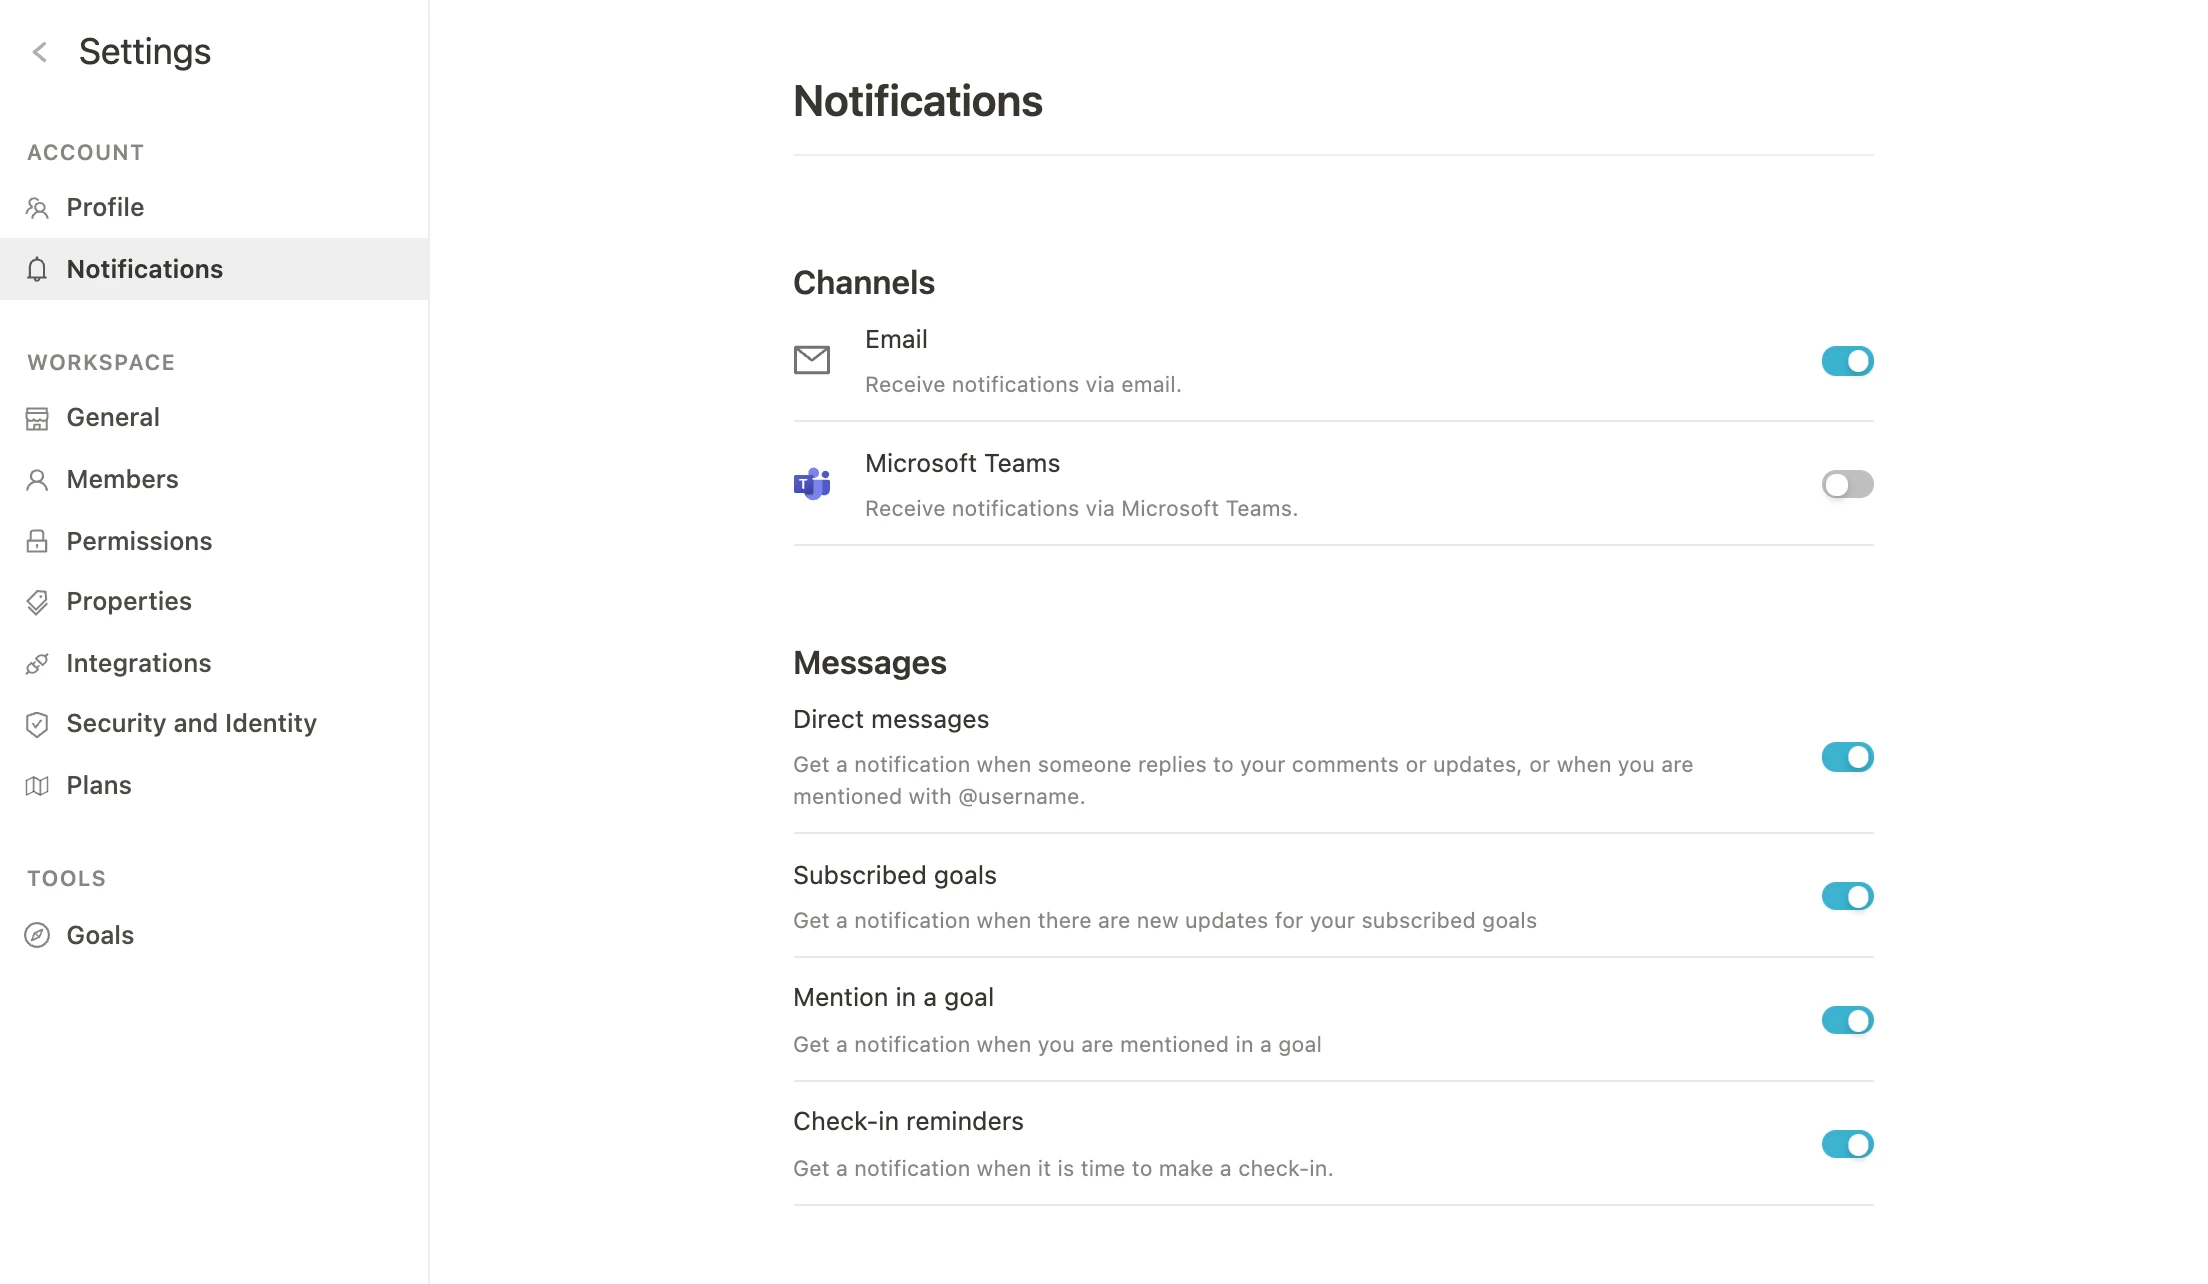 ### Kanäle:
* E-Mail
* Slack (Integration muss zuerst aktiviert werden)
* Microsoft Teams (Integration muss zuerst aktiviert werden)
Zusätzlich zu diesen externen Kanälen erhältst du auch persönliche Benachrichtigungen über den Posteingang innerhalb der Mooncamp-Plattform.
### Benachrichtigungen:
* **Direkte Nachrichten**: Erhalte eine Benachrichtigung, wenn jemand auf deine Kommentare oder Updates antwortet oder dich mit @Benutzername erwähnt.
* **Abonnierte Ziele**: Erhalte eine Benachrichtigung, wenn ein Ziel, das du abonniert hast, aktualisiert wird.
* **Erwähnungen in einem Ziel**: Erhalte eine Benachrichtigung, wenn dir ein Ziel zugewiesen wird.
* **Erinnerung für Check-ins**: Erhalte eine Benachrichtigung, wenn es Zeit für deinen Check-in ist.
# Plannings
Source: https://mooncamp.com/docs/de/planning-spaces
Ein Überblick über Plannings und Zielentwürfe
### Was sind Plannings?
Ein Planning ist ein dedizierter Bereich, in dem du gemeinsam mit deinem Team Ziel- oder OKR-Entwürfe erstellen kannst, bevor diese in deiner Organisation veröffentlicht werden.
### Warum solltest du Plannings nutzen?
Plannings sind ein wichtiger Bestandteil des Strategie- oder OKR-Prozesses und bieten unter anderem folgende Vorteile:
**Gute Ziele/OKRs schreiben**
Ein dedizierter Bereich für Ziel- oder OKR-Entwürfe, die zunächst im Team besprochen werden, hilft dabei, gute Ziele oder OKRs zu formulieren, bevor sie veröffentlicht werden.
**Bewusste Ausrichtung an übergeordneten Zielen**
Sobald Ziele aus anderen Abteilungen oder Organisationsebenen (z.B. Leadership Ziele) veröffentlicht sind, können die Zielentwürfe aus deinem Planning daran ausgerichtet werden.
**Den Überblick behalten**
Ein separater Bereich für Zielentwürfe hilft dir schließlich dabei, den Überblick zu behalten und deine Entwürfe nicht mit veröffentlichten Zielen zu vermischen.
### Übersicht der Plannings
Navigiere zunächst zum 'Ziele'-Modul und klicke auf den Unterpunkt 'Plannings'. Hier siehst du eine Liste aller *offenen* Plannings (zu denen du Zugriff hast).
Um alle oder nur geschlossene Plannings anzuzeigen, klicke auf "Offen" in der Tabellenkopfzeile (`1`) und wähle die entsprechende Option aus.
### Kanäle:
* E-Mail
* Slack (Integration muss zuerst aktiviert werden)
* Microsoft Teams (Integration muss zuerst aktiviert werden)
Zusätzlich zu diesen externen Kanälen erhältst du auch persönliche Benachrichtigungen über den Posteingang innerhalb der Mooncamp-Plattform.
### Benachrichtigungen:
* **Direkte Nachrichten**: Erhalte eine Benachrichtigung, wenn jemand auf deine Kommentare oder Updates antwortet oder dich mit @Benutzername erwähnt.
* **Abonnierte Ziele**: Erhalte eine Benachrichtigung, wenn ein Ziel, das du abonniert hast, aktualisiert wird.
* **Erwähnungen in einem Ziel**: Erhalte eine Benachrichtigung, wenn dir ein Ziel zugewiesen wird.
* **Erinnerung für Check-ins**: Erhalte eine Benachrichtigung, wenn es Zeit für deinen Check-in ist.
# Plannings
Source: https://mooncamp.com/docs/de/planning-spaces
Ein Überblick über Plannings und Zielentwürfe
### Was sind Plannings?
Ein Planning ist ein dedizierter Bereich, in dem du gemeinsam mit deinem Team Ziel- oder OKR-Entwürfe erstellen kannst, bevor diese in deiner Organisation veröffentlicht werden.
### Warum solltest du Plannings nutzen?
Plannings sind ein wichtiger Bestandteil des Strategie- oder OKR-Prozesses und bieten unter anderem folgende Vorteile:
**Gute Ziele/OKRs schreiben**
Ein dedizierter Bereich für Ziel- oder OKR-Entwürfe, die zunächst im Team besprochen werden, hilft dabei, gute Ziele oder OKRs zu formulieren, bevor sie veröffentlicht werden.
**Bewusste Ausrichtung an übergeordneten Zielen**
Sobald Ziele aus anderen Abteilungen oder Organisationsebenen (z.B. Leadership Ziele) veröffentlicht sind, können die Zielentwürfe aus deinem Planning daran ausgerichtet werden.
**Den Überblick behalten**
Ein separater Bereich für Zielentwürfe hilft dir schließlich dabei, den Überblick zu behalten und deine Entwürfe nicht mit veröffentlichten Zielen zu vermischen.
### Übersicht der Plannings
Navigiere zunächst zum 'Ziele'-Modul und klicke auf den Unterpunkt 'Plannings'. Hier siehst du eine Liste aller *offenen* Plannings (zu denen du Zugriff hast).
Um alle oder nur geschlossene Plannings anzuzeigen, klicke auf "Offen" in der Tabellenkopfzeile (`1`) und wähle die entsprechende Option aus.
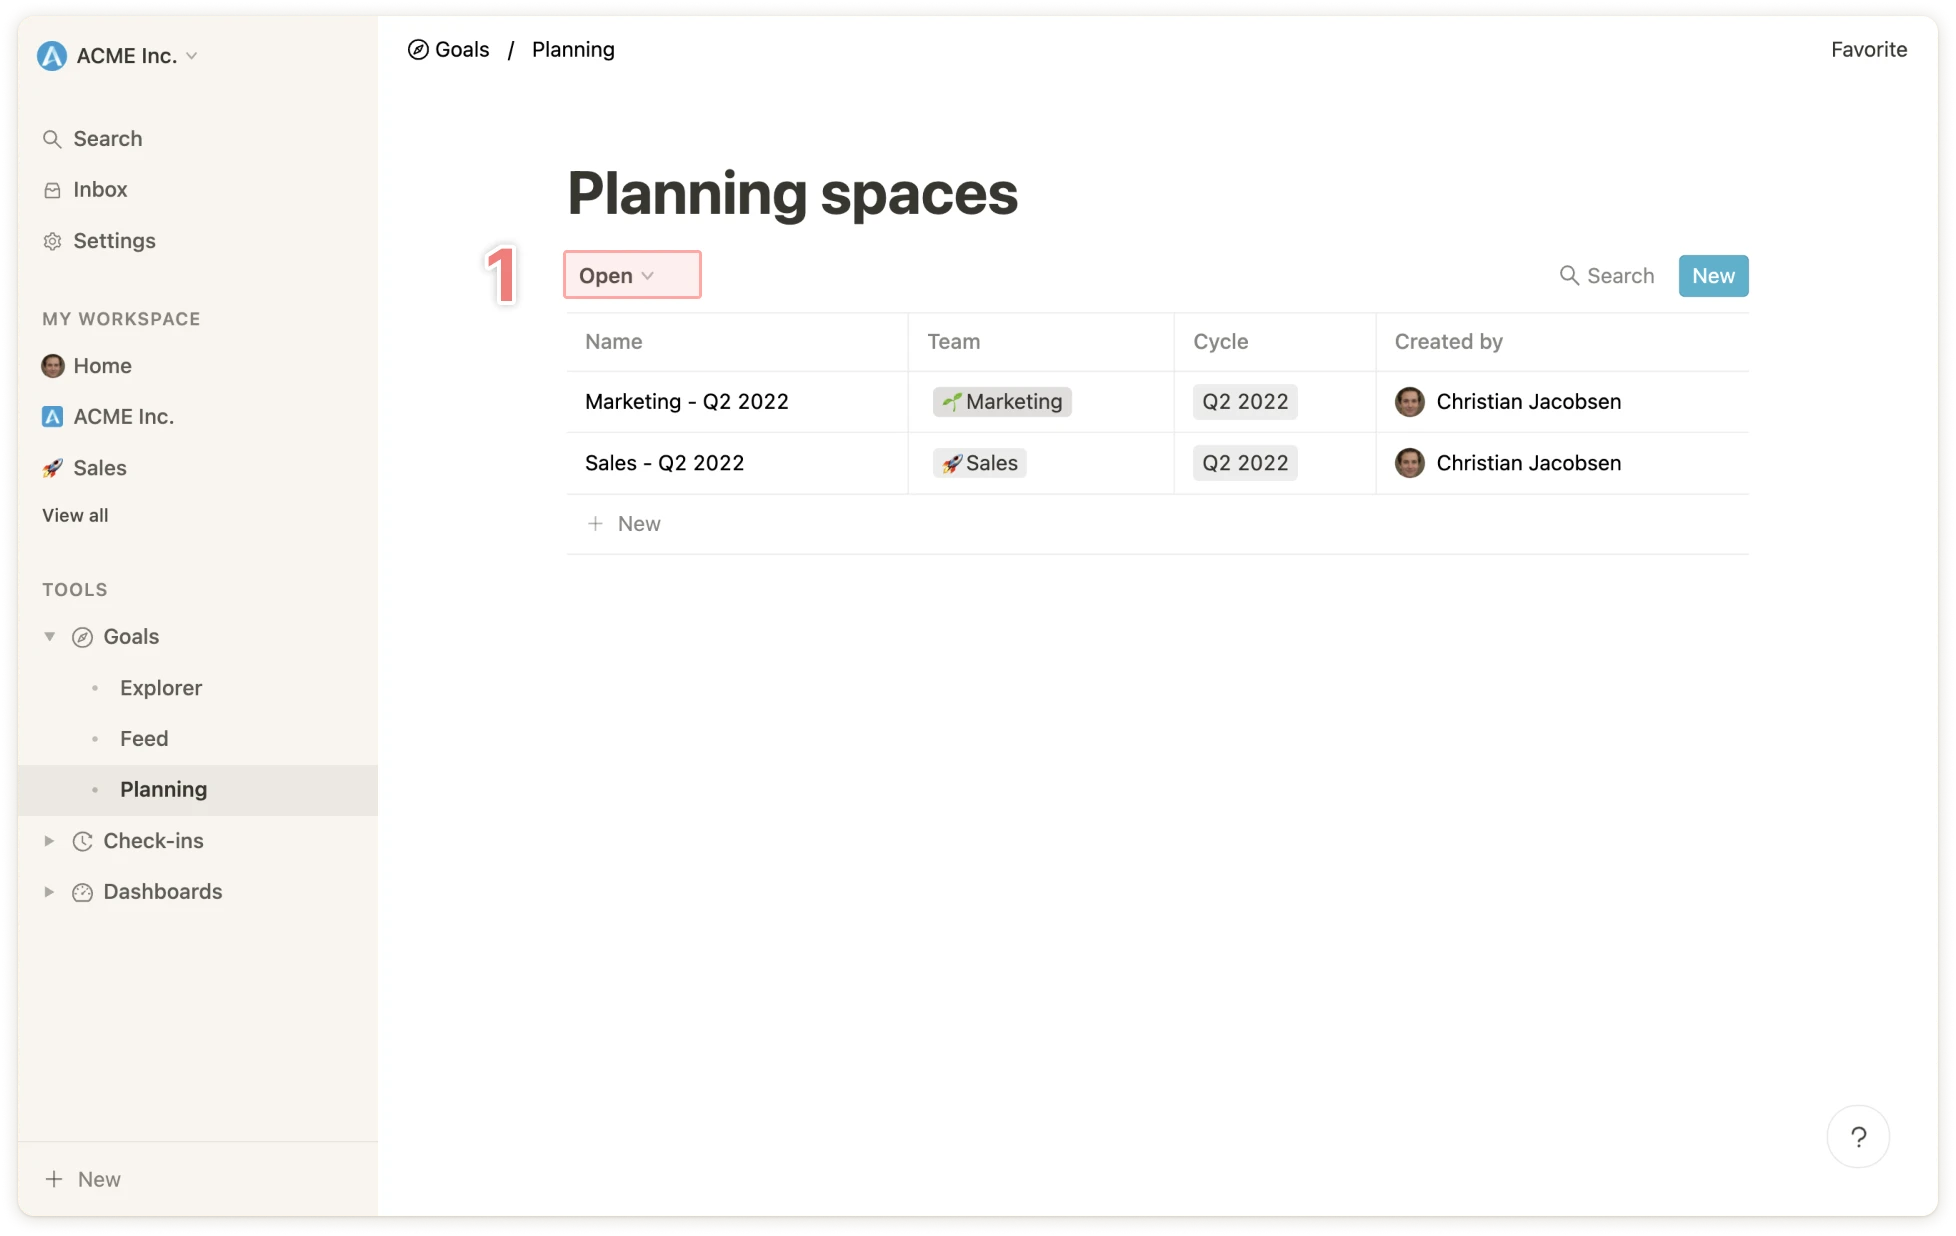 ### Ein Planning erstellen
Um ein Planning zu erstellen, klicke auf den blauen Button `1` oder auf die letzte Zeile in der Tabelle `2`. Es öffnet sich dann ein Fenster, in dem du das Planning deinem Team (oder deinen Teams) und einem Zyklus zuordnen kannst, bevor du es erstellst. Ein Name für das Planning wird von Mooncamp vorgeschlagen, kann aber überschrieben werden.
💡 Alle Benutzer können ihre eigenen Plannings erstellen, teilen, bearbeiten und löschen. Das Gleiche gilt für Plannings, zu denen sie vollen Zugriff haben. Wenn Mitarbeiter nicht das Recht haben, Ziele zu erstellen, können sie auch keine Zielentwürfe erstellen.
### Ein Planning erstellen
Um ein Planning zu erstellen, klicke auf den blauen Button `1` oder auf die letzte Zeile in der Tabelle `2`. Es öffnet sich dann ein Fenster, in dem du das Planning deinem Team (oder deinen Teams) und einem Zyklus zuordnen kannst, bevor du es erstellst. Ein Name für das Planning wird von Mooncamp vorgeschlagen, kann aber überschrieben werden.
💡 Alle Benutzer können ihre eigenen Plannings erstellen, teilen, bearbeiten und löschen. Das Gleiche gilt für Plannings, zu denen sie vollen Zugriff haben. Wenn Mitarbeiter nicht das Recht haben, Ziele zu erstellen, können sie auch keine Zielentwürfe erstellen.
 ### Den Planning mit anderen in deiner Organisation teilen
Standardmäßig wird ein Planning mit den ausgewählten Teams geteilt, denen es zugeordnet ist. Jedes Teammitglied hat vollen Zugriff auf das Planning und hat folgende Rechte:
* Bearbeitungszugriff auf das Planning
* Das Planning bearbeiten
* Namen bearbeiten
* Zyklus bearbeiten
* Team bearbeiten
* Ansichten erstellen und bearbeiten
* Planning schließen und öffnen
* Zielentwürfe erstellen und bearbeiten
* Zielentwürfe veröffentlichen
Standardmäßig hat der Rest der Organisation keinen Zugriff auf das Planning. Die Einstellungen können jedoch jederzeit durch Klicken auf "Teilen" `1` geändert werden.
### Den Planning mit anderen in deiner Organisation teilen
Standardmäßig wird ein Planning mit den ausgewählten Teams geteilt, denen es zugeordnet ist. Jedes Teammitglied hat vollen Zugriff auf das Planning und hat folgende Rechte:
* Bearbeitungszugriff auf das Planning
* Das Planning bearbeiten
* Namen bearbeiten
* Zyklus bearbeiten
* Team bearbeiten
* Ansichten erstellen und bearbeiten
* Planning schließen und öffnen
* Zielentwürfe erstellen und bearbeiten
* Zielentwürfe veröffentlichen
Standardmäßig hat der Rest der Organisation keinen Zugriff auf das Planning. Die Einstellungen können jedoch jederzeit durch Klicken auf "Teilen" `1` geändert werden.
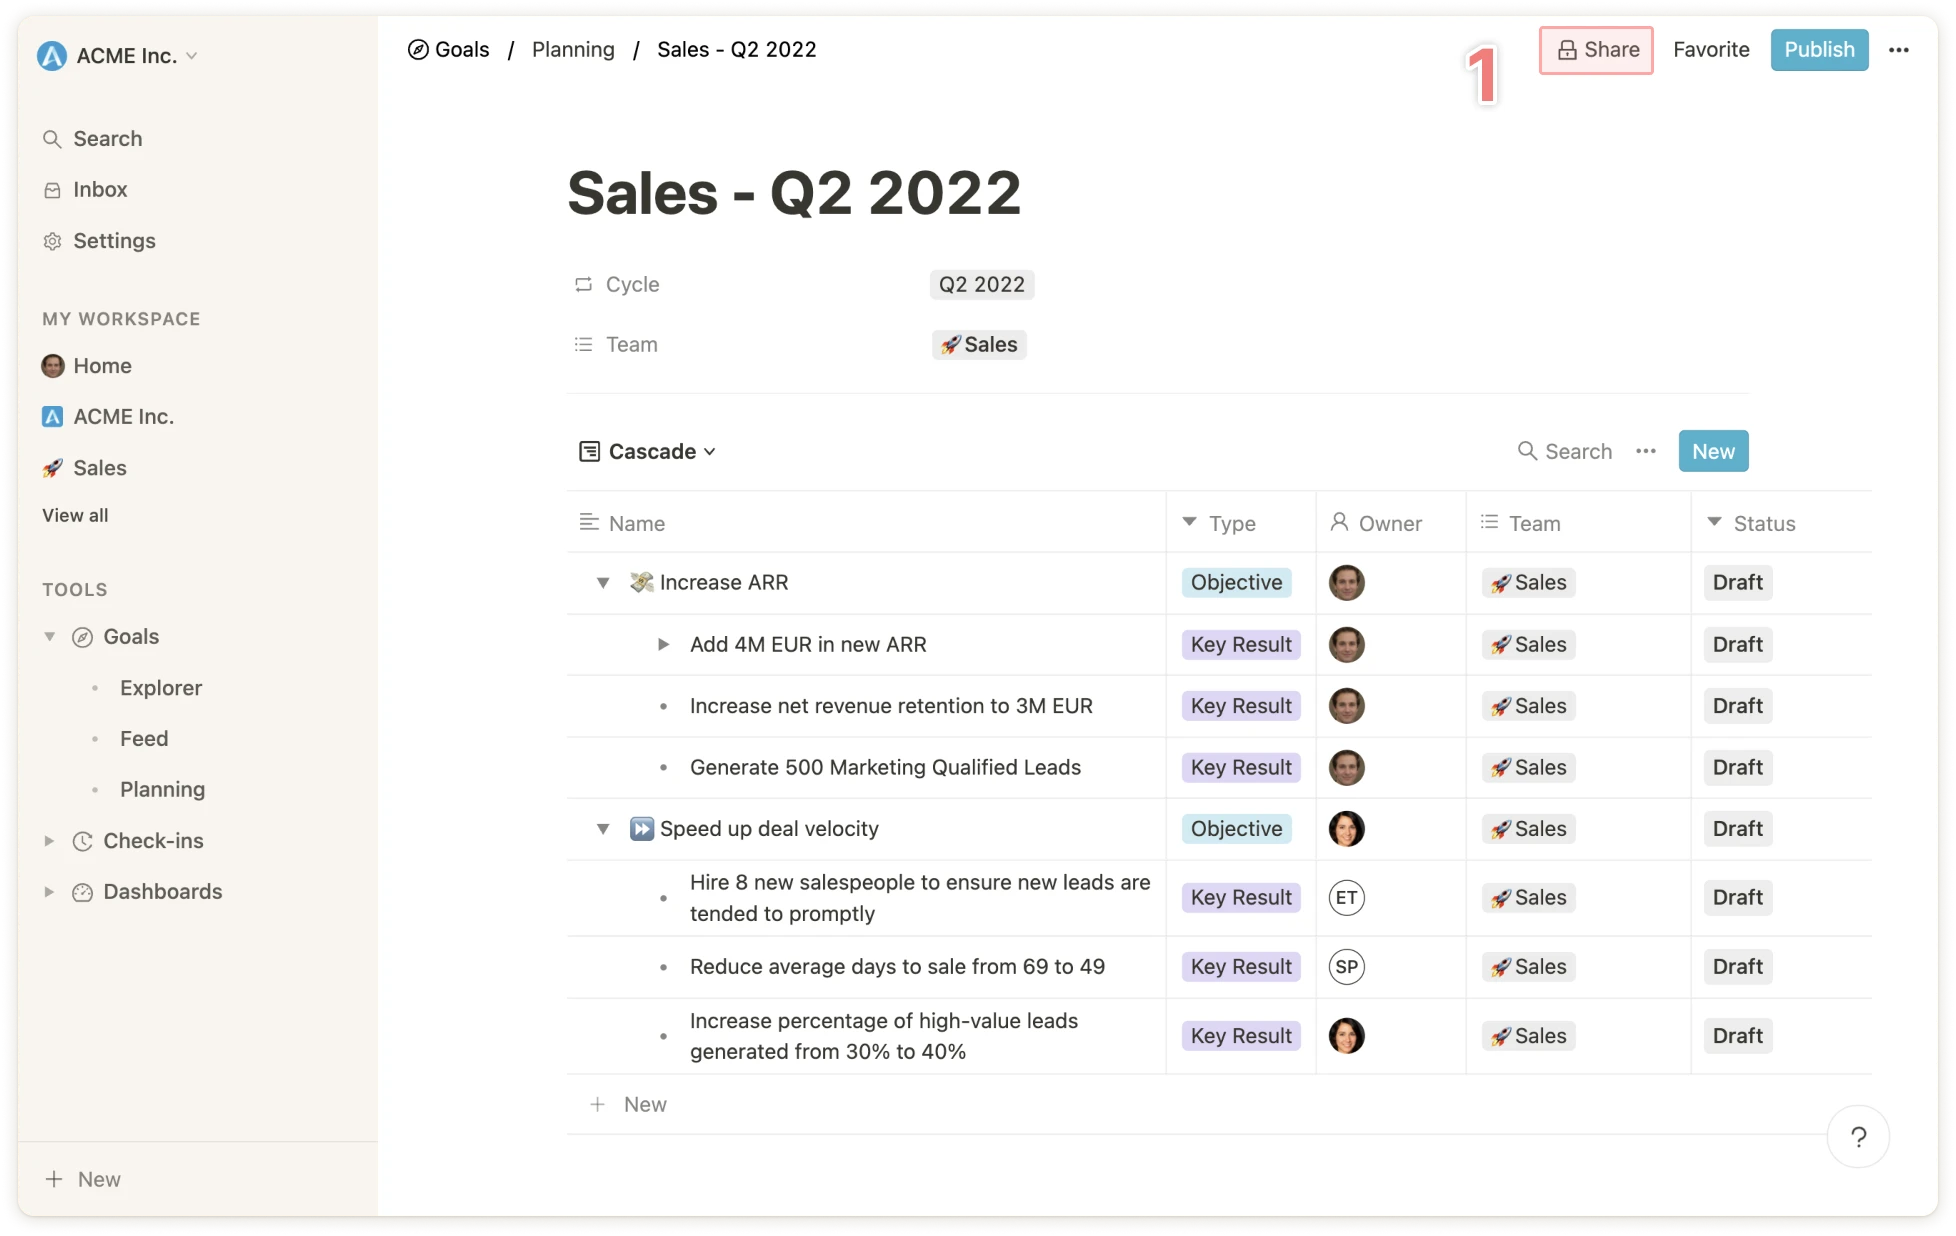 ### Zielentwürfe erstellen
Jedes Ziel, das innerhalb eines Plannings erstellt wird, hat standardmäßig den Status "Entwurf".
Es gibt zwei Möglichkeiten, Zielentwürfe zu erstellen:
**Entwürfe selbst erstellen**
Zielentwürfe können genau wie andere Ziele über den blauen Button oder die letzte Zeile in der Tabelle erstellt werden.
**Ziele als Entwürfe importieren**
Oft ändern sich Ziele von Zyklus zu Zyklus nur geringfügig, daher ist es sinnvoll, bestehende Ziele als Duplikate zu importieren, um sie anzupassen.
Bei der Erstellung eines Plannings kannst du auswählen, ob Ziele importiert werden sollen oder nicht. Zusätzlich können Ziele jederzeit importiert werden, indem du auf das Ellipsen-Symbol ("...") oben im Bildschirm klickst und "Ziele importieren" `1` auswählst.
### Zielentwürfe erstellen
Jedes Ziel, das innerhalb eines Plannings erstellt wird, hat standardmäßig den Status "Entwurf".
Es gibt zwei Möglichkeiten, Zielentwürfe zu erstellen:
**Entwürfe selbst erstellen**
Zielentwürfe können genau wie andere Ziele über den blauen Button oder die letzte Zeile in der Tabelle erstellt werden.
**Ziele als Entwürfe importieren**
Oft ändern sich Ziele von Zyklus zu Zyklus nur geringfügig, daher ist es sinnvoll, bestehende Ziele als Duplikate zu importieren, um sie anzupassen.
Bei der Erstellung eines Plannings kannst du auswählen, ob Ziele importiert werden sollen oder nicht. Zusätzlich können Ziele jederzeit importiert werden, indem du auf das Ellipsen-Symbol ("...") oben im Bildschirm klickst und "Ziele importieren" `1` auswählst.

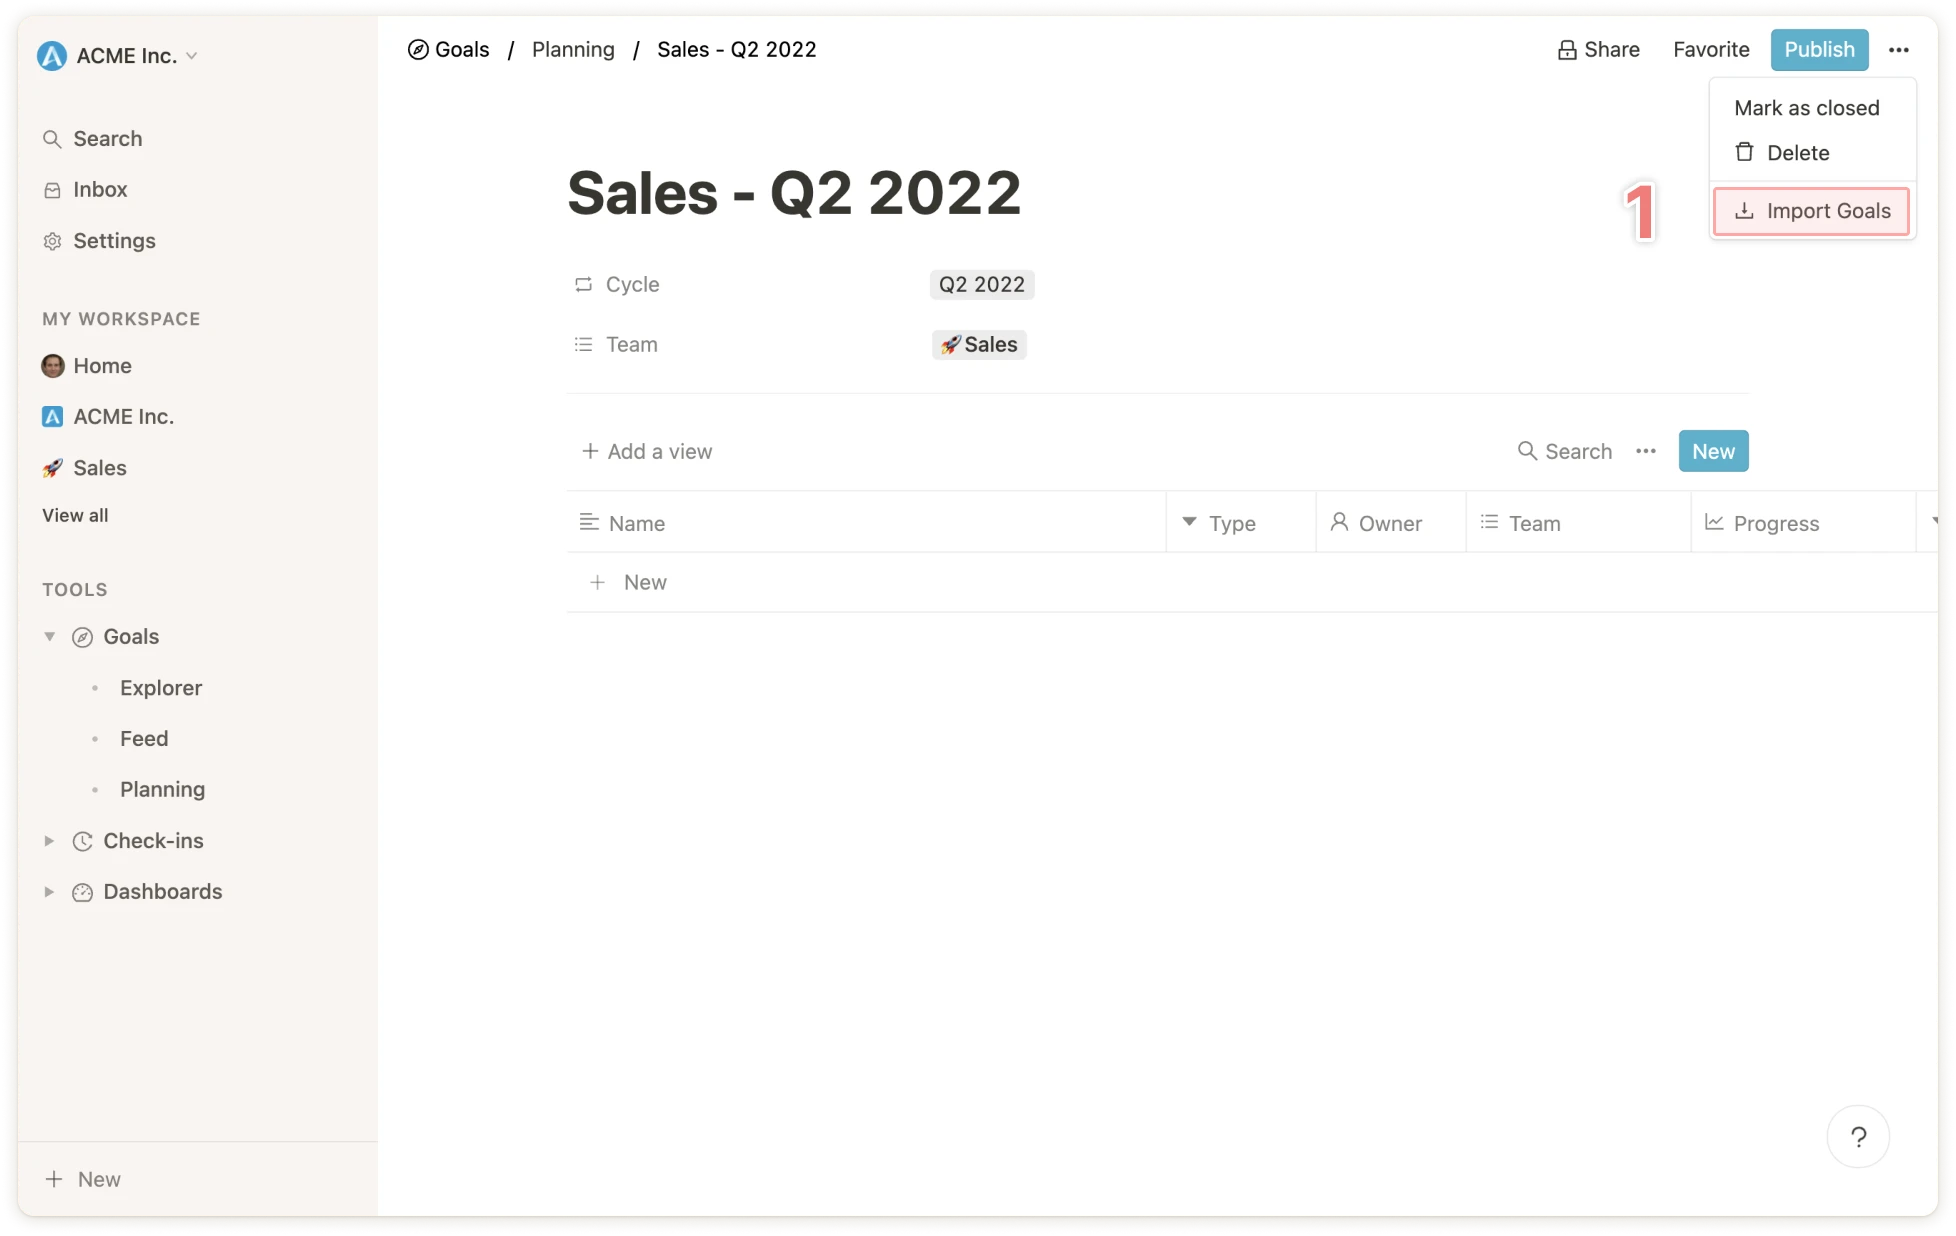 ### Zielentwürfe veröffentlichen
Nach der Bearbeitung und Finalisierung der Zielentwürfe können diese durch Klicken auf den blauen Button oben im Bildschirm `1` veröffentlicht werden.
Im sich öffnenden Fenster kannst du wählen, ob alle Entwürfe oder nur eine Auswahl davon veröffentlicht werden sollen. Bei der Veröffentlichung kannst du auch auswählen, ob das Planning danach geschlossen werden soll.
### Zielentwürfe veröffentlichen
Nach der Bearbeitung und Finalisierung der Zielentwürfe können diese durch Klicken auf den blauen Button oben im Bildschirm `1` veröffentlicht werden.
Im sich öffnenden Fenster kannst du wählen, ob alle Entwürfe oder nur eine Auswahl davon veröffentlicht werden sollen. Bei der Veröffentlichung kannst du auch auswählen, ob das Planning danach geschlossen werden soll.
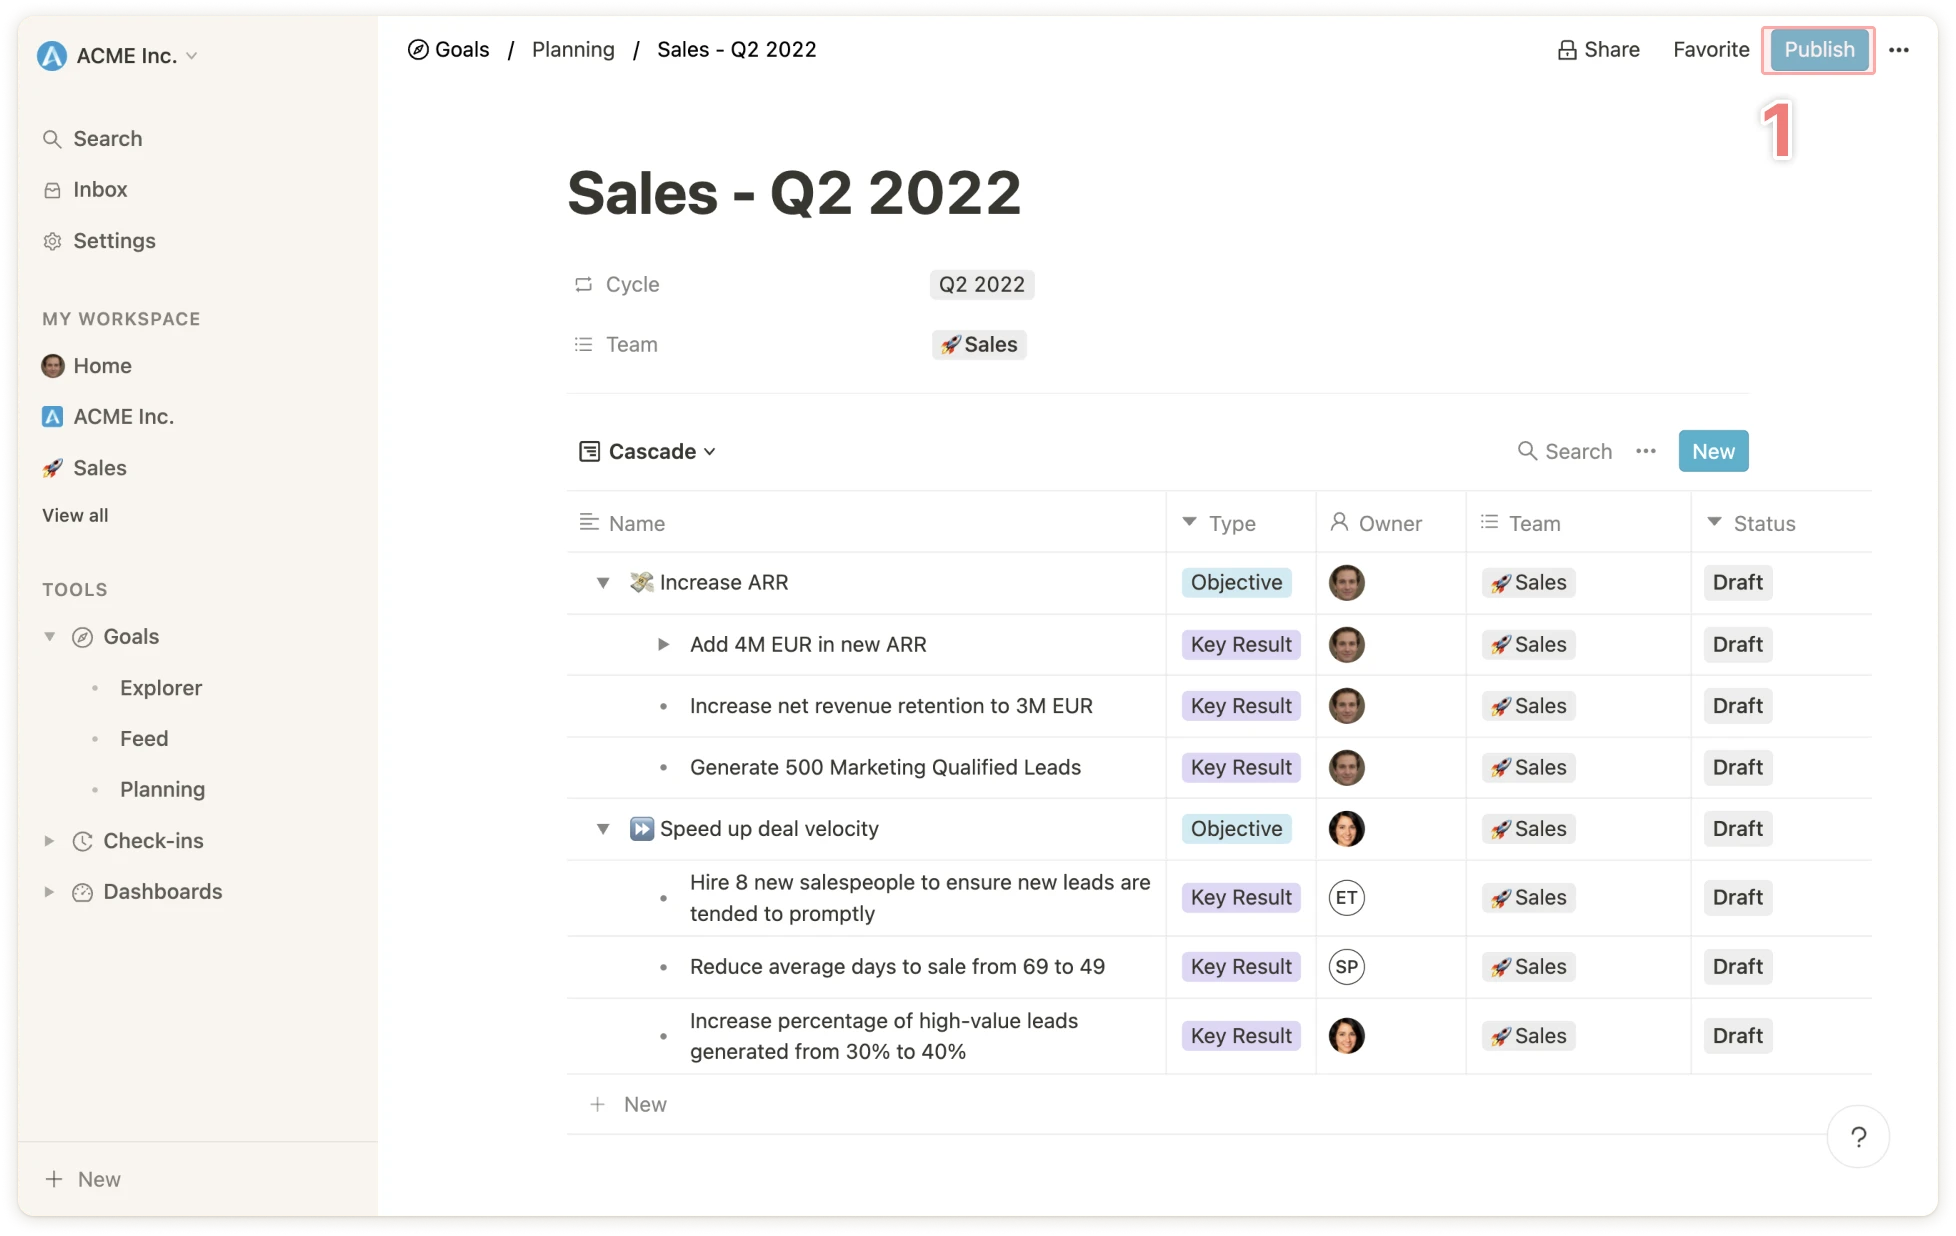 ### Einen Planning schließen
Wenn ein Planning geschlossen wird, können keine weiteren Entwürfe mehr erstellt werden und es verschwindet aus der Liste der offenen Plannings.
Ein Planning kann im Rahmen der Veröffentlichung von Zielentwürfen `1` oder über den Ellipsen-Menüpunkt oben im Bildschirm `2` geschlossen werden.
### Einen Planning schließen
Wenn ein Planning geschlossen wird, können keine weiteren Entwürfe mehr erstellt werden und es verschwindet aus der Liste der offenen Plannings.
Ein Planning kann im Rahmen der Veröffentlichung von Zielentwürfen `1` oder über den Ellipsen-Menüpunkt oben im Bildschirm `2` geschlossen werden.

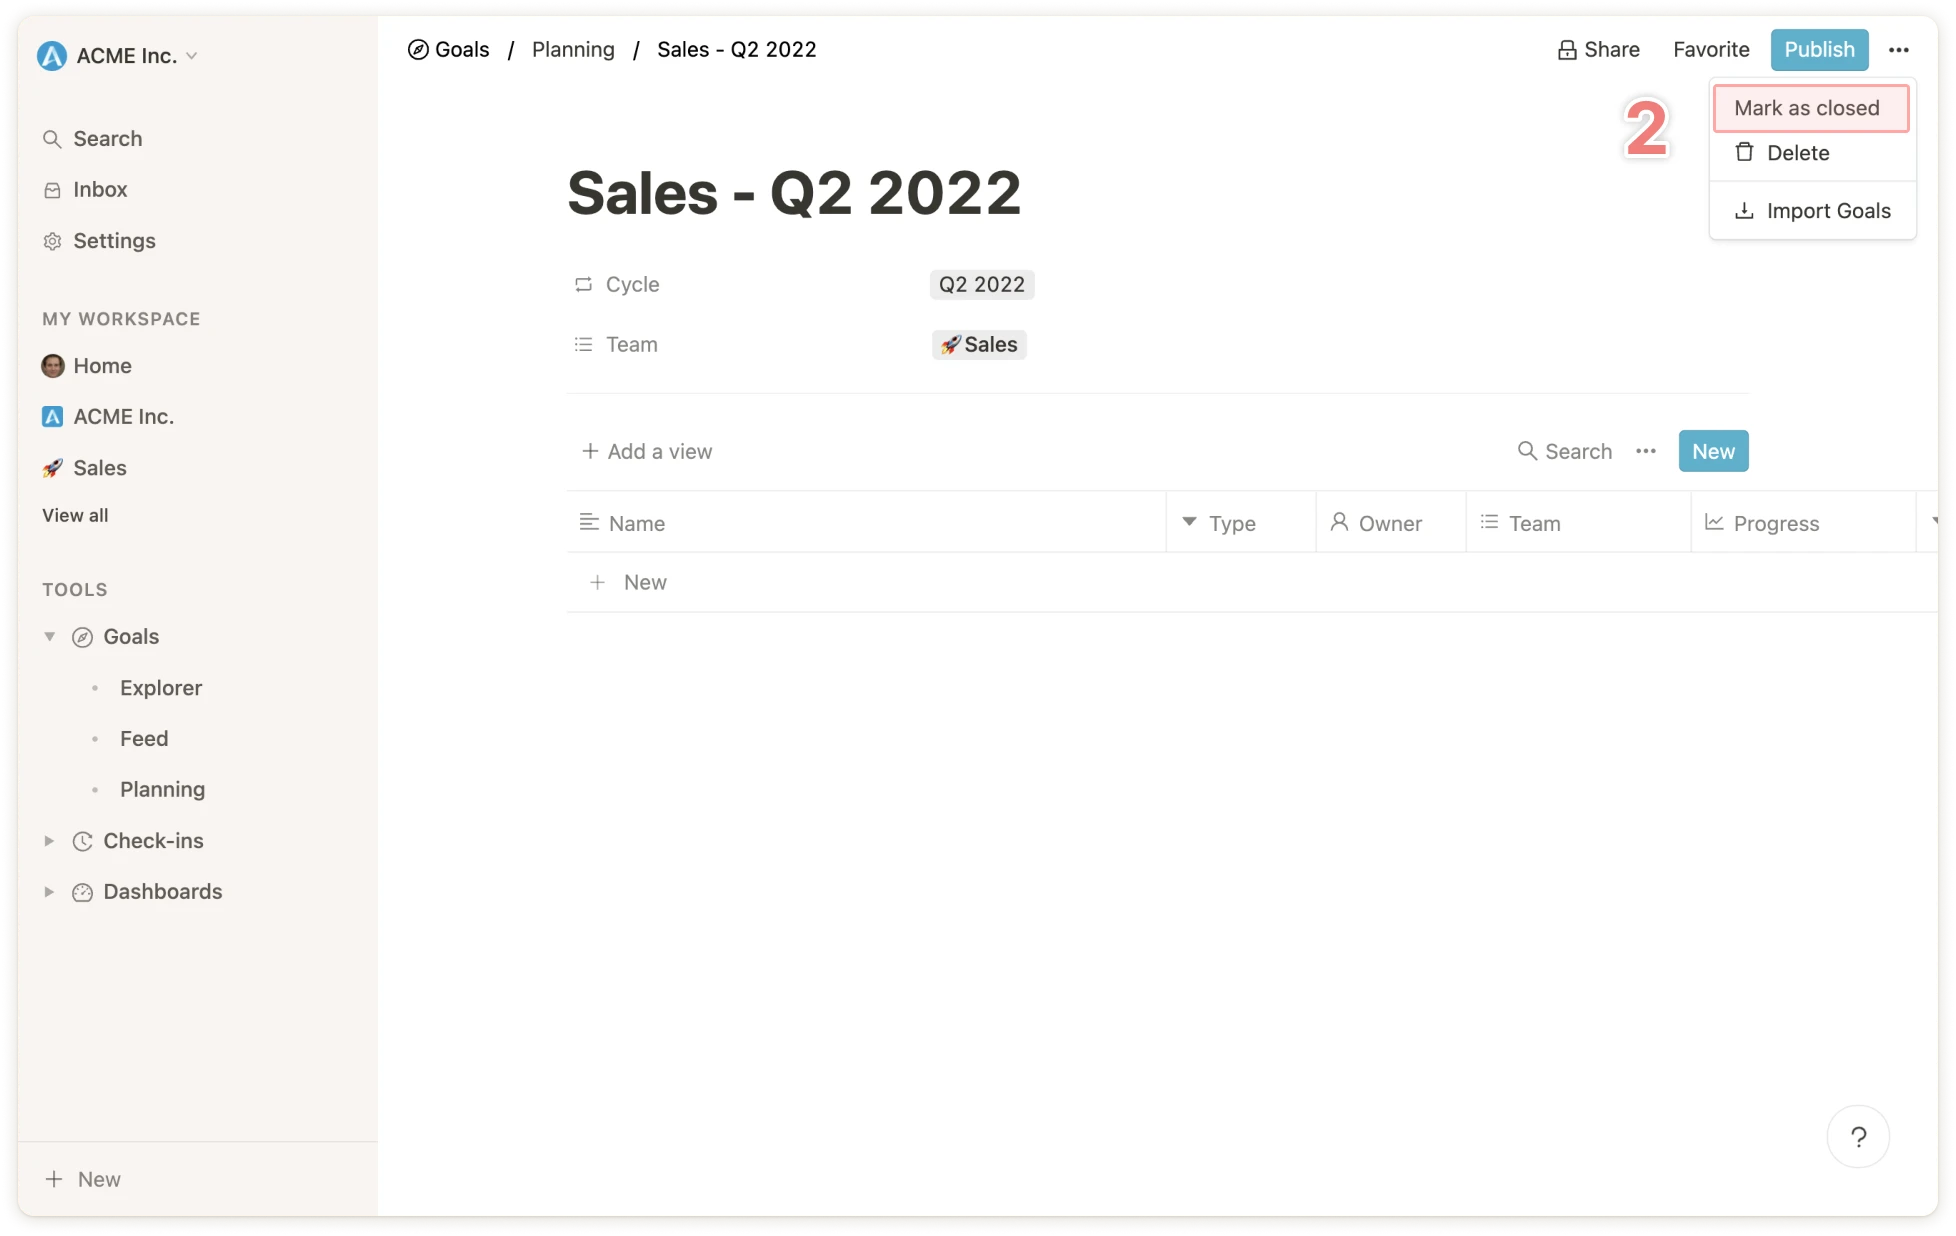 Ein Planning kann jederzeit durch Klicken auf "Erneut öffnen" oben im Bildschirm wieder geöffnet werden.
# Persönliche Informationen und Passwort zurücksetzen
Source: https://mooncamp.com/docs/de/profile-settings
Ändere deinen Namen, dein Profilbild und die Kontosprache oder setze dein Passwort zurück
Ein Planning kann jederzeit durch Klicken auf "Erneut öffnen" oben im Bildschirm wieder geöffnet werden.
# Persönliche Informationen und Passwort zurücksetzen
Source: https://mooncamp.com/docs/de/profile-settings
Ändere deinen Namen, dein Profilbild und die Kontosprache oder setze dein Passwort zurück
 Unter *Einstellungen > Profil* kannst du:
* Ein **Profilbild** hochladen, das auf deiner [Homepage](/de/homepage), deiner öffentlichen Profilseite und neben deinem Namen in verschiedenen Tools als "Avatar" erscheint
* Deinen **Vor-** **und** **Nachnamen** ändern
* Deine bei Mooncamp registrierte **E-Mail-Adresse** einsehen
* Die **Sprache** deines Kontos ändern (bisher werden Englisch und Deutsch unterstützt)
* Dein **Passwort** zurücksetzen
# Progress Dashboard
Source: https://mooncamp.com/docs/de/progress-dashboard
Ein Überblick über das Progress Dashboard für Ziele und OKRs.
**Wichtiger Hinweis:** Damit alle Mitglieder Zugriff auf Progress- und Health-Dashboards erhalten, muss dies einmalig vom Admin unter `Einstellungen > Zugriffsgruppen > Mitglied > Kann Progress- und Health-Dashboards einsehen` eingestellt werden.
Das Progress Dashboard bietet Informationen über den Fortschritt aller Ziele, gruppiert nach Team oder Mitarbeiter. Es können beliebig viele Filter angewendet werden, um z.B. Ziele anzuzeigen, die noch nicht aktualisiert wurden, nicht ausgerichtet sind oder gefährdet sind.
Unter *Einstellungen > Profil* kannst du:
* Ein **Profilbild** hochladen, das auf deiner [Homepage](/de/homepage), deiner öffentlichen Profilseite und neben deinem Namen in verschiedenen Tools als "Avatar" erscheint
* Deinen **Vor-** **und** **Nachnamen** ändern
* Deine bei Mooncamp registrierte **E-Mail-Adresse** einsehen
* Die **Sprache** deines Kontos ändern (bisher werden Englisch und Deutsch unterstützt)
* Dein **Passwort** zurücksetzen
# Progress Dashboard
Source: https://mooncamp.com/docs/de/progress-dashboard
Ein Überblick über das Progress Dashboard für Ziele und OKRs.
**Wichtiger Hinweis:** Damit alle Mitglieder Zugriff auf Progress- und Health-Dashboards erhalten, muss dies einmalig vom Admin unter `Einstellungen > Zugriffsgruppen > Mitglied > Kann Progress- und Health-Dashboards einsehen` eingestellt werden.
Das Progress Dashboard bietet Informationen über den Fortschritt aller Ziele, gruppiert nach Team oder Mitarbeiter. Es können beliebig viele Filter angewendet werden, um z.B. Ziele anzuzeigen, die noch nicht aktualisiert wurden, nicht ausgerichtet sind oder gefährdet sind.
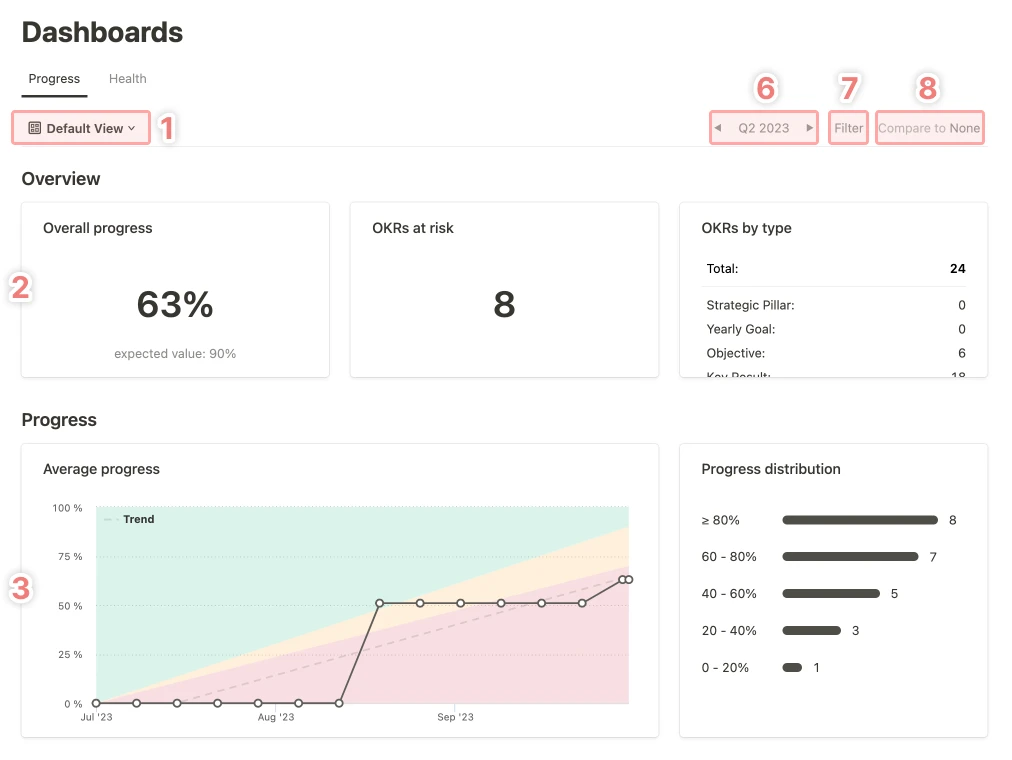
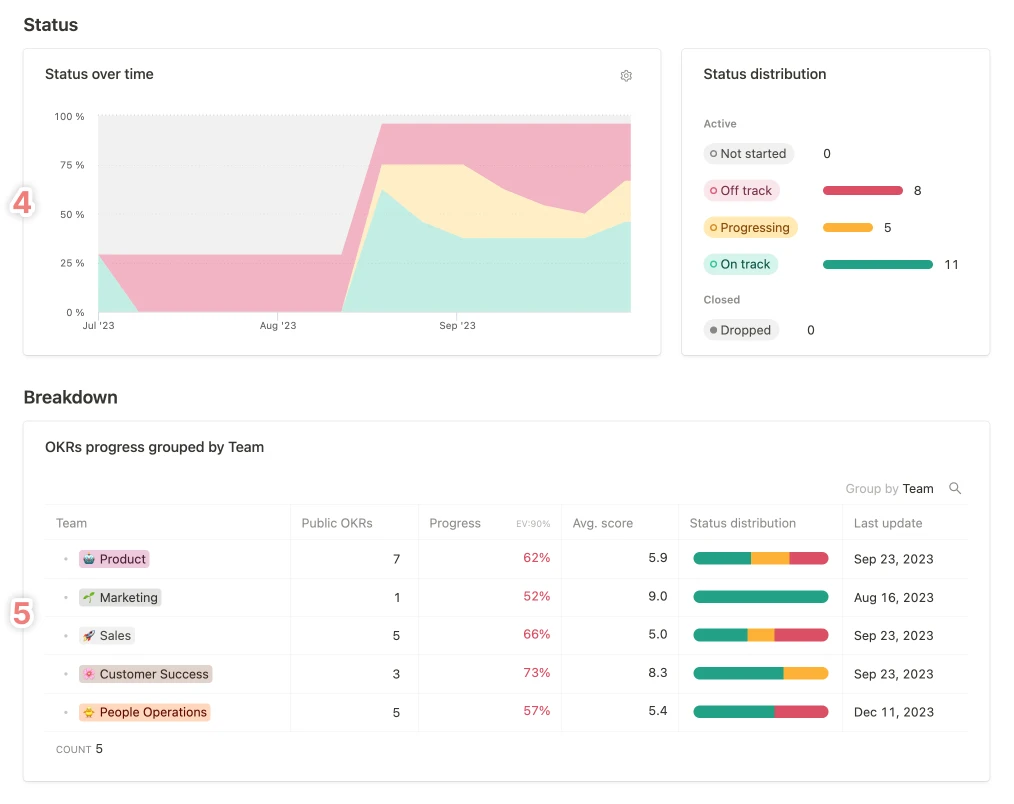 ### Liste der Funktionen und Elemente des Ziele-Dashboards:
**1. Ansichten**
Wechsle zwischen Ansichten und erstelle deine eigenen privaten (falls berechtigt, auch öffentlichen) Ansichten.
**2. Wichtige Kennzahlen**
* Gesamtfortschritt: der Gesamtfortschritt aller Ziele (basierend auf Filtern) einschließlich des erwarteten Werts zum aktuellen Zeitpunkt
* Gefährdete Ziele: Alle Ziele mit dem Status "Nicht auf Kurs"
* Gesamtzahl der Ziele und Ziele nach Typ (z.B. Objective oder Key Result)
**3. Fortschritts-Diagramme**
Der Fortschritt aller gefilterten Ziele über den ausgewählten Zeitraum sowie die Fortschrittsverteilung aller gefilterten Ziele in diesem Zeitraum.
**4. Status-Diagramme**
Die Entwicklung der Status aller gefilterten Ziele über den ausgewählten Zeitraum sowie die Verteilung der Status über alle gefilterten Ziele in diesem Zeitraum.
**5. Kennzahlen nach Team / Mitarbeiter**
Die Kennzahlen können in der oberen rechten Ecke des Diagramms nach Team oder Mitarbeitern gruppiert werden. Hier kannst du zum Beispiel sehen, wie sich der Zielfortschritt oder Status der Teams oder Mitarbeiter vergleicht oder welche Teams oder Mitarbeiter noch keine Ziele aktualisiert haben.
**6. Zyklus-Filter**
Hier kannst du den jeweiligen Zielzyklus auswählen. Es können auch mehrere Zyklen ausgewählt werden.
**7. Weitere Filter**
Wende Filter auf die Zielauswertung an.
**8. Vergleich**
Vergleiche die Daten deines aktuellen Dashboards mit denen von vor einem Tag, einer Woche, einem Monat oder einem benutzerdefinierten Zeitraum.
**9. Speichere die ausgewählte Ansicht über die Schaltfläche `Zu Favoriten` in der oberen rechten Ecke der Seite.**
**10. PDF-Export**
Über die Ellipse (...) in der oberen rechten Ecke des Bildschirms kannst du das Progress-Dashboard als PDF-Datei exportieren.
# Fortschrittsmessarten
Source: https://mooncamp.com/docs/de/progress-measurement
Ein Überblick über die verschiedenen Arten der Fortschrittsmessung
## Messung des Zielfortschritts
Wie der Fortschritt von Zielen gemessen werden soll, kannst Du für jedes Ziel individuell festlegen, indem Du auf `Fortschritt` klickst.
Es gibt fünf verschiedene Optionen zur Messung des Fortschritts eines Ziels:
* `Start- und Zielwert`
* `Aggregation`
* `Grenzwert`
* `Offen/Erledigt`
* `Keine`
### Start- und Zielwert
Mit dieser Option kannst Du den Start- und Zielwert für eine Kennzahl und die zugehörige Einheit festlegen (z.B. Start: 0 % => Ziel: 100 %).
Darüber hinaus kann das Ziel durch Integrationen mit anderen Tools wie Asana, Jira oder Excel automatisch aktualisiert werden, indem Du auf `Mit Datenquelle verbinden` klickst. Auf diese Weise kannst Du die manuelle Aktualisierung von Zielen automatisieren.
### Aggregation
Mit der Option `Aggregation` hast Du zunächst die Möglichkeit anzupassen, wie der Zielfortschritt in der Zieltabellenansicht erscheint. Du kannst wählen, ob der Fortschritt als Prozentsatz, als absolute Werte oder beides angezeigt werden soll.
Standardmäßig wird der Fortschritt des Ziels als Prozentsatz des durchschnittlichen Fortschritts aller darunter liegenden Ziele ausgedrückt. Der Fortschritt wird also von 0 bis 100% angezeigt. Wenn die Unterziele nicht auf einer Skala von 0 bis 100% gemessen werden und andere Einheiten haben (was häufig vorkommt), werden sie vorher in eine Prozentskala umgerechnet.
Beispiel für die Berechnung:
**Fortschritt (Aggregation)**
| Ziel | Fortschritt (Aggregation) |
| ------------- | ------------------------- |
| **Objective** | 33% |
| Key Result 1 | 100% |
| Key Result 2 | 0% |
| Key Result 3 | 0% |
Wenn Du bei bestimmten Zielen zulassen möchtest, dass sie die 100%-Fortschrittsgrenze überschreiten können, kannst Du bei diesen Zielen den Button `Übererfüllung von ausgerichteten Elementen zulassen` aktivieren. Dies hat zur Folge, dass auch Berichte und Dashboards die Ziele nicht bei 100% deckeln.
### Liste der Funktionen und Elemente des Ziele-Dashboards:
**1. Ansichten**
Wechsle zwischen Ansichten und erstelle deine eigenen privaten (falls berechtigt, auch öffentlichen) Ansichten.
**2. Wichtige Kennzahlen**
* Gesamtfortschritt: der Gesamtfortschritt aller Ziele (basierend auf Filtern) einschließlich des erwarteten Werts zum aktuellen Zeitpunkt
* Gefährdete Ziele: Alle Ziele mit dem Status "Nicht auf Kurs"
* Gesamtzahl der Ziele und Ziele nach Typ (z.B. Objective oder Key Result)
**3. Fortschritts-Diagramme**
Der Fortschritt aller gefilterten Ziele über den ausgewählten Zeitraum sowie die Fortschrittsverteilung aller gefilterten Ziele in diesem Zeitraum.
**4. Status-Diagramme**
Die Entwicklung der Status aller gefilterten Ziele über den ausgewählten Zeitraum sowie die Verteilung der Status über alle gefilterten Ziele in diesem Zeitraum.
**5. Kennzahlen nach Team / Mitarbeiter**
Die Kennzahlen können in der oberen rechten Ecke des Diagramms nach Team oder Mitarbeitern gruppiert werden. Hier kannst du zum Beispiel sehen, wie sich der Zielfortschritt oder Status der Teams oder Mitarbeiter vergleicht oder welche Teams oder Mitarbeiter noch keine Ziele aktualisiert haben.
**6. Zyklus-Filter**
Hier kannst du den jeweiligen Zielzyklus auswählen. Es können auch mehrere Zyklen ausgewählt werden.
**7. Weitere Filter**
Wende Filter auf die Zielauswertung an.
**8. Vergleich**
Vergleiche die Daten deines aktuellen Dashboards mit denen von vor einem Tag, einer Woche, einem Monat oder einem benutzerdefinierten Zeitraum.
**9. Speichere die ausgewählte Ansicht über die Schaltfläche `Zu Favoriten` in der oberen rechten Ecke der Seite.**
**10. PDF-Export**
Über die Ellipse (...) in der oberen rechten Ecke des Bildschirms kannst du das Progress-Dashboard als PDF-Datei exportieren.
# Fortschrittsmessarten
Source: https://mooncamp.com/docs/de/progress-measurement
Ein Überblick über die verschiedenen Arten der Fortschrittsmessung
## Messung des Zielfortschritts
Wie der Fortschritt von Zielen gemessen werden soll, kannst Du für jedes Ziel individuell festlegen, indem Du auf `Fortschritt` klickst.
Es gibt fünf verschiedene Optionen zur Messung des Fortschritts eines Ziels:
* `Start- und Zielwert`
* `Aggregation`
* `Grenzwert`
* `Offen/Erledigt`
* `Keine`
### Start- und Zielwert
Mit dieser Option kannst Du den Start- und Zielwert für eine Kennzahl und die zugehörige Einheit festlegen (z.B. Start: 0 % => Ziel: 100 %).
Darüber hinaus kann das Ziel durch Integrationen mit anderen Tools wie Asana, Jira oder Excel automatisch aktualisiert werden, indem Du auf `Mit Datenquelle verbinden` klickst. Auf diese Weise kannst Du die manuelle Aktualisierung von Zielen automatisieren.
### Aggregation
Mit der Option `Aggregation` hast Du zunächst die Möglichkeit anzupassen, wie der Zielfortschritt in der Zieltabellenansicht erscheint. Du kannst wählen, ob der Fortschritt als Prozentsatz, als absolute Werte oder beides angezeigt werden soll.
Standardmäßig wird der Fortschritt des Ziels als Prozentsatz des durchschnittlichen Fortschritts aller darunter liegenden Ziele ausgedrückt. Der Fortschritt wird also von 0 bis 100% angezeigt. Wenn die Unterziele nicht auf einer Skala von 0 bis 100% gemessen werden und andere Einheiten haben (was häufig vorkommt), werden sie vorher in eine Prozentskala umgerechnet.
Beispiel für die Berechnung:
**Fortschritt (Aggregation)**
| Ziel | Fortschritt (Aggregation) |
| ------------- | ------------------------- |
| **Objective** | 33% |
| Key Result 1 | 100% |
| Key Result 2 | 0% |
| Key Result 3 | 0% |
Wenn Du bei bestimmten Zielen zulassen möchtest, dass sie die 100%-Fortschrittsgrenze überschreiten können, kannst Du bei diesen Zielen den Button `Übererfüllung von ausgerichteten Elementen zulassen` aktivieren. Dies hat zur Folge, dass auch Berichte und Dashboards die Ziele nicht bei 100% deckeln.
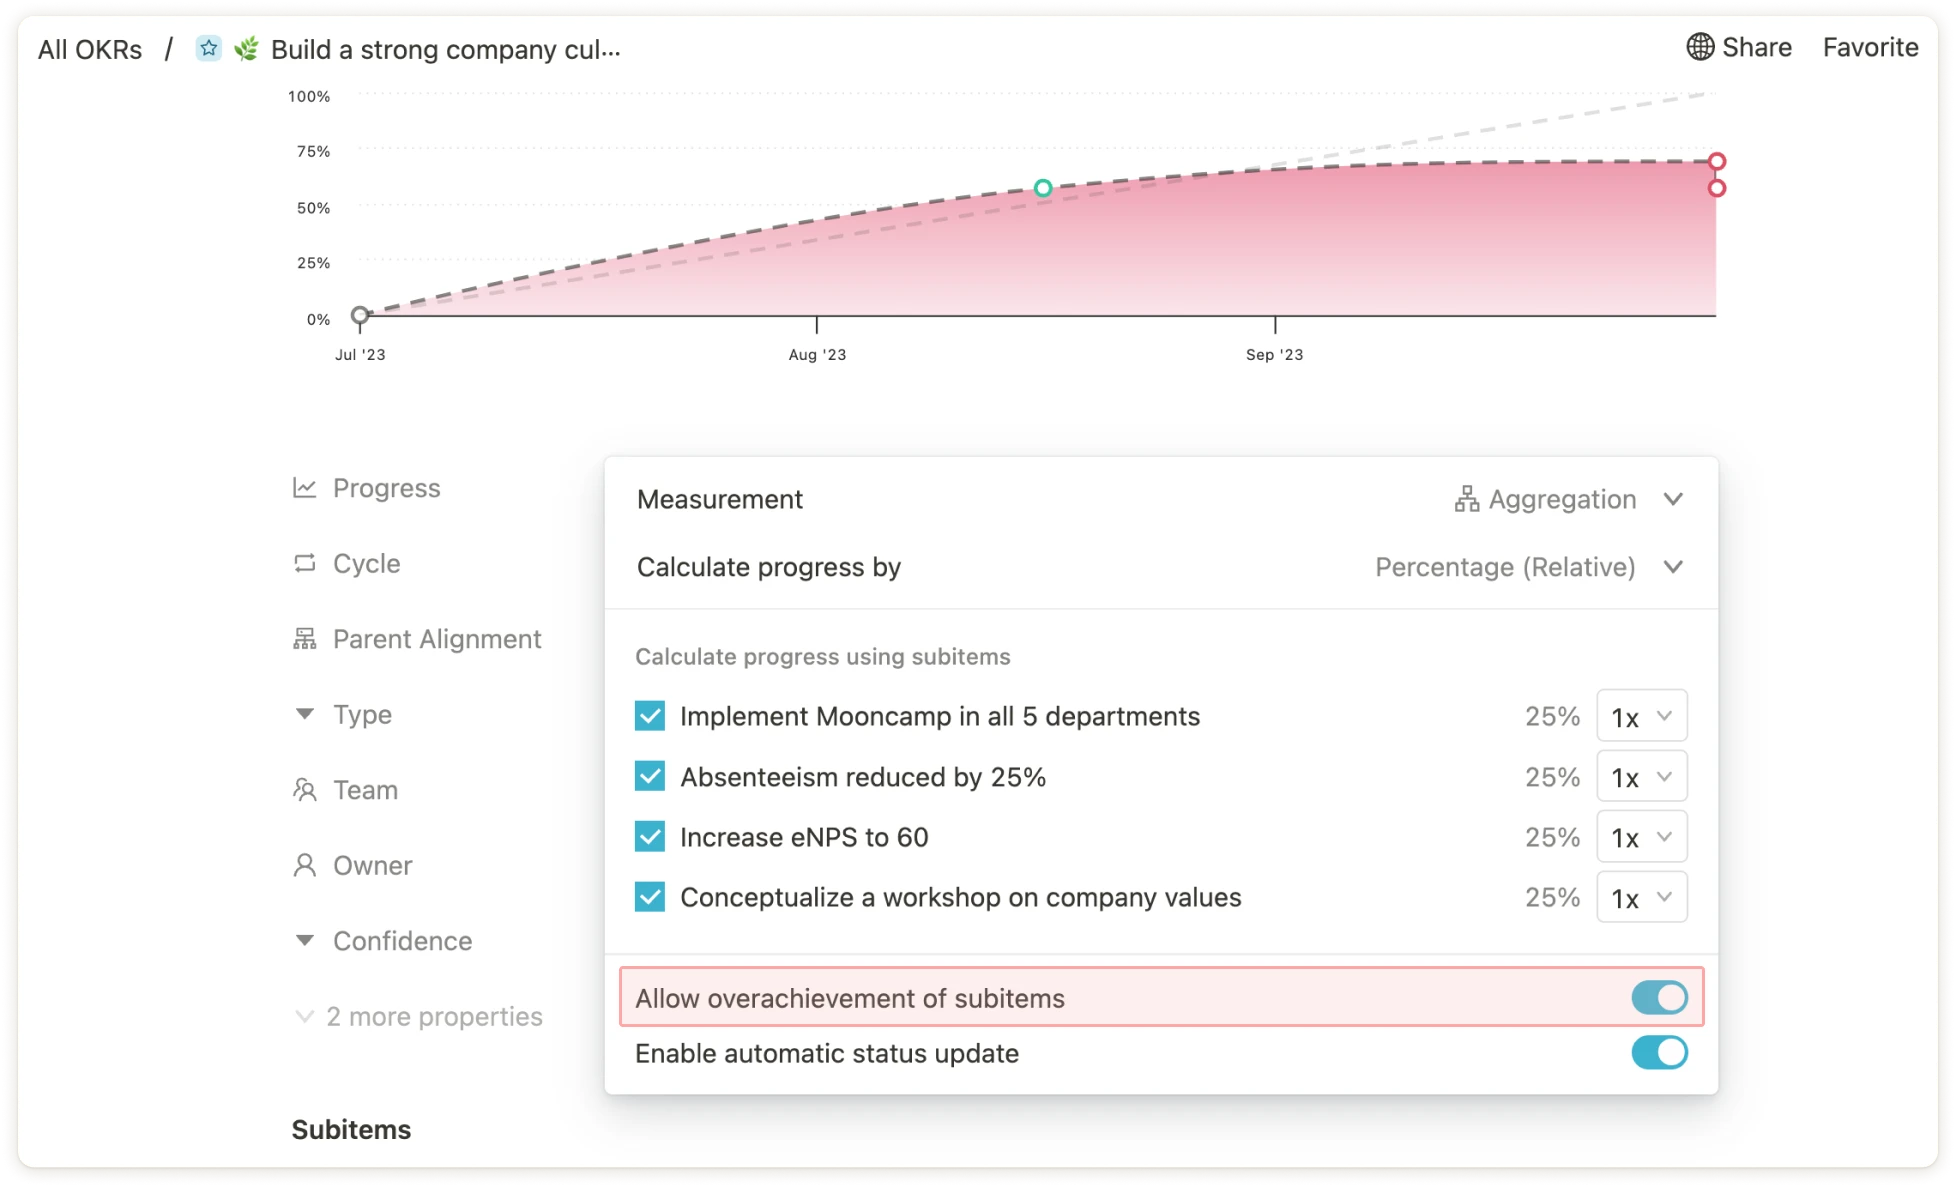 Außerdem hast Du die Möglichkeit, die Gesamtwerte der Unterelemente eines Ziels zu addieren, um dessen Fortschritt zu berechnen. Dadurch kannst Du z.B. Umsatzwerte aus verschiedenen Verkaufsbereichen addieren oder selbstaktualisierte KPI-Bäume erstellen. Diese Einstellung kannst Du aktivieren, indem Du `Fortschritt durch Summe berechnen (Absolut)` auswählst.
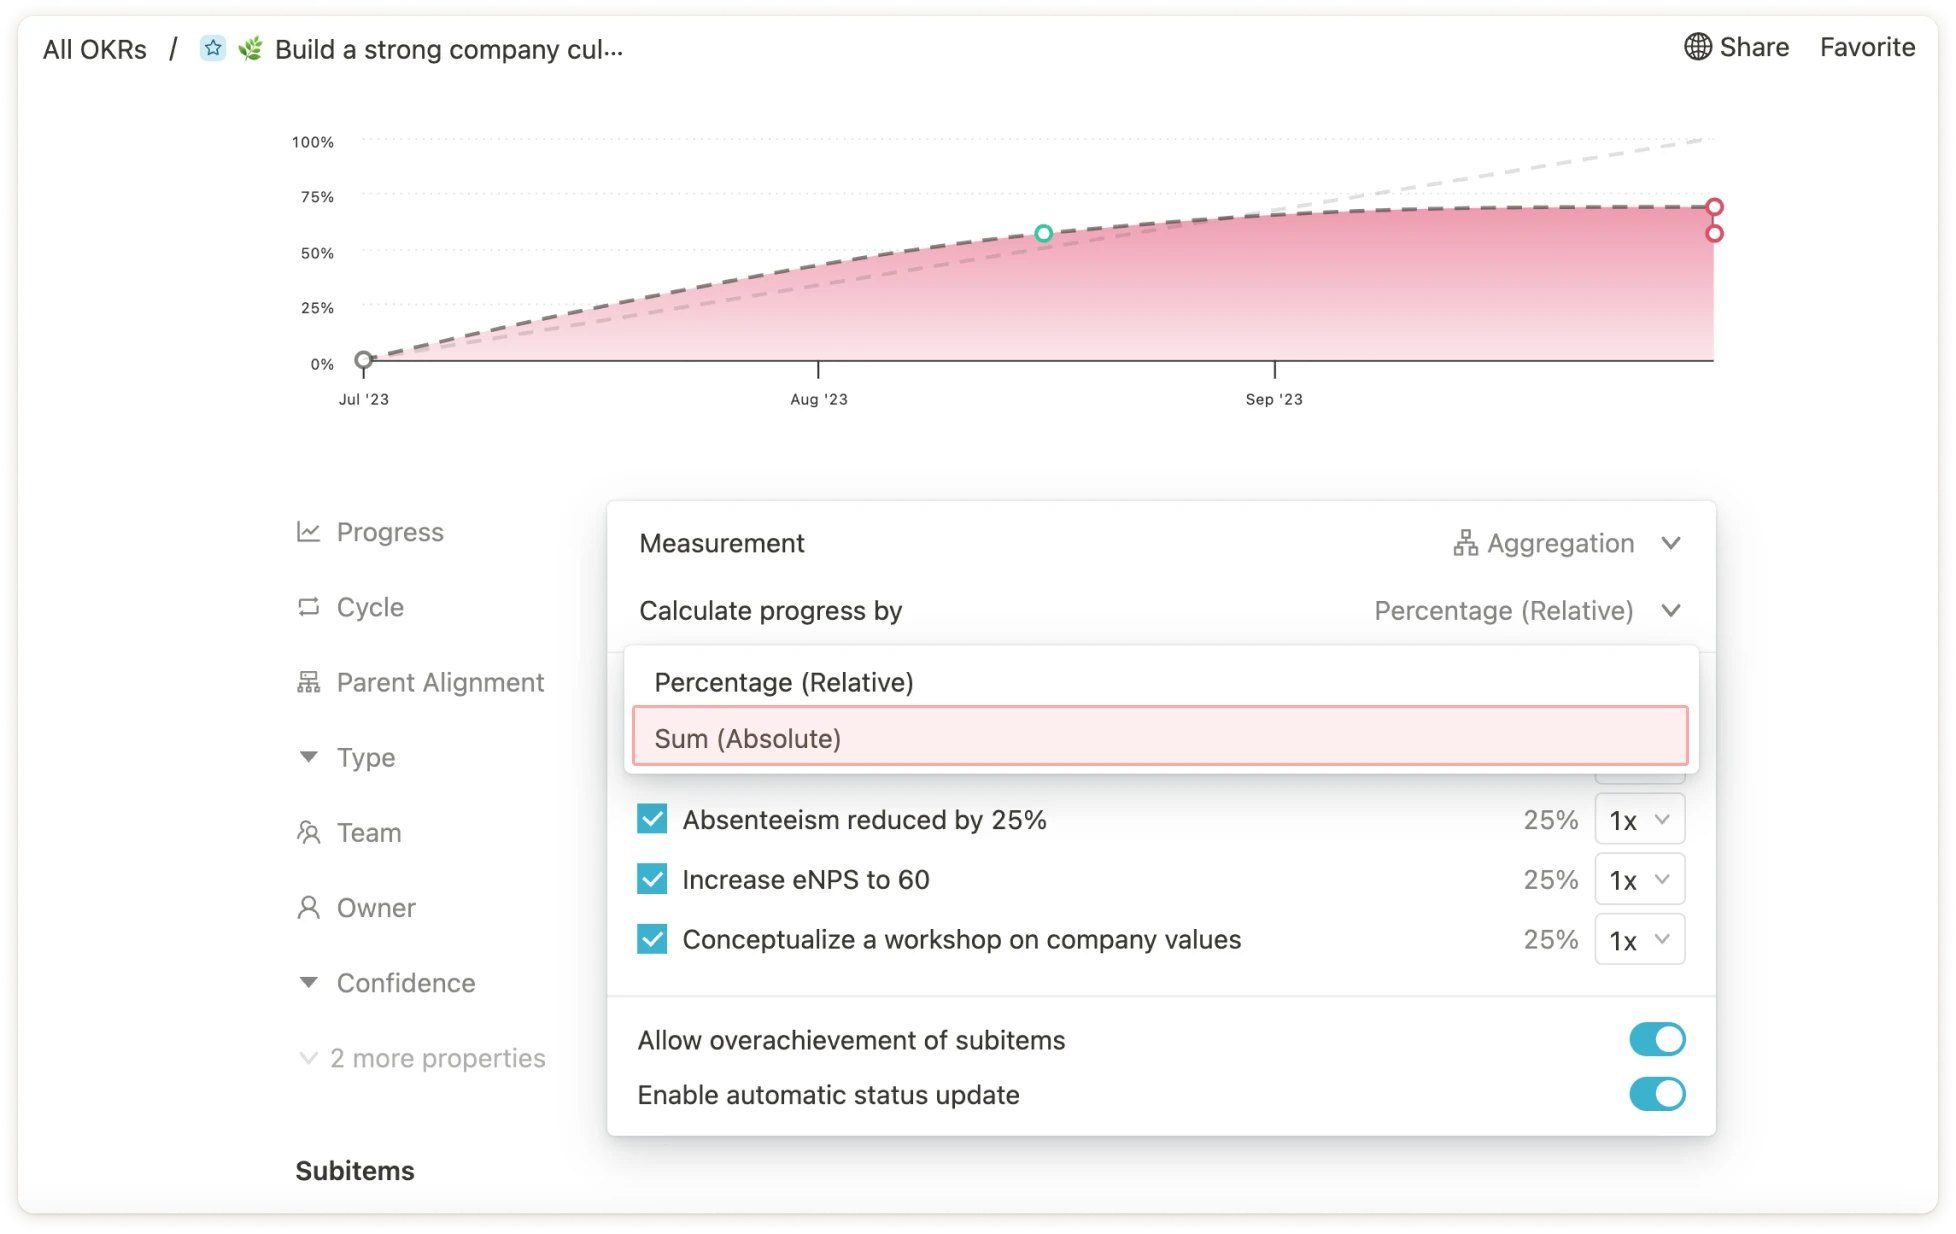 ### Grenzwert
Diese Option eignet sich für Ziele, die einen bestimmten Grenzwert nicht über- oder unterschreiten sollen. Es ist möglich, einen numerischen Grenzwert sowie eine selbst definierte Einheit (z.B. Prozent, Euro, Kunden etc.) anzugeben. Auch hier kann das Ziel durch Integrationen mit anderen Tools wie Asana, Jira oder Excel automatisch aktualisiert werden, indem Du auf `Mit Datenquelle verbinden` klickst.
### Offen/Erledigt
Bei dieser Option wird der Fortschritt nur binär gemessen (entweder `Offen` oder `Erledigt`). Diese Option eignet sich daher hauptsächlich für Ziele oder Initiativen mit Aufgaben- oder Meilensteincharakter.
### Keine
Schließlich gibt es die Option, keinen Fortschritt anzuzeigen. Dies kann zum Beispiel für Objectives oder andere Ziele vorteilhaft sein, die rein qualitativer Natur sein sollen. Untergeordnete Key Results oder andere Unterziele können wiederum eine Fortschrittsmessung haben.
# Eigenschaften in Mooncamp
Source: https://mooncamp.com/docs/de/properties
Was sind Eigenschaften? Wie erstellst und bearbeitest du Eigenschaften?
## Video-Tutorial
Wenn du keine Lust zum Lesen hast, hier ist ein ausführliches Video-Tutorial.
## Was sind Eigenschaften?
Eigenschaften sind eines der spannendsten Features von Mooncamp. Sie ermöglichen es deiner Organisation, die Mooncamp-Plattform vollständig an deine Bedürfnisse, internen Prozesse und Unternehmenssprache anzupassen.
Eigenschaften werden verwendet, um Tools wie Ziele oder Check-Ins an die Bedürfnisse deiner Organisation anzupassen. Nach der Einrichtung können benutzerdefinierte Eigenschaften beispielsweise in Zielansichten oder als Filter verwendet werden.
### Grenzwert
Diese Option eignet sich für Ziele, die einen bestimmten Grenzwert nicht über- oder unterschreiten sollen. Es ist möglich, einen numerischen Grenzwert sowie eine selbst definierte Einheit (z.B. Prozent, Euro, Kunden etc.) anzugeben. Auch hier kann das Ziel durch Integrationen mit anderen Tools wie Asana, Jira oder Excel automatisch aktualisiert werden, indem Du auf `Mit Datenquelle verbinden` klickst.
### Offen/Erledigt
Bei dieser Option wird der Fortschritt nur binär gemessen (entweder `Offen` oder `Erledigt`). Diese Option eignet sich daher hauptsächlich für Ziele oder Initiativen mit Aufgaben- oder Meilensteincharakter.
### Keine
Schließlich gibt es die Option, keinen Fortschritt anzuzeigen. Dies kann zum Beispiel für Objectives oder andere Ziele vorteilhaft sein, die rein qualitativer Natur sein sollen. Untergeordnete Key Results oder andere Unterziele können wiederum eine Fortschrittsmessung haben.
# Eigenschaften in Mooncamp
Source: https://mooncamp.com/docs/de/properties
Was sind Eigenschaften? Wie erstellst und bearbeitest du Eigenschaften?
## Video-Tutorial
Wenn du keine Lust zum Lesen hast, hier ist ein ausführliches Video-Tutorial.
## Was sind Eigenschaften?
Eigenschaften sind eines der spannendsten Features von Mooncamp. Sie ermöglichen es deiner Organisation, die Mooncamp-Plattform vollständig an deine Bedürfnisse, internen Prozesse und Unternehmenssprache anzupassen.
Eigenschaften werden verwendet, um Tools wie Ziele oder Check-Ins an die Bedürfnisse deiner Organisation anzupassen. Nach der Einrichtung können benutzerdefinierte Eigenschaften beispielsweise in Zielansichten oder als Filter verwendet werden.
 Als Administrator kannst du Eigenschaften unter Einstellungen > Eigenschaften erstellen, bearbeiten und löschen.
## Eigenschaften erstellen
Eigenschaften können durch Klicken auf `Eigenschaft hinzufügen` in der oberen rechten Ecke der Eigenschaften-Seite erstellt werden.
**Für jede Eigenschaft müssen folgende Optionen festgelegt werden:**
* Name der Eigenschaft
* (Daten-)Typ
* Verwendung (in welchen Tools soll die jeweilige Eigenschaft verfügbar sein?)
Als Administrator kannst du Eigenschaften unter Einstellungen > Eigenschaften erstellen, bearbeiten und löschen.
## Eigenschaften erstellen
Eigenschaften können durch Klicken auf `Eigenschaft hinzufügen` in der oberen rechten Ecke der Eigenschaften-Seite erstellt werden.
**Für jede Eigenschaft müssen folgende Optionen festgelegt werden:**
* Name der Eigenschaft
* (Daten-)Typ
* Verwendung (in welchen Tools soll die jeweilige Eigenschaft verfügbar sein?)
 ### Optionen für (Daten-)Typ
* `Multi-Select`: Mehrere Optionen können ausgewählt werden (z.B. Abteilungen)
* `Single-Select`: Nur eine Option kann ausgewählt werden (z.B. der Status eines Ziels)
* `Text`: Ein Textfeld (z.B. die Rolle oder Position eines Mitarbeiters)
* `Datum`: Ein Datum im Format "TT/MM/JJJJ" (z.B. der Geburtstag eines Mitarbeiters)
* `Benutzer`: Auswahl eines oder mehrerer Benutzer (z.B. Manager eines Mitarbeiters oder Eigentümer eines Ziels)
* `Zahl`: Ein formatiertes Zahlenfeld
* `Link`: Ein Link zu einer externen Website (z.B. eine Website oder ein Dokument)
* `Verweis`: Gibt den Inhalt einer Eigenschaft aus einem anderen Objekt (z.B. Benutzer) zurück
**Verwendung**
Hier kannst du auswählen, in welchen Datenbanken die Eigenschaft verfügbar sein soll (Ziele, Check-Ins oder Benutzer).
**Optionen**
Für den Typ `Multi-Select` legen die Optionen die möglichen Werte der Eigenschaften fest, z.B. `Marketing`, `Sales` und `Human Resources` für die Eigenschaft `Department`.
Optionen können auf der linken Seite per Drag & Drop sortiert werden. Außerdem können die Farben der Tags angepasst werden.
### Optionen für (Daten-)Typ
* `Multi-Select`: Mehrere Optionen können ausgewählt werden (z.B. Abteilungen)
* `Single-Select`: Nur eine Option kann ausgewählt werden (z.B. der Status eines Ziels)
* `Text`: Ein Textfeld (z.B. die Rolle oder Position eines Mitarbeiters)
* `Datum`: Ein Datum im Format "TT/MM/JJJJ" (z.B. der Geburtstag eines Mitarbeiters)
* `Benutzer`: Auswahl eines oder mehrerer Benutzer (z.B. Manager eines Mitarbeiters oder Eigentümer eines Ziels)
* `Zahl`: Ein formatiertes Zahlenfeld
* `Link`: Ein Link zu einer externen Website (z.B. eine Website oder ein Dokument)
* `Verweis`: Gibt den Inhalt einer Eigenschaft aus einem anderen Objekt (z.B. Benutzer) zurück
**Verwendung**
Hier kannst du auswählen, in welchen Datenbanken die Eigenschaft verfügbar sein soll (Ziele, Check-Ins oder Benutzer).
**Optionen**
Für den Typ `Multi-Select` legen die Optionen die möglichen Werte der Eigenschaften fest, z.B. `Marketing`, `Sales` und `Human Resources` für die Eigenschaft `Department`.
Optionen können auf der linken Seite per Drag & Drop sortiert werden. Außerdem können die Farben der Tags angepasst werden.


 ## Eigenschaften bearbeiten
Um eine Eigenschaft zu bearbeiten, klicke einfach in der Tabelle auf die entsprechende Eigenschaft. Von hier aus können der Name, die Verwendung und datentypspezifische Einstellungen (wie Optionen für Mehrfachauswahl oder Format für Zahlen) geändert werden.
Der `Datentyp` selbst kann nicht mehr bearbeitet werden, sobald die Eigenschaft verwendet wird.
Es ist möglich, eine Eigenschaft auf `inaktiv` zu setzen, wenn sie nicht mehr benötigt wird, aber nicht gelöscht werden soll.
## Eigenschaften löschen
Um eine Eigenschaft zu löschen, bewege deinen Cursor über das Feature in der Tabelle und klicke auf das Mülleimer-Symbol rechts.
**Achtung**: Sobald eine Eigenschaft gelöscht wurde, kann sie nicht wiederhergestellt werden! Verwende daher im Zweifelsfall immer die Funktion `Deaktivieren`.
## Beispiele für Eigenschaften
Eigenschaften in Zielansichten können verwendet werden, um mehr Kontext zu geben, Ziele besser zu filtern und das Ziel- und OKR-Tool an deine internen Prozesse und deine Unternehmenssprache anzupassen. Eigenschaften auf Benutzerprofilseiten können verwendet werden, um weitere Informationen wie Beschreibungen, Mitarbeiter oder Manager anzuzeigen.
**Beispiel: Eigenschaften bei Zielen**
**Beispiel: Eigenschaften auf Profilseiten**
# Öffentliche Links (TV-Modus)
Source: https://mooncamp.com/docs/de/public-links
Ein Überblick über öffentliche Links (TV-Modus) für Ansichten
Öffentliche Links sind für Kunden im `Enterprise`-Plan verfügbar.
## Öffentliche Links (TV-Modus) erklärt
Mit dieser Funktion kannst Du einen öffentlichen Link zu einer Zielansicht mit Personen teilen, die nicht in Deinem Mooncamp-Workspace sind. Öffentliche Links sollen das Teilen einer öffentlichen Zielansicht z.B. auf einem TV-Bildschirm im Büro oder in einem Dashboard im Firmen-Intranet ermöglichen (die Links können per iframe eingebettet werden). Auf diese Weise können Daten mit Stakeholdern geteilt werden, die keinen Zugang zum Mooncamp-Account Deines Unternehmens haben. Ein öffentlicher Link kann nur von Administratoren oder Benutzern mit speziellen Zugriffsrechten erstellt werden und ist eher zum Einbetten gedacht als zum direkten Versenden.
## Wie Du öffentliche Links (TV-Modus) verwendest
Ein öffentlicher Link kann über den [Ziel- oder OKR-Explorer](/de/goal-explorer) erstellt werden. Hier hast Du verschiedene Möglichkeiten, Deine Ziele basierend auf dem, was Du teilen möchtest, zu erstellen, zu sortieren und zu filtern. Du kannst Deine individuellen Einstellungen in [Ansichten](/de/views) speichern und für jede Ansicht kann ein separater öffentlicher Link erstellt werden.
Nachdem Du eine Ansicht erstellt hast, kannst Du diese über das Ellipsen-Menü `...` in der oberen rechten Ecke als öffentlichen Link veröffentlichen (oder später wieder zurückziehen). Sobald Du den 'Im Web teilen'-Button aktiviert hast, kannst Du den Link einfach kopieren und in die interne Datenbank Deines Unternehmens einbetten oder auf einem TV-Bildschirm in Deinen Büroräumen teilen.
**Hinweis für Administratoren:** Falls Du bestimmten Zugriffsgruppen oder Benutzern das Recht geben möchtest, öffentliche Ansichten und damit öffentliche Links zu erstellen, kannst Du dies über die Admin-Einstellungen tun: `Einstellungen > Zugriffsgruppen`, dann wähle eine bestehende Zugriffsgruppe aus oder erstelle eine neue. Hier kannst Du die Berechtigung `Verwaltung öffentlicher Ansichten` aktivieren.
Um mehr über Ansichten im Allgemeinen zu erfahren, lies unseren [Artikel über Ansichten](/de/views).
# Reporting
Source: https://mooncamp.com/docs/de/reports
Ein Überblick über die Reporting-Funktion
Die Reporting-Funktion steht allen Kunden mit einem `Pro`-Plan oder höher zur Verfügung.
## Was sind Reporting und wozu werden sie verwendet?
Berichte sind automatisierte Momentaufnahmen deiner Dashboards, die regelmäßig per E-Mail verschickt werden können. Es ermöglicht es Dir, Dein Team und Stakeholder über KPIs und andere Erkenntnisse auf dem Laufenden zu halten, ohne dass diese sich bei Mooncamp einloggen müssen. Darüber hinaus ist Reporting eine großartige Möglichkeit, eine konstante Kommunikation über Strategieleistung und Zielfortschritte in Deiner Organisation aufrechtzuerhalten und damit Transparenz und Ausrichtung zu fördern.
Mit Reporting kannst Du:
* Regelmäßige Dashboard-Exporte einrichten, die automatisch per E-Mail versendet werden
* Benutzerdefinierte Versandhäufigkeiten festlegen
* Bestimmte Empfänger festlegen, die die Berichte erhalten sollen
* Eine optionale Nachricht in der E-Mail hinzufügen
* Kontinuierliche Kommunikation über Strategieleistung und Zielfortschritte in deiner Organisation aufrechterhalten
Diese Funktion ist besonders nützlich, um Updates mit Führungskräften, Stakeholdern oder Teammitgliedern zu teilen, die E-Mail-Updates dem direkten Einloggen in die Plattform vorziehen.
## Wie du einen Bericht erstellst
### Über ein Dashboard
1. Navigiere zu dem Dashboard, auf dem der Bericht basieren soll.
2. Klicke auf den `Senden`-Button in der oberen rechten Ecke.
3. Lege die Versandhäufigkeit des Berichts fest.
4. Wähle die Empfänger des Berichts aus.
5. Wähle einen Betreff und ob Du eine optionale Nachricht hinzufügen möchtest.
6. Klicke auf `Erstellen`.
Dein Bericht ist nun geplant und kann über die Berichte-Seite in der Seitenleiste oder durch Klicken auf `Berichte verwalten` in der oberen Leiste der Dashboard-Seite aufgerufen werden.
### Über die Berichte-Seite
1. Navigiere zur Berichte-Seite, indem Du auf den Menüpunkt `Berichte` in der Seitenleiste klickst.
2. Klicke auf den `Neu`-Button.
3. Wähle das Dashboard aus, das Du in den Bericht aufnehmen möchtest.
4. Lege die Versandhäufigkeit des Berichts fest.
5. Wähle die Empfänger des Berichts aus.
6. Wähle einen Betreff und ob Du eine optionale Nachricht hinzufügen möchtest.
7. Klicke auf `Erstellen`.
Dein Bericht ist nun geplant und kann über die Berichte-Seite in der Seitenleiste oder durch Klicken auf `Berichte verwalten` in der oberen Leiste der jeweiligen Dashboard-Seite aufgerufen werden.
## Wie Du einen Bericht bearbeitest, pausierst oder abonnierst
* **Einen Bericht bearbeiten**: Navigiere einfach zur `Berichte`-Seite und klicke darauf, um die Berichtseinstellungen zu bearbeiten.
* **Einen Bericht pausieren**: Klicke auf die Ellipsen `...` in der Zeile des Berichts, den du pausieren möchtest, und wähle `Pausieren`. Um ihn wieder zu aktivieren, klicke auf `Aktivieren`.
* **Abonnieren eines Berichts**: Um einen Bericht zu abonnieren oder das Abonnement zu kündigen, klicke auf die Ellipsen `...` in der Zeile des gewünschten Berichts und schalte den `Abonnieren`-Schalter um.
## Wie du einen Bericht löschst
Um einen Bericht zu löschen, klicke auf die Ellipsen `...` in der Zeile des Berichts, den du löschen möchtest, und wähle `Löschen`.
# Rechte und Zugriffskontrolle
Source: https://mooncamp.com/docs/de/rights-and-access-control
Berechtigungen und Zugriffsgruppen verwalten
Als Admin kannst du die Rechte aller Mitarbeiter oder bestimmter Zugriffsgruppen unter `Einstellungen > Zugriffsgruppen` verwalten.
Standardmäßig werden diese zwei Zugriffsgruppen erstellt:
* Alle Mitglieder
* Admin
## Eigenschaften bearbeiten
Um eine Eigenschaft zu bearbeiten, klicke einfach in der Tabelle auf die entsprechende Eigenschaft. Von hier aus können der Name, die Verwendung und datentypspezifische Einstellungen (wie Optionen für Mehrfachauswahl oder Format für Zahlen) geändert werden.
Der `Datentyp` selbst kann nicht mehr bearbeitet werden, sobald die Eigenschaft verwendet wird.
Es ist möglich, eine Eigenschaft auf `inaktiv` zu setzen, wenn sie nicht mehr benötigt wird, aber nicht gelöscht werden soll.
## Eigenschaften löschen
Um eine Eigenschaft zu löschen, bewege deinen Cursor über das Feature in der Tabelle und klicke auf das Mülleimer-Symbol rechts.
**Achtung**: Sobald eine Eigenschaft gelöscht wurde, kann sie nicht wiederhergestellt werden! Verwende daher im Zweifelsfall immer die Funktion `Deaktivieren`.
## Beispiele für Eigenschaften
Eigenschaften in Zielansichten können verwendet werden, um mehr Kontext zu geben, Ziele besser zu filtern und das Ziel- und OKR-Tool an deine internen Prozesse und deine Unternehmenssprache anzupassen. Eigenschaften auf Benutzerprofilseiten können verwendet werden, um weitere Informationen wie Beschreibungen, Mitarbeiter oder Manager anzuzeigen.
**Beispiel: Eigenschaften bei Zielen**
**Beispiel: Eigenschaften auf Profilseiten**
# Öffentliche Links (TV-Modus)
Source: https://mooncamp.com/docs/de/public-links
Ein Überblick über öffentliche Links (TV-Modus) für Ansichten
Öffentliche Links sind für Kunden im `Enterprise`-Plan verfügbar.
## Öffentliche Links (TV-Modus) erklärt
Mit dieser Funktion kannst Du einen öffentlichen Link zu einer Zielansicht mit Personen teilen, die nicht in Deinem Mooncamp-Workspace sind. Öffentliche Links sollen das Teilen einer öffentlichen Zielansicht z.B. auf einem TV-Bildschirm im Büro oder in einem Dashboard im Firmen-Intranet ermöglichen (die Links können per iframe eingebettet werden). Auf diese Weise können Daten mit Stakeholdern geteilt werden, die keinen Zugang zum Mooncamp-Account Deines Unternehmens haben. Ein öffentlicher Link kann nur von Administratoren oder Benutzern mit speziellen Zugriffsrechten erstellt werden und ist eher zum Einbetten gedacht als zum direkten Versenden.
## Wie Du öffentliche Links (TV-Modus) verwendest
Ein öffentlicher Link kann über den [Ziel- oder OKR-Explorer](/de/goal-explorer) erstellt werden. Hier hast Du verschiedene Möglichkeiten, Deine Ziele basierend auf dem, was Du teilen möchtest, zu erstellen, zu sortieren und zu filtern. Du kannst Deine individuellen Einstellungen in [Ansichten](/de/views) speichern und für jede Ansicht kann ein separater öffentlicher Link erstellt werden.
Nachdem Du eine Ansicht erstellt hast, kannst Du diese über das Ellipsen-Menü `...` in der oberen rechten Ecke als öffentlichen Link veröffentlichen (oder später wieder zurückziehen). Sobald Du den 'Im Web teilen'-Button aktiviert hast, kannst Du den Link einfach kopieren und in die interne Datenbank Deines Unternehmens einbetten oder auf einem TV-Bildschirm in Deinen Büroräumen teilen.
**Hinweis für Administratoren:** Falls Du bestimmten Zugriffsgruppen oder Benutzern das Recht geben möchtest, öffentliche Ansichten und damit öffentliche Links zu erstellen, kannst Du dies über die Admin-Einstellungen tun: `Einstellungen > Zugriffsgruppen`, dann wähle eine bestehende Zugriffsgruppe aus oder erstelle eine neue. Hier kannst Du die Berechtigung `Verwaltung öffentlicher Ansichten` aktivieren.
Um mehr über Ansichten im Allgemeinen zu erfahren, lies unseren [Artikel über Ansichten](/de/views).
# Reporting
Source: https://mooncamp.com/docs/de/reports
Ein Überblick über die Reporting-Funktion
Die Reporting-Funktion steht allen Kunden mit einem `Pro`-Plan oder höher zur Verfügung.
## Was sind Reporting und wozu werden sie verwendet?
Berichte sind automatisierte Momentaufnahmen deiner Dashboards, die regelmäßig per E-Mail verschickt werden können. Es ermöglicht es Dir, Dein Team und Stakeholder über KPIs und andere Erkenntnisse auf dem Laufenden zu halten, ohne dass diese sich bei Mooncamp einloggen müssen. Darüber hinaus ist Reporting eine großartige Möglichkeit, eine konstante Kommunikation über Strategieleistung und Zielfortschritte in Deiner Organisation aufrechtzuerhalten und damit Transparenz und Ausrichtung zu fördern.
Mit Reporting kannst Du:
* Regelmäßige Dashboard-Exporte einrichten, die automatisch per E-Mail versendet werden
* Benutzerdefinierte Versandhäufigkeiten festlegen
* Bestimmte Empfänger festlegen, die die Berichte erhalten sollen
* Eine optionale Nachricht in der E-Mail hinzufügen
* Kontinuierliche Kommunikation über Strategieleistung und Zielfortschritte in deiner Organisation aufrechterhalten
Diese Funktion ist besonders nützlich, um Updates mit Führungskräften, Stakeholdern oder Teammitgliedern zu teilen, die E-Mail-Updates dem direkten Einloggen in die Plattform vorziehen.
## Wie du einen Bericht erstellst
### Über ein Dashboard
1. Navigiere zu dem Dashboard, auf dem der Bericht basieren soll.
2. Klicke auf den `Senden`-Button in der oberen rechten Ecke.
3. Lege die Versandhäufigkeit des Berichts fest.
4. Wähle die Empfänger des Berichts aus.
5. Wähle einen Betreff und ob Du eine optionale Nachricht hinzufügen möchtest.
6. Klicke auf `Erstellen`.
Dein Bericht ist nun geplant und kann über die Berichte-Seite in der Seitenleiste oder durch Klicken auf `Berichte verwalten` in der oberen Leiste der Dashboard-Seite aufgerufen werden.
### Über die Berichte-Seite
1. Navigiere zur Berichte-Seite, indem Du auf den Menüpunkt `Berichte` in der Seitenleiste klickst.
2. Klicke auf den `Neu`-Button.
3. Wähle das Dashboard aus, das Du in den Bericht aufnehmen möchtest.
4. Lege die Versandhäufigkeit des Berichts fest.
5. Wähle die Empfänger des Berichts aus.
6. Wähle einen Betreff und ob Du eine optionale Nachricht hinzufügen möchtest.
7. Klicke auf `Erstellen`.
Dein Bericht ist nun geplant und kann über die Berichte-Seite in der Seitenleiste oder durch Klicken auf `Berichte verwalten` in der oberen Leiste der jeweiligen Dashboard-Seite aufgerufen werden.
## Wie Du einen Bericht bearbeitest, pausierst oder abonnierst
* **Einen Bericht bearbeiten**: Navigiere einfach zur `Berichte`-Seite und klicke darauf, um die Berichtseinstellungen zu bearbeiten.
* **Einen Bericht pausieren**: Klicke auf die Ellipsen `...` in der Zeile des Berichts, den du pausieren möchtest, und wähle `Pausieren`. Um ihn wieder zu aktivieren, klicke auf `Aktivieren`.
* **Abonnieren eines Berichts**: Um einen Bericht zu abonnieren oder das Abonnement zu kündigen, klicke auf die Ellipsen `...` in der Zeile des gewünschten Berichts und schalte den `Abonnieren`-Schalter um.
## Wie du einen Bericht löschst
Um einen Bericht zu löschen, klicke auf die Ellipsen `...` in der Zeile des Berichts, den du löschen möchtest, und wähle `Löschen`.
# Rechte und Zugriffskontrolle
Source: https://mooncamp.com/docs/de/rights-and-access-control
Berechtigungen und Zugriffsgruppen verwalten
Als Admin kannst du die Rechte aller Mitarbeiter oder bestimmter Zugriffsgruppen unter `Einstellungen > Zugriffsgruppen` verwalten.
Standardmäßig werden diese zwei Zugriffsgruppen erstellt:
* Alle Mitglieder
* Admin
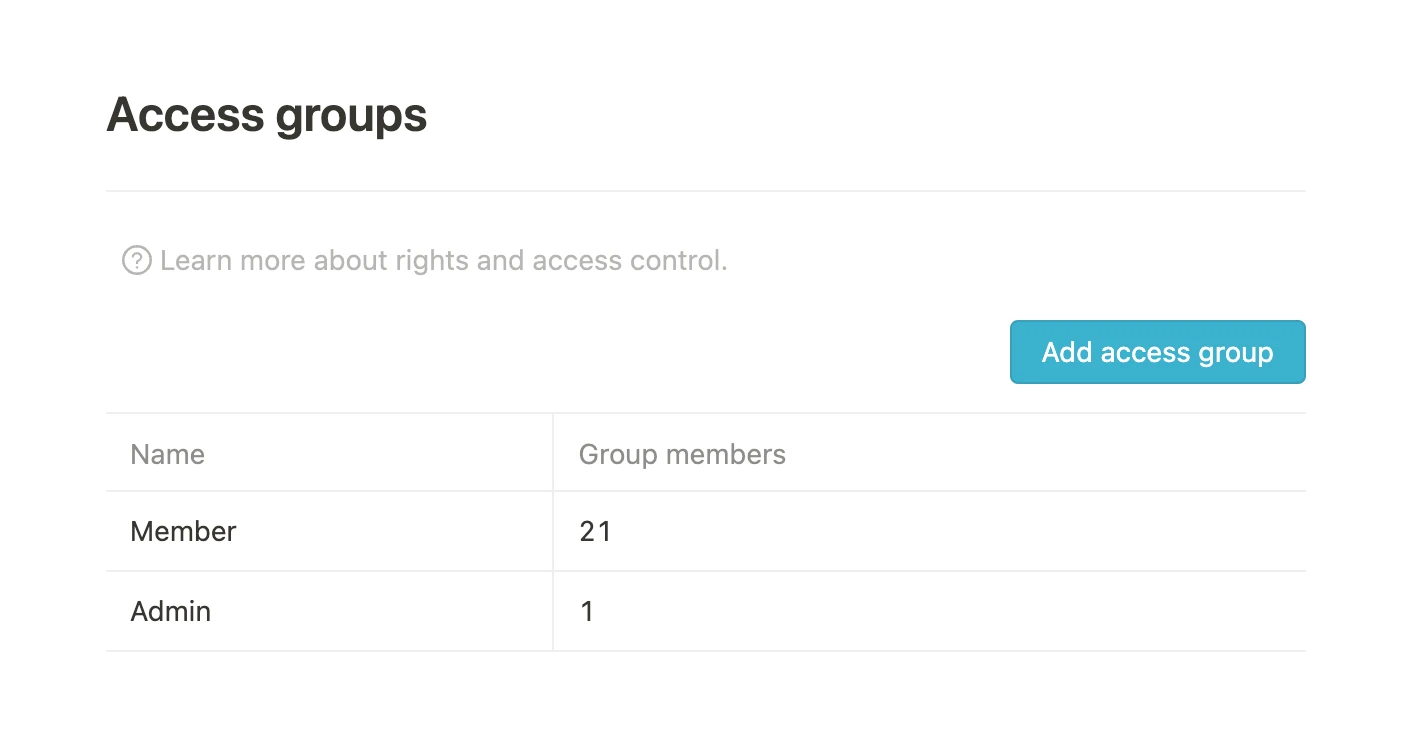 ## Zugriffsgruppe bearbeiten
Die Berechtigungen der Zugriffsgruppen können durch Klicken auf die jeweilige Gruppe bearbeitet werden.
## Zugriffsgruppe bearbeiten
Die Berechtigungen der Zugriffsgruppen können durch Klicken auf die jeweilige Gruppe bearbeitet werden.
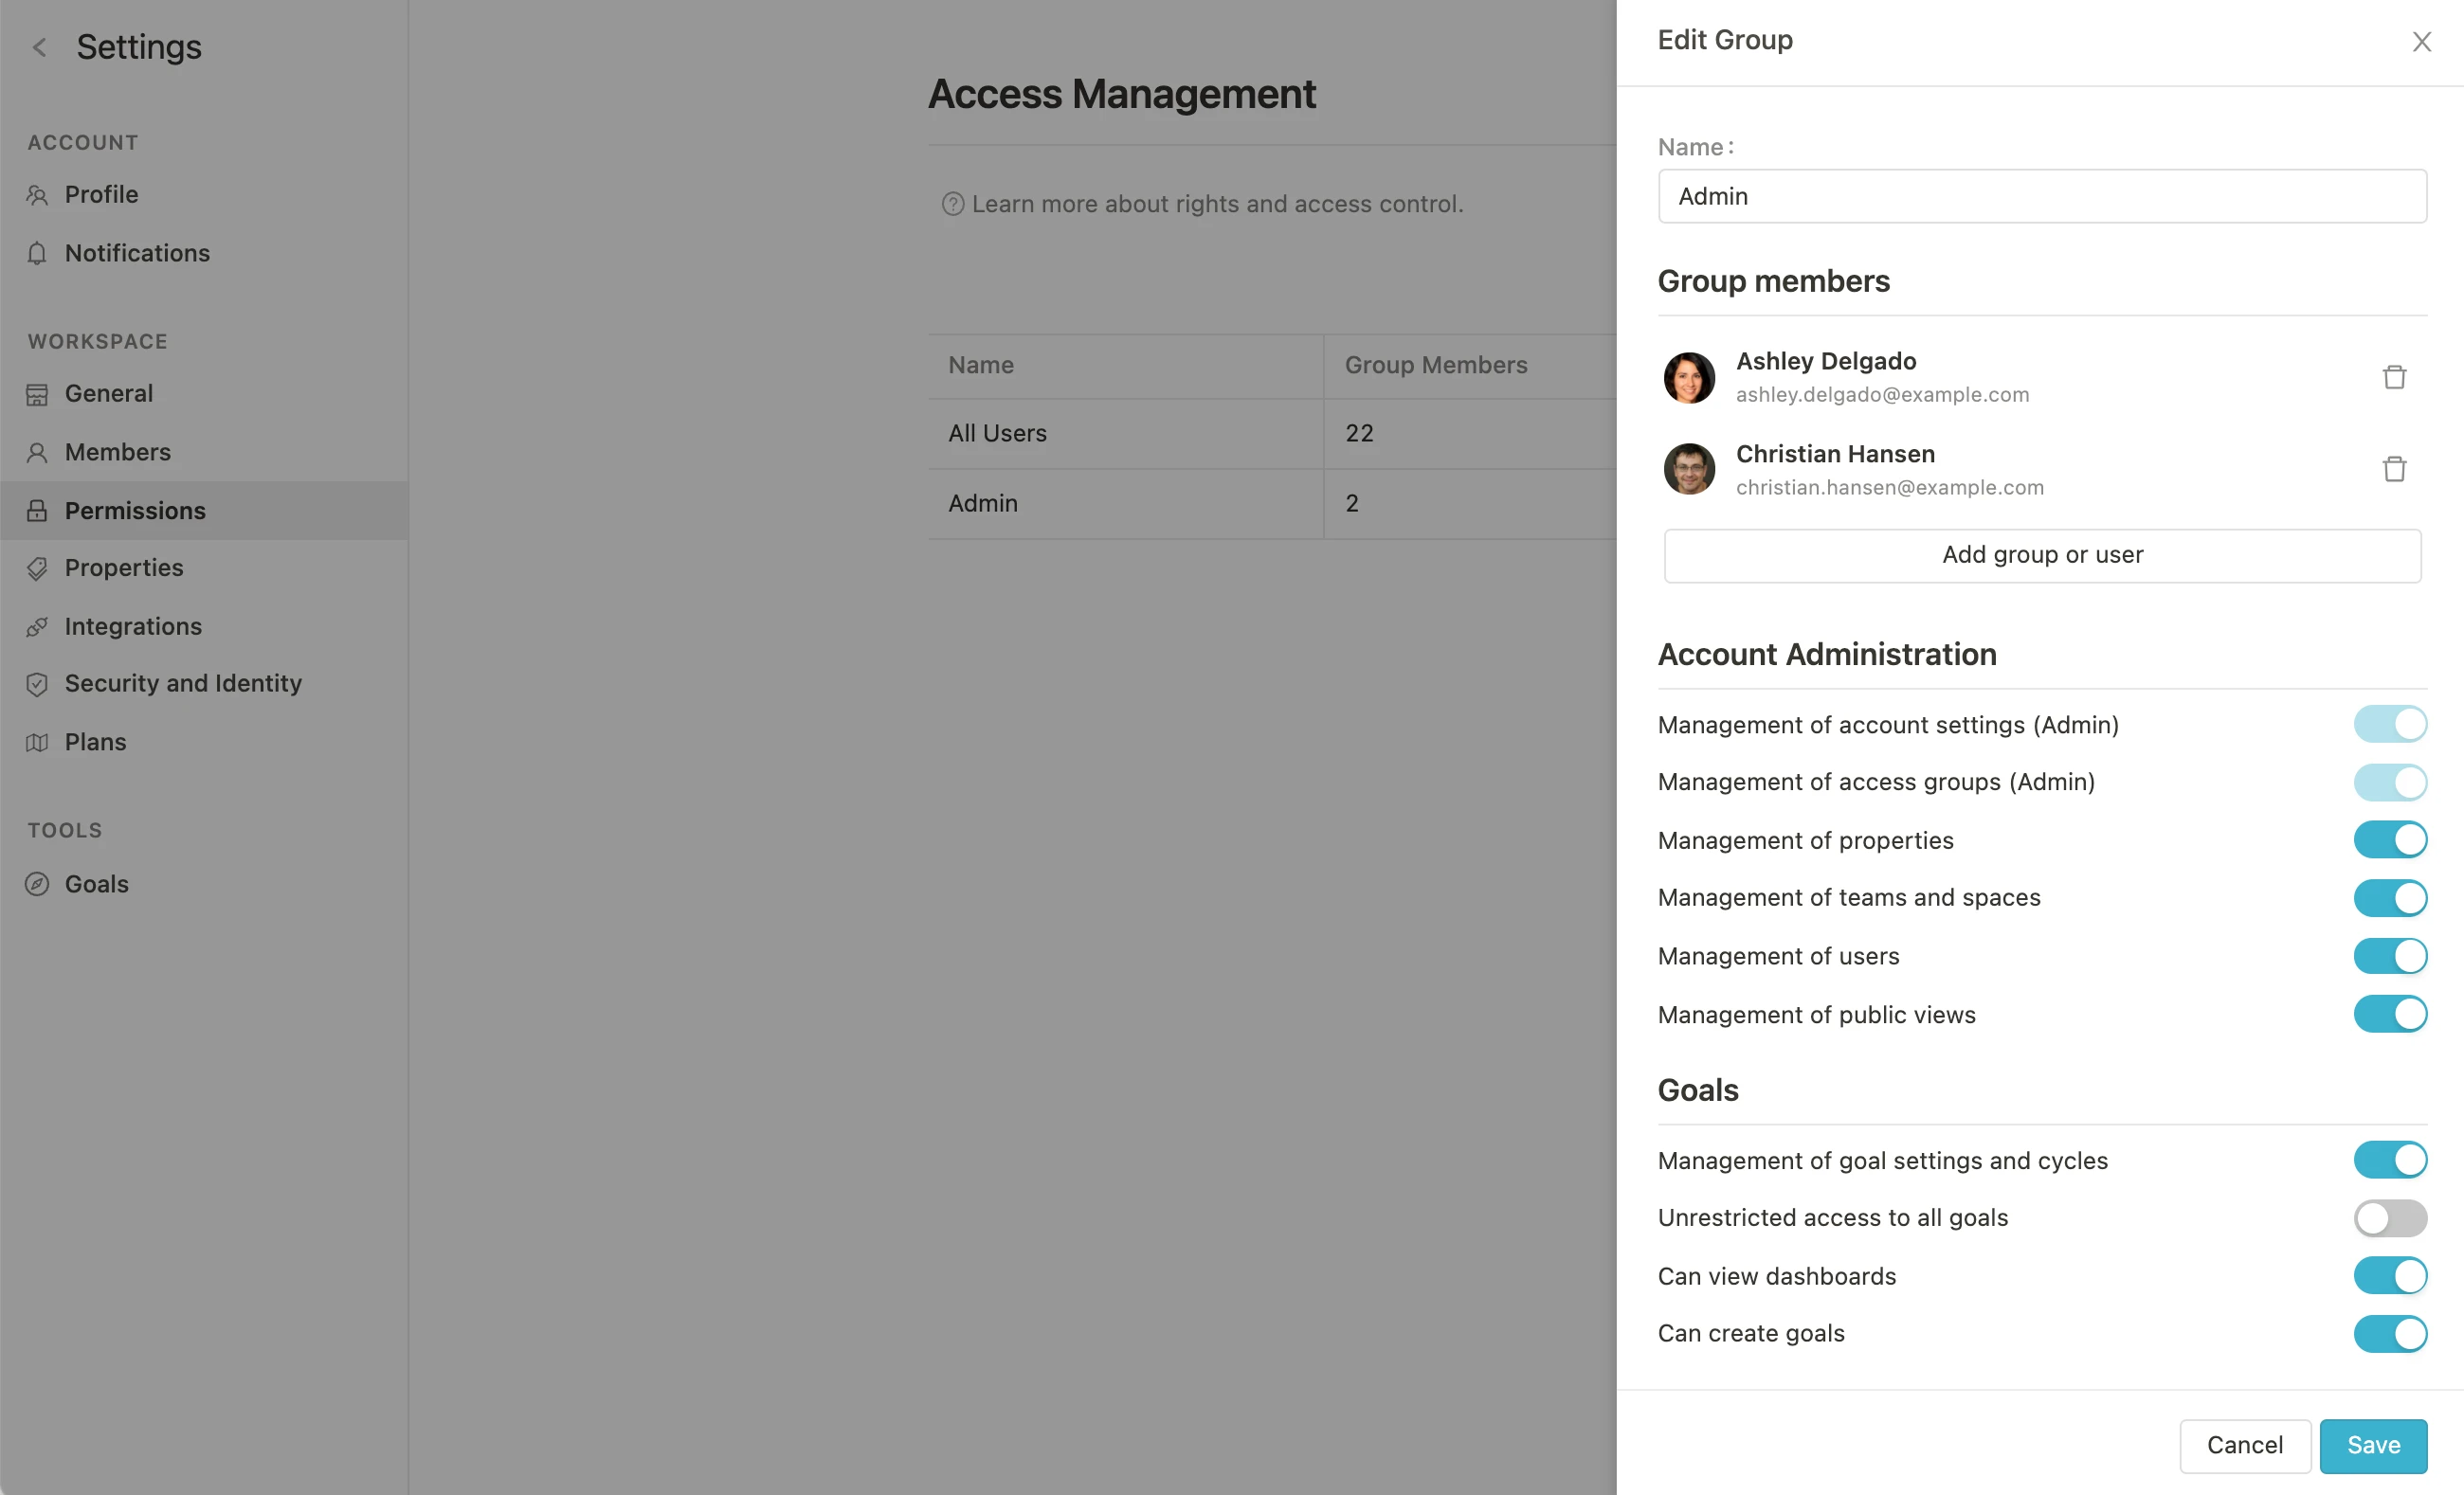 ## Zugriffsgruppe erstellen
### Gruppenmitglieder
Hier werden alle Mitglieder der Gruppe festgelegt, die die unten angegebenen Berechtigungen erhalten sollen. Es ist möglich, Benutzer manuell oder anhand von Eigenschaften der Benutzer (Team, Standort, Manager etc.) auszuwählen.
## Zugriffsgruppe erstellen
### Gruppenmitglieder
Hier werden alle Mitglieder der Gruppe festgelegt, die die unten angegebenen Berechtigungen erhalten sollen. Es ist möglich, Benutzer manuell oder anhand von Eigenschaften der Benutzer (Team, Standort, Manager etc.) auszuwählen.
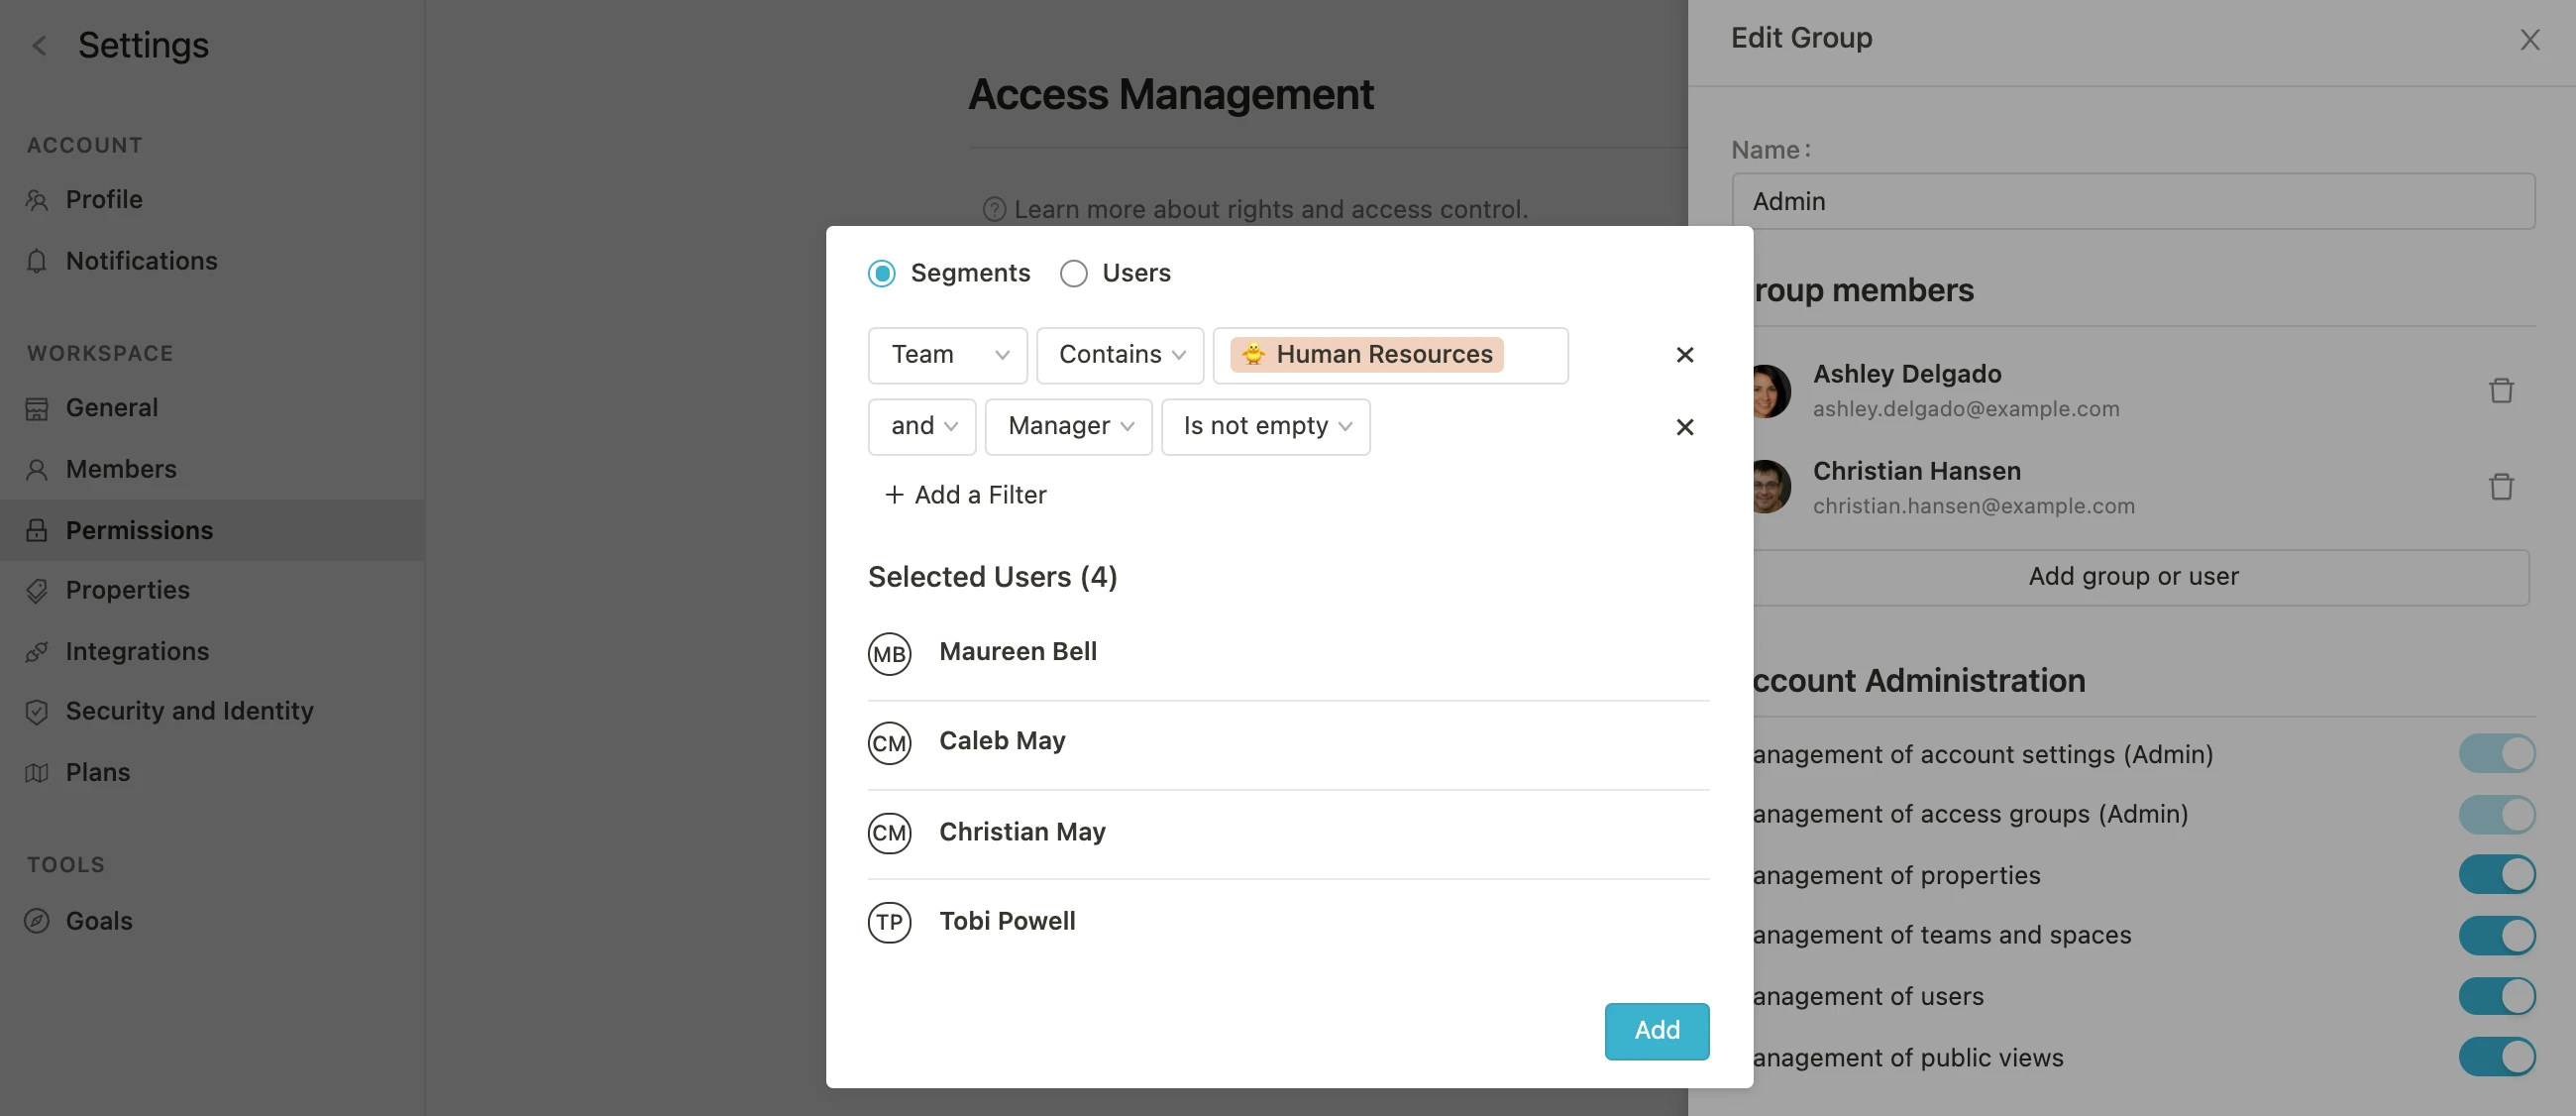 ## Berechtigungen
Beim Erstellen einer neuen Zugriffsgruppe können folgende Berechtigungen festgelegt werden:
### Account verwalten
**Verwaltung der Account-Einstellungen (Admin)**
Berechtigte Benutzer können den Account verwalten und Änderungen unter `Einstellungen > Workspace > Allgemein` und unter `Einstellungen > Ziele` vornehmen.
**Verwaltung von Zugriffsgruppen (Admin)**
Berechtigte Benutzer können auf dieses Menü, in dem wir uns gerade befinden, zugreifen und Änderungen vornehmen.
**Verwaltung von Eigenschaften**
Berechtigte Benutzer können Eigenschaften verwalten.
**Verwaltung von Teams**
Berechtigte Benutzer können neue Teams erstellen, indem sie über die Seitenleiste auf "Alle anzeigen" klicken und dann über das Plus neue Teams hinzufügen.
**Verwaltung von Benutzern**
Berechtigte Benutzer können den Bereich Mitglieder unter *Einstellungen - Workspace* sehen und die Mitglieder des Accounts verwalten.
**Verwaltung öffentlicher Ansichten**
Berechtigte Benutzer können unter *Tools* - *OKRs* - *Explorer* und über das Menü, das sie über die drei Punkte oben rechts auf der OKR-Explorer-Seite erreichen, öffentliche Links zu einzelnen Ansichten erstellen.
### Ziele verwalten
**Verwaltung von Zieleinstellungen und Zyklen**
Berechtigte Benutzer haben Zugriff auf erweiterte Zieleinstellungen über `Einstellungen > Ziele` (z.B. Konfiguration des Ampelsystems) und dürfen Zielzyklen erstellen und ändern.
**Uneingeschränkter Zugriff auf alle Ziele**
Dieses Recht gibt ausgewählten Benutzern vollen Zugriff (Zugriffsrecht-Option "Voller Zugang") auf alle Ziele und ermöglicht das Ansehen, Bearbeiten, Löschen und Bearbeiten von Zugriffsrechten zu diesen. Dies gilt auch für Ziele, bei denen nur Ansichtsrechte gesetzt sind. Es gilt nicht für Ziele, bei denen der Ersteller die Zugriffsrecht-Option "Kein Zugriff" gesetzt hat, diese können nicht eingesehen werden.
**Kann Ziele erstellen**
Berechtigte Benutzer können Ziele erstellen.
**Kann aus allen Teams und deren Mitgliedern wählen**
Bei Team- und Benutzereigenschaften für Ziele dürfen Benutzer aus allen Teams und Mitgliedern wählen, nicht nur aus ihren Teams und deren Mitgliedern.
### Check-ins verwalten
**Verwaltung von Check-in-Vorlagen und Einstellungen**
Berechtigte Benutzer können Vorlagen erstellen sowie Zeitpläne einrichten und verwalten.
### Dashboards
**Hat Zugriff auf Progress- und Health-Dashboards**
Berechtigte Benutzer haben Zugriff auf die [Progress](/de/progress-dashboard)- und [Health](/de/health-dashboard)-Dashboards.
**Kann Dashboards und Berichte erstellen**
Berechtigte Benutzer können Dashboards und Berichte erstellen.
**Uneingeschränkter Zugriff auf alle Dashboards**
# Salesforce Integration
Source: https://mooncamp.com/docs/de/salesforce-integration
Ein Überblick über die Salesforce-Datenintegration
## Überblick
Die Salesforce-Integration aktualisiert deinen Zielfortschritt automatisch basierend auf der Aufgabenerfüllung in Salesforce.
Die Salesforce-Integration ist für Kunden der `Pro`- und `Enterprise`-Pläne verfügbar.
## Aktivierung der Salesforce-Integration
Bitte beachte: Es wird empfohlen, die Refresh-Token-Richtlinie von Salesforce auf `Refresh token is valid until revoked` einzustellen, um Probleme mit der Integration zu vermeiden (siehe Einrichtungsanleitung unten in den [FAQs](#faqs)).
Account-Administratoren können die Salesforce-Integration mit diesen Schritten aktivieren:
1. **Zugriff auf Integrationen:** Gehe in den `Einstellungen`-Bereich und öffne die `Integrationen`-Seite.
2. **Salesforce aktivieren:** Finde Salesforce in der Integrationsliste und aktiviere den Schalter.
## Erstellen einer neuen Salesforce-Verbindung
Jeder Benutzer (nicht nur Administratoren) kann jetzt eine neue Verbindung zu Salesforce erstellen. Folge diesen Schritten:
1. **Neue Verbindung erstellen:** Klicke auf `Verwalten` neben dem Schalter und dann auf `Hinzufügen`.
2. **Zugriff auf Salesforce gewähren:** Klicke auf `Bei Salesforce anmelden` und dann auf `Zugriff erlauben`. Nach der Autorisierung kannst du deine Mooncamp-Ziele mit deinen Salesforce-Daten verknüpfen.
3. **Freigabeeinstellungen:** Wähle aus, ob du die Verbindung mit allen Benutzern oder nur mit dir selbst teilen möchtest.
4. Klicke auf `Speichern`, um die Einrichtung der Verbindung abzuschließen.
Beachte, dass das Teilen der Verbindung mit allen Benutzern jedem in diesem Workspace Zugriff auf die Salesforce-Daten dieser Verbindung ermöglicht.
## Verknüpfung eines Zielfortschritts mit Salesforce-Daten
## Berechtigungen
Beim Erstellen einer neuen Zugriffsgruppe können folgende Berechtigungen festgelegt werden:
### Account verwalten
**Verwaltung der Account-Einstellungen (Admin)**
Berechtigte Benutzer können den Account verwalten und Änderungen unter `Einstellungen > Workspace > Allgemein` und unter `Einstellungen > Ziele` vornehmen.
**Verwaltung von Zugriffsgruppen (Admin)**
Berechtigte Benutzer können auf dieses Menü, in dem wir uns gerade befinden, zugreifen und Änderungen vornehmen.
**Verwaltung von Eigenschaften**
Berechtigte Benutzer können Eigenschaften verwalten.
**Verwaltung von Teams**
Berechtigte Benutzer können neue Teams erstellen, indem sie über die Seitenleiste auf "Alle anzeigen" klicken und dann über das Plus neue Teams hinzufügen.
**Verwaltung von Benutzern**
Berechtigte Benutzer können den Bereich Mitglieder unter *Einstellungen - Workspace* sehen und die Mitglieder des Accounts verwalten.
**Verwaltung öffentlicher Ansichten**
Berechtigte Benutzer können unter *Tools* - *OKRs* - *Explorer* und über das Menü, das sie über die drei Punkte oben rechts auf der OKR-Explorer-Seite erreichen, öffentliche Links zu einzelnen Ansichten erstellen.
### Ziele verwalten
**Verwaltung von Zieleinstellungen und Zyklen**
Berechtigte Benutzer haben Zugriff auf erweiterte Zieleinstellungen über `Einstellungen > Ziele` (z.B. Konfiguration des Ampelsystems) und dürfen Zielzyklen erstellen und ändern.
**Uneingeschränkter Zugriff auf alle Ziele**
Dieses Recht gibt ausgewählten Benutzern vollen Zugriff (Zugriffsrecht-Option "Voller Zugang") auf alle Ziele und ermöglicht das Ansehen, Bearbeiten, Löschen und Bearbeiten von Zugriffsrechten zu diesen. Dies gilt auch für Ziele, bei denen nur Ansichtsrechte gesetzt sind. Es gilt nicht für Ziele, bei denen der Ersteller die Zugriffsrecht-Option "Kein Zugriff" gesetzt hat, diese können nicht eingesehen werden.
**Kann Ziele erstellen**
Berechtigte Benutzer können Ziele erstellen.
**Kann aus allen Teams und deren Mitgliedern wählen**
Bei Team- und Benutzereigenschaften für Ziele dürfen Benutzer aus allen Teams und Mitgliedern wählen, nicht nur aus ihren Teams und deren Mitgliedern.
### Check-ins verwalten
**Verwaltung von Check-in-Vorlagen und Einstellungen**
Berechtigte Benutzer können Vorlagen erstellen sowie Zeitpläne einrichten und verwalten.
### Dashboards
**Hat Zugriff auf Progress- und Health-Dashboards**
Berechtigte Benutzer haben Zugriff auf die [Progress](/de/progress-dashboard)- und [Health](/de/health-dashboard)-Dashboards.
**Kann Dashboards und Berichte erstellen**
Berechtigte Benutzer können Dashboards und Berichte erstellen.
**Uneingeschränkter Zugriff auf alle Dashboards**
# Salesforce Integration
Source: https://mooncamp.com/docs/de/salesforce-integration
Ein Überblick über die Salesforce-Datenintegration
## Überblick
Die Salesforce-Integration aktualisiert deinen Zielfortschritt automatisch basierend auf der Aufgabenerfüllung in Salesforce.
Die Salesforce-Integration ist für Kunden der `Pro`- und `Enterprise`-Pläne verfügbar.
## Aktivierung der Salesforce-Integration
Bitte beachte: Es wird empfohlen, die Refresh-Token-Richtlinie von Salesforce auf `Refresh token is valid until revoked` einzustellen, um Probleme mit der Integration zu vermeiden (siehe Einrichtungsanleitung unten in den [FAQs](#faqs)).
Account-Administratoren können die Salesforce-Integration mit diesen Schritten aktivieren:
1. **Zugriff auf Integrationen:** Gehe in den `Einstellungen`-Bereich und öffne die `Integrationen`-Seite.
2. **Salesforce aktivieren:** Finde Salesforce in der Integrationsliste und aktiviere den Schalter.
## Erstellen einer neuen Salesforce-Verbindung
Jeder Benutzer (nicht nur Administratoren) kann jetzt eine neue Verbindung zu Salesforce erstellen. Folge diesen Schritten:
1. **Neue Verbindung erstellen:** Klicke auf `Verwalten` neben dem Schalter und dann auf `Hinzufügen`.
2. **Zugriff auf Salesforce gewähren:** Klicke auf `Bei Salesforce anmelden` und dann auf `Zugriff erlauben`. Nach der Autorisierung kannst du deine Mooncamp-Ziele mit deinen Salesforce-Daten verknüpfen.
3. **Freigabeeinstellungen:** Wähle aus, ob du die Verbindung mit allen Benutzern oder nur mit dir selbst teilen möchtest.
4. Klicke auf `Speichern`, um die Einrichtung der Verbindung abzuschließen.
Beachte, dass das Teilen der Verbindung mit allen Benutzern jedem in diesem Workspace Zugriff auf die Salesforce-Daten dieser Verbindung ermöglicht.
## Verknüpfung eines Zielfortschritts mit Salesforce-Daten
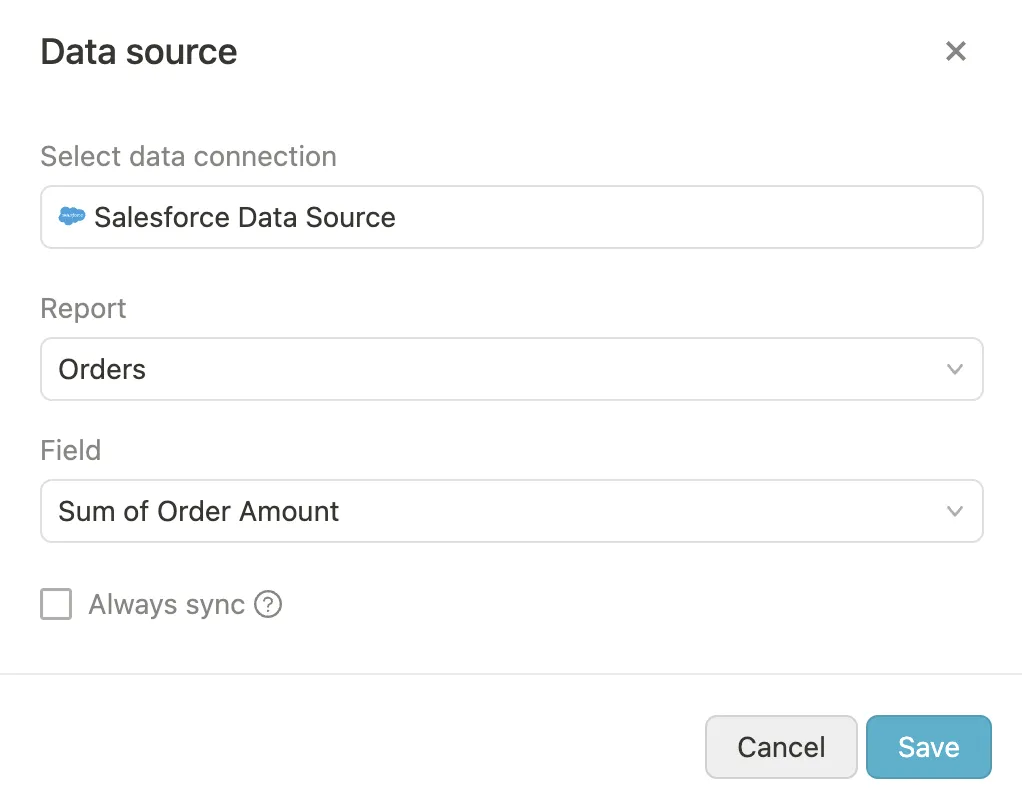 Um den Fortschritt eines Ziels automatisch mit Salesforce zu verfolgen, führe diese Schritte aus:
1. Erstelle oder bearbeite ein Ziel, gehe dann zur Fortschritt-Eigenschaft und wähle einen Messungstyp, der die Verbindung zu einer Datenquelle erlaubt (`Start- und Zielwert`, `Grenzwert`).
2. Klicke auf *Mit Datenquelle verbinden* und wähle die **Salesforce**-Verbindung aus der Liste der verfügbaren Verbindungen. (Du kannst hier auch eine neue Verbindung erstellen.)
3. Wähle zunächst den Salesforce-`Bericht` aus, auf den du zugreifen möchtest.
4. Wähle dann das `Feld` aus, das du zur Fortschrittsverfolgung verwenden möchtest.
5. Wähle abschließend, ob du die Daten `Immer synchronisieren` oder nur bei Wertänderungen aktualisieren möchtest.
6. **Verbindung speichern:** Nach der Konfiguration der zu verfolgenden Daten klicke auf `Speichern`. Das Salesforce-Symbol erscheint neben deinem Ziel und zeigt an, dass es mit Salesforce synchronisiert ist.
### Automatische Fortschrittsaktualisierungen
Sobald die Integration aktiv ist, aktualisiert Mooncamp deine Ziele automatisch basierend auf Änderungen in Salesforce.
Tipp für Administratoren: Gehe zu `Einstellungen > Integrationen` und stelle sicher, dass unter `Synchronisation` jeder Tag ausgewählt ist.
## FAQs
In einigen Fällen funktioniert die Salesforce-Integration aufgrund der Refresh-Token-Richtlinie von Salesforce nicht mehr. Um dies zu beheben, passe bitte die Refresh-Token-Richtlinie von Salesforce auf `Refresh token is valid until revoked` an. Siehe das Video unten:
# SAML SSO Einrichtung
Source: https://mooncamp.com/docs/de/saml-sso
Ein Überblick darüber, wie du SAML SSO in Mooncamp einrichtest
SAML SSO ist für unsere Kunden im **`Enterprise Plan`** verfügbar. Falls du SAML SSO nutzen möchtest, wende dich bitte an deinen Mooncamp Ansprechpartner oder unser Support-Team für weitere Details.
## SAML SSO erklärt
SSO steht für "Single Sign-On" und diese Funktion ermöglicht es dir, dich mit deinem Microsoft- oder Google-Konto anzumelden, ohne ein neues Passwort erstellen zu müssen. Bei Mooncamp bieten wir standardmäßig Microsoft und Google SSO sowie SAML SSO für Identity Provider wie Okta an. Mit SAML SSO kannst du deine bestehende Single Sign-On-Lösung in dein Mooncamp-Konto integrieren. Eine Integration ist mit jedem SAML 2.0 Identity Provider möglich.
## SAML SSO einrichten
💡 Die Integration von SAML SSO ist ein **technischer Prozess**, daher empfehlen wir dir, dass dich jemand aus deiner IT-Abteilung bei der Konfiguration unterstützt.
Um SAML SSO in deinem Konto einzurichten, navigiere zu den Einstellungen und dann zu *Identity and Provisioning Settings*. Dort findest du drei Optionen:
* Anmeldung per Passwort erlauben
* Anmeldung über Google erlauben
* Anmeldung über Microsoft erlauben
Aus Sicherheitsgründen empfehlen wir, eine Option zu wählen und die anderen zu deaktivieren. Je nach Struktur deiner Organisation kann es jedoch sinnvoll sein, mehrere Optionen zuzulassen.
Um den Fortschritt eines Ziels automatisch mit Salesforce zu verfolgen, führe diese Schritte aus:
1. Erstelle oder bearbeite ein Ziel, gehe dann zur Fortschritt-Eigenschaft und wähle einen Messungstyp, der die Verbindung zu einer Datenquelle erlaubt (`Start- und Zielwert`, `Grenzwert`).
2. Klicke auf *Mit Datenquelle verbinden* und wähle die **Salesforce**-Verbindung aus der Liste der verfügbaren Verbindungen. (Du kannst hier auch eine neue Verbindung erstellen.)
3. Wähle zunächst den Salesforce-`Bericht` aus, auf den du zugreifen möchtest.
4. Wähle dann das `Feld` aus, das du zur Fortschrittsverfolgung verwenden möchtest.
5. Wähle abschließend, ob du die Daten `Immer synchronisieren` oder nur bei Wertänderungen aktualisieren möchtest.
6. **Verbindung speichern:** Nach der Konfiguration der zu verfolgenden Daten klicke auf `Speichern`. Das Salesforce-Symbol erscheint neben deinem Ziel und zeigt an, dass es mit Salesforce synchronisiert ist.
### Automatische Fortschrittsaktualisierungen
Sobald die Integration aktiv ist, aktualisiert Mooncamp deine Ziele automatisch basierend auf Änderungen in Salesforce.
Tipp für Administratoren: Gehe zu `Einstellungen > Integrationen` und stelle sicher, dass unter `Synchronisation` jeder Tag ausgewählt ist.
## FAQs
In einigen Fällen funktioniert die Salesforce-Integration aufgrund der Refresh-Token-Richtlinie von Salesforce nicht mehr. Um dies zu beheben, passe bitte die Refresh-Token-Richtlinie von Salesforce auf `Refresh token is valid until revoked` an. Siehe das Video unten:
# SAML SSO Einrichtung
Source: https://mooncamp.com/docs/de/saml-sso
Ein Überblick darüber, wie du SAML SSO in Mooncamp einrichtest
SAML SSO ist für unsere Kunden im **`Enterprise Plan`** verfügbar. Falls du SAML SSO nutzen möchtest, wende dich bitte an deinen Mooncamp Ansprechpartner oder unser Support-Team für weitere Details.
## SAML SSO erklärt
SSO steht für "Single Sign-On" und diese Funktion ermöglicht es dir, dich mit deinem Microsoft- oder Google-Konto anzumelden, ohne ein neues Passwort erstellen zu müssen. Bei Mooncamp bieten wir standardmäßig Microsoft und Google SSO sowie SAML SSO für Identity Provider wie Okta an. Mit SAML SSO kannst du deine bestehende Single Sign-On-Lösung in dein Mooncamp-Konto integrieren. Eine Integration ist mit jedem SAML 2.0 Identity Provider möglich.
## SAML SSO einrichten
💡 Die Integration von SAML SSO ist ein **technischer Prozess**, daher empfehlen wir dir, dass dich jemand aus deiner IT-Abteilung bei der Konfiguration unterstützt.
Um SAML SSO in deinem Konto einzurichten, navigiere zu den Einstellungen und dann zu *Identity and Provisioning Settings*. Dort findest du drei Optionen:
* Anmeldung per Passwort erlauben
* Anmeldung über Google erlauben
* Anmeldung über Microsoft erlauben
Aus Sicherheitsgründen empfehlen wir, eine Option zu wählen und die anderen zu deaktivieren. Je nach Struktur deiner Organisation kann es jedoch sinnvoll sein, mehrere Optionen zuzulassen.
.webp) Um die Felder unter *SAML* korrekt auszufüllen, befolge bitte die folgenden Anweisungen:
* Als ersten Schritt bei der Einrichtung der SAML-Integration auf deiner Seite verwende bitte die folgenden Konfigurationen (Mooncamp kann mit jedem SAML 2.0 Identity Provider integriert werden):
ACS-URL: [`https://app.mooncamp.com/api/v1/saml/acl`](https://app.mooncamp.com/api/v1/saml/acl)
Entity-ID: [`https://app.mooncamp.com/api/v1/saml/metadata`](https://app.mooncamp.com/api/v1/saml/metadata)
* Stelle sicher, dass du einen benutzerdefinierten Wert mit dem Namen `email` hinzufügst, der mit der E-Mail-Adresse des Benutzers übereinstimmt.
* Als letzten Schritt kopiere die Metadaten deiner SAML-Anwendung und füge sie in deinen SAML-Konfigurationsbereich innerhalb deiner [*Identity and Provisioning Settings*](https://app.mooncamp.com/#/identity-and-provisioning) ein.
Um die Felder unter *SAML* korrekt auszufüllen, befolge bitte die folgenden Anweisungen:
* Als ersten Schritt bei der Einrichtung der SAML-Integration auf deiner Seite verwende bitte die folgenden Konfigurationen (Mooncamp kann mit jedem SAML 2.0 Identity Provider integriert werden):
ACS-URL: [`https://app.mooncamp.com/api/v1/saml/acl`](https://app.mooncamp.com/api/v1/saml/acl)
Entity-ID: [`https://app.mooncamp.com/api/v1/saml/metadata`](https://app.mooncamp.com/api/v1/saml/metadata)
* Stelle sicher, dass du einen benutzerdefinierten Wert mit dem Namen `email` hinzufügst, der mit der E-Mail-Adresse des Benutzers übereinstimmt.
* Als letzten Schritt kopiere die Metadaten deiner SAML-Anwendung und füge sie in deinen SAML-Konfigurationsbereich innerhalb deiner [*Identity and Provisioning Settings*](https://app.mooncamp.com/#/identity-and-provisioning) ein.
 **Wichtiger Hinweis:** Deine IT-Administratoren müssen möglicherweise zunächst Mooncamp als Provider **genehmigen**, bevor du SAML SSO nutzen kannst. Außerdem ist es für die Einrichtung von SAML SSO wichtig, dass die **E-Mail-Adresse** eines Benutzers in Mooncamp dieselbe ist wie bei deinem Identity Provider.
Sobald du sichergestellt hast, dass alles korrekt eingerichtet ist, müssen die Benutzer nur noch mit ihrer Microsoft- oder Google-E-Mail zu deinem Mooncamp-Konto hinzugefügt werden und können sich dann über die Schaltfläche *Anmeldung über SSO* einloggen.
**Wichtiger Hinweis:** Deine IT-Administratoren müssen möglicherweise zunächst Mooncamp als Provider **genehmigen**, bevor du SAML SSO nutzen kannst. Außerdem ist es für die Einrichtung von SAML SSO wichtig, dass die **E-Mail-Adresse** eines Benutzers in Mooncamp dieselbe ist wie bei deinem Identity Provider.
Sobald du sichergestellt hast, dass alles korrekt eingerichtet ist, müssen die Benutzer nur noch mit ihrer Microsoft- oder Google-E-Mail zu deinem Mooncamp-Konto hinzugefügt werden und können sich dann über die Schaltfläche *Anmeldung über SSO* einloggen.
 # Azure SCIM Integration
Source: https://mooncamp.com/docs/de/scim-azure
Ein Überblick darüber, wie du die Benutzerbereitstellung mit Azure via SCIM in Mooncamp einrichtest.
## Benutzerbereitstellung erklärt
Mit der Benutzerbereitstellung kannst du alle Benutzerprofile von deinem Unternehmens-Identitätsanbieter (z.B. Azure) mit Mooncamp synchronisieren. Das bedeutet, wenn ein neuer Mitarbeiter in dein Unternehmen eintritt oder es verlässt und als Benutzer in Mooncamp hinzugefügt oder gelöscht werden muss, geschieht dies automatisch, sobald der Mitarbeiter in deinem Identitätsanbieter hinzugefügt oder gelöscht wird.
Die Benutzerbereitstellung ist eine **Enterprise-Funktion** und muss zunächst von Mooncamp konfiguriert werden. Zusätzlich müssen deine IT-Administratoren möglicherweise erst Mooncamp als Anbieter genehmigen, bevor du die Benutzerbereitstellung einrichten kannst.
## Einrichtung der Benutzerbereitstellung mit Azure
Um die Benutzerbereitstellung in deinem Konto einzurichten, navigiere zu `Einstellungen` → `Sicherheit und Identität` → `Benutzerbereitstellung`
Klicke auf `Benutzerbereitstellung aktivieren`. Die Benutzerbereitstellung ist nun für dein Konto aktiviert. Ein `API-Token` wird benötigt, um die Konfiguration in Azure zu starten. Besuche [https://portal.azure.com](https://portal.azure.com) und navigiere zu `Enterprise-Anwendungen`.
# Azure SCIM Integration
Source: https://mooncamp.com/docs/de/scim-azure
Ein Überblick darüber, wie du die Benutzerbereitstellung mit Azure via SCIM in Mooncamp einrichtest.
## Benutzerbereitstellung erklärt
Mit der Benutzerbereitstellung kannst du alle Benutzerprofile von deinem Unternehmens-Identitätsanbieter (z.B. Azure) mit Mooncamp synchronisieren. Das bedeutet, wenn ein neuer Mitarbeiter in dein Unternehmen eintritt oder es verlässt und als Benutzer in Mooncamp hinzugefügt oder gelöscht werden muss, geschieht dies automatisch, sobald der Mitarbeiter in deinem Identitätsanbieter hinzugefügt oder gelöscht wird.
Die Benutzerbereitstellung ist eine **Enterprise-Funktion** und muss zunächst von Mooncamp konfiguriert werden. Zusätzlich müssen deine IT-Administratoren möglicherweise erst Mooncamp als Anbieter genehmigen, bevor du die Benutzerbereitstellung einrichten kannst.
## Einrichtung der Benutzerbereitstellung mit Azure
Um die Benutzerbereitstellung in deinem Konto einzurichten, navigiere zu `Einstellungen` → `Sicherheit und Identität` → `Benutzerbereitstellung`
Klicke auf `Benutzerbereitstellung aktivieren`. Die Benutzerbereitstellung ist nun für dein Konto aktiviert. Ein `API-Token` wird benötigt, um die Konfiguration in Azure zu starten. Besuche [https://portal.azure.com](https://portal.azure.com) und navigiere zu `Enterprise-Anwendungen`.
 Klicke auf `Neue Anwendung`:
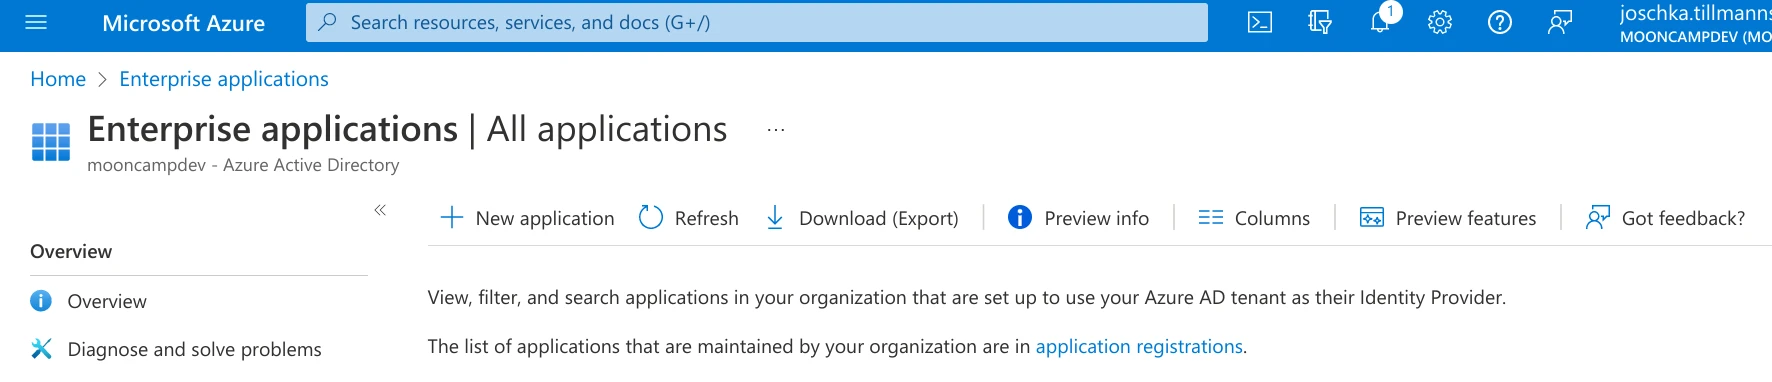 Klicke auf `+ Eigene Anwendung erstellen` und benenne die App `Mooncamp user provisioning`:
 Wähle `• Integriere eine andere Anwendung, die du nicht in der Galerie findest (Nicht-Galerie)` und klicke auf `Erstellen`. Du kannst die Vorschläge aus den Galerie-Anwendungen ignorieren.
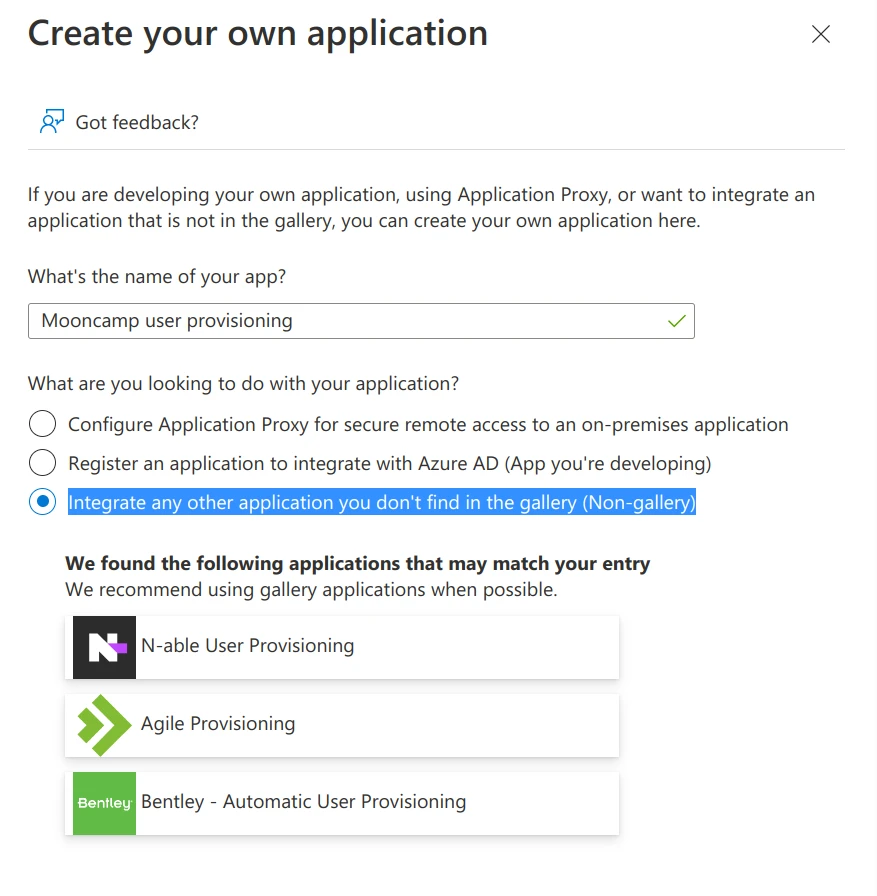 Navigiere zu `Bereitstellung` und klicke auf `Erste Schritte`:
 Wähle dann `Bereitstellungsmodus` → `Automatisch`. Als Mandanten-URL füge hinzu: *[https://identity.mooncamp.com/scim/v2](https://identity.mooncamp.com/scim/v2)* und unter Geheimes Token füge das `API-Token` ein, das du aus dem Einstellungsmenü von Mooncamp kopiert hast.
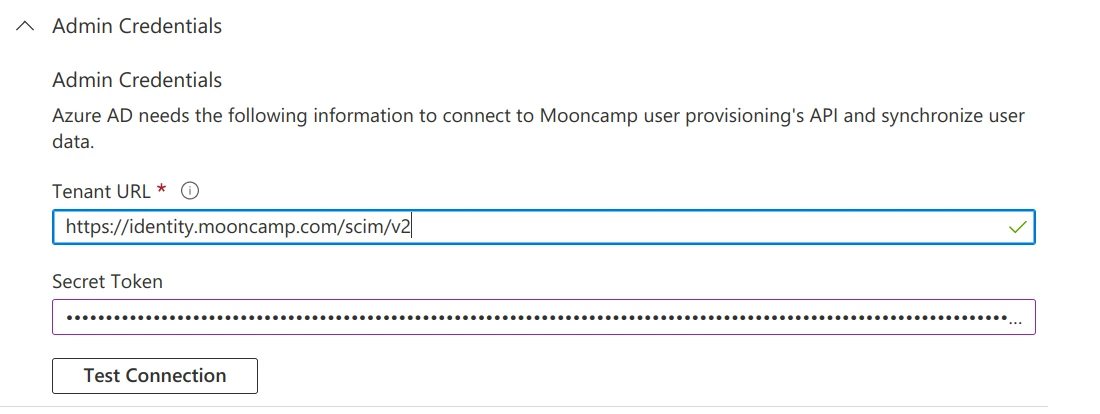 Nach dem Klicken auf `Verbindung testen` solltest du eine positive Rückmeldung erhalten.
 Klicke auf `Speichern`, erweitere `Zuordnungen` und klicke auf `Azure Active Directory-Benutzer bereitstellen`. Suche die Eintrags-Zuordnung und wähle sie aus. Setze die `Übereinstimmungspriorität` auf 2 und klicke auf `OK`.
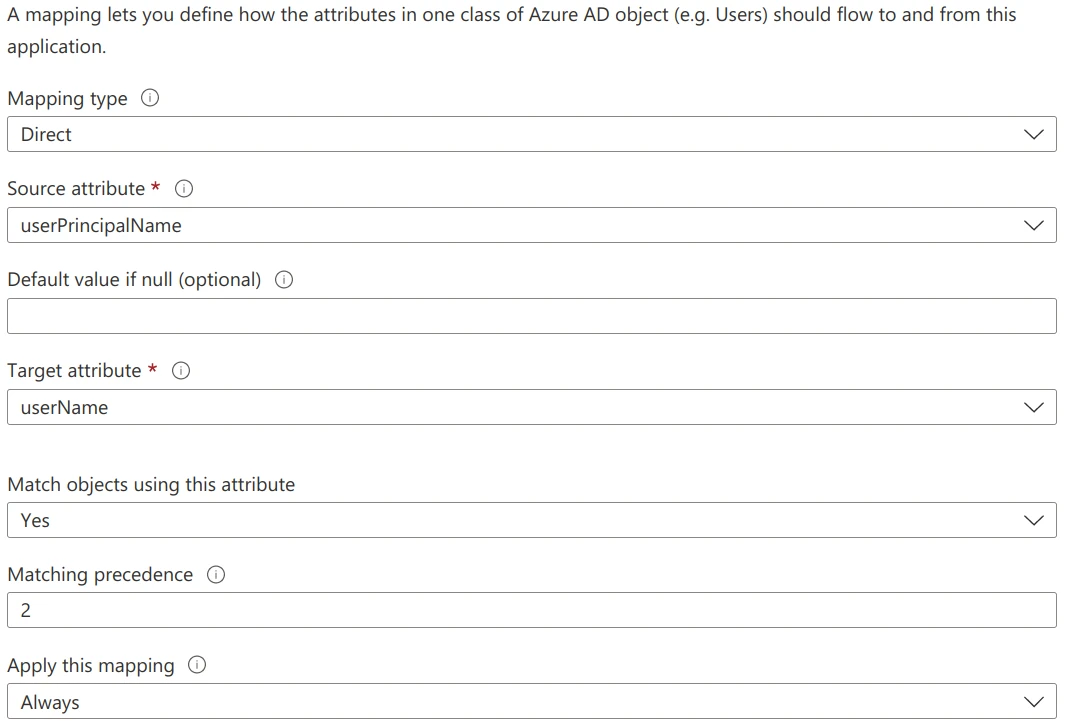 Suche die Eintrags-Zuordnung und wähle sie aus. Ändere `mailNickname` zu `objectId` und setze `Objekte mit diesem Attribut abgleichen` auf `Ja`. Die `Übereinstimmungspriorität` sollte `1` sein. Klicke auf `OK`.
Klicke erneut auf die Eintrags-Zuordnung `userPrincipalName` → `userName` und setze `Objekte mit diesem Attribut abgleichen` auf `Nein`, sodass nur ein einziger Eintrag mit einer `Übereinstimmungspriorität` konfiguriert ist.
Suche die Eintrags-Zuordnung und wähle sie aus. Ändere `mailNickname` zu `objectId` und setze `Objekte mit diesem Attribut abgleichen` auf `Ja`. Die `Übereinstimmungspriorität` sollte `1` sein. Klicke auf `OK`.
Klicke erneut auf die Eintrags-Zuordnung `userPrincipalName` → `userName` und setze `Objekte mit diesem Attribut abgleichen` auf `Nein`, sodass nur ein einziger Eintrag mit einer `Übereinstimmungspriorität` konfiguriert ist.
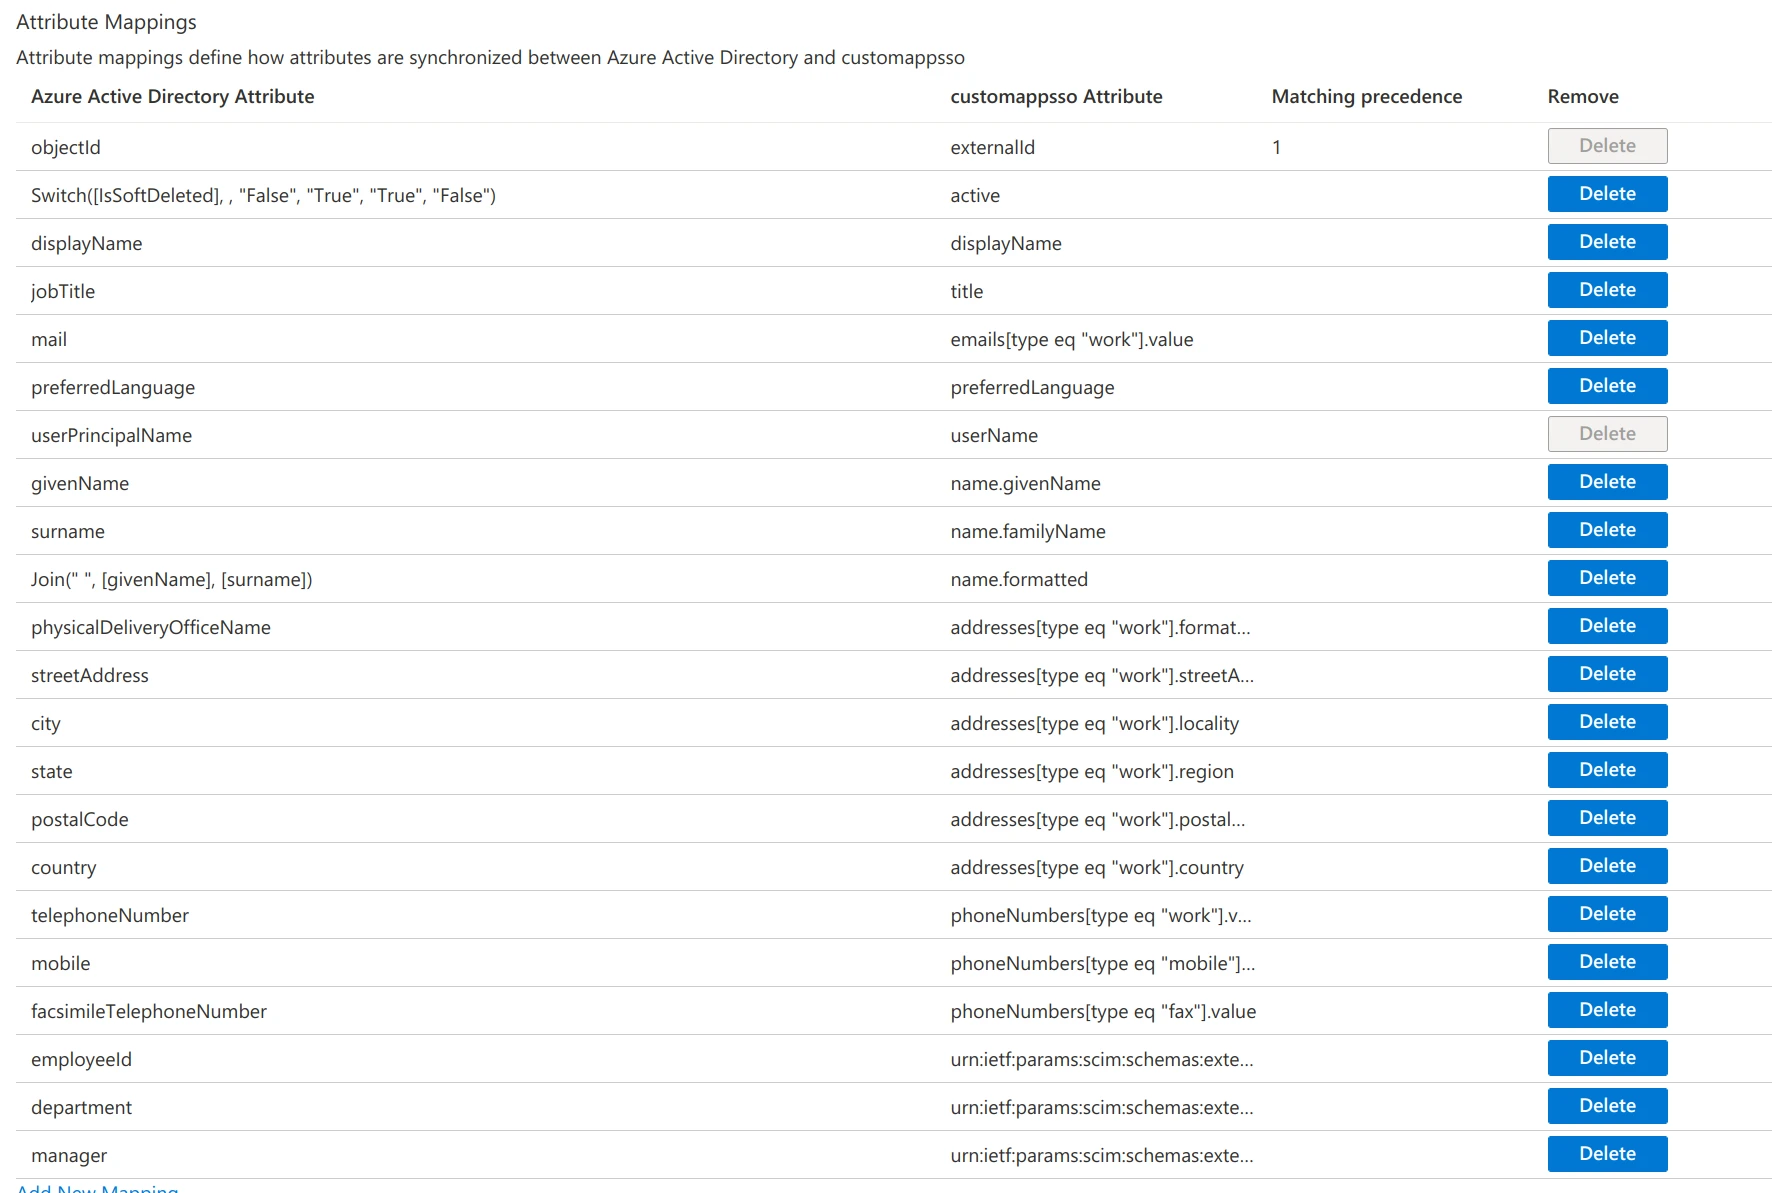 Klicke auf `Speichern` und dann oben auf der Seite auf `Bereitstellung`.
 Wähle `Azure Active Directory-Gruppen bereitstellen`. Suche die Eintrags-Zuordnung und wähle sie aus. Setze die `Übereinstimmungspriorität` auf `2`. Klicke auf `OK`. Suche die Eintrags-Zuordnung und wähle sie aus. Setze `Objekte mit diesem Attribut abgleichen` auf `Ja`. Suche dann erneut die Eintrags-Zuordnung `displayName` → `displayName` und setze `Objekte mit diesem Attribut abgleichen` auf `Nein`.
 Klicke auf `Speichern` und konfiguriere `Benutzer und Gruppen` entsprechend deinen Anforderungen. Klicke auf `Bereitstellung starten`.
 Es kann bis zu einer Stunde dauern, bis der erste Durchlauf der Bereitstellung gestartet wird. Wenn der erste Durchlauf abgeschlossen ist, kannst du beginnen, die Benutzer in Mooncamp zu übernehmen.
Navigiere erneut zu `Einstellungen` → `Sicherheit und Identität` → `Benutzerbereitstellung` in Mooncamp. Du solltest jetzt sehen, dass Benutzer zur Synchronisierung mit Mooncamp verfügbar sind.
Es kann bis zu einer Stunde dauern, bis der erste Durchlauf der Bereitstellung gestartet wird. Wenn der erste Durchlauf abgeschlossen ist, kannst du beginnen, die Benutzer in Mooncamp zu übernehmen.
Navigiere erneut zu `Einstellungen` → `Sicherheit und Identität` → `Benutzerbereitstellung` in Mooncamp. Du solltest jetzt sehen, dass Benutzer zur Synchronisierung mit Mooncamp verfügbar sind.
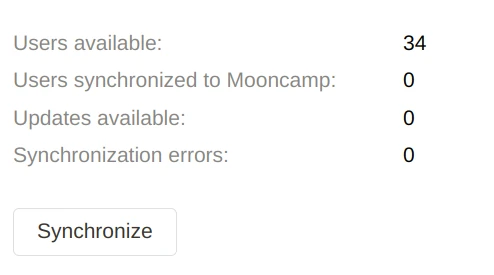 Klicke auf `Synchronisieren`, um diese Benutzer zu Mooncamp zu übertragen. Unter `Mitglieder` solltest du diese Benutzer nun finden. Der Bereich `Attributzuordnung` ermöglicht es dir, beliebige *SCIM-Attribute* den *Mooncamp-Eigenschaften* zuzuordnen. Lies mehr über *Mooncamp-Eigenschaften* hier: [Eigenschaften in Mooncamp](/de/properties).
Benutzer werden täglich automatisch mit Mooncamp synchronisiert. Um Änderungen, die über Azure bereitgestellt wurden, sofort zu synchronisieren, verwende die Schaltfläche `Synchronisieren`.
# Seitenleiste
Source: https://mooncamp.com/docs/de/sidebar
Ein Überblick über die Seitenleiste
## Überblick
Die Seitenleiste ist in vier Bereiche unterteilt. Wenn du mit der Maus über deinen Firmennamen fährst, kannst du dich über den Pfeil nach unten ausloggen, und du kannst die Navigationsleiste mit den Doppelpfeilen auf der rechten Seite ausblenden.
Klicke auf `Synchronisieren`, um diese Benutzer zu Mooncamp zu übertragen. Unter `Mitglieder` solltest du diese Benutzer nun finden. Der Bereich `Attributzuordnung` ermöglicht es dir, beliebige *SCIM-Attribute* den *Mooncamp-Eigenschaften* zuzuordnen. Lies mehr über *Mooncamp-Eigenschaften* hier: [Eigenschaften in Mooncamp](/de/properties).
Benutzer werden täglich automatisch mit Mooncamp synchronisiert. Um Änderungen, die über Azure bereitgestellt wurden, sofort zu synchronisieren, verwende die Schaltfläche `Synchronisieren`.
# Seitenleiste
Source: https://mooncamp.com/docs/de/sidebar
Ein Überblick über die Seitenleiste
## Überblick
Die Seitenleiste ist in vier Bereiche unterteilt. Wenn du mit der Maus über deinen Firmennamen fährst, kannst du dich über den Pfeil nach unten ausloggen, und du kannst die Navigationsleiste mit den Doppelpfeilen auf der rechten Seite ausblenden.
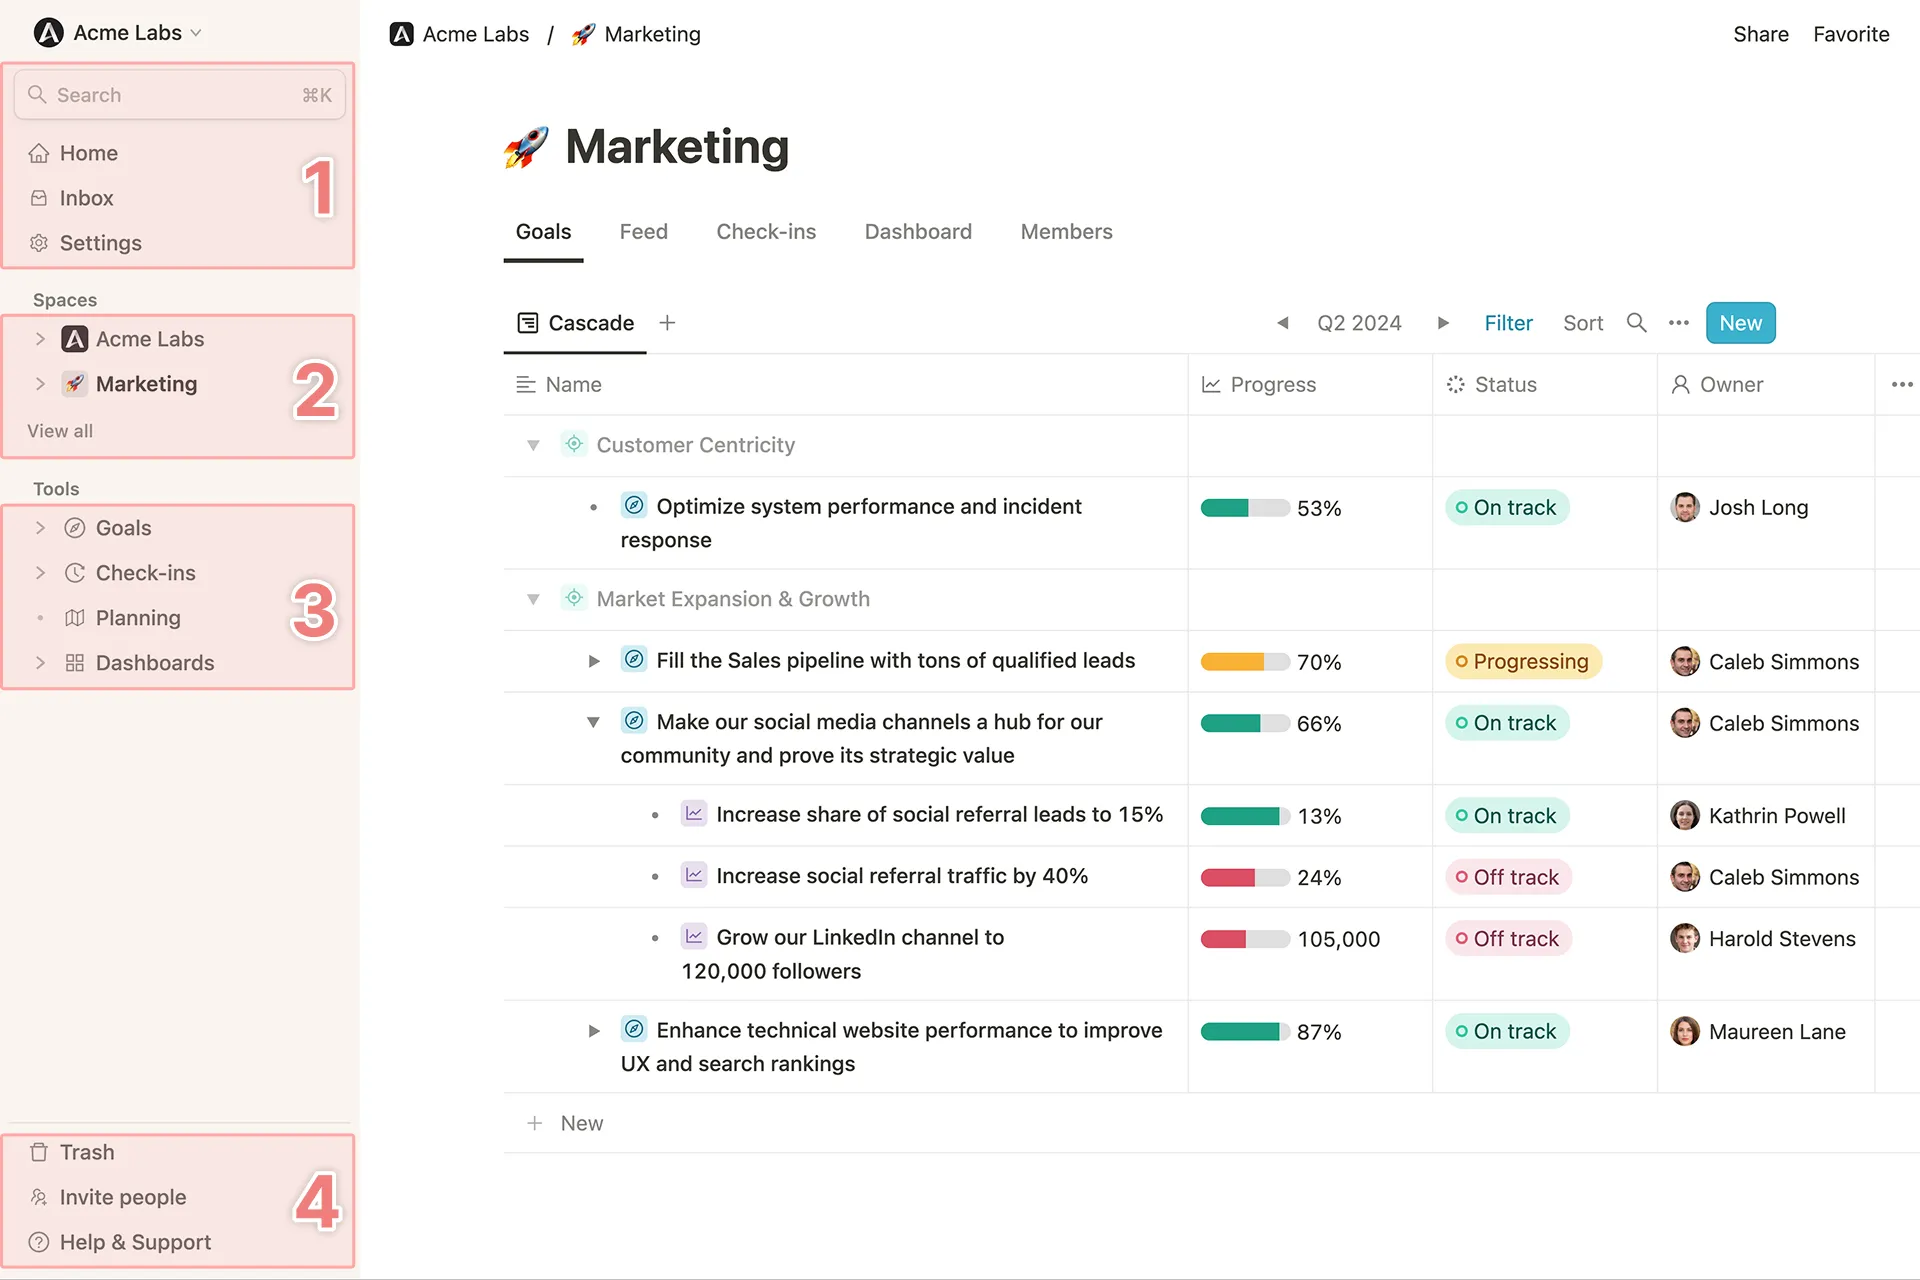 ## 1. Suche, Startseite, Posteingang und Einstellungen
Der erste Bereich umfasst eine Schnellsuche, deinen Posteingang und deine persönlichen Einstellungen (sowie Kontoeinstellungen, wenn du Administratorrechte hast).
**Suche**: Mit der Schnellsuche (`Strg + K` oder `⌘ + K` auf Mac) kannst du nach bestimmten Zielen, Teams oder Personen suchen. durch Klicken auf eines der Suchergebnisse gelangst du dann zur jeweiligen Zielseite, Teamseite oder zum öffentlichen Profil eines Workspace-Mitglieds.
[Startseite](/de/homepage): deine Startseite ermöglicht dir den Zugriff auf alle dir zur Verfügung stehenden Mooncamp-Tools, ohne dass du zwischen Fenstern wechseln musst. Sie gibt dir auch einen Überblick über alle Ziele, deren Eigentümer du bist.
**Posteingang**: In deinem Posteingang siehst du alle dir zugewiesenen Aufgaben und Erinnerungen für z.B. anstehende Check-ins oder Umfragen sowie Benachrichtigungen über relevante Kommentare und Erwähnungen innerhalb der Plattform.
## 1. Suche, Startseite, Posteingang und Einstellungen
Der erste Bereich umfasst eine Schnellsuche, deinen Posteingang und deine persönlichen Einstellungen (sowie Kontoeinstellungen, wenn du Administratorrechte hast).
**Suche**: Mit der Schnellsuche (`Strg + K` oder `⌘ + K` auf Mac) kannst du nach bestimmten Zielen, Teams oder Personen suchen. durch Klicken auf eines der Suchergebnisse gelangst du dann zur jeweiligen Zielseite, Teamseite oder zum öffentlichen Profil eines Workspace-Mitglieds.
[Startseite](/de/homepage): deine Startseite ermöglicht dir den Zugriff auf alle dir zur Verfügung stehenden Mooncamp-Tools, ohne dass du zwischen Fenstern wechseln musst. Sie gibt dir auch einen Überblick über alle Ziele, deren Eigentümer du bist.
**Posteingang**: In deinem Posteingang siehst du alle dir zugewiesenen Aufgaben und Erinnerungen für z.B. anstehende Check-ins oder Umfragen sowie Benachrichtigungen über relevante Kommentare und Erwähnungen innerhalb der Plattform.
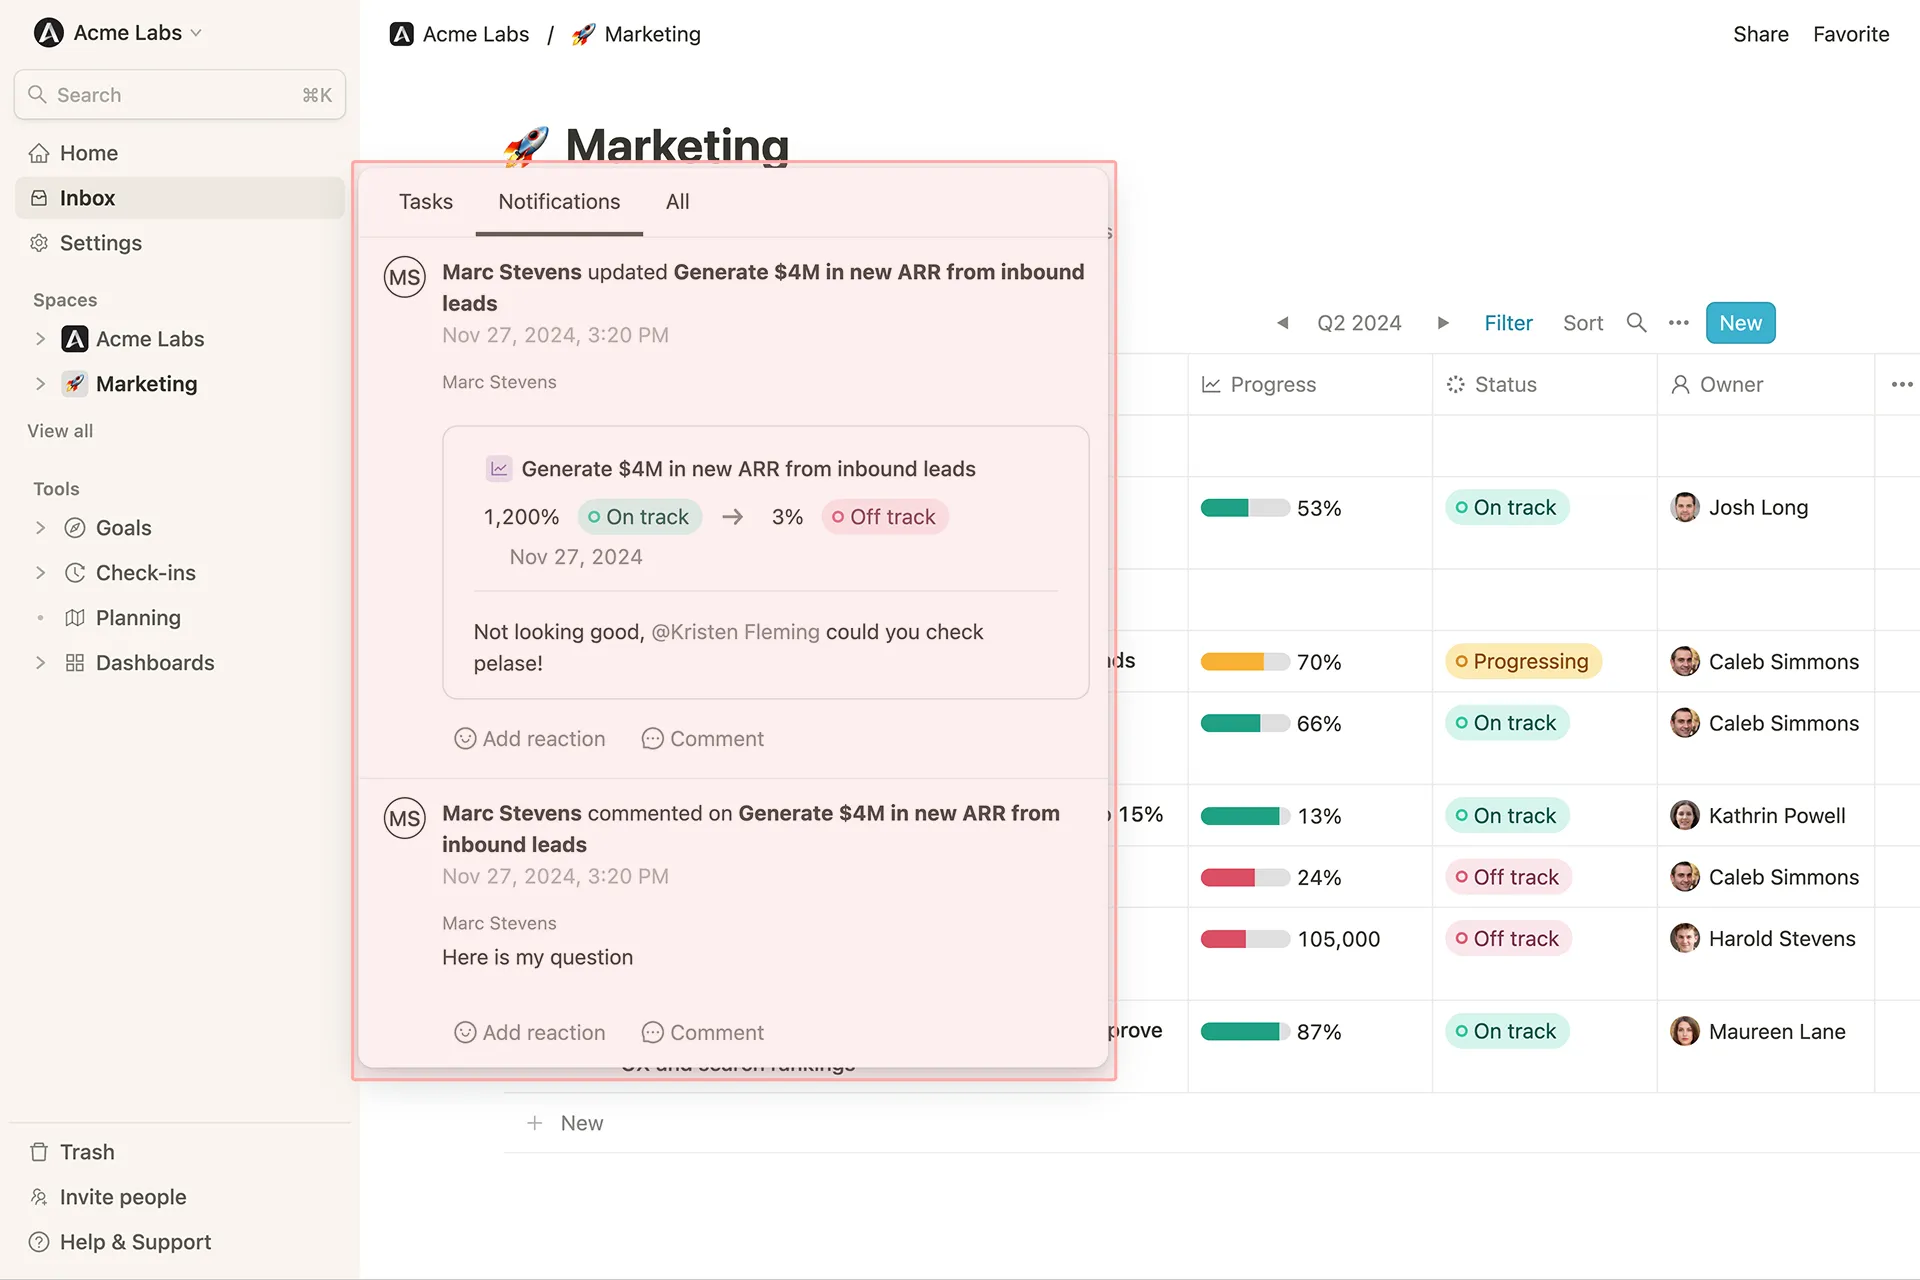 **Einstellungen**: In deinen [Profileinstellungen](/de/profile-settings) kannst du Dinge wie dein Profilbild, deinen Namen und deine Sprache festlegen. Außerdem kannst du unter "[Benachrichtigungen](/de/personal-notifications)" deine Präferenzen festlegen, ob und wie du von Mooncamp über bestimmte Ereignisse benachrichtigt werden möchtest.
## 2. (Team) Spaces
**Einstellungen**: In deinen [Profileinstellungen](/de/profile-settings) kannst du Dinge wie dein Profilbild, deinen Namen und deine Sprache festlegen. Außerdem kannst du unter "[Benachrichtigungen](/de/personal-notifications)" deine Präferenzen festlegen, ob und wie du von Mooncamp über bestimmte Ereignisse benachrichtigt werden möchtest.
## 2. (Team) Spaces
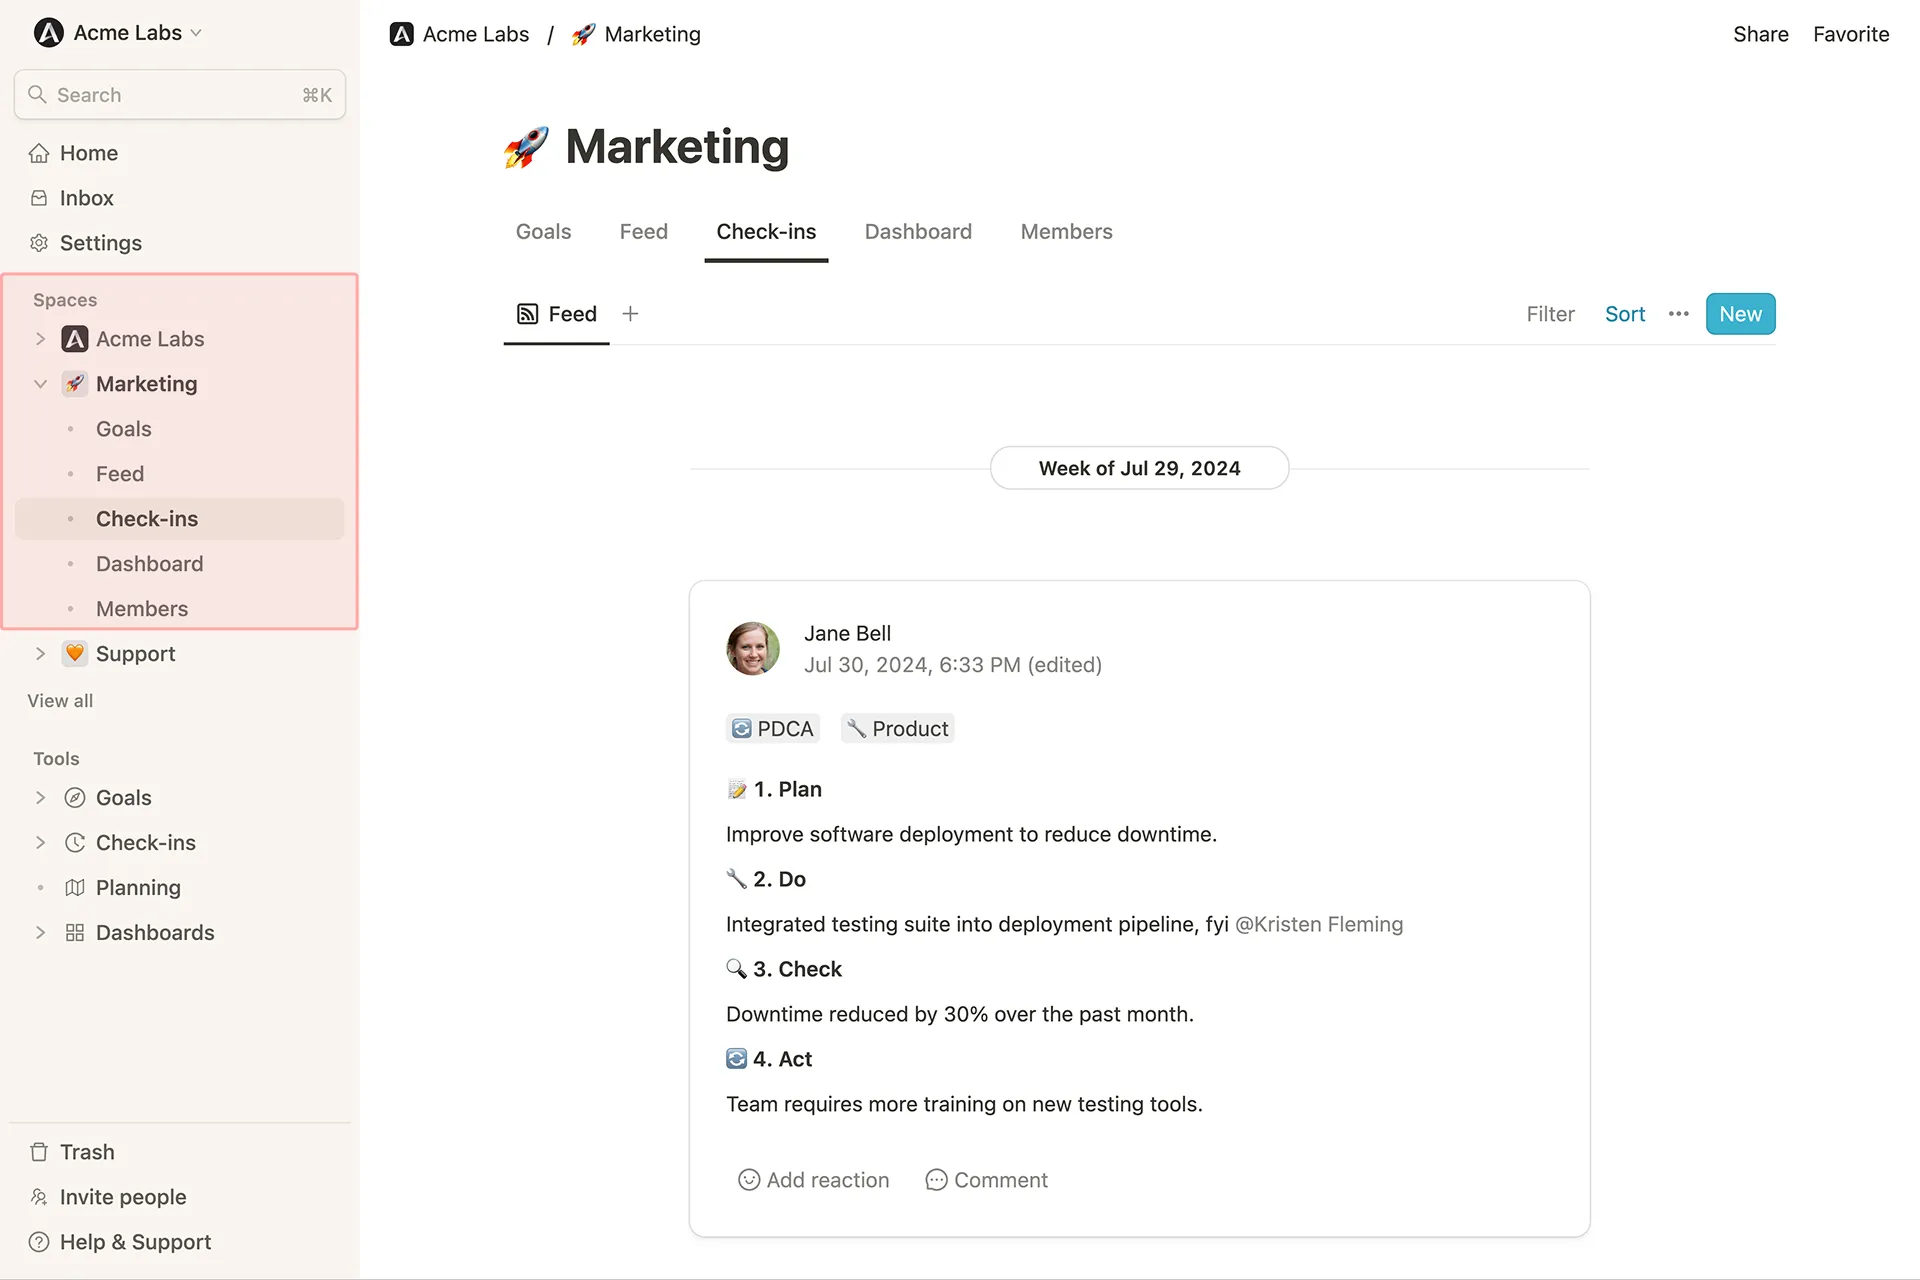 Das Team, dem du innerhalb von Mooncamp zugewiesen bist als auch deine Unternehmens-Space, wird automatisch in deiner Seitenleiste angezeigt.
## 3. Tools
In dieser Liste siehst du alle Mooncamp-Tools, auf die du als Benutzer Zugriff hast, wie zum Beispiel Ziele oder Check-ins.
### Ziele
Im [Ziel-Explorer](/de/goal-explorer) kannst du zusätzliche Zielansichten erstellen und sie über 'Favorisieren' oben rechts zu deinen persönlichen Favoriten hinzufügen. Diese Favoriten werden automatisch oben in deiner Seitenleiste angeheftet. Im Ziele-Feed siehst du alle Aktualisierungen, die an den Zielen aus dem Explorer vorgenommen wurden. Die [Plannings](/de/planning-spaces) bieten einen separaten Bereich, in dem du deine Ziele für den nächsten Zyklus getrennt planen und später veröffentlichen kannst.
💡 **Hinweis:** Die Favoriten-Funktion kann auch für einzelne Ziele, Check-in-Ansichten oder Dashboards verwendet werden.
### Check-ins
Mit [Check-ins](/de/check-ins) aktualisierst du deinen Zielfortschritt und siehst die Updates deines Teams und deiner Organisation.
### Dashboards
In diesem Bereich stehen dir verschiedene Arten von Dashboards zur Verfügung. Das [Progress-Dashboard](/de/progress-dashboard) bietet einen Überblick über den aktuellen Status und Fortschritt aller Ziele deiner Organisation, gruppiert nach Team oder Mitglied. Je nach Mooncamp-Plan bietet dir das [Health-Dashboard](/de/health-dashboard) eine umfassende Gesundheits- und Qualitätsprüfung für alle Ziele. Zusätzlich hast du mit [benutzerdefinierten Dashboards](/de/dashboards) die Möglichkeit, eigene Berichte zu erstellen und beliebige Datentypen visuell zu kombinieren.
## 5. Papierkorb
Hier findest du gelöschte Ziele und hast die Möglichkeit, diese entweder wiederherzustellen oder endgültig zu löschen.
## 6. Onboarding, Hilfe und Support
Der letzte Bereich in der Seitenleiste führt zu verschiedenen Ressourcen und ist der Ort, an dem dich der Onboarding-Guide Schritt für Schritt durch das Tool führt. Unter 'Video-Tutorials' findest du kurze Videos zu deinen ersten Schritten mit Mooncamp und kannst außerdem auf alle Inhalte unseres Help Centers, unserer Video-FAQs und weitere Ressourcen zu OKRs und Best Practices zugreifen.
Das Team, dem du innerhalb von Mooncamp zugewiesen bist als auch deine Unternehmens-Space, wird automatisch in deiner Seitenleiste angezeigt.
## 3. Tools
In dieser Liste siehst du alle Mooncamp-Tools, auf die du als Benutzer Zugriff hast, wie zum Beispiel Ziele oder Check-ins.
### Ziele
Im [Ziel-Explorer](/de/goal-explorer) kannst du zusätzliche Zielansichten erstellen und sie über 'Favorisieren' oben rechts zu deinen persönlichen Favoriten hinzufügen. Diese Favoriten werden automatisch oben in deiner Seitenleiste angeheftet. Im Ziele-Feed siehst du alle Aktualisierungen, die an den Zielen aus dem Explorer vorgenommen wurden. Die [Plannings](/de/planning-spaces) bieten einen separaten Bereich, in dem du deine Ziele für den nächsten Zyklus getrennt planen und später veröffentlichen kannst.
💡 **Hinweis:** Die Favoriten-Funktion kann auch für einzelne Ziele, Check-in-Ansichten oder Dashboards verwendet werden.
### Check-ins
Mit [Check-ins](/de/check-ins) aktualisierst du deinen Zielfortschritt und siehst die Updates deines Teams und deiner Organisation.
### Dashboards
In diesem Bereich stehen dir verschiedene Arten von Dashboards zur Verfügung. Das [Progress-Dashboard](/de/progress-dashboard) bietet einen Überblick über den aktuellen Status und Fortschritt aller Ziele deiner Organisation, gruppiert nach Team oder Mitglied. Je nach Mooncamp-Plan bietet dir das [Health-Dashboard](/de/health-dashboard) eine umfassende Gesundheits- und Qualitätsprüfung für alle Ziele. Zusätzlich hast du mit [benutzerdefinierten Dashboards](/de/dashboards) die Möglichkeit, eigene Berichte zu erstellen und beliebige Datentypen visuell zu kombinieren.
## 5. Papierkorb
Hier findest du gelöschte Ziele und hast die Möglichkeit, diese entweder wiederherzustellen oder endgültig zu löschen.
## 6. Onboarding, Hilfe und Support
Der letzte Bereich in der Seitenleiste führt zu verschiedenen Ressourcen und ist der Ort, an dem dich der Onboarding-Guide Schritt für Schritt durch das Tool führt. Unter 'Video-Tutorials' findest du kurze Videos zu deinen ersten Schritten mit Mooncamp und kannst außerdem auf alle Inhalte unseres Help Centers, unserer Video-FAQs und weitere Ressourcen zu OKRs und Best Practices zugreifen.
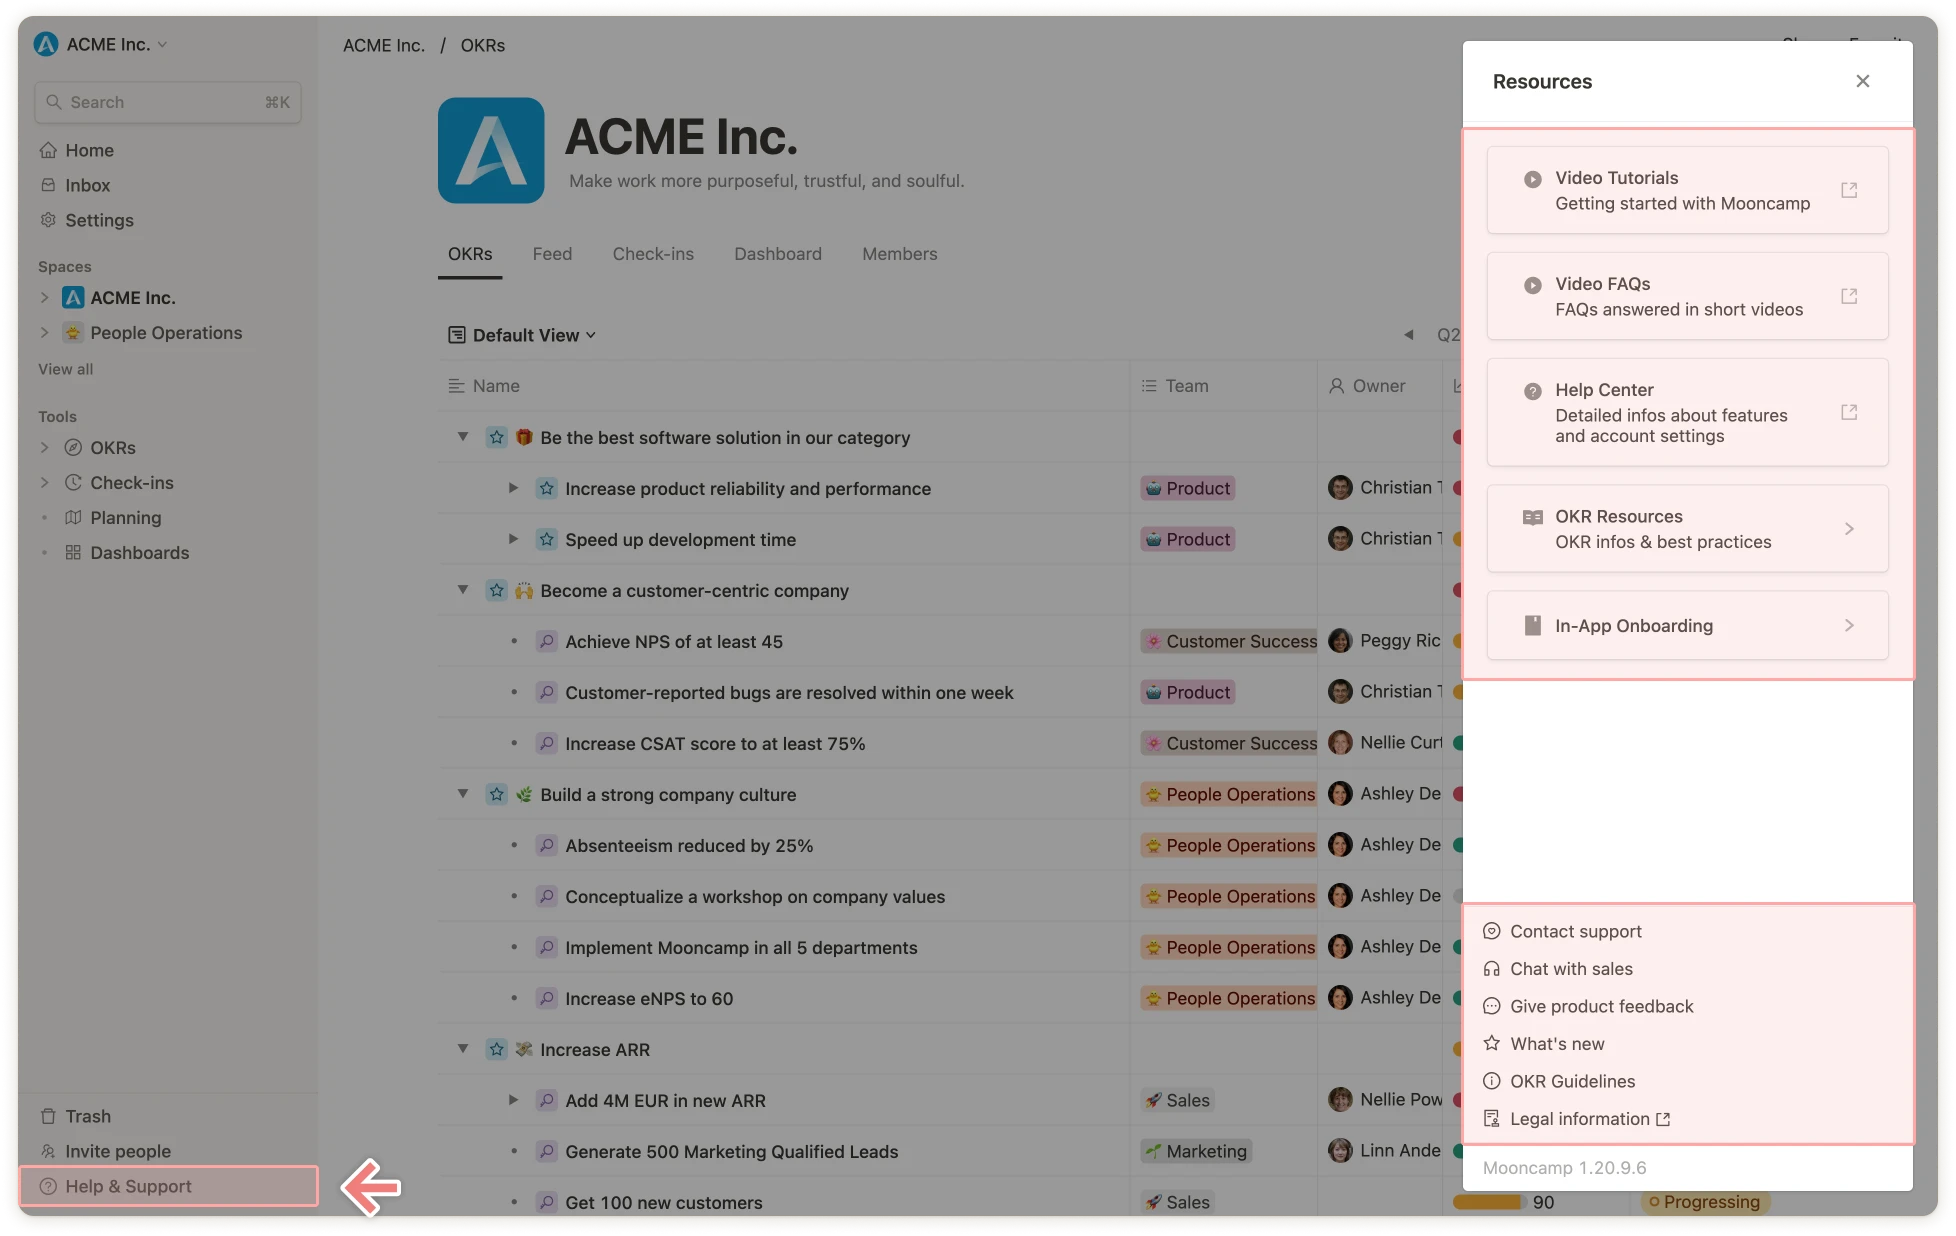 Im unteren Bereich hast du die Möglichkeit, bei technischen Fragen direkt unser Support-Team oder bei Fragen zu unseren Plänen unser Sales-Team zu kontaktieren. Über 'Produktneuheiten' kannst du immer die neuen Funktionen überprüfen, die kürzlich in Mooncamp veröffentlicht wurden.
# Slack-Integration
Source: https://mooncamp.com/docs/de/slack-integration
Lerne, wie du Mooncamp mit deinem Slack verbindest und nutzt
💡 **Hinweis für Administratoren:** Damit Benutzer die Integration nutzen können, muss sie als erster Schritt in den Admin-Einstellungen unter *Einstellungen > Integrationen > Messaging* aktiviert werden.
**Bitte beachte:** In manchen Fällen muss dein Slack-Systemadministrator die App erst freischalten, damit sie in der Suche erscheint. Den offiziellen Link zur Mooncamp-App im *Slack App-Verzeichnis* findest du [**hier**](https://mooncamphq.slack.com/apps/ASJ1XBZBK-mooncamp).
## Installation des Mooncamp-Bots
Um Mooncamp in Slack zu installieren, scrolle in der linken Seitenleiste nach unten zu *Apps*, klicke auf *+App hinzufügen*, suche nach "Mooncamp" und klicke auf *Hinzufügen* unter der Mooncamp-App in der Liste der Suchergebnisse. Du wirst zum Slack App-Verzeichnis weitergeleitet, wo du die App über den grünen *Zu Slack hinzufügen*-Button hinzufügen kannst. Du wirst zur *Mooncamp + Slack*-Infoseite weitergeleitet, wo du mit dem *Zu Slack hinzufügen*-Button den Slack-Bot in deinem Mooncamp-Workspace aktivieren kannst.
Gehe als nächsten Schritt zurück zu Slack und klicke in deiner Seitenleiste auf *Apps > Verwalten > Apps durchsuchen > Mooncamp > Konfiguration*. Du wirst erneut zum Slack App-Verzeichnis weitergeleitet, wo du über den grünen Button *In Slack öffnen* fortfahren kannst. Sobald Mooncamp zu Slack hinzugefügt wurde, führt dich der Bot durch die nächsten Schritte.
Im unteren Bereich hast du die Möglichkeit, bei technischen Fragen direkt unser Support-Team oder bei Fragen zu unseren Plänen unser Sales-Team zu kontaktieren. Über 'Produktneuheiten' kannst du immer die neuen Funktionen überprüfen, die kürzlich in Mooncamp veröffentlicht wurden.
# Slack-Integration
Source: https://mooncamp.com/docs/de/slack-integration
Lerne, wie du Mooncamp mit deinem Slack verbindest und nutzt
💡 **Hinweis für Administratoren:** Damit Benutzer die Integration nutzen können, muss sie als erster Schritt in den Admin-Einstellungen unter *Einstellungen > Integrationen > Messaging* aktiviert werden.
**Bitte beachte:** In manchen Fällen muss dein Slack-Systemadministrator die App erst freischalten, damit sie in der Suche erscheint. Den offiziellen Link zur Mooncamp-App im *Slack App-Verzeichnis* findest du [**hier**](https://mooncamphq.slack.com/apps/ASJ1XBZBK-mooncamp).
## Installation des Mooncamp-Bots
Um Mooncamp in Slack zu installieren, scrolle in der linken Seitenleiste nach unten zu *Apps*, klicke auf *+App hinzufügen*, suche nach "Mooncamp" und klicke auf *Hinzufügen* unter der Mooncamp-App in der Liste der Suchergebnisse. Du wirst zum Slack App-Verzeichnis weitergeleitet, wo du die App über den grünen *Zu Slack hinzufügen*-Button hinzufügen kannst. Du wirst zur *Mooncamp + Slack*-Infoseite weitergeleitet, wo du mit dem *Zu Slack hinzufügen*-Button den Slack-Bot in deinem Mooncamp-Workspace aktivieren kannst.
Gehe als nächsten Schritt zurück zu Slack und klicke in deiner Seitenleiste auf *Apps > Verwalten > Apps durchsuchen > Mooncamp > Konfiguration*. Du wirst erneut zum Slack App-Verzeichnis weitergeleitet, wo du über den grünen Button *In Slack öffnen* fortfahren kannst. Sobald Mooncamp zu Slack hinzugefügt wurde, führt dich der Bot durch die nächsten Schritte.
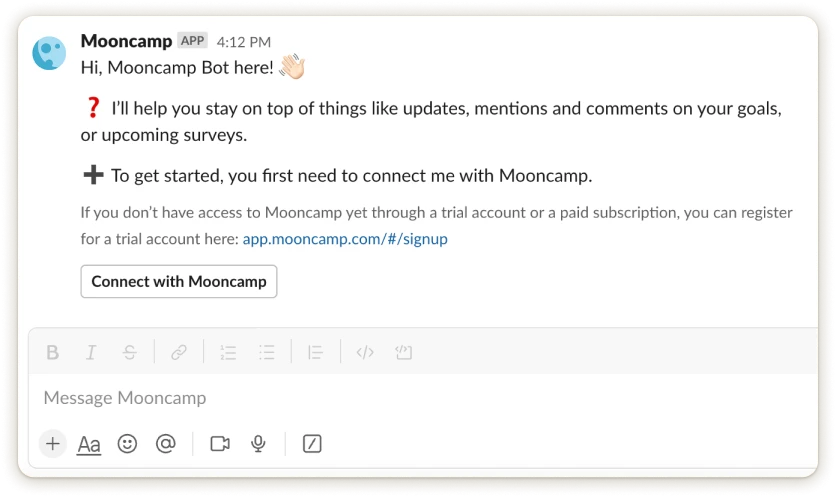 Wenn du auf den "Mit Mooncamp verbinden"-Button klickst, leitet dich der Bot zu deinem Mooncamp-Konto weiter. Der Bot wird dir auch mitteilen, dass die Verbindung erfolgreich hergestellt wurde.
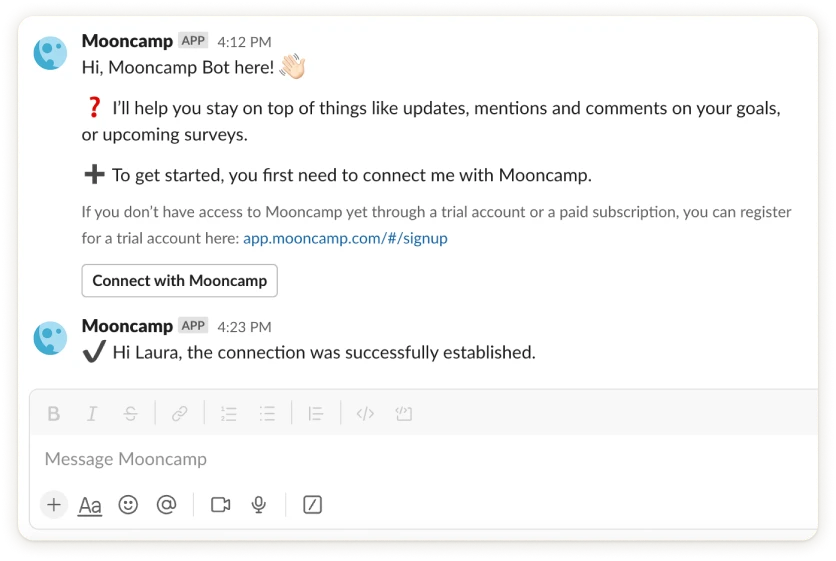 **Fertig! 🎉**
## Mooncamp über Slack nutzen
Sobald dein Mooncamp-Bot verfügbar ist, kannst du mit ihm über Slash-Befehle interagieren. Diese ermöglichen es dir, eine Aktion mit der Mooncamp-App auszuführen, indem du einfach eine Nachricht in Slack sendest. Tippe dazu einen Schrägstrich **`/`** in einer beliebigen Unterhaltung ein, um eine Liste der verfügbaren Slash-Befehle anzuzeigen.
Um deine Ziele in Slack anzuzeigen, gib */mooncamp goals* in einen beliebigen Kanal oder eine Unterhaltung ein und drücke Enter. Der Bot wird dann deine Ziele auflisten. Neben jedem Ziel gibt es einen *Ziel aktualisieren*-Button, mit dem du den Fortschritt deiner Ziele direkt über Slack aktualisieren kannst. Wenn du auf den Button klickst, öffnet sich ein Fenster, in dem du den *Status* und den *Wert* deines Ziels bearbeiten und bei Bedarf einen Kommentar zur Aktualisierung hinzufügen kannst. Schau dir diesen Vorgang in den Video-FAQs unten an. 👇
# SSO-Einrichtung
Source: https://mooncamp.com/docs/de/sso
Ein Überblick darüber, wie du SSO in Mooncamp einrichtest
## SSO erklärt
SSO steht für "Single Sign-On" und ermöglicht dir die Anmeldung mit deinem Microsoft- oder Google-Konto, ohne ein neues Passwort erstellen zu müssen. Bei Mooncamp bieten wir Microsoft- und Google-SSO an. Wir bieten auch [SAML SSO](/de/saml-sso) an (für Anbieter wie Okta).
Deine IT-Administratoren müssen Mooncamp möglicherweise erst als Anbieter genehmigen, bevor du SSO nutzen kannst. Außerdem ist es für die Einrichtung von SSO wichtig, dass die **E-Mail-Adresse** eines Benutzers in Mooncamp dieselbe ist wie bei deinem Anbieter (z.B. Microsoft).
## SSO einrichten
Um SSO in deinem Konto einzurichten, musst du nur sicherstellen, dass es für den entsprechenden Anbieter aktiviert ist. Navigiere dazu zu den Einstellungen und dann zu "Sicherheits- und Identitätseinstellungen". Dort findest du drei Optionen:
* Anmeldung per Passwort erlauben
* Anmeldung über Google erlauben
* Anmeldung über Microsoft erlauben
Aus Sicherheitsgründen empfehlen wir, eine Option zu wählen und die anderen zu deaktivieren. Je nach Struktur deiner Organisation kann es jedoch sinnvoll sein, mehrere Optionen zuzulassen.
Sobald du sichergestellt hast, dass alles korrekt eingerichtet ist, müssen die Benutzer nur noch mit ihrer Microsoft- oder Google-E-Mail-Adresse zu deinem Mooncamp-Konto hinzugefügt werden und können sich dann über SSO anmelden.
**Fertig! 🎉**
## Mooncamp über Slack nutzen
Sobald dein Mooncamp-Bot verfügbar ist, kannst du mit ihm über Slash-Befehle interagieren. Diese ermöglichen es dir, eine Aktion mit der Mooncamp-App auszuführen, indem du einfach eine Nachricht in Slack sendest. Tippe dazu einen Schrägstrich **`/`** in einer beliebigen Unterhaltung ein, um eine Liste der verfügbaren Slash-Befehle anzuzeigen.
Um deine Ziele in Slack anzuzeigen, gib */mooncamp goals* in einen beliebigen Kanal oder eine Unterhaltung ein und drücke Enter. Der Bot wird dann deine Ziele auflisten. Neben jedem Ziel gibt es einen *Ziel aktualisieren*-Button, mit dem du den Fortschritt deiner Ziele direkt über Slack aktualisieren kannst. Wenn du auf den Button klickst, öffnet sich ein Fenster, in dem du den *Status* und den *Wert* deines Ziels bearbeiten und bei Bedarf einen Kommentar zur Aktualisierung hinzufügen kannst. Schau dir diesen Vorgang in den Video-FAQs unten an. 👇
# SSO-Einrichtung
Source: https://mooncamp.com/docs/de/sso
Ein Überblick darüber, wie du SSO in Mooncamp einrichtest
## SSO erklärt
SSO steht für "Single Sign-On" und ermöglicht dir die Anmeldung mit deinem Microsoft- oder Google-Konto, ohne ein neues Passwort erstellen zu müssen. Bei Mooncamp bieten wir Microsoft- und Google-SSO an. Wir bieten auch [SAML SSO](/de/saml-sso) an (für Anbieter wie Okta).
Deine IT-Administratoren müssen Mooncamp möglicherweise erst als Anbieter genehmigen, bevor du SSO nutzen kannst. Außerdem ist es für die Einrichtung von SSO wichtig, dass die **E-Mail-Adresse** eines Benutzers in Mooncamp dieselbe ist wie bei deinem Anbieter (z.B. Microsoft).
## SSO einrichten
Um SSO in deinem Konto einzurichten, musst du nur sicherstellen, dass es für den entsprechenden Anbieter aktiviert ist. Navigiere dazu zu den Einstellungen und dann zu "Sicherheits- und Identitätseinstellungen". Dort findest du drei Optionen:
* Anmeldung per Passwort erlauben
* Anmeldung über Google erlauben
* Anmeldung über Microsoft erlauben
Aus Sicherheitsgründen empfehlen wir, eine Option zu wählen und die anderen zu deaktivieren. Je nach Struktur deiner Organisation kann es jedoch sinnvoll sein, mehrere Optionen zuzulassen.
Sobald du sichergestellt hast, dass alles korrekt eingerichtet ist, müssen die Benutzer nur noch mit ihrer Microsoft- oder Google-E-Mail-Adresse zu deinem Mooncamp-Konto hinzugefügt werden und können sich dann über SSO anmelden.
 # Teamspaces
Source: https://mooncamp.com/docs/de/teamspaces
Ein Überblick über die Teams-Seite in den Einstellungen
## Teamspaces erklärt
In Team Spaces kannst du Teams oder Abteilungen deiner Organisation verwalten. Du kannst neue Teams erstellen und jedem Team eine Farbe, ein Symbol und eine Beschreibung zuweisen. Außerdem kannst du deine Organisationsstruktur abbilden, indem du Teams per Drag & Drop anordnest und bei Bedarf übergeordnete Teams zuweist. Für jedes Team kannst du direkt neue Mitglieder hinzufügen und auch einen Eigentümer bestimmen. Team-Eigentümer haben automatisch das Recht, neue Mitglieder zu ihrem Team hinzuzufügen, ohne dass zusätzliche Admin-Einstellungen erforderlich sind. Falls du Teams umstrukturieren oder zusammenführen musst, Projekte pausieren oder abschließen möchtest, hast du die Möglichkeit, ein Team zu archivieren. Dadurch wird es aus deiner Seitenleiste entfernt, aber alle zugehörigen Ziele und Dashboards bleiben zugänglich. Alternativ gibt es auch die Option, das Team zusammen mit allen seinen Zielen vollständig zu löschen.
## So verwendest du Team Spaces
### Ein Team erstellen
Navigiere als Admin zu *Einstellungen* > *Workspace* > *Teams*. Dort kannst du über den blauen Button *Team erstellen* ein neues Team anlegen, wie im Screenshot unten gezeigt. In dem sich öffnenden Modal kannst du den Namen des Teams eingeben, ein passendes Symbol und eine Farbe hinzufügen sowie bei Bedarf eine Beschreibung verfassen und abschließend auf *Erstellen* klicken. Über *Übergeordnetes Team* kannst du deinem neuen Team aus einer Liste bestehender Teams ein übergeordnetes Team zuweisen. Wenn du später ein übergeordnetes Team erstellen oder hinzufügen möchtest, kannst du dies per Drag & Drop in der Teamübersicht tun.
# Teamspaces
Source: https://mooncamp.com/docs/de/teamspaces
Ein Überblick über die Teams-Seite in den Einstellungen
## Teamspaces erklärt
In Team Spaces kannst du Teams oder Abteilungen deiner Organisation verwalten. Du kannst neue Teams erstellen und jedem Team eine Farbe, ein Symbol und eine Beschreibung zuweisen. Außerdem kannst du deine Organisationsstruktur abbilden, indem du Teams per Drag & Drop anordnest und bei Bedarf übergeordnete Teams zuweist. Für jedes Team kannst du direkt neue Mitglieder hinzufügen und auch einen Eigentümer bestimmen. Team-Eigentümer haben automatisch das Recht, neue Mitglieder zu ihrem Team hinzuzufügen, ohne dass zusätzliche Admin-Einstellungen erforderlich sind. Falls du Teams umstrukturieren oder zusammenführen musst, Projekte pausieren oder abschließen möchtest, hast du die Möglichkeit, ein Team zu archivieren. Dadurch wird es aus deiner Seitenleiste entfernt, aber alle zugehörigen Ziele und Dashboards bleiben zugänglich. Alternativ gibt es auch die Option, das Team zusammen mit allen seinen Zielen vollständig zu löschen.
## So verwendest du Team Spaces
### Ein Team erstellen
Navigiere als Admin zu *Einstellungen* > *Workspace* > *Teams*. Dort kannst du über den blauen Button *Team erstellen* ein neues Team anlegen, wie im Screenshot unten gezeigt. In dem sich öffnenden Modal kannst du den Namen des Teams eingeben, ein passendes Symbol und eine Farbe hinzufügen sowie bei Bedarf eine Beschreibung verfassen und abschließend auf *Erstellen* klicken. Über *Übergeordnetes Team* kannst du deinem neuen Team aus einer Liste bestehender Teams ein übergeordnetes Team zuweisen. Wenn du später ein übergeordnetes Team erstellen oder hinzufügen möchtest, kannst du dies per Drag & Drop in der Teamübersicht tun.
 ### Teamübersicht
Als Admin kannst du über *Einstellungen* > *Workspace* > *Teams* auf die Teamübersicht zugreifen (siehe Screenshot oben). Neben dem Seitentitel findest du in Klammern die aktuelle Anzahl aktiver Teams. Darunter befinden sich vier Tabs, die deine aktiven Teams von archivierten Teams und von Teams trennen, denen du als Mitglied zugewiesen bist. Unter *Alle* findest du eine Liste aller aktiven und archivierten Teams. In allen Tabs siehst du den Namen der Teams, die Anzahl der Mitglieder, den Eigentümer sowie den Status. Der Tag *Beigetreten* zeigt dir, dass du Mitglied eines Teams bist. Du hast auch eine Suchfunktion über das Suchsymbol direkt neben dem blauen Button *Team erstellen*.
### Ein Team bearbeiten und Teammitglieder hinzufügen
Wenn du in der Teamübersicht auf ein Team klickst, öffnet sich ein Team-Einstellungen-Modal. Auf dem Tab *Allgemein* kannst du alle ursprünglichen Einstellungen wie Name, Symbol, Farbe, Beschreibung und übergeordnetes Team bearbeiten. Außerdem hast du die Möglichkeit, ein Team zu archivieren oder zu löschen.
Auf dem Tab *Mitglieder* findest du eine Liste aller Teammitglieder und ihrer Rolle als Mitglied oder Eigentümer, einschließlich einer Suchfunktion in der oberen rechten Ecke der Liste. Über *Mitglieder hinzufügen* kannst du ein neues Mitglied zum Team hinzufügen. Eine Person kann Mitglied in einem oder mehreren Teams sein. Durch Klicken auf die Rolle einer Person kannst du über *Entfernen* ein Mitglied aus dem Team entfernen. Hier kannst du auch den Status eines Teammitglieds von *Mitglied* zu *Eigentümer* oder umgekehrt ändern.
In der Teamübersicht erscheint bei Rechtsklick auf ein Team ein Menü. Hier kannst du entweder das Team archivieren oder löschen, ein Unterteam erstellen oder direkt über *Team öffnen* zu den Zielen des Teams navigieren. Wenn du mit der Maus über ein Team fährst, erscheint ein Symbol neben dem Teamnamen. Über dieses Symbol findest du die gleichen Funktionen. Außerdem kannst du das Symbol verwenden, um das Team per Drag & Drop an eine andere Position in der Übersicht zu verschieben.
### Teams anordnen und ausrichten
In der Teamübersicht kannst du deine Teams einfach anordnen und ausrichten. Fahre dazu mit der Maus über das Team, das du verschieben möchtest, und verwende das Symbol, das links neben dem Team erscheint, zum Drag & Drop. Du kannst ein Team an jede Position in der Liste verschieben und es außerdem in andere Teams ablegen, um es zu einem Unterteam eines bestehenden Teams zu machen. Auf diese Weise kannst du deine Organisationsstruktur einfach darstellen und neu ordnen.
### Einen Team-Eigentümer zuweisen und Eigentumsrechte
Um einem Team einen Eigentümer zuzuweisen, klicke in der Teamübersicht auf ein Team, wähle den Tab *Mitglieder* und klicke auf *Mitglied hinzufügen*, um die Person hinzuzufügen, die Eigentümer werden soll. Wenn diese Person bereits Teammitglied ist, kannst du diesen Schritt überspringen. Du kannst direkt auf das Dropdown-Menü *Rolle* neben dem Mitglied klicken und die Rollenoption *Eigentümer* wählen. Mit dieser Rolle hat das Mitglied nun das Recht, neue Mitglieder zu seinem Team hinzuzufügen, ohne dass zusätzliche Administratorrechte erforderlich sind. Besonders für größere Organisationen kann dies die Administration deutlich erleichtern. Bitte beachte, dass neue Teammitglieder nur aus der bestehenden Nutzerbasis des Organisationskontos hinzugefügt werden können. Ein Team-Eigentümer hat nicht das Recht, neue Benutzer zum Konto hinzuzufügen.
💡 **Tipp:** Die Team-Einstellungen sind auch **direkt über die Seitenleiste oder die obere Navigation der Zielseite eines Teams zugänglich**. Wenn du mit der Maus über ein Team in der Seitenleiste fährst, kannst du über die Ellipse (...) zum Team-Einstellungen-Modal gelangen. Wenn du **in der oberen Navigation einer Teamseite auf das Team klickst**, findest du grundlegende Informationen wie die Anzahl der Mitglieder sowie eine **Ellipse (...), die das Team-Einstellungen-Modal** direkt auf der Seite öffnet, auf der du dich gerade befindest.
### Teams archivieren, wiederherstellen und löschen
Falls du Teams umstrukturieren oder zusammenführen musst, Projekte pausieren oder abschließen möchtest, hast du die Möglichkeit, Teams zu archivieren oder zu löschen. Wenn du in der Übersicht auf ein Team klickst, findest du unter *Aktionen* die Option *Team archivieren*. Diese Option entfernt ein Team aus deiner Seitenleiste, aber alle zugehörigen Ziele und Dashboards bleiben zugänglich. Nach der Archivierung hast du die Möglichkeit, das Team über den Tab *Archiviert* und einen Rechtsklick auf das wiederherzustellende Team zu reaktivieren. Mit der zweiten Option, *Team löschen*, wird das Team vollständig gelöscht, einschließlich aller seiner Ziele. Um ein Team vollständig zu löschen, kannst du auch eine Abkürzung über einen Rechtsklick auf ein Team in der Teamübersicht verwenden.
# Wie du ein Ziel aktualisierst
Source: https://mooncamp.com/docs/de/updating-goals
Verschiedene Möglichkeiten, Ziele zu aktualisieren
Du kannst den Fortschritt deiner Ziele direkt in Mooncamp oder über unsere Slack- oder Microsoft Teams-Integration aktualisieren.
### Fortschritt von Zielen in Mooncamp aktualisieren
Es gibt mehrere Möglichkeiten, Ziele zu aktualisieren.
**1. Direkt aus der Kaskadenansicht**
### Teamübersicht
Als Admin kannst du über *Einstellungen* > *Workspace* > *Teams* auf die Teamübersicht zugreifen (siehe Screenshot oben). Neben dem Seitentitel findest du in Klammern die aktuelle Anzahl aktiver Teams. Darunter befinden sich vier Tabs, die deine aktiven Teams von archivierten Teams und von Teams trennen, denen du als Mitglied zugewiesen bist. Unter *Alle* findest du eine Liste aller aktiven und archivierten Teams. In allen Tabs siehst du den Namen der Teams, die Anzahl der Mitglieder, den Eigentümer sowie den Status. Der Tag *Beigetreten* zeigt dir, dass du Mitglied eines Teams bist. Du hast auch eine Suchfunktion über das Suchsymbol direkt neben dem blauen Button *Team erstellen*.
### Ein Team bearbeiten und Teammitglieder hinzufügen
Wenn du in der Teamübersicht auf ein Team klickst, öffnet sich ein Team-Einstellungen-Modal. Auf dem Tab *Allgemein* kannst du alle ursprünglichen Einstellungen wie Name, Symbol, Farbe, Beschreibung und übergeordnetes Team bearbeiten. Außerdem hast du die Möglichkeit, ein Team zu archivieren oder zu löschen.
Auf dem Tab *Mitglieder* findest du eine Liste aller Teammitglieder und ihrer Rolle als Mitglied oder Eigentümer, einschließlich einer Suchfunktion in der oberen rechten Ecke der Liste. Über *Mitglieder hinzufügen* kannst du ein neues Mitglied zum Team hinzufügen. Eine Person kann Mitglied in einem oder mehreren Teams sein. Durch Klicken auf die Rolle einer Person kannst du über *Entfernen* ein Mitglied aus dem Team entfernen. Hier kannst du auch den Status eines Teammitglieds von *Mitglied* zu *Eigentümer* oder umgekehrt ändern.
In der Teamübersicht erscheint bei Rechtsklick auf ein Team ein Menü. Hier kannst du entweder das Team archivieren oder löschen, ein Unterteam erstellen oder direkt über *Team öffnen* zu den Zielen des Teams navigieren. Wenn du mit der Maus über ein Team fährst, erscheint ein Symbol neben dem Teamnamen. Über dieses Symbol findest du die gleichen Funktionen. Außerdem kannst du das Symbol verwenden, um das Team per Drag & Drop an eine andere Position in der Übersicht zu verschieben.
### Teams anordnen und ausrichten
In der Teamübersicht kannst du deine Teams einfach anordnen und ausrichten. Fahre dazu mit der Maus über das Team, das du verschieben möchtest, und verwende das Symbol, das links neben dem Team erscheint, zum Drag & Drop. Du kannst ein Team an jede Position in der Liste verschieben und es außerdem in andere Teams ablegen, um es zu einem Unterteam eines bestehenden Teams zu machen. Auf diese Weise kannst du deine Organisationsstruktur einfach darstellen und neu ordnen.
### Einen Team-Eigentümer zuweisen und Eigentumsrechte
Um einem Team einen Eigentümer zuzuweisen, klicke in der Teamübersicht auf ein Team, wähle den Tab *Mitglieder* und klicke auf *Mitglied hinzufügen*, um die Person hinzuzufügen, die Eigentümer werden soll. Wenn diese Person bereits Teammitglied ist, kannst du diesen Schritt überspringen. Du kannst direkt auf das Dropdown-Menü *Rolle* neben dem Mitglied klicken und die Rollenoption *Eigentümer* wählen. Mit dieser Rolle hat das Mitglied nun das Recht, neue Mitglieder zu seinem Team hinzuzufügen, ohne dass zusätzliche Administratorrechte erforderlich sind. Besonders für größere Organisationen kann dies die Administration deutlich erleichtern. Bitte beachte, dass neue Teammitglieder nur aus der bestehenden Nutzerbasis des Organisationskontos hinzugefügt werden können. Ein Team-Eigentümer hat nicht das Recht, neue Benutzer zum Konto hinzuzufügen.
💡 **Tipp:** Die Team-Einstellungen sind auch **direkt über die Seitenleiste oder die obere Navigation der Zielseite eines Teams zugänglich**. Wenn du mit der Maus über ein Team in der Seitenleiste fährst, kannst du über die Ellipse (...) zum Team-Einstellungen-Modal gelangen. Wenn du **in der oberen Navigation einer Teamseite auf das Team klickst**, findest du grundlegende Informationen wie die Anzahl der Mitglieder sowie eine **Ellipse (...), die das Team-Einstellungen-Modal** direkt auf der Seite öffnet, auf der du dich gerade befindest.
### Teams archivieren, wiederherstellen und löschen
Falls du Teams umstrukturieren oder zusammenführen musst, Projekte pausieren oder abschließen möchtest, hast du die Möglichkeit, Teams zu archivieren oder zu löschen. Wenn du in der Übersicht auf ein Team klickst, findest du unter *Aktionen* die Option *Team archivieren*. Diese Option entfernt ein Team aus deiner Seitenleiste, aber alle zugehörigen Ziele und Dashboards bleiben zugänglich. Nach der Archivierung hast du die Möglichkeit, das Team über den Tab *Archiviert* und einen Rechtsklick auf das wiederherzustellende Team zu reaktivieren. Mit der zweiten Option, *Team löschen*, wird das Team vollständig gelöscht, einschließlich aller seiner Ziele. Um ein Team vollständig zu löschen, kannst du auch eine Abkürzung über einen Rechtsklick auf ein Team in der Teamübersicht verwenden.
# Wie du ein Ziel aktualisierst
Source: https://mooncamp.com/docs/de/updating-goals
Verschiedene Möglichkeiten, Ziele zu aktualisieren
Du kannst den Fortschritt deiner Ziele direkt in Mooncamp oder über unsere Slack- oder Microsoft Teams-Integration aktualisieren.
### Fortschritt von Zielen in Mooncamp aktualisieren
Es gibt mehrere Möglichkeiten, Ziele zu aktualisieren.
**1. Direkt aus der Kaskadenansicht**
 **2. Fortschrittsbalken auf der Detailansicht des Ziels**
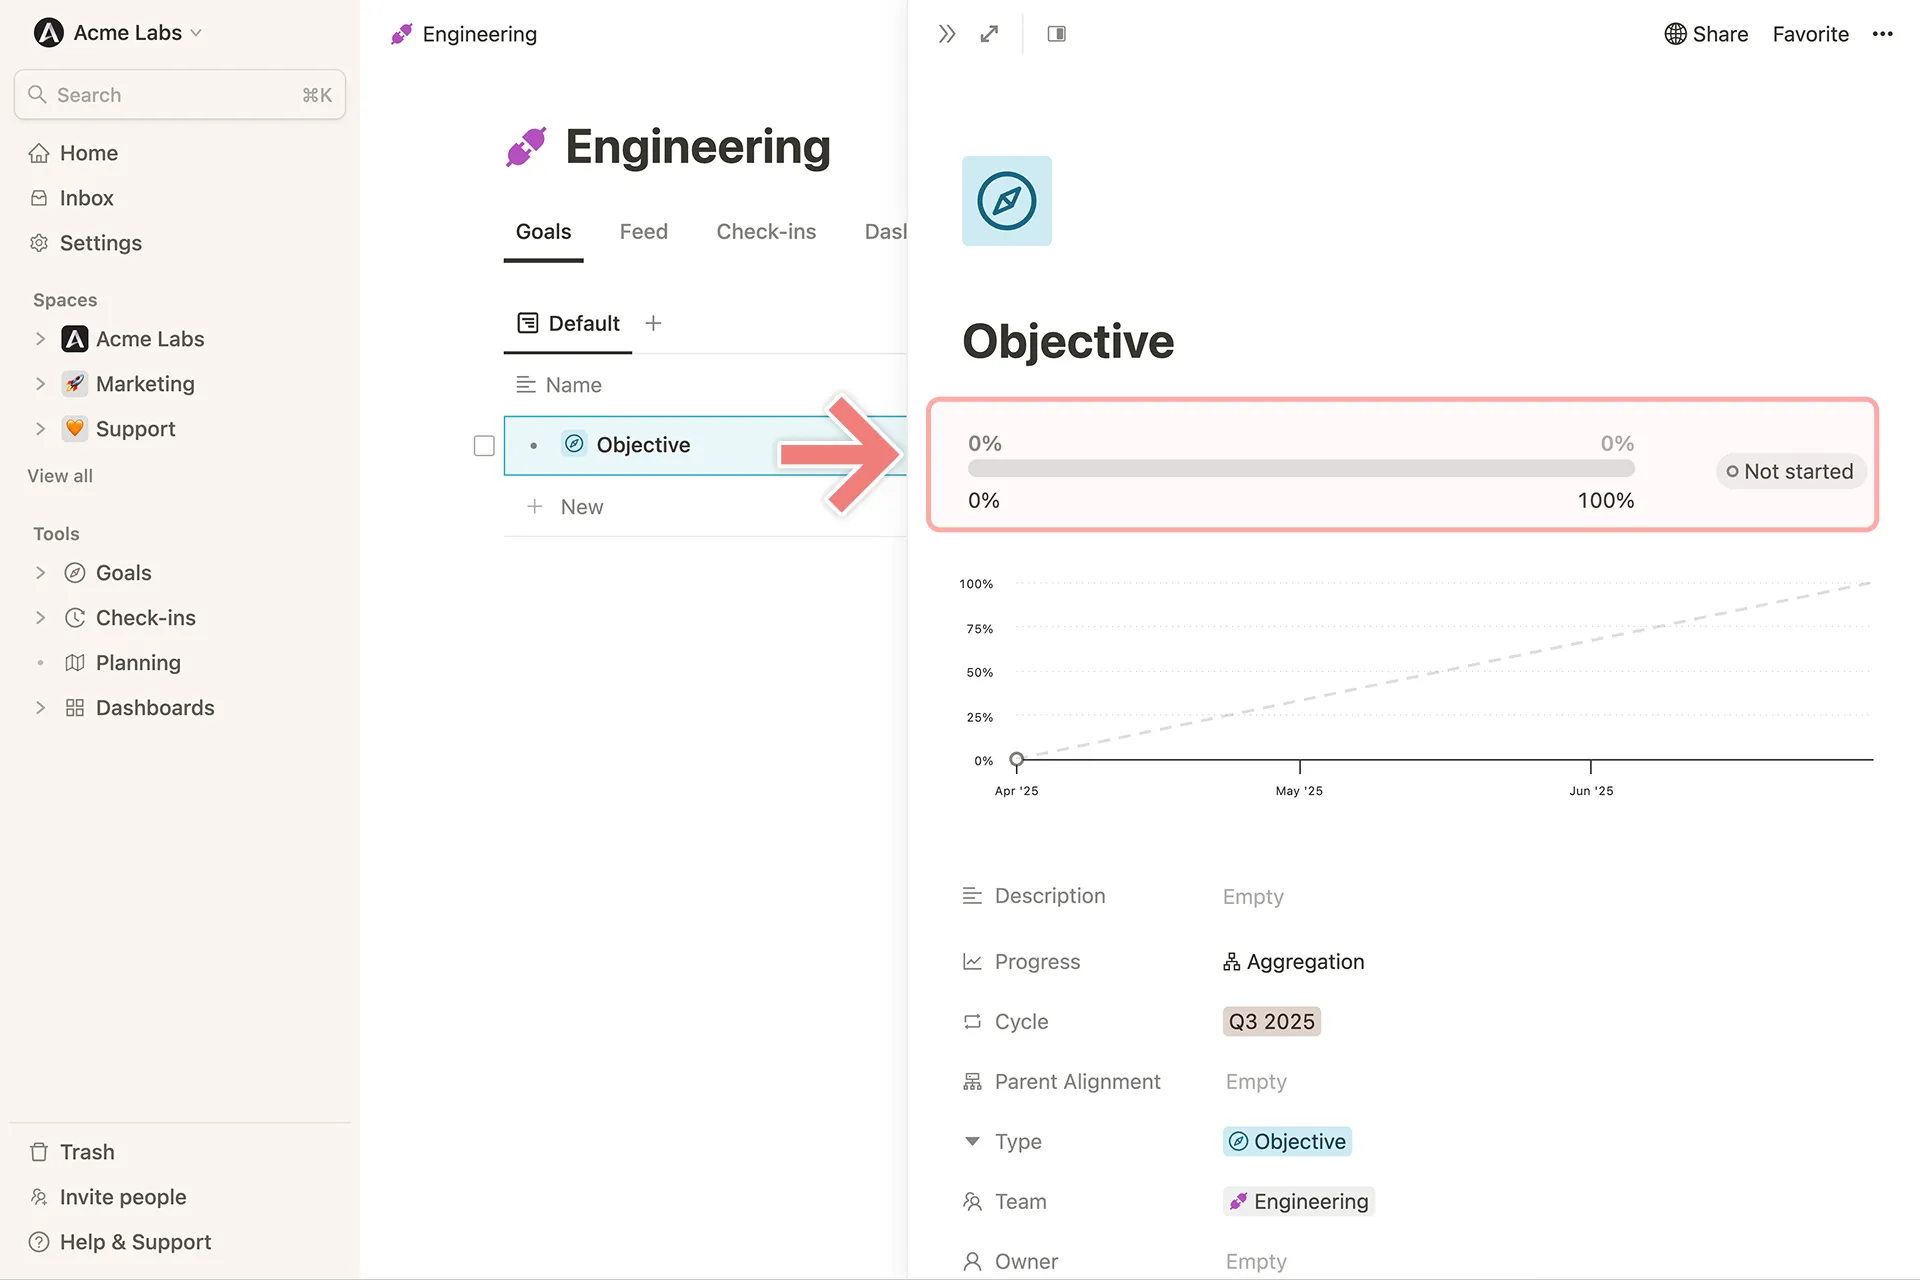 **3. Auf einem Check-In**
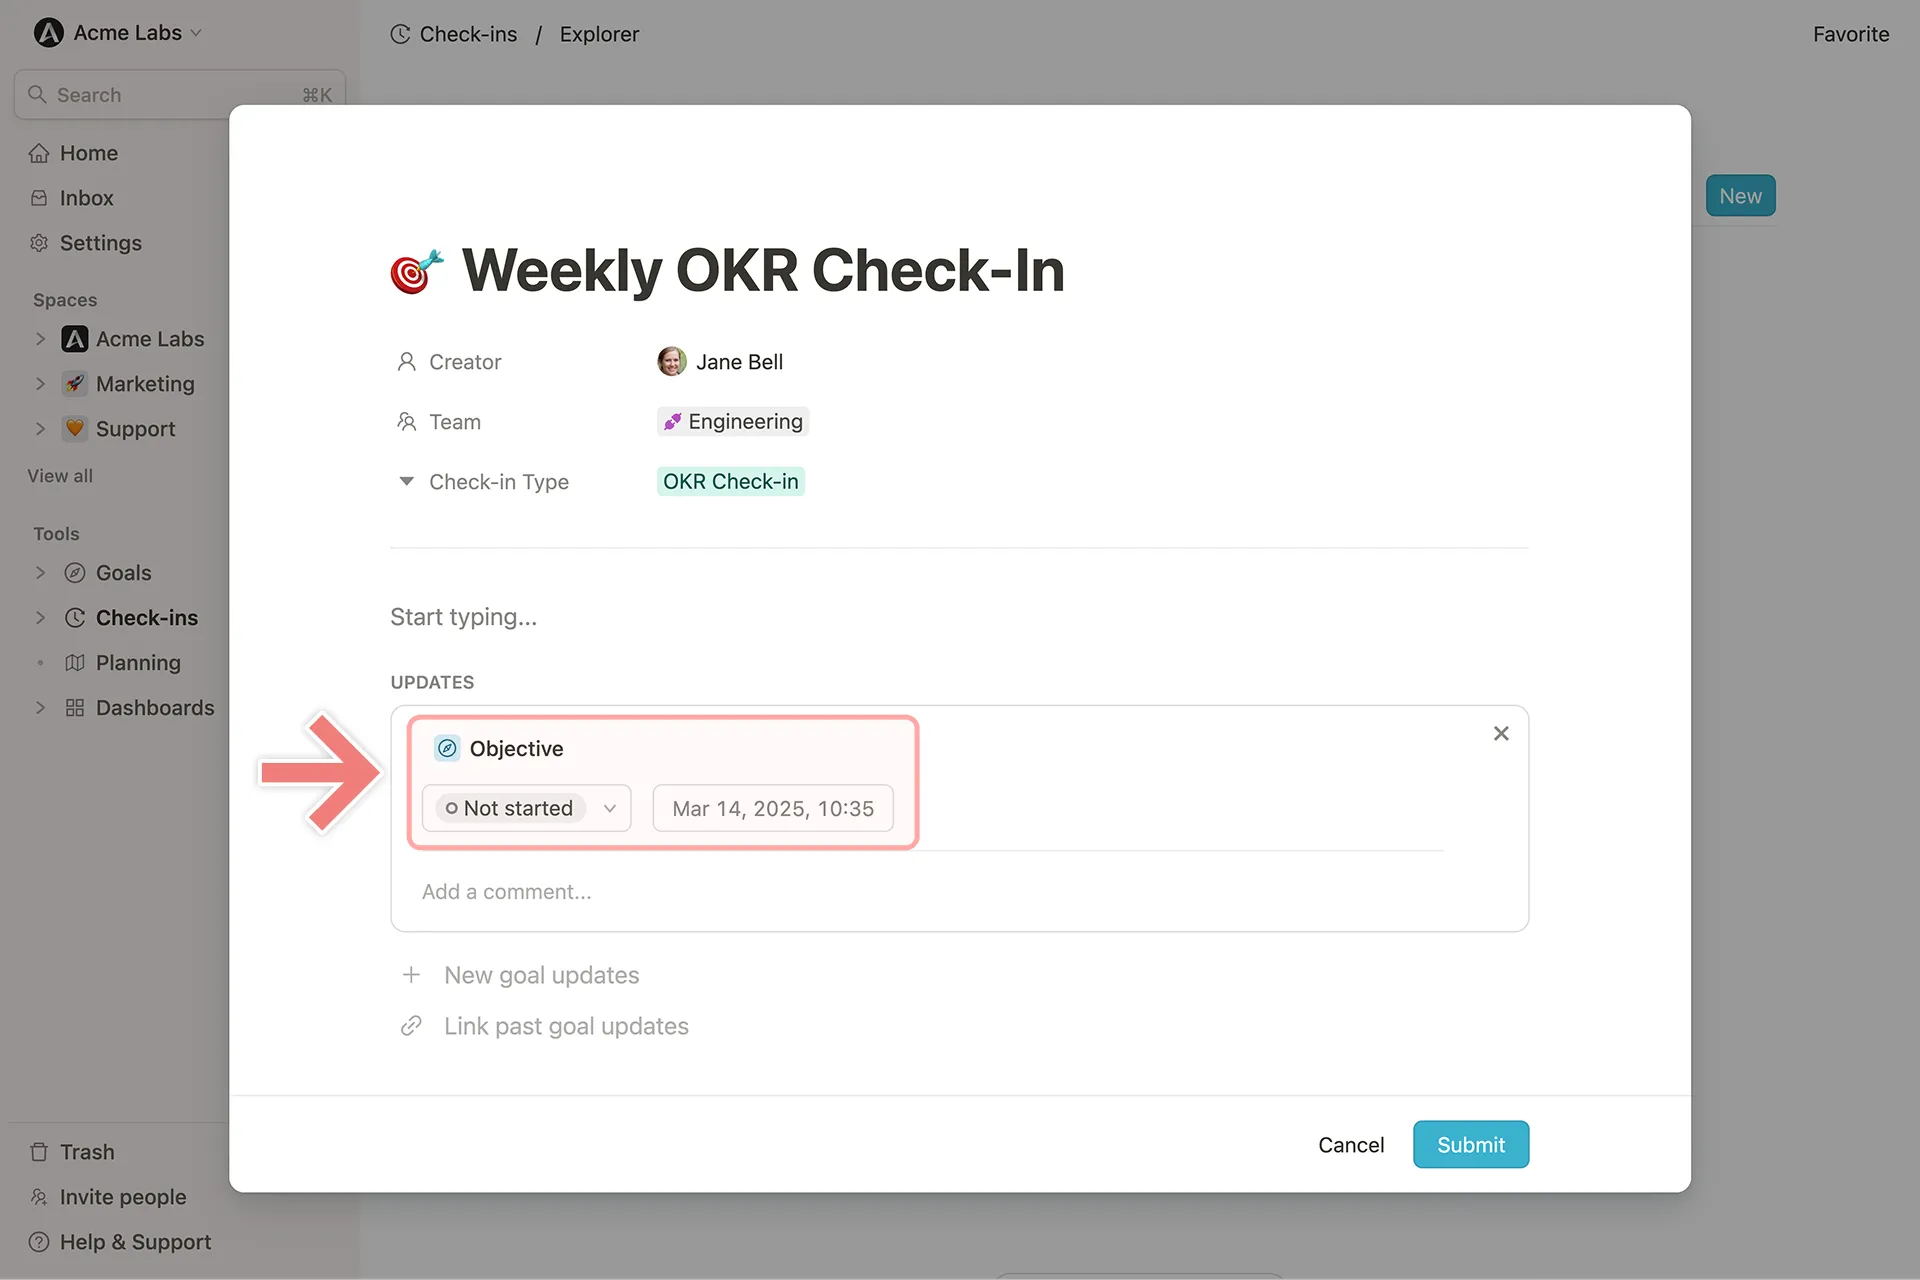 ### Fortschritt von Zielen in Microsoft Teams aktualisieren
Wenn du die Microsoft Teams-Integration aktiviert hast, kannst du Ziele auf die gleiche Weise wie oben beschrieben aktualisieren.
Zusätzlich kannst du im **Mooncamp Chatbot** den Befehl `goals` eingeben, um alle dir zugewiesenen Ziele anzuzeigen und sie direkt im Chat zu aktualisieren.
### Fortschritt von Zielen in Slack aktualisieren
Wenn du die Slack-Integration aktiviert hast, kannst du auf deine Ziele im Mooncamp Slack-Bot zugreifen und sie mit dem Befehl `/mooncamp goals` aktualisieren.
# Ansichten
Source: https://mooncamp.com/docs/de/views
Ein Überblick über Ansichten für Ziele, Check-ins und Dashboards
Mit Ansichten kannst du deine **Ziele**, **Check-ins** oder **Dashboards** nach bestimmten Kriterien oder Eigenschaften filtern und die Ergebnisse in einer sogenannten Ansicht speichern. Du kannst private Ansichten auf deiner persönlichen Startseite oder, wenn du dazu berechtigt bist, eine öffentliche Ansicht in deinen Team-Bereichen erstellen.
Derzeit kannst du diese Arten von Ansichten für **Ziel-Datenbanken** erstellen:
* Kaskade (verschachtelte Tabelle)
* Liste
* Baumansicht
* Netzwerk
Für **Check-in-Datenbanken** kannst du diese Arten von Ansichten erstellen:
* Feed
* Liste
Auf **Dashboards** kannst du nur Dashboard-Ansichten hinzufügen.
Jeder Ansichtstyp bietet einzigartige Vorteile für verschiedene Anwendungsfälle. Hier sind einige Beispiele, was du mit Ansichten machen kannst:
* Filtern nach bestimmten nicht auf Kurs liegenden Zielen, an denen du beteiligt bist
* Wichtige strategische Initiativen und deren Status im Auge behalten
* Regelmäßige Überprüfung der Ziele bestimmter Teams oder Teammitglieder
Außerdem ist es möglich, eine Ansicht zum Bereich '**Favoriten**' in deiner Seitenleiste hinzuzufügen oder ausgewählte Ansichten als [CSV](/de/exporting-goals-as-csv) oder als [öffentlichen Link](/de/public-links) zu exportieren.
## Wie du Ansichten verwendest
Falls du nicht lesen möchtest, haben wir ein Video-Tutorial für dich aufgenommen. Es bietet einen allgemeinen Überblick über Ansichten in Mooncamp.
## Wo kannst du Ansichten erstellen?
Du kannst Ansichten an folgenden Stellen erstellen:
* Startseite (Ansichten sind privat für dich)
* Team-Bereiche
* Ziel-Explorer
* Check-in-Explorer
* Dashboards
* Fortschritts-Dashboard
* Status-Dashboard
* Benutzerdefinierte Dashboards (auf Kacheln)
## Berechtigungen für Ansichten
Ansichten im Ziel-Explorer sind für alle Benutzer in deiner Organisation sichtbar. Ansichten in Team-Bereichen sind für alle Benutzer sichtbar, die mindestens Leserechte für den Team-Bereich haben. In jedem Bereich, in dem Ansichten erstellt werden können, sind sie für alle zugänglich. Im **Ziel-Explorer** kann jede Ansicht über die Ellipse `...` in der oberen rechten Ecke als [öffentlicher Link](/de/public-links) veröffentlicht (und wieder zurückgezogen) werden (nur im `Enterprise`-Plan verfügbar).
**Bitte beachte:** Standardmäßig können nur Administratoren Ansichten erstellen. Zusätzlich kann der Administrator Zugriffsgruppen das Recht dazu über `Einstellungen > Zugriffsgruppen > Kontoverwaltung > Verwaltung öffentlicher Ansichten` gewähren.
## Wie kannst du eine Ansicht erstellen und bearbeiten?
### Ansicht erstellen
Um eine Ansicht zu erstellen, klicke auf das `+` in der Datenbank-Kopfzeile, gib deiner Ansicht einen Namen und wähle einen Ansichtstyp.
Jetzt kannst du deine Ansicht anpassen, z.B. durch:
* Hinzufügen von Filtern
* Hinzufügen von Sortieroptionen
* Ein- oder Ausblenden von Eigenschaften
* Neuanordnen von Spalten
* Umbrechen von Zellen
* etc.
### Ansicht bearbeiten und löschen
Sobald du eine neue Ansicht hinzugefügt hast, kannst du ihren Namen, Symbol und Typ bearbeiten, indem du erneut auf ihren Namen klickst. Hier kannst du die Ansicht bei Bedarf auch löschen.
## Ansichten für Ziel-Datenbanken
Ansichten für Ziele können auf deiner [Startseite](/de/homepage), in [Team-Bereichen](/de/teamspaces) und im [Ziel-Explorer](/de/goal-explorer) erstellt werden. Auf deiner **Startseite** sind Ziele bereits vorgefiltert, um alle Ziele anzuzeigen, die mit deinem Benutzerkonto verbunden sind. In einem **Team-Bereich** sind Ziele vorgefiltert, um nur die Ziele des jeweiligen Teams anzuzeigen.
Im Ziel-Explorer kannst du **jede Zielansicht** als **CSV** exportieren, einschließlich Daten wie Titel, Ersteller, letzte Aktualisierung, aktueller Wert, Status und alle zugehörigen Eigenschaften (ausgenommen Aktualisierungsverlauf oder Kommentare). Details zum CSV-Export findest du in [diesem Artikel](/de/exporting-goals-as-csv). Zusätzlich kann jede öffentliche Ansicht als **öffentlicher Link** exportiert werden, der für Nicht-Benutzer zugänglich ist. Details zu öffentlichen Links findest du in [diesem Artikel](/de/public-links).
Abgesehen davon funktionieren Ansichten für Ziele überall gleich.
### Ziel-Ansichtstypen
Zeigt Ziele in einer verschachtelten Tabelle an, um die Hierarchie der Ziele auf verschiedenen Ebenen darzustellen.
Zeigt alle Ziele in einer einfachen flachen Liste an.
Bietet eine visuelle Darstellung von Zielen und OKRs und zeigt strategische Säulen und Initiativen in einer hierarchischen Ansicht.
Zeigt Ziele in einer Netzwerkansicht an und visualisiert die Beziehungen zwischen Zielen und deren Ausrichtungen.
## Ansichten für Check-ins
Ansichten für Check-ins können im Check-in-Explorer erstellt werden. Hier hast du zwei Ansichtstypen:
Der Feed zeigt grundsätzlich die gleichen Informationen wie eine Liste, stellt jedoch jeden Check-in in Form einer Karte dar. Dadurch ist es möglich, den Inhalt eines Check-ins anzuzeigen, wie zum Beispiel Freitext-Antworten auf Vorlagenfragen und Zielaktualisierungen. Diese Ansicht ist ideal, wenn du den Inhalt direkt durchsehen möchtest, und es ist sogar möglich, mit einem Emoji für Lob oder einem Kommentar für Fragen oder Diskussionen zu reagieren.
Zeigt alle Check-ins in einer einfachen flachen Liste an. Du kannst wählen, ob Eigenschaften wie Team, Ersteller, Erstellungsdatum oder Vorlagentitel angezeigt werden sollen.
### Check-in-Ansichtseinstellungen
In der oberen rechten Ecke deiner Check-in-Ansicht findest du verschiedene Einstellungen, darunter Optionen zum Filtern, Sortieren oder Anzeigen von Check-ins und deren Eigenschaften für deine Ansichten. Du kannst nach Team, Erstellungsdatum und Ersteller eines Check-ins filtern, und wie überall können Filter über UND und ODER kombiniert werden. Die Sortierung ist aufsteigend oder absteigend nach dem Erstellungsdatum möglich. Zu den bearbeitbaren Anzeigeoptionen gehören das Team eines Check-ins und der Titel der verwendeten Vorlage.
## Ansichten für Dashboards
Ansichten können für das [Fortschritts-Dashboard](/de/progress-dashboard) und das [Status-Dashboard](/de/health-dashboard) mit den gleichen Einstellungsoptionen für beide Dashboard-Typen erstellt werden. Für das [Fortschritts-Dashboard](/de/progress-dashboard) gibt es eine zusätzliche `Vergleichen mit`-Funktion, die dir die Möglichkeit gibt, deine aktuellen Daten mit der Vergangenheit zu vergleichen.
In einem [**Benutzerdefinierten Dashboard**](/de/dashboards) ist es möglich, Kacheln zu erstellen, die verschiedene Daten anzeigen. Für jede Kachel vom Typ Liste (Ziele, Check-ins, Update-Feed, Mitglieder) ist es möglich, eine Ansicht mit unterschiedlichen Filter-, Sortier- und Anzeigeeinstellungen zu erstellen.
## Ansichten als Favoriten in der Seitenleiste anheften
Ansichten können als Favorit gespeichert und so der Seitenleiste direkt über deinen Team-Bereichen hinzugefügt werden.
## Ansichten und Zyklen
Standardmäßig wird der aktuell ausgewählte Zyklus global auf jede Ansicht angewendet. Du kannst jedoch einen Zyklus innerhalb einer Ansicht sperren, um sicherzustellen, dass Benutzer genau die Daten sehen, die du ihnen zeigen möchtest, sei es in Zieltabellen oder Dashboards. Wenn kein Zyklus gesperrt ist, wird automatisch der aktuell ausgewählte Zyklus für jeden Benutzer angewendet.
Mehr über Zyklen erfährst du in [diesem Artikel](/de/cycles).
# Workspace settings
Source: https://mooncamp.com/docs/de/workspace-settings
Edit the name and logo of your workspace
Under *Settings > General* you can change the name of your organization and upload a logo. The infromation added here will then always be displayed in the top left of your sidebar.
Further below, there is an invite link that can be used to collectively invite existing users to Mooncamp. They can easily register using the link; an important requirement for this is that the users have already been created under *Settings > Members*.
# How to Delete a Goal
Source: https://mooncamp.com/docs/deleting-goals
Different ways to delete goals
There are two ways to delete goals:
* Delete a goal from the Goals Cascade view
* Delete a goal from the detail view of a goal
## Delete a goal from the Goals Cascade View
You can right-click on a goal on the cascade view to delete it. If you want to delete several goals at once, you can click and hold and drag to select all the goals you want to delete, and then right-click again to bring up the menu to delete the goals.
## Delete a goal from the Detail View of a Goal
On the detail view of a goal you can click on the ellipsis icon in the upper right corner and delete the goal from there.
## Restoring goals from the trash
In case you have accidentally deleted one or several goals, you can easily get these back via the trash button on the sidebar. When you navigate to the trash bin, a modal opens and shows all recently deleted goals including a deletion date and time stamp. Next to each goal you find two buttons, one to restore the item, one to delete it permanently. Via the search bar you can also search for specific goals that might have been deleted longer ago. A goal can be restored or permanently deleted by every user who had edit access rights to the goal, irrespective of who has deleted it.
# Getting Started Guide for Employees
Source: https://mooncamp.com/docs/employees-introduction
Learn how to get started with Mooncamp as an employee
### Fortschritt von Zielen in Microsoft Teams aktualisieren
Wenn du die Microsoft Teams-Integration aktiviert hast, kannst du Ziele auf die gleiche Weise wie oben beschrieben aktualisieren.
Zusätzlich kannst du im **Mooncamp Chatbot** den Befehl `goals` eingeben, um alle dir zugewiesenen Ziele anzuzeigen und sie direkt im Chat zu aktualisieren.
### Fortschritt von Zielen in Slack aktualisieren
Wenn du die Slack-Integration aktiviert hast, kannst du auf deine Ziele im Mooncamp Slack-Bot zugreifen und sie mit dem Befehl `/mooncamp goals` aktualisieren.
# Ansichten
Source: https://mooncamp.com/docs/de/views
Ein Überblick über Ansichten für Ziele, Check-ins und Dashboards
Mit Ansichten kannst du deine **Ziele**, **Check-ins** oder **Dashboards** nach bestimmten Kriterien oder Eigenschaften filtern und die Ergebnisse in einer sogenannten Ansicht speichern. Du kannst private Ansichten auf deiner persönlichen Startseite oder, wenn du dazu berechtigt bist, eine öffentliche Ansicht in deinen Team-Bereichen erstellen.
Derzeit kannst du diese Arten von Ansichten für **Ziel-Datenbanken** erstellen:
* Kaskade (verschachtelte Tabelle)
* Liste
* Baumansicht
* Netzwerk
Für **Check-in-Datenbanken** kannst du diese Arten von Ansichten erstellen:
* Feed
* Liste
Auf **Dashboards** kannst du nur Dashboard-Ansichten hinzufügen.
Jeder Ansichtstyp bietet einzigartige Vorteile für verschiedene Anwendungsfälle. Hier sind einige Beispiele, was du mit Ansichten machen kannst:
* Filtern nach bestimmten nicht auf Kurs liegenden Zielen, an denen du beteiligt bist
* Wichtige strategische Initiativen und deren Status im Auge behalten
* Regelmäßige Überprüfung der Ziele bestimmter Teams oder Teammitglieder
Außerdem ist es möglich, eine Ansicht zum Bereich '**Favoriten**' in deiner Seitenleiste hinzuzufügen oder ausgewählte Ansichten als [CSV](/de/exporting-goals-as-csv) oder als [öffentlichen Link](/de/public-links) zu exportieren.
## Wie du Ansichten verwendest
Falls du nicht lesen möchtest, haben wir ein Video-Tutorial für dich aufgenommen. Es bietet einen allgemeinen Überblick über Ansichten in Mooncamp.
## Wo kannst du Ansichten erstellen?
Du kannst Ansichten an folgenden Stellen erstellen:
* Startseite (Ansichten sind privat für dich)
* Team-Bereiche
* Ziel-Explorer
* Check-in-Explorer
* Dashboards
* Fortschritts-Dashboard
* Status-Dashboard
* Benutzerdefinierte Dashboards (auf Kacheln)
## Berechtigungen für Ansichten
Ansichten im Ziel-Explorer sind für alle Benutzer in deiner Organisation sichtbar. Ansichten in Team-Bereichen sind für alle Benutzer sichtbar, die mindestens Leserechte für den Team-Bereich haben. In jedem Bereich, in dem Ansichten erstellt werden können, sind sie für alle zugänglich. Im **Ziel-Explorer** kann jede Ansicht über die Ellipse `...` in der oberen rechten Ecke als [öffentlicher Link](/de/public-links) veröffentlicht (und wieder zurückgezogen) werden (nur im `Enterprise`-Plan verfügbar).
**Bitte beachte:** Standardmäßig können nur Administratoren Ansichten erstellen. Zusätzlich kann der Administrator Zugriffsgruppen das Recht dazu über `Einstellungen > Zugriffsgruppen > Kontoverwaltung > Verwaltung öffentlicher Ansichten` gewähren.
## Wie kannst du eine Ansicht erstellen und bearbeiten?
### Ansicht erstellen
Um eine Ansicht zu erstellen, klicke auf das `+` in der Datenbank-Kopfzeile, gib deiner Ansicht einen Namen und wähle einen Ansichtstyp.
Jetzt kannst du deine Ansicht anpassen, z.B. durch:
* Hinzufügen von Filtern
* Hinzufügen von Sortieroptionen
* Ein- oder Ausblenden von Eigenschaften
* Neuanordnen von Spalten
* Umbrechen von Zellen
* etc.
### Ansicht bearbeiten und löschen
Sobald du eine neue Ansicht hinzugefügt hast, kannst du ihren Namen, Symbol und Typ bearbeiten, indem du erneut auf ihren Namen klickst. Hier kannst du die Ansicht bei Bedarf auch löschen.
## Ansichten für Ziel-Datenbanken
Ansichten für Ziele können auf deiner [Startseite](/de/homepage), in [Team-Bereichen](/de/teamspaces) und im [Ziel-Explorer](/de/goal-explorer) erstellt werden. Auf deiner **Startseite** sind Ziele bereits vorgefiltert, um alle Ziele anzuzeigen, die mit deinem Benutzerkonto verbunden sind. In einem **Team-Bereich** sind Ziele vorgefiltert, um nur die Ziele des jeweiligen Teams anzuzeigen.
Im Ziel-Explorer kannst du **jede Zielansicht** als **CSV** exportieren, einschließlich Daten wie Titel, Ersteller, letzte Aktualisierung, aktueller Wert, Status und alle zugehörigen Eigenschaften (ausgenommen Aktualisierungsverlauf oder Kommentare). Details zum CSV-Export findest du in [diesem Artikel](/de/exporting-goals-as-csv). Zusätzlich kann jede öffentliche Ansicht als **öffentlicher Link** exportiert werden, der für Nicht-Benutzer zugänglich ist. Details zu öffentlichen Links findest du in [diesem Artikel](/de/public-links).
Abgesehen davon funktionieren Ansichten für Ziele überall gleich.
### Ziel-Ansichtstypen
Zeigt Ziele in einer verschachtelten Tabelle an, um die Hierarchie der Ziele auf verschiedenen Ebenen darzustellen.
Zeigt alle Ziele in einer einfachen flachen Liste an.
Bietet eine visuelle Darstellung von Zielen und OKRs und zeigt strategische Säulen und Initiativen in einer hierarchischen Ansicht.
Zeigt Ziele in einer Netzwerkansicht an und visualisiert die Beziehungen zwischen Zielen und deren Ausrichtungen.
## Ansichten für Check-ins
Ansichten für Check-ins können im Check-in-Explorer erstellt werden. Hier hast du zwei Ansichtstypen:
Der Feed zeigt grundsätzlich die gleichen Informationen wie eine Liste, stellt jedoch jeden Check-in in Form einer Karte dar. Dadurch ist es möglich, den Inhalt eines Check-ins anzuzeigen, wie zum Beispiel Freitext-Antworten auf Vorlagenfragen und Zielaktualisierungen. Diese Ansicht ist ideal, wenn du den Inhalt direkt durchsehen möchtest, und es ist sogar möglich, mit einem Emoji für Lob oder einem Kommentar für Fragen oder Diskussionen zu reagieren.
Zeigt alle Check-ins in einer einfachen flachen Liste an. Du kannst wählen, ob Eigenschaften wie Team, Ersteller, Erstellungsdatum oder Vorlagentitel angezeigt werden sollen.
### Check-in-Ansichtseinstellungen
In der oberen rechten Ecke deiner Check-in-Ansicht findest du verschiedene Einstellungen, darunter Optionen zum Filtern, Sortieren oder Anzeigen von Check-ins und deren Eigenschaften für deine Ansichten. Du kannst nach Team, Erstellungsdatum und Ersteller eines Check-ins filtern, und wie überall können Filter über UND und ODER kombiniert werden. Die Sortierung ist aufsteigend oder absteigend nach dem Erstellungsdatum möglich. Zu den bearbeitbaren Anzeigeoptionen gehören das Team eines Check-ins und der Titel der verwendeten Vorlage.
## Ansichten für Dashboards
Ansichten können für das [Fortschritts-Dashboard](/de/progress-dashboard) und das [Status-Dashboard](/de/health-dashboard) mit den gleichen Einstellungsoptionen für beide Dashboard-Typen erstellt werden. Für das [Fortschritts-Dashboard](/de/progress-dashboard) gibt es eine zusätzliche `Vergleichen mit`-Funktion, die dir die Möglichkeit gibt, deine aktuellen Daten mit der Vergangenheit zu vergleichen.
In einem [**Benutzerdefinierten Dashboard**](/de/dashboards) ist es möglich, Kacheln zu erstellen, die verschiedene Daten anzeigen. Für jede Kachel vom Typ Liste (Ziele, Check-ins, Update-Feed, Mitglieder) ist es möglich, eine Ansicht mit unterschiedlichen Filter-, Sortier- und Anzeigeeinstellungen zu erstellen.
## Ansichten als Favoriten in der Seitenleiste anheften
Ansichten können als Favorit gespeichert und so der Seitenleiste direkt über deinen Team-Bereichen hinzugefügt werden.
## Ansichten und Zyklen
Standardmäßig wird der aktuell ausgewählte Zyklus global auf jede Ansicht angewendet. Du kannst jedoch einen Zyklus innerhalb einer Ansicht sperren, um sicherzustellen, dass Benutzer genau die Daten sehen, die du ihnen zeigen möchtest, sei es in Zieltabellen oder Dashboards. Wenn kein Zyklus gesperrt ist, wird automatisch der aktuell ausgewählte Zyklus für jeden Benutzer angewendet.
Mehr über Zyklen erfährst du in [diesem Artikel](/de/cycles).
# Workspace settings
Source: https://mooncamp.com/docs/de/workspace-settings
Edit the name and logo of your workspace
Under *Settings > General* you can change the name of your organization and upload a logo. The infromation added here will then always be displayed in the top left of your sidebar.
Further below, there is an invite link that can be used to collectively invite existing users to Mooncamp. They can easily register using the link; an important requirement for this is that the users have already been created under *Settings > Members*.
# How to Delete a Goal
Source: https://mooncamp.com/docs/deleting-goals
Different ways to delete goals
There are two ways to delete goals:
* Delete a goal from the Goals Cascade view
* Delete a goal from the detail view of a goal
## Delete a goal from the Goals Cascade View
You can right-click on a goal on the cascade view to delete it. If you want to delete several goals at once, you can click and hold and drag to select all the goals you want to delete, and then right-click again to bring up the menu to delete the goals.
## Delete a goal from the Detail View of a Goal
On the detail view of a goal you can click on the ellipsis icon in the upper right corner and delete the goal from there.
## Restoring goals from the trash
In case you have accidentally deleted one or several goals, you can easily get these back via the trash button on the sidebar. When you navigate to the trash bin, a modal opens and shows all recently deleted goals including a deletion date and time stamp. Next to each goal you find two buttons, one to restore the item, one to delete it permanently. Via the search bar you can also search for specific goals that might have been deleted longer ago. A goal can be restored or permanently deleted by every user who had edit access rights to the goal, irrespective of who has deleted it.
# Getting Started Guide for Employees
Source: https://mooncamp.com/docs/employees-introduction
Learn how to get started with Mooncamp as an employee
 ## Welcome to Mooncamp 👋
Mooncamp has just been introduced in your organization? This guide will help you
* get familiar with Mooncamp's features
* edit your profile information, display language and upload a profile picture
* configure the notifications you receive
* learn how to create, edit and update goals
To learn about what Mooncamp is and why it will transform the way you do strategy, you can visit the [overview page](/overview).
## Step 1: Familiarize yourself with Mooncamp's platform
### Workspace navigation
* [Sidebar](/sidebar)
* [Your homepage](/homepage)
* [Teamspaces](/teamspaces)
### Core features
* [Goals](/goals-overview)
* [Check-ins](/check-ins)
* [Dashboards](/dashboards), [Progress dashboard](/progress-dashboard) and [Health dashboard](/health-dashboard)
* [Reports](/reports)
* [Integrations](/data-integrations)
* [Planning spaces](/planning-spaces)
## Step 2: Set up your profile and notifications
* [Add your personal information](/profile-settings)
* [Configure the notifications you receive](/personal-notifications)
## Step 3: Learn how to create, edit, and update goals
* [Creating goals](/create-and-edit-goals)
* [Setting the right measurement type](/progress-measurement) for your goals
* [Updating goals](/updating-goals)
* [Adding subgoals](/adding-subgoals) (e.g. Key Results)
* [Deleting and restoring goals](/deleting-goals)
* [Navigating through existing goals](/goals-overview)
## Well done, you're ready to go! 🚀
For a smooth start with Mooncamp you can also check out our [Video Guide](https://mooncamp.com/watch-demo/).
# Exporting Dashboards as PDF
Source: https://mooncamp.com/docs/exporting-dashboards-as-pdf
Navigate to the Progress-, Health- or a Custom Dashboard that you want to export.
Apply the appropriate view or filters so that you only export the data you need.
Click the ellipsis `...` in the top right corner of the screen and select "Save as PDF" to download the PDF file.
# Exporting Goals as CSV
Source: https://mooncamp.com/docs/exporting-goals-as-csv
Navigate to the Goals Explorer.
Apply the appropriate view or filters so that you only export the goals you want.
Click the ellipsis `...` in the top right corner and select "Export CSV" to download the CSV file.
# FAQs
Source: https://mooncamp.com/docs/faqs
Answers to common questions about Mooncamp
## General Tips
## Right-Click Function described
When you are working in Mooncamp and are looking at a list of your goals, you can hover over a goal and then right-click. You will then be presented with a menu which will give you different options to choose from. You also have the possibility to multi-select a group of goals in order to use the right-click function to bulk-edit your goals. This is quite convenient because you don’t have to open the goal to make changes.
## How to use the right-click function
As stated above, when looking at your list of goals, hover over one and right-click. You will then be presented with the following option:
* Delete
* Duplicate - make a copy of the goal
* Duplicate to cycle - copy a goal to a future cycle
* Create subgoal - create a sub-aligned goal or child goal
* Edit property - edit the properties e.g. Cycle, Parent Alignment, Owner etc.
* Edit access rights - edit who has which level of access to the goal
You have the same possibilities with the multi-select except for “Create subgoal”.
## Team & User Management
## Integrations
## Settings & Customization
## Goal Management
# Goal Explorer
Source: https://mooncamp.com/docs/goal-explorer
An overview of the Mooncamp goal explorer
The goal explorer is a tool that serves **four main purposes**:
Admins or workspace owners can create specific views that should be available to all employees.
Users with sufficient permissions can publish views as [public links](/public-links) that are accessible to people outside the workspace.
Users with sufficient permissions can embed views in other apps.
Users can export filtered goals as CSV files.
To access the goal explorer, navigate to the **Goal Explorer** tab in the left sidebar. If you want to export a specific filtered view of your goals as a CSV file, you can do so by clicking the ellipsis `...` in the top right corner of the goal explorer and selecting **Export as CSV** (`1`). Similarly, you can publish a specific view as a [public link](/public-links) or embed it in other apps by switching the `Share to web` toggle on and copying the link or embed code (`2`).
# Goal and OKR rules
Source: https://mooncamp.com/docs/goal-rules
An overview of Mooncamp's customizable rule system for Goals and OKRs
### What are **Goal and OKR rules?**
Under *Settings > Goals > Types,* you will find all created goal types in your OKR or goal management system, such as `Objective`, `Key Result` or `Initiative`.
For each of these goal types you can define specific *rules,* e.g. that `Key Results` may only be aligned to `Objectives`, or that all `Key Results` must have an `Owner`.
The following rules can be set individually per goal type:
* **Setting up the goal hierarchy**: To which goal types may the respective goal type be aligned?
* **Visibility** of properties on the goal type (e.g. all description fields can be hidden if they are empty).
* Specifying allowed **progress measurement types** (Professional and Enterprise Plan)
* Defining **required fields** (Professional and Enterprise Plan)
Details about the specific settings can be found further down in the article.
### Why use Goal and OKR rules?
Rules allow you to completely customize your organization's goal system according to your needs. Among other things, this provides the following benefits:
**1. Setting up your customized goals hierarchy**
With the flexible rule system you can decide yourself how the hierarchy of your goals and OKRs should be structured. As an example, the following rules may be applied:
* Goals of type `Company Objective` may only contribute to `Strategic Pillars`
* `Strategic Pillars` may not be aligned to other goal types (i.e. they are always at the top)
* Goals of type `Team Objective` may only be aligned to `Company Objectives`
* `Key Results` may only be aligned to `Company Objectives` or `Team Objectives`
* `Initiatives` may only be aligned to `Team Objectives` or `Key Results`
**2. Avoid chaos in your goal system**
Rules for hierarchical structure provide guardrails for all employees so that the goal system naturally follows the given structure. Incorrectly aligned goals are also highlighted so that they can be adjusted accordingly.
**3. Ensure correct data entry**
Especially when many teams are working in Mooncamp, it increases the likelihood of "human error" when entering data. Therefore, properties of a goal type, such as `Owner` or `Team`, can be marked as required fields.
### Configuration of the goal hierarchy
Under *Settings > Goals > Types,* all goal types are listed. If, for example, you want to create a rule for the goal type `Key Result` that it can only be aligned to `Objectives`, then first click on the relevant goal type.
A window opens in which all goal properties are listed. Now click on `Parent Alignment`.
The settings for the `Parent Alignment` property of the goal type `Key Result` will open. Under the item `Can be child of`, the goal type `Objective` can now be selected, all other goal types should be deselected.
Et voilà - `Key Results` can now only be aligned to `Objectives`.
💡 Existing or newly created goals that do not follow this rule will be flagged with warnings (`!`) from now on. Furthermore, only allowed goal types will be available for selection when creating subgoals.
### Set allowed progress measurement types per goal type
It may make sense to adjust the progress measurement types depending on the goal type. Typical use cases are, for example:
* `Strategic Pillars` should not have a measurement type (`None`), so there should be no progress measure associated with the goal type
* `Objectives` should have only `Aggregation` as a measurement type
* `Key Results` may have any measurement type except `Open/Done`
* `Initiatives` can only have the measurement type `Open/Done`
To configure the allowed measurement types, click on the relevant goal type and then on `Progress`. Under the item `Measurement`, the allowed measurement types can be selected.
💡 **Note**: Specifying progress measurement types is only available in Mooncamp's `Pro` or `Enterprise Plan`. [Contact our sales team to learn more](mailto:sales@mooncamp.com)
### Marking properties as required fields
In the `Enterprise Plan` you can mark properties as required fields *for each goal type*. If, for example, `Key Results` should always have an `Owner`, then click on the goal type `Key Results` in the list, select `Owner` and mark this as a required field.
Existing or newly created goals that do not follow this rule are now marked with warnings.
💡
**Note**: Required fields are only available in Mooncamp's `Pro` or `Enterprise Plan`. [Contact our sales team to learn more](mailto:sales@mooncamp.com)
### Fixing issues
Goals that violate one or more of the rules are highlighted in the cascade view. On the detail pages of the goals in question, the properties that violate the rules are also highlighted.
To quickly fix the issues without having to go to the detail page of each goal, you can simply click on the red button on the cascade view and adjust the affected fields.
# Goal Statuses
Source: https://mooncamp.com/docs/goal-statuses
An overview of Goal Statuses
## Explanation of Goal Statuses
It is possible to configure goal statuses to align perfectly with the processes and goal system of your company. In the tool, you will find some common preset statuses, but you can easily rename them or add your own statuses to track your goals most effectively.
Additionally, you can categorize your statuses as "Active" and "Closed." Goals with an "Active" status are those that are still being worked on, while "Closed" goals have already been completed or finished.
## Using Goal Statuses
First, navigate to `Settings > Goals > Status`. At the top of the page, you can provide a general name for the status property. `Status` is most commonly used (in OKR contexts, `Confidence` is also a common alternative).
Below, you'll find a list of statuses; some common ones are already available in your account, so you can start tracking your goals right away. Statuses are customizable, allowing you to add additional statuses and edit or delete existing ones. By default, the following statuses, along with their respective thresholds, are set up in your account:
The existing statuses are divided into two groups, "Active" and "Closed." The status `Not started` under `Active` is marked as `default`. This default status is assigned to all newly created goals that have no progress updates yet. It is also fully customizable (for more information on evaluations, groups, and defaults, see below). You can easily rearrange these statuses within their respective groups by using the dragging and dropping the different statuses. By clicking the arrow on the right side, you can view and edit the settings of a status:
### Name
Set a title for your status if you want to rename some of the preset titles or create a new one.
### Archive
Additionally, you can archive a status, which will then be displayed in the archive section below. Here, items can either be restored or permanently deleted. However, permanent deletion is only possible as long as a status is not used in a goal update in your account.
### Set as Default
With this feature, you can set a status as the default. A default status is automatically selected if a goal has no updates yet.
A default status cannot be archived. First, it must be changed to a non-default status.
### Group
A status is always assigned to a group. Here, you have the options "Active" or "Closed." Active goals are those currently being actively worked on, while closed goals have already been finished. By default, you can close out goals by marking them as "Achieved," "Partial," "Missed," or "Dropped" (in case you decide not to continue tracking them). Of course, you can also define your own "Closed" statuses.
Note that closed goals can still be edited if necessary.
### Thresholds
It is possible to assign a threshold to each of your statuses. There are already preset suggestions, such as 0% for `Off track`, 70% for `Progressing`, 90% for `On track`, and 100% for `Achieved`, 50% for partially achieved goals, or 0% for `Missed`. These are all adjustable, and you can essentially assign any number to tailor the statuses to your individual goal system and processes. For example, it would also be possible to represent a confidence scale from 0 to 10, as this is quite commonly used in the OKR world.
Thresholds come into effect in two different scenarios. Firstly, every time you create a new goal update, a status recommendation is displayed. This recommendation is based on the value you enter and the threshold assigned in the status settings. In practice, this means that when updating a goal to 30% progress (relative to the time passed within the assigned cycle), the system will automatically suggest the status whose threshold is less than or equal to 30% and is closest to 30%.
Time-weighted progress measures how far a goal has advanced in relation to the elapsed time. For example, 30% progress at 50% of the time corresponds to a time-weighted progress of 30% / 0.5 = 60%.
Secondly, the charts on the [Progress Dashboard](/progress-dashboard) display an average value based on the assessment of goal statuses. Here, you have the option to display either the average or the distribution of statuses.
### Color
Different colors can be assigned to a status. As we suggest in the presets, it is quite common to use traffic light colors to indicate various progress levels of goals. So, when a goal's progress has started, it may make sense to display a change as follows: red for goals that are behind schedule, yellow for generally progressing goals, and green for those progressing as planned. If a goal is inactive, because it is not being pursued further, it can be grayed out.
Please note that the colors used to visually represent progress in your [Progress Dashboard](/progress-dashboard) and in the [network view](/views) do not originate from the status colors. Instead, they correspond to your settings set in `Settings > Goals > Progress Indicator Thresholds`. Here, progress for the Progress Dashboard and the network view can be predefined in three different levels: red, yellow, and green. You are free to define the percentage thresholds for these levels.
# Goal Tree
Source: https://mooncamp.com/docs/goal-tree
An overview of the Mooncamp Goal Tree
The Goal Tree View is available for customers in the **`Pro`** and **`Enterprise`** plan.
## Goal Tree View explained
The goal tree view offers the most visual way of displaying goals and OKRs. It can actually be used as a drawing board to map out all your strategic pillars, focus areas, goals, and initiatives in a hierarchical view. It gives a high-level overview of your company’s strategy and each aligned goal is shown as a card with all relevant info in one view. The cards are connected as hierarchical branches and can easily be moved around and realigned via drag and drop. You can zoom in on certain OKR sets or focus areas as well as quickly discover isolated goals and align them correctly.
If you don’t feel like reading, check out the video tutorial below. It gives a general overview of the Goal Tree View function.
## How to use the Goal Tree View
With the goal tree view you have numerous different ways to conveniently draft and work with your goals and OKRs.
First of all, as you know from the cascade view, you can easily **inline-edit** your goal title, properties and progress. Via the edit button in the top right corner of a goal card you can access the edit-mode without leaving the page. With one further click on this button, you can open the goal **detail page** as a modal or further as a whole page.
Using the ellipsis `...` also in the upper right corner of a goal card, you have all the functions that usually come with the right-click in the goal explorer, such as deletion or duplication of a goal, creating sub-goals, editing access rights or properties. You can also use the right-click on a goal card to access these functions.
On the goal cards you can see a “+”-button on each side of every card. With these you can add sub-, parent- or sibling-goals of different types into the chosen direction. Once your goal tree has several levels, there is the function to **expand or collapse** all levels at once. You can find this via the right-click or the ellipsis `...` in the upper right corner of a goal card. If you would like to expand or collapse levels one by one, you can use the “Expand next level”-function via the ellipsis `...` in the upper right corner of the goal tree view. A further function via the “^1” in the lower right corner of each goal card that contains a sub-goal, you can expand specific goals below each goal card.
This settings menu further contains **property and card size settings**. It helps you to show or hide properties congruently on all shown goal cards. In general, empty properties will not be shown on an individual goal card, only when they are filled. Also the card width is adjustable to small, medium or large in order to make it more condense or show more content.
The sorting and filter functions work in the same way as you are used to in the cascade view.
### Scrolling and Zooming Controls
Since the goal tree view is a very visual overview of your goals and OKRs, it is helpful to master a few scrolling and zooming short-cuts
* To **scroll vertically**, simply use your scroll wheel on the mouse.
* In order to move the content **horizontally**, hold the shift key on your keyboard and then use the scroll wheel. This works on any mouse or trackpad.
* For **zooming in or out**, press and hold the Ctrl key (for Windows or Linux) or the command key (for macOS), then use the scroll wheel or trackpad.
Please note that with larger data sets, the data is being loaded while you are scrolling.
### Select mode and hand mode
With the **select mode**, you can select several items and perform bulk actions.
* Press and hold the left mouse button, then drag the cursor to select multiple goals or items.
* Use the Select Tool for performing bulk actions on the selected items.
The **hand mode** allows you to move the content by dragging.
* Press and hold the left mouse button.
* While holding the button, move the mouse to drag and navigate through the content.
### Realigning goals
In order to realign a goal, switch to the hand mode and simply drag and drop the according goal to a new location and it connects automatically.
# Goal Types
Source: https://mooncamp.com/docs/goal-types
An overview of goal types in Mooncamp
## Goal Types explained
Any goal you create in Mooncamp is generally termed as *goal* and can be assigned with a goal type. If you are using the OKR method, the most commonly used goal types are Objectives and Key Results. These two types are pre-defined in your Mooncamp account. In the sphere of OKRs, organizations use other customized goal types to adapt to their individual goal setting practices. Above the Objective level, e.g. *strategic pillars* or *yearly goals* are used. Below Key Results, organisations work with *projects*, *initiatives* or *tasks*. Further, organizations differentiate between *Company Objectives* and *Team Objectives* or even use different terms for *Objectives* or *Key Results*. Therefore, with Mooncamp you can flexibly customize and create your own goal types.
## How to use Goal Types
**As an admin**, via *Settings > Goals > Types and rules* you find the two pre-defined goal types *Objectives* and *Key Results*. Via the *New* buttons you can add your own goal types, e.g. Strategic Pillars, Initiatives or Tasks. Once you have a longer list of goal types, the six-point icon on the left helps you to drag and drop them into the chosen hierarchy.
Via the ellipsis `...` next to each goal type you can either edit, duplicate or delete a goal type (the two pre-defined goal types cannot be deleted but renamed). Behind the edit button you can find a range of functions. Under ‘Edit type’ you can specify a name as well as add an icon and a colour to your goal type. Especially the icons can later be quite helpful in larger goal hierarchies to quickly differentiate between the different types at one glance.
All settings below *Properties* support you to create **rules for your different goal types**. These rules inlcude settings regarding the hierarchy between goal types, permitted measurements for goal types or the visibility of properties on a goal detail page for specific goal types (i.e. properties can be set as *required* or *not required* or as *always visible,* *hidden when empty* or *always hidden*). For detailed infos, please navigate to [this article](/goal-rules).
## Useful examples for goal types
As the abbreviation says, the goal types in the common OKR method consist of **Objectives** and **Key Results**. Yet, there are many different ways how organizations adjust the method to their specific needs. Organizations might have the need for another layer above their quarterly objectives and work with **Strategic Pillars** or **Yearly Goals**, which some also call **Mid-Term Goals** (**MOALs**). Further there can be the need to have more granular layers below quarterly Key Results, for example **Initiatives** or specific **Tasks** that might be attached to these. What can also be helpful is to have a direct link between OKRs, **Projects** and **KPIs** in one tool, therefore some organizations also use these two as goal types within Mooncamp. For larger organisations it might be useful to differentiate between Company OKRs and Team OKRs and create specific goal types for these, i.e. **Company Objectives and -Key Results** as well as **Team Objectives and Key Results**.
**Tip:** Setting a **colored icon** for each goal type can be very helpful in keeping a **better overview** in bigger goal hierachies and **distinguishing** the different types at one glance.
# Goals Overview
Source: https://mooncamp.com/docs/goals-overview
Navigating goals on company, team and individual level
You can access various views of Goals in the sidebar:
* The teamspace of your organization, your team, as well as other teamspaces
* Your homepage
* Goal Explorer
### Teamspaces (organization and subteams)
### Homepage
Here you can see all goals assigned to you at a glance. You can also use filters to define which goals should be displayed on your own homepage.
### Goal Explorer
In the Goal Explorer you can explore goals in different views (e.g. cascade or network), apply filters, and save your own views.
# Goals Settings
Source: https://mooncamp.com/docs/goals-settings
An overview of the goal settings page in the settings
To get to the goal settings page, navigate to `Settings` and then click on `Goals > Settings` at the bottom.
## Display name
What name would you like displayed throughout the app when referring to your goals. Most companies stay with "Goals" but some of our customers use terms like "OKRs".
## Default access of your goals
This setting defines the default access rights of your goals when they are created. For example, in the screenshot below, the default access is set so that when a user creates a goal, they have full access and everyone else in the account can comment. That means they can comment and even give updates to the goal, but can’t edit or give access rights.
The different levels of access are defined as follows:
* No access
* Can view - means they can see the goal but can’t interact with it in any way, not even leave a comment.
* Can comment - means they can comment and give updates
* Can edit - means they can edit title and properties, but not the access rights.
* Full access - all of the above plus you can give access rights to others.
## Progress indicator thresholds
This where you can define the thresholds for what is off track, progressing, or on track. In the example below, the settings are quite ambitious. Some of our customers lower them so that the results don’t have a negative effect on employee morale.
# Google Sheets Integration
Source: https://mooncamp.com/docs/google-sheets-integration
An overview of the data integration with Google Sheets.
## The Google Sheets integration described
The Google Sheets integration allows you to pull data from a specific cell within a Google Sheets document and use it to automatically update your goals in Mooncamp. In order to access documents via Mooncamp, you need to have access to the Google Sheets file with your e-mail. You will also need to create a connection to Google Sheets.
## Connecting goals to Google Sheets
As a first step, the admin of your Mooncamp account needs to make sure that the integration is activated via `Settings > Integrations > Data Integrations > Google Sheets`.
In order to connect to Google Sheets, please see our article on connecting to data integrations: [Connecting goals to data integrations](/data-integrations)
Please be aware that for **Google Sheets** you can only connect files from your **personal Google Drive** and no files from any shared folders. However, via the privacy settings of your data connection, you can share your files with other members within your Mooncamp account (for details, please see [here](/data-integrations).)
## Selecting a cell
Once you have created the connection to Google Sheets, the next step is to select the document you want to reference. By clicking on the document drop down box, you will find a list of available documents. After that, you can select the correct sheet / table and lastly, you can enter the correct column and row. Now, anytime that cell is updated, it will automatically update the value in Mooncamp.
Tip for admins: Go to `Settings > Integrations` and make sure every day is selected under `Synchronization`.
# Health Dashboard
Source: https://mooncamp.com/docs/health-dashboard
An overview of the Health dashboard for goals and OKRs.
The Health dashboard is available for customers in the `Pro` and `Enterprise` plan.
## The Health Dashboard explained
With the Health dashboard, you can do a comprehensive health and quality check on all of your organization’s goals. Consider it a cockpit from where you can quickly identify and solve any issues with your goals. This helps to ensure that your whole goal management process is running smoothly and that everyone follows the [Goal and OKR rules](/goal-rules) that you configured in the settings area.
**Important note:** In order to grant all members access to progress- and health dashboards, this needs to be set once by the admin under `Settings > Access groups > Member > Can view progress and health dashboards`.
## Navigating the Health dashboard
The health dashboard can be found under `Dashboards` in the sidebar.
Once you’ve found the Health Dashboard, there are a few important areas to note.
1. **Add a view**: Here you can create different views in combination with the filter function.
2. **Cycle picker**: Make sure you are viewing the correct cycle in order to see the most relevant data.
3. **Filter function**: Filter for any [properties](/properties) you have in the system.
4. **Share:** Share the link with your colleagues who also have access to Mooncamp.
5. **Favorite**: Add the view to your favorites, so you have it easily accessible in the left-hand side.
Via the ellipsis (…) in the upper right corner of the screen, the Health Dashboard can be exported as a **PDF file**.
## Overview
At the top of the page you have “Overview” and under that, 3 metrics. This is the easiest and quickest way to get an idea of how many goals have issues.
* **Goals with invalid parent goal**: If you click on the metric, you will find a list of goals which have an invalid parent goal. There are three different reasons why goals can show up here. `1` The parent goal is the wrong type (e.g. a `Key Result` is a parent of an `Objective`), `2` the parent goal is empty, although it should have a parent (e.g. an initiative), and `3` the parent goal is not empty, although it shouldn’t have a parent goal (e.g. a `Strategic Pillar`)
* **Goals with missing properties**: If you click on the metric, you will find a list of goals with missing properties. What properties should always be filled in can be configured in the settings area under [Types and rules](/goal-rules).
* **Goals with invalid measurement types**: If you click on the metric, you will find a list of goals which have invalid measurement types (e.g. you could set up a rule that initiatives should always have the measurement type “Open/Done” applied).
Here is an example:
By clicking on the red buttons in the list above, you can easily solve any issues with your goals.
## Health check by goal type
In this space, each goal type has its information broken down into up to 4 main categories. Let’s use a `Key Result` as an example. Everything is interactive, so be sure to click on the different charts to see the filtered list of goals.
* **Goals with invalid vs. valid parent goal**: This shows how many goals have the correct parent goal and how many have the wrong parent goal.
* **Goals with missing vs. existing property values**: This shows how many goals have all the required properties filled out and how many have missing property values.
* **Goals with invalid vs. valid measurement types:** Here you will find, how many of each measurement type is being used. If there are goals using the incorrect measurement type, they will show up red.
* **Automated vs. manual**: This report shows how many goals are updated manually and how many goals are updated via data integrations. This only refers to goals which are using “Start and target value” or “Threshold” as a measurement type (only these types can be synched via data integrations).
**Remember**: All this information is based on the rules you have set up in the settings, so be sure to check out our article on [rules](/goal-rules).
## Breakdown
Last, but not least, we have the breakdown section at the bottom of the page. In this table, each team is listed with their total number of goals as well as the goals that still have issues, like invalid parent goals, missing property values, or invalid measurement types. Here the numbers are also interactive, so you can click on them to see the list of goals.
# Homepage
Source: https://mooncamp.com/docs/homepage
An overview of the homepage
Your individual homepage allows you to directly access all of your workspace's tools.
On your homepage you can:
1. View and update your goals and create new goals
2. View and edit your check-ins and create new check-ins
3. View public profile information about you
# Hubspot Integration
Source: https://mooncamp.com/docs/hubspot-integration
An overview of the data integration with Hubspot.
## The Hubspot integration described
The Hubspot integration allows you to pull data from specific metrics within Hubspot, in order to automatically update your goals in Mooncamp. This is a one way integration, which means you can only pull data from Hubspot and not send it. At the moment, there is a set list of metrics you can choose from and these are mainly marketing based. The available metrics you can find below.
* Number of raw views
* Number of visits
* Number of visitors
* Number of leads
* Number of contacts
* Number of subscribers
* Number of MQLs
* Number of SQLs
* Number of opportunities
* Number of customers
* Average page views per session
* % bounce rate
* Time per session (in seconds)
* % new sessions
* % session to contact
* % contact to customer
## Connecting to Hubspot
In order to connect to Hubspot, please see our article on connecting to data integration below.
[Connecting goals to data integration](/data-integrations)
## Selecting your metric and date range
Once you have created the connection to Hubspot, you can select the metric you want to pull from and the time range which should be considered.
Tip for the Admins: Go to Settings → Integrations → and make sure every day is selected under “Synchronization”.
# Info Page
Source: https://mooncamp.com/docs/info-page
A page to share general information about the company, OKR processes or other important details
The Info Page is available for customers in the **`Pro`** and **`Enterprise`** plan.
Under `Settings > General` you can create an info page that is accessible to all employees. The content of this page can be defined freely; typically, internal contact persons, user agreements, legal information or general information on the OKR process are communicated here. The info page can be especially helpful for new team members that join your organization. You can activate to show the page either in the help area (via the question mark in the lower right corner of every page), to new employees during their Mooncamp onboarding, or both.
# Jira Integration
Source: https://mooncamp.com/docs/jira-integration
Learn how to connect Jira to Mooncamp goals
## Jira Integration described
With Mooncamp's Jira integration, you can easily synchronize all issues, user stories or epics in Jira with goals in Mooncamp. The progress of goals can thus be updated automatically.
## For Admins
### Before setup (required for on-premise hosting)
If your Jira instance is hosted on-premise (self-managed), you should ask your IT/Jira administrator to set up an [Application Link](https://confluence.atlassian.com/adminjiraserver/using-applinks-to-link-to-other-applications-938846918.html) within Jira.
Please note that if the Application Link is not configured in your Jira instance, the Jira connection will fail.
### Create a new Jira connection
**Step 1:** Link a goal to Jira by clicking `Start and Target Value` or `Threshold` under `Progress` and then `Connect to data source`. A window will open where you will need to provide information about the integration.
**Step 2:** Adjust the name of the Jira connection if needed and select whether all users of this account in Mooncamp should be able to access the connection.
**Step 3:** Select whether your Jira instance is self-managed (on-premise) or hosted in the cloud. If you're not sure which type your instance is, check with your IT/Jira administrator.
**Step 4:** Add your server URL. Here it is important that you stick to the following format: `[yourdomain.atlassian.net](http://clientdomain.atlassian.net)` (so without `https://` at the start and without `/jira/` at the end).
**Step 5: Connect to Jira**
* For self-managed **instances**, click the `Sign in with Jira` button and follow the instructions.
* For cloud instances, enter the email address and API token associated with your Jira account. The instructions for creating an API token for your Jira Cloud account can be found [here](https://confluence.atlassian.com/cloud/api-tokens-938839638.html).
**Done!** 🎉 You can now have goals in Mooncamp automatically updated using the connection you created with Jira.
💡 Tip for the Admins: Go to `Settings` → `Integrations` → and make sure every day is selected under “Synchronization”.
## For Employees (Non-Admins)
### Update goals with Jira
**Step 1**: You can choose between two types of measurement:
* `Overall progress`, expressed as the ratio of two Jira issue sets (e.g., the ratio of all issues with status `Done` divided by all issues in the project)
* `Number of issues`, captured by the JQL query
**Step 2:** Define the JQL queries, by populating the fields for "[JQL](https://www.atlassian.com/blog/jira-software/jql-the-most-flexible-way-to-search-jira-14)". The Jira issues are queried using a JQL query. A JQL query can be copied from Jira.
**Note:** For more information on how JIRA does time and progress tracking, see this [Jira article.](https://confluence.atlassian.com/jiraportfolioserver0326/tracking-progress-and-status-1005330901.html)
# Managing Employees
Source: https://mooncamp.com/docs/managing-employees
Adding and managing employees in Mooncamp
As an admin, you can add new employees (members) to your workspace or edit existing ones under `Settings > Members`.
On the member management page you can:
* Add members manually
* Add multiple members via CSV import or export multiple members via CSV export
* Edit member information (name, email, language, ...)
* Delete members from Mooncamp
* Send invitations to Mooncamp to individual members by email
## Add members manually
By clicking on `Add user` you can create a new user and specify name, email, account language, and any other custom properties you have created.
If you check the box `Send invitation email` when adding a new member, the member will receive an invitation via email.
## Import members via CSV
By clicking on `Import CSV` you can upload a CSV file (Comma Separated Value) with all members. Here you can also download a CSV file as a template.
For each new row in the CSV file a new member will be added.
## Invite-Link
Once all members have successfully been added, you can use the invite-link to collectively invite existing users to Mooncamp. The link is located under `Settings > General` and can be copied there. Members can easily register using the link; an important requirement for this is that they have already been created within Mooncamp under `Settings > Members`.
# Microsoft Excel Integration
Source: https://mooncamp.com/docs/microsoft-excel-integration
An overview of the data integration with Microsoft Excel
Please note that the integration only works with the web version of Microsoft Excel.
## The Microsoft Excel integration described
The Microsoft Excel integration allows you to pull data from a specific cell within a Microsoft Excel document and use it to automatically update your goals in Mooncamp. In order to access documents via Mooncamp, you need to have access to the Excel Online file with your e-mail. You will also need to create a connection to Excel Online.
## Connecting goals to Microsoft Excel
As a first step, the admin of your Mooncamp account needs to make sure that the integration is activated via `Settings > Integrations > Data Integrations > Microsoft Excel`.
In order to connect to Microsoft Excel, please see our article on connecting to data integrations: [Connecting goals to data integrations](/data-integrations)
Please be aware that for **Microsoft Excel** you can only connect files from your **OneDrive**, not from SharePoint. However, via the privacy settings of your data connection, you can share your files with other members within your Mooncamp account (for details, please see [here](/data-integrations)).
## Selecting your cell
Once you have created the connection to Excel Online, the next step is to select the document you want to reference. By clicking on the document drop down box, you will find a list of available documents. After that, you can select the correct sheet / table and lastly, you can enter the correct column and row. Now, anytime that cell is updated, it will automatically update the value in Mooncamp.
Tip for the Admins: Go to `Settings > Integrations` and make sure every day is selected under `Synchronization`.
# Microsoft Planner Integration
Source: https://mooncamp.com/docs/microsoft-planner-integration
An overview of the Microsoft Planner data integration
## Overview
The Microsoft Planner integration updates your goal progress automatically based on task completion in Planner.
The Planner integration is available for customers on the **Pro** and **Enterprise** plans.
## How to set up the integration
Account admins can enable the Planner integration by following these steps:
1. **Access Integrations:**
Go to your Mooncamp workspace settings and open the Integrations section.
2. **Enable Microsoft Planner:**
Find Microsoft Planner and toggle the integration on.
3. **Connect to Microsoft Planner:**
Any user can then sign in with their Microsoft account and grant access to Planner. Once authorized, users can link their Mooncamp goals with their Plans in Microsoft Planner.
## Using Microsoft Planner for tracking goals
To automatically track progress for a goal using Microsoft Planner, follow these steps:
1. **Create or edit a goal:**
Go to the Progress property and choose a measurement type that allows connecting to a data source.
2. **Select Automatic Progress Tracking:**
Click *Connect to data source* and select **Planner** from the list of available integrations.
3. **Tracking Progress:**
Based on the progress type (numeric or percentage-based), choose how to track progress:
There are two options for selecting the tasks to track progress: `Filter` (filtering a set of tasks of a Plan by buckets and labels) and `Distinct tasks` (selecting a set of tasks from a Plan by hand).
* **Progress of tasks:**
This is one of the most popular options. It allows you to link a plan's progress to one of your goals in Mooncamp. When selected, you'll see the percentage of completed tasks among those you've chosen. Progress updates occur when tasks are marked as `In Progress` or `Completed`. In-progress tasks are considered 50% complete, while fully completed tasks are 100% complete.
Example: If your plan has 10 tasks, with 3 Completed and 2 In Progress, the overall progress would be 40%.
* **Progress of checklist items:**
This shows the percentage of completed checklist items.
Example: If there are 10 checklist items and 3 are completed, the overall progress would be 30%.
* **Count of completed tasks:**
This option returns the number of completed tasks. It's useful when you know in advance how many tasks you need to complete, such as milestones. You can set up your goal to target the total number of tasks.
* **Count of completed checklist items:**
This option returns the number of completed checklist items.
* **Progress of tasks:**
This will measure the progress of one or more selected tasks.
* **Progress of checklist items:**
This shows the percentage of completed checklist items of the selected tasks.
* **Count of completed tasks:**
This option returns the number of completed tasks among the selected tasks.
* **Count of completed checklist items:**
This option returns the number of completed checklist items among the selected tasks.
4. **Choose the Plan:**
Select the Plan you want to link to your goal.
5. **Select tasks (optional, per default all tasks are selected)**
Filter tasks by buckets or select specific tasks, see explanation above.
6. **Save your connection:**
After configuring your tracking settings, click *Save*. The Planner icon will appear next to your goal, indicating it's synced with Microsoft Planner.
### Automatic Progress Updates
Once the integration is active, Mooncamp automatically updates your goals based on changes in MS Planner.
Tip for admins: Go to `Settings > Integrations`, and make sure every day is selected under `Synchronization`.
# Microsoft Power BI Integration
Source: https://mooncamp.com/docs/microsoft-power-bi-integration
An overview of the Microsoft Power BI data integration
## Overview
The Microsoft Power BI integration updates your Mooncamp goal progress automatically based on reports in Power BI.
The MS Power BI integration is available for customers on the `Pro` and `Enterprise` plans.
## How to set up the integration
Account admins can enable the Power BI integration by following these steps:
1. **Access Integrations:**
Go to your Mooncamp workspace settings and open the Integrations section.
2. **Enable Microsoft Power BI:**
Find Microsoft Power BI and toggle the integration on.
3. **Connect to Microsoft Power BI:**
Any user can then sign in with their Microsoft account and grant access to Power BI. Once authorized, users can link their Mooncamp goals with their databases in Microsoft Power BI.
## Using Microsoft Power BI for tracking goals
To automatically track progress for a goal using Microsoft Power BI, follow these steps:
1. **Create or edit a goal:**
Go to the Progress property and choose a measurement type that allows connecting to a data source.
2. **Select Automatic Progress Tracking:**
Click `Connect to data source` and select `Power BI` from the list of available integrations.
3. **Tracking progress with DAX queries:**
You will be presented with a screen where you can select a workspace, a dataset and define a DAX query.
DAX (Data Analysis Expressions) is a query language unique to Power BI, enabling you to extract specific values or entire datasets. Using DAX requires a certain level of technical expertise and familiarity with Power BI administration.
In the section below, you'll find instructions on how to retrieve a DAX query from specific report data.
Please note that the **DAX query needs to return one single value**. This is the value that will be displayed as the progress of your goal.
4. **Save your connection:**
After configuring your tracking settings, click `Save`. The Power BI icon will appear next to your goal, indicating it's synced with Microsoft Power BI.
### Automatic Progress Updates
Once the integration is active, Mooncamp automatically updates your goals based on changes in MS Power BI.
Tip for admins: Go to `Settings > Integrations`, and make sure every day is selected under `Synchronization`.
## How to get a DAX query for a specific report
To retrieve the DAX query that generates a specific value in a Power BI report, follow these steps:
1. **Enable Performance Analyzer**:
* Open your Power BI report in either Power BI Desktop or Power BI Service.
* Go to the `View` tab on the ribbon and click on `Performance Analyzer`.
2. **Start Recording**:
* In the Performance Analyzer pane that appears, click on `Start Recording`.
* Interact with the visual or section of the report where the value you are interested in is located. For example, select or filter the visual to trigger the calculation.
3. **Capture the Query**:
* After interacting with the report, go back to the Performance Analyzer pane and click on `Stop Recording`.
* Locate the specific visual that contains the value you want. Click on the corresponding entry in the Performance Analyzer pane and then click on `Copy Query`.
4. **Retrieve the DAX Query**:
* This action copies the DAX query behind that specific visual to your clipboard. You can then paste the DAX query into any text editor to review or analyze further.
This method gives you the exact DAX query that Power BI is using to compute the value for that visual.
# Microsoft Teams Integration
Source: https://mooncamp.com/docs/microsoft-teams-integration
Learn how to connect Mooncamp with your Microsoft Teams
**Note for admins:** In order for users to be able to use the integration, as a first step it needs to be activated in the admin settings via `Settings > Integrations > Messaging`.
**Please note:** In some cases, your Microsoft Team's system administrator must first unlock the app for it to appear in search. You can find the official link to the Mooncamp app in the Microsoft App Store [**here**](https://appsource.microsoft.com/en-us/product/office/wa200002080).
### Install the Mooncamp Bot
To install Mooncamp in Microsoft Teams, click the `...` icon (ellipsis) in the left sidebar, search for "Mooncamp" and click on the Mooncamp app in the list of search results.
On the Mooncamp app detail page, you can click the `Add` button to add the Mooncamp bot to your workspace. Once Mooncamp is added to Microsoft Teams, the bot will guide you through the next steps.
When you click the `Connect with Mooncamp` button, the bot will guide you to your Mooncamp account. The bot will also tell you that the connection has been successfully established.
**Done! 🎉**
# Mooncamp on Mobile
Source: https://mooncamp.com/docs/mobile-app
A guide to accessing Mooncamp as a mobile app
Mooncamp is built as a so-called "Progressive Web App". This means that with the development and improvement of Mooncamp, our product team constantly ensures that all functions can also be used as a mobile version. You can access Mooncamp as a mobile app with the following steps:
1. Open the URL [app.mooncamp.com](http://app.mooncamp.com) in the browser of your smartphone.
2. If you are using an Apple device with iOS, click on "Share" in your browser and then on "Add to your home screen"; for Android, click on the three dots in the top right corner of the browser and then on "Add to start screen".
3. Mooncamp automatically appears on your home screen and you can now quickly check and update your goals on the go.
# Welcome to Mooncamp
Source: https://mooncamp.com/docs/overview
Your central platform for strategy execution and goal management
## Welcome to Mooncamp 👋
Mooncamp has just been introduced in your organization? This guide will help you
* get familiar with Mooncamp's features
* edit your profile information, display language and upload a profile picture
* configure the notifications you receive
* learn how to create, edit and update goals
To learn about what Mooncamp is and why it will transform the way you do strategy, you can visit the [overview page](/overview).
## Step 1: Familiarize yourself with Mooncamp's platform
### Workspace navigation
* [Sidebar](/sidebar)
* [Your homepage](/homepage)
* [Teamspaces](/teamspaces)
### Core features
* [Goals](/goals-overview)
* [Check-ins](/check-ins)
* [Dashboards](/dashboards), [Progress dashboard](/progress-dashboard) and [Health dashboard](/health-dashboard)
* [Reports](/reports)
* [Integrations](/data-integrations)
* [Planning spaces](/planning-spaces)
## Step 2: Set up your profile and notifications
* [Add your personal information](/profile-settings)
* [Configure the notifications you receive](/personal-notifications)
## Step 3: Learn how to create, edit, and update goals
* [Creating goals](/create-and-edit-goals)
* [Setting the right measurement type](/progress-measurement) for your goals
* [Updating goals](/updating-goals)
* [Adding subgoals](/adding-subgoals) (e.g. Key Results)
* [Deleting and restoring goals](/deleting-goals)
* [Navigating through existing goals](/goals-overview)
## Well done, you're ready to go! 🚀
For a smooth start with Mooncamp you can also check out our [Video Guide](https://mooncamp.com/watch-demo/).
# Exporting Dashboards as PDF
Source: https://mooncamp.com/docs/exporting-dashboards-as-pdf
Navigate to the Progress-, Health- or a Custom Dashboard that you want to export.
Apply the appropriate view or filters so that you only export the data you need.
Click the ellipsis `...` in the top right corner of the screen and select "Save as PDF" to download the PDF file.
# Exporting Goals as CSV
Source: https://mooncamp.com/docs/exporting-goals-as-csv
Navigate to the Goals Explorer.
Apply the appropriate view or filters so that you only export the goals you want.
Click the ellipsis `...` in the top right corner and select "Export CSV" to download the CSV file.
# FAQs
Source: https://mooncamp.com/docs/faqs
Answers to common questions about Mooncamp
## General Tips
## Right-Click Function described
When you are working in Mooncamp and are looking at a list of your goals, you can hover over a goal and then right-click. You will then be presented with a menu which will give you different options to choose from. You also have the possibility to multi-select a group of goals in order to use the right-click function to bulk-edit your goals. This is quite convenient because you don’t have to open the goal to make changes.
## How to use the right-click function
As stated above, when looking at your list of goals, hover over one and right-click. You will then be presented with the following option:
* Delete
* Duplicate - make a copy of the goal
* Duplicate to cycle - copy a goal to a future cycle
* Create subgoal - create a sub-aligned goal or child goal
* Edit property - edit the properties e.g. Cycle, Parent Alignment, Owner etc.
* Edit access rights - edit who has which level of access to the goal
You have the same possibilities with the multi-select except for “Create subgoal”.
## Team & User Management
## Integrations
## Settings & Customization
## Goal Management
# Goal Explorer
Source: https://mooncamp.com/docs/goal-explorer
An overview of the Mooncamp goal explorer
The goal explorer is a tool that serves **four main purposes**:
Admins or workspace owners can create specific views that should be available to all employees.
Users with sufficient permissions can publish views as [public links](/public-links) that are accessible to people outside the workspace.
Users with sufficient permissions can embed views in other apps.
Users can export filtered goals as CSV files.
To access the goal explorer, navigate to the **Goal Explorer** tab in the left sidebar. If you want to export a specific filtered view of your goals as a CSV file, you can do so by clicking the ellipsis `...` in the top right corner of the goal explorer and selecting **Export as CSV** (`1`). Similarly, you can publish a specific view as a [public link](/public-links) or embed it in other apps by switching the `Share to web` toggle on and copying the link or embed code (`2`).
# Goal and OKR rules
Source: https://mooncamp.com/docs/goal-rules
An overview of Mooncamp's customizable rule system for Goals and OKRs
### What are **Goal and OKR rules?**
Under *Settings > Goals > Types,* you will find all created goal types in your OKR or goal management system, such as `Objective`, `Key Result` or `Initiative`.
For each of these goal types you can define specific *rules,* e.g. that `Key Results` may only be aligned to `Objectives`, or that all `Key Results` must have an `Owner`.
The following rules can be set individually per goal type:
* **Setting up the goal hierarchy**: To which goal types may the respective goal type be aligned?
* **Visibility** of properties on the goal type (e.g. all description fields can be hidden if they are empty).
* Specifying allowed **progress measurement types** (Professional and Enterprise Plan)
* Defining **required fields** (Professional and Enterprise Plan)
Details about the specific settings can be found further down in the article.
### Why use Goal and OKR rules?
Rules allow you to completely customize your organization's goal system according to your needs. Among other things, this provides the following benefits:
**1. Setting up your customized goals hierarchy**
With the flexible rule system you can decide yourself how the hierarchy of your goals and OKRs should be structured. As an example, the following rules may be applied:
* Goals of type `Company Objective` may only contribute to `Strategic Pillars`
* `Strategic Pillars` may not be aligned to other goal types (i.e. they are always at the top)
* Goals of type `Team Objective` may only be aligned to `Company Objectives`
* `Key Results` may only be aligned to `Company Objectives` or `Team Objectives`
* `Initiatives` may only be aligned to `Team Objectives` or `Key Results`
**2. Avoid chaos in your goal system**
Rules for hierarchical structure provide guardrails for all employees so that the goal system naturally follows the given structure. Incorrectly aligned goals are also highlighted so that they can be adjusted accordingly.
**3. Ensure correct data entry**
Especially when many teams are working in Mooncamp, it increases the likelihood of "human error" when entering data. Therefore, properties of a goal type, such as `Owner` or `Team`, can be marked as required fields.
### Configuration of the goal hierarchy
Under *Settings > Goals > Types,* all goal types are listed. If, for example, you want to create a rule for the goal type `Key Result` that it can only be aligned to `Objectives`, then first click on the relevant goal type.
A window opens in which all goal properties are listed. Now click on `Parent Alignment`.
The settings for the `Parent Alignment` property of the goal type `Key Result` will open. Under the item `Can be child of`, the goal type `Objective` can now be selected, all other goal types should be deselected.
Et voilà - `Key Results` can now only be aligned to `Objectives`.
💡 Existing or newly created goals that do not follow this rule will be flagged with warnings (`!`) from now on. Furthermore, only allowed goal types will be available for selection when creating subgoals.
### Set allowed progress measurement types per goal type
It may make sense to adjust the progress measurement types depending on the goal type. Typical use cases are, for example:
* `Strategic Pillars` should not have a measurement type (`None`), so there should be no progress measure associated with the goal type
* `Objectives` should have only `Aggregation` as a measurement type
* `Key Results` may have any measurement type except `Open/Done`
* `Initiatives` can only have the measurement type `Open/Done`
To configure the allowed measurement types, click on the relevant goal type and then on `Progress`. Under the item `Measurement`, the allowed measurement types can be selected.
💡 **Note**: Specifying progress measurement types is only available in Mooncamp's `Pro` or `Enterprise Plan`. [Contact our sales team to learn more](mailto:sales@mooncamp.com)
### Marking properties as required fields
In the `Enterprise Plan` you can mark properties as required fields *for each goal type*. If, for example, `Key Results` should always have an `Owner`, then click on the goal type `Key Results` in the list, select `Owner` and mark this as a required field.
Existing or newly created goals that do not follow this rule are now marked with warnings.
💡
**Note**: Required fields are only available in Mooncamp's `Pro` or `Enterprise Plan`. [Contact our sales team to learn more](mailto:sales@mooncamp.com)
### Fixing issues
Goals that violate one or more of the rules are highlighted in the cascade view. On the detail pages of the goals in question, the properties that violate the rules are also highlighted.
To quickly fix the issues without having to go to the detail page of each goal, you can simply click on the red button on the cascade view and adjust the affected fields.
# Goal Statuses
Source: https://mooncamp.com/docs/goal-statuses
An overview of Goal Statuses
## Explanation of Goal Statuses
It is possible to configure goal statuses to align perfectly with the processes and goal system of your company. In the tool, you will find some common preset statuses, but you can easily rename them or add your own statuses to track your goals most effectively.
Additionally, you can categorize your statuses as "Active" and "Closed." Goals with an "Active" status are those that are still being worked on, while "Closed" goals have already been completed or finished.
## Using Goal Statuses
First, navigate to `Settings > Goals > Status`. At the top of the page, you can provide a general name for the status property. `Status` is most commonly used (in OKR contexts, `Confidence` is also a common alternative).
Below, you'll find a list of statuses; some common ones are already available in your account, so you can start tracking your goals right away. Statuses are customizable, allowing you to add additional statuses and edit or delete existing ones. By default, the following statuses, along with their respective thresholds, are set up in your account:
The existing statuses are divided into two groups, "Active" and "Closed." The status `Not started` under `Active` is marked as `default`. This default status is assigned to all newly created goals that have no progress updates yet. It is also fully customizable (for more information on evaluations, groups, and defaults, see below). You can easily rearrange these statuses within their respective groups by using the dragging and dropping the different statuses. By clicking the arrow on the right side, you can view and edit the settings of a status:
### Name
Set a title for your status if you want to rename some of the preset titles or create a new one.
### Archive
Additionally, you can archive a status, which will then be displayed in the archive section below. Here, items can either be restored or permanently deleted. However, permanent deletion is only possible as long as a status is not used in a goal update in your account.
### Set as Default
With this feature, you can set a status as the default. A default status is automatically selected if a goal has no updates yet.
A default status cannot be archived. First, it must be changed to a non-default status.
### Group
A status is always assigned to a group. Here, you have the options "Active" or "Closed." Active goals are those currently being actively worked on, while closed goals have already been finished. By default, you can close out goals by marking them as "Achieved," "Partial," "Missed," or "Dropped" (in case you decide not to continue tracking them). Of course, you can also define your own "Closed" statuses.
Note that closed goals can still be edited if necessary.
### Thresholds
It is possible to assign a threshold to each of your statuses. There are already preset suggestions, such as 0% for `Off track`, 70% for `Progressing`, 90% for `On track`, and 100% for `Achieved`, 50% for partially achieved goals, or 0% for `Missed`. These are all adjustable, and you can essentially assign any number to tailor the statuses to your individual goal system and processes. For example, it would also be possible to represent a confidence scale from 0 to 10, as this is quite commonly used in the OKR world.
Thresholds come into effect in two different scenarios. Firstly, every time you create a new goal update, a status recommendation is displayed. This recommendation is based on the value you enter and the threshold assigned in the status settings. In practice, this means that when updating a goal to 30% progress (relative to the time passed within the assigned cycle), the system will automatically suggest the status whose threshold is less than or equal to 30% and is closest to 30%.
Time-weighted progress measures how far a goal has advanced in relation to the elapsed time. For example, 30% progress at 50% of the time corresponds to a time-weighted progress of 30% / 0.5 = 60%.
Secondly, the charts on the [Progress Dashboard](/progress-dashboard) display an average value based on the assessment of goal statuses. Here, you have the option to display either the average or the distribution of statuses.
### Color
Different colors can be assigned to a status. As we suggest in the presets, it is quite common to use traffic light colors to indicate various progress levels of goals. So, when a goal's progress has started, it may make sense to display a change as follows: red for goals that are behind schedule, yellow for generally progressing goals, and green for those progressing as planned. If a goal is inactive, because it is not being pursued further, it can be grayed out.
Please note that the colors used to visually represent progress in your [Progress Dashboard](/progress-dashboard) and in the [network view](/views) do not originate from the status colors. Instead, they correspond to your settings set in `Settings > Goals > Progress Indicator Thresholds`. Here, progress for the Progress Dashboard and the network view can be predefined in three different levels: red, yellow, and green. You are free to define the percentage thresholds for these levels.
# Goal Tree
Source: https://mooncamp.com/docs/goal-tree
An overview of the Mooncamp Goal Tree
The Goal Tree View is available for customers in the **`Pro`** and **`Enterprise`** plan.
## Goal Tree View explained
The goal tree view offers the most visual way of displaying goals and OKRs. It can actually be used as a drawing board to map out all your strategic pillars, focus areas, goals, and initiatives in a hierarchical view. It gives a high-level overview of your company’s strategy and each aligned goal is shown as a card with all relevant info in one view. The cards are connected as hierarchical branches and can easily be moved around and realigned via drag and drop. You can zoom in on certain OKR sets or focus areas as well as quickly discover isolated goals and align them correctly.
If you don’t feel like reading, check out the video tutorial below. It gives a general overview of the Goal Tree View function.
## How to use the Goal Tree View
With the goal tree view you have numerous different ways to conveniently draft and work with your goals and OKRs.
First of all, as you know from the cascade view, you can easily **inline-edit** your goal title, properties and progress. Via the edit button in the top right corner of a goal card you can access the edit-mode without leaving the page. With one further click on this button, you can open the goal **detail page** as a modal or further as a whole page.
Using the ellipsis `...` also in the upper right corner of a goal card, you have all the functions that usually come with the right-click in the goal explorer, such as deletion or duplication of a goal, creating sub-goals, editing access rights or properties. You can also use the right-click on a goal card to access these functions.
On the goal cards you can see a “+”-button on each side of every card. With these you can add sub-, parent- or sibling-goals of different types into the chosen direction. Once your goal tree has several levels, there is the function to **expand or collapse** all levels at once. You can find this via the right-click or the ellipsis `...` in the upper right corner of a goal card. If you would like to expand or collapse levels one by one, you can use the “Expand next level”-function via the ellipsis `...` in the upper right corner of the goal tree view. A further function via the “^1” in the lower right corner of each goal card that contains a sub-goal, you can expand specific goals below each goal card.
This settings menu further contains **property and card size settings**. It helps you to show or hide properties congruently on all shown goal cards. In general, empty properties will not be shown on an individual goal card, only when they are filled. Also the card width is adjustable to small, medium or large in order to make it more condense or show more content.
The sorting and filter functions work in the same way as you are used to in the cascade view.
### Scrolling and Zooming Controls
Since the goal tree view is a very visual overview of your goals and OKRs, it is helpful to master a few scrolling and zooming short-cuts
* To **scroll vertically**, simply use your scroll wheel on the mouse.
* In order to move the content **horizontally**, hold the shift key on your keyboard and then use the scroll wheel. This works on any mouse or trackpad.
* For **zooming in or out**, press and hold the Ctrl key (for Windows or Linux) or the command key (for macOS), then use the scroll wheel or trackpad.
Please note that with larger data sets, the data is being loaded while you are scrolling.
### Select mode and hand mode
With the **select mode**, you can select several items and perform bulk actions.
* Press and hold the left mouse button, then drag the cursor to select multiple goals or items.
* Use the Select Tool for performing bulk actions on the selected items.
The **hand mode** allows you to move the content by dragging.
* Press and hold the left mouse button.
* While holding the button, move the mouse to drag and navigate through the content.
### Realigning goals
In order to realign a goal, switch to the hand mode and simply drag and drop the according goal to a new location and it connects automatically.
# Goal Types
Source: https://mooncamp.com/docs/goal-types
An overview of goal types in Mooncamp
## Goal Types explained
Any goal you create in Mooncamp is generally termed as *goal* and can be assigned with a goal type. If you are using the OKR method, the most commonly used goal types are Objectives and Key Results. These two types are pre-defined in your Mooncamp account. In the sphere of OKRs, organizations use other customized goal types to adapt to their individual goal setting practices. Above the Objective level, e.g. *strategic pillars* or *yearly goals* are used. Below Key Results, organisations work with *projects*, *initiatives* or *tasks*. Further, organizations differentiate between *Company Objectives* and *Team Objectives* or even use different terms for *Objectives* or *Key Results*. Therefore, with Mooncamp you can flexibly customize and create your own goal types.
## How to use Goal Types
**As an admin**, via *Settings > Goals > Types and rules* you find the two pre-defined goal types *Objectives* and *Key Results*. Via the *New* buttons you can add your own goal types, e.g. Strategic Pillars, Initiatives or Tasks. Once you have a longer list of goal types, the six-point icon on the left helps you to drag and drop them into the chosen hierarchy.
Via the ellipsis `...` next to each goal type you can either edit, duplicate or delete a goal type (the two pre-defined goal types cannot be deleted but renamed). Behind the edit button you can find a range of functions. Under ‘Edit type’ you can specify a name as well as add an icon and a colour to your goal type. Especially the icons can later be quite helpful in larger goal hierarchies to quickly differentiate between the different types at one glance.
All settings below *Properties* support you to create **rules for your different goal types**. These rules inlcude settings regarding the hierarchy between goal types, permitted measurements for goal types or the visibility of properties on a goal detail page for specific goal types (i.e. properties can be set as *required* or *not required* or as *always visible,* *hidden when empty* or *always hidden*). For detailed infos, please navigate to [this article](/goal-rules).
## Useful examples for goal types
As the abbreviation says, the goal types in the common OKR method consist of **Objectives** and **Key Results**. Yet, there are many different ways how organizations adjust the method to their specific needs. Organizations might have the need for another layer above their quarterly objectives and work with **Strategic Pillars** or **Yearly Goals**, which some also call **Mid-Term Goals** (**MOALs**). Further there can be the need to have more granular layers below quarterly Key Results, for example **Initiatives** or specific **Tasks** that might be attached to these. What can also be helpful is to have a direct link between OKRs, **Projects** and **KPIs** in one tool, therefore some organizations also use these two as goal types within Mooncamp. For larger organisations it might be useful to differentiate between Company OKRs and Team OKRs and create specific goal types for these, i.e. **Company Objectives and -Key Results** as well as **Team Objectives and Key Results**.
**Tip:** Setting a **colored icon** for each goal type can be very helpful in keeping a **better overview** in bigger goal hierachies and **distinguishing** the different types at one glance.
# Goals Overview
Source: https://mooncamp.com/docs/goals-overview
Navigating goals on company, team and individual level
You can access various views of Goals in the sidebar:
* The teamspace of your organization, your team, as well as other teamspaces
* Your homepage
* Goal Explorer
### Teamspaces (organization and subteams)
### Homepage
Here you can see all goals assigned to you at a glance. You can also use filters to define which goals should be displayed on your own homepage.
### Goal Explorer
In the Goal Explorer you can explore goals in different views (e.g. cascade or network), apply filters, and save your own views.
# Goals Settings
Source: https://mooncamp.com/docs/goals-settings
An overview of the goal settings page in the settings
To get to the goal settings page, navigate to `Settings` and then click on `Goals > Settings` at the bottom.
## Display name
What name would you like displayed throughout the app when referring to your goals. Most companies stay with "Goals" but some of our customers use terms like "OKRs".
## Default access of your goals
This setting defines the default access rights of your goals when they are created. For example, in the screenshot below, the default access is set so that when a user creates a goal, they have full access and everyone else in the account can comment. That means they can comment and even give updates to the goal, but can’t edit or give access rights.
The different levels of access are defined as follows:
* No access
* Can view - means they can see the goal but can’t interact with it in any way, not even leave a comment.
* Can comment - means they can comment and give updates
* Can edit - means they can edit title and properties, but not the access rights.
* Full access - all of the above plus you can give access rights to others.
## Progress indicator thresholds
This where you can define the thresholds for what is off track, progressing, or on track. In the example below, the settings are quite ambitious. Some of our customers lower them so that the results don’t have a negative effect on employee morale.
# Google Sheets Integration
Source: https://mooncamp.com/docs/google-sheets-integration
An overview of the data integration with Google Sheets.
## The Google Sheets integration described
The Google Sheets integration allows you to pull data from a specific cell within a Google Sheets document and use it to automatically update your goals in Mooncamp. In order to access documents via Mooncamp, you need to have access to the Google Sheets file with your e-mail. You will also need to create a connection to Google Sheets.
## Connecting goals to Google Sheets
As a first step, the admin of your Mooncamp account needs to make sure that the integration is activated via `Settings > Integrations > Data Integrations > Google Sheets`.
In order to connect to Google Sheets, please see our article on connecting to data integrations: [Connecting goals to data integrations](/data-integrations)
Please be aware that for **Google Sheets** you can only connect files from your **personal Google Drive** and no files from any shared folders. However, via the privacy settings of your data connection, you can share your files with other members within your Mooncamp account (for details, please see [here](/data-integrations).)
## Selecting a cell
Once you have created the connection to Google Sheets, the next step is to select the document you want to reference. By clicking on the document drop down box, you will find a list of available documents. After that, you can select the correct sheet / table and lastly, you can enter the correct column and row. Now, anytime that cell is updated, it will automatically update the value in Mooncamp.
Tip for admins: Go to `Settings > Integrations` and make sure every day is selected under `Synchronization`.
# Health Dashboard
Source: https://mooncamp.com/docs/health-dashboard
An overview of the Health dashboard for goals and OKRs.
The Health dashboard is available for customers in the `Pro` and `Enterprise` plan.
## The Health Dashboard explained
With the Health dashboard, you can do a comprehensive health and quality check on all of your organization’s goals. Consider it a cockpit from where you can quickly identify and solve any issues with your goals. This helps to ensure that your whole goal management process is running smoothly and that everyone follows the [Goal and OKR rules](/goal-rules) that you configured in the settings area.
**Important note:** In order to grant all members access to progress- and health dashboards, this needs to be set once by the admin under `Settings > Access groups > Member > Can view progress and health dashboards`.
## Navigating the Health dashboard
The health dashboard can be found under `Dashboards` in the sidebar.
Once you’ve found the Health Dashboard, there are a few important areas to note.
1. **Add a view**: Here you can create different views in combination with the filter function.
2. **Cycle picker**: Make sure you are viewing the correct cycle in order to see the most relevant data.
3. **Filter function**: Filter for any [properties](/properties) you have in the system.
4. **Share:** Share the link with your colleagues who also have access to Mooncamp.
5. **Favorite**: Add the view to your favorites, so you have it easily accessible in the left-hand side.
Via the ellipsis (…) in the upper right corner of the screen, the Health Dashboard can be exported as a **PDF file**.
## Overview
At the top of the page you have “Overview” and under that, 3 metrics. This is the easiest and quickest way to get an idea of how many goals have issues.
* **Goals with invalid parent goal**: If you click on the metric, you will find a list of goals which have an invalid parent goal. There are three different reasons why goals can show up here. `1` The parent goal is the wrong type (e.g. a `Key Result` is a parent of an `Objective`), `2` the parent goal is empty, although it should have a parent (e.g. an initiative), and `3` the parent goal is not empty, although it shouldn’t have a parent goal (e.g. a `Strategic Pillar`)
* **Goals with missing properties**: If you click on the metric, you will find a list of goals with missing properties. What properties should always be filled in can be configured in the settings area under [Types and rules](/goal-rules).
* **Goals with invalid measurement types**: If you click on the metric, you will find a list of goals which have invalid measurement types (e.g. you could set up a rule that initiatives should always have the measurement type “Open/Done” applied).
Here is an example:
By clicking on the red buttons in the list above, you can easily solve any issues with your goals.
## Health check by goal type
In this space, each goal type has its information broken down into up to 4 main categories. Let’s use a `Key Result` as an example. Everything is interactive, so be sure to click on the different charts to see the filtered list of goals.
* **Goals with invalid vs. valid parent goal**: This shows how many goals have the correct parent goal and how many have the wrong parent goal.
* **Goals with missing vs. existing property values**: This shows how many goals have all the required properties filled out and how many have missing property values.
* **Goals with invalid vs. valid measurement types:** Here you will find, how many of each measurement type is being used. If there are goals using the incorrect measurement type, they will show up red.
* **Automated vs. manual**: This report shows how many goals are updated manually and how many goals are updated via data integrations. This only refers to goals which are using “Start and target value” or “Threshold” as a measurement type (only these types can be synched via data integrations).
**Remember**: All this information is based on the rules you have set up in the settings, so be sure to check out our article on [rules](/goal-rules).
## Breakdown
Last, but not least, we have the breakdown section at the bottom of the page. In this table, each team is listed with their total number of goals as well as the goals that still have issues, like invalid parent goals, missing property values, or invalid measurement types. Here the numbers are also interactive, so you can click on them to see the list of goals.
# Homepage
Source: https://mooncamp.com/docs/homepage
An overview of the homepage
Your individual homepage allows you to directly access all of your workspace's tools.
On your homepage you can:
1. View and update your goals and create new goals
2. View and edit your check-ins and create new check-ins
3. View public profile information about you
# Hubspot Integration
Source: https://mooncamp.com/docs/hubspot-integration
An overview of the data integration with Hubspot.
## The Hubspot integration described
The Hubspot integration allows you to pull data from specific metrics within Hubspot, in order to automatically update your goals in Mooncamp. This is a one way integration, which means you can only pull data from Hubspot and not send it. At the moment, there is a set list of metrics you can choose from and these are mainly marketing based. The available metrics you can find below.
* Number of raw views
* Number of visits
* Number of visitors
* Number of leads
* Number of contacts
* Number of subscribers
* Number of MQLs
* Number of SQLs
* Number of opportunities
* Number of customers
* Average page views per session
* % bounce rate
* Time per session (in seconds)
* % new sessions
* % session to contact
* % contact to customer
## Connecting to Hubspot
In order to connect to Hubspot, please see our article on connecting to data integration below.
[Connecting goals to data integration](/data-integrations)
## Selecting your metric and date range
Once you have created the connection to Hubspot, you can select the metric you want to pull from and the time range which should be considered.
Tip for the Admins: Go to Settings → Integrations → and make sure every day is selected under “Synchronization”.
# Info Page
Source: https://mooncamp.com/docs/info-page
A page to share general information about the company, OKR processes or other important details
The Info Page is available for customers in the **`Pro`** and **`Enterprise`** plan.
Under `Settings > General` you can create an info page that is accessible to all employees. The content of this page can be defined freely; typically, internal contact persons, user agreements, legal information or general information on the OKR process are communicated here. The info page can be especially helpful for new team members that join your organization. You can activate to show the page either in the help area (via the question mark in the lower right corner of every page), to new employees during their Mooncamp onboarding, or both.
# Jira Integration
Source: https://mooncamp.com/docs/jira-integration
Learn how to connect Jira to Mooncamp goals
## Jira Integration described
With Mooncamp's Jira integration, you can easily synchronize all issues, user stories or epics in Jira with goals in Mooncamp. The progress of goals can thus be updated automatically.
## For Admins
### Before setup (required for on-premise hosting)
If your Jira instance is hosted on-premise (self-managed), you should ask your IT/Jira administrator to set up an [Application Link](https://confluence.atlassian.com/adminjiraserver/using-applinks-to-link-to-other-applications-938846918.html) within Jira.
Please note that if the Application Link is not configured in your Jira instance, the Jira connection will fail.
### Create a new Jira connection
**Step 1:** Link a goal to Jira by clicking `Start and Target Value` or `Threshold` under `Progress` and then `Connect to data source`. A window will open where you will need to provide information about the integration.
**Step 2:** Adjust the name of the Jira connection if needed and select whether all users of this account in Mooncamp should be able to access the connection.
**Step 3:** Select whether your Jira instance is self-managed (on-premise) or hosted in the cloud. If you're not sure which type your instance is, check with your IT/Jira administrator.
**Step 4:** Add your server URL. Here it is important that you stick to the following format: `[yourdomain.atlassian.net](http://clientdomain.atlassian.net)` (so without `https://` at the start and without `/jira/` at the end).
**Step 5: Connect to Jira**
* For self-managed **instances**, click the `Sign in with Jira` button and follow the instructions.
* For cloud instances, enter the email address and API token associated with your Jira account. The instructions for creating an API token for your Jira Cloud account can be found [here](https://confluence.atlassian.com/cloud/api-tokens-938839638.html).
**Done!** 🎉 You can now have goals in Mooncamp automatically updated using the connection you created with Jira.
💡 Tip for the Admins: Go to `Settings` → `Integrations` → and make sure every day is selected under “Synchronization”.
## For Employees (Non-Admins)
### Update goals with Jira
**Step 1**: You can choose between two types of measurement:
* `Overall progress`, expressed as the ratio of two Jira issue sets (e.g., the ratio of all issues with status `Done` divided by all issues in the project)
* `Number of issues`, captured by the JQL query
**Step 2:** Define the JQL queries, by populating the fields for "[JQL](https://www.atlassian.com/blog/jira-software/jql-the-most-flexible-way-to-search-jira-14)". The Jira issues are queried using a JQL query. A JQL query can be copied from Jira.
**Note:** For more information on how JIRA does time and progress tracking, see this [Jira article.](https://confluence.atlassian.com/jiraportfolioserver0326/tracking-progress-and-status-1005330901.html)
# Managing Employees
Source: https://mooncamp.com/docs/managing-employees
Adding and managing employees in Mooncamp
As an admin, you can add new employees (members) to your workspace or edit existing ones under `Settings > Members`.
On the member management page you can:
* Add members manually
* Add multiple members via CSV import or export multiple members via CSV export
* Edit member information (name, email, language, ...)
* Delete members from Mooncamp
* Send invitations to Mooncamp to individual members by email
## Add members manually
By clicking on `Add user` you can create a new user and specify name, email, account language, and any other custom properties you have created.
If you check the box `Send invitation email` when adding a new member, the member will receive an invitation via email.
## Import members via CSV
By clicking on `Import CSV` you can upload a CSV file (Comma Separated Value) with all members. Here you can also download a CSV file as a template.
For each new row in the CSV file a new member will be added.
## Invite-Link
Once all members have successfully been added, you can use the invite-link to collectively invite existing users to Mooncamp. The link is located under `Settings > General` and can be copied there. Members can easily register using the link; an important requirement for this is that they have already been created within Mooncamp under `Settings > Members`.
# Microsoft Excel Integration
Source: https://mooncamp.com/docs/microsoft-excel-integration
An overview of the data integration with Microsoft Excel
Please note that the integration only works with the web version of Microsoft Excel.
## The Microsoft Excel integration described
The Microsoft Excel integration allows you to pull data from a specific cell within a Microsoft Excel document and use it to automatically update your goals in Mooncamp. In order to access documents via Mooncamp, you need to have access to the Excel Online file with your e-mail. You will also need to create a connection to Excel Online.
## Connecting goals to Microsoft Excel
As a first step, the admin of your Mooncamp account needs to make sure that the integration is activated via `Settings > Integrations > Data Integrations > Microsoft Excel`.
In order to connect to Microsoft Excel, please see our article on connecting to data integrations: [Connecting goals to data integrations](/data-integrations)
Please be aware that for **Microsoft Excel** you can only connect files from your **OneDrive**, not from SharePoint. However, via the privacy settings of your data connection, you can share your files with other members within your Mooncamp account (for details, please see [here](/data-integrations)).
## Selecting your cell
Once you have created the connection to Excel Online, the next step is to select the document you want to reference. By clicking on the document drop down box, you will find a list of available documents. After that, you can select the correct sheet / table and lastly, you can enter the correct column and row. Now, anytime that cell is updated, it will automatically update the value in Mooncamp.
Tip for the Admins: Go to `Settings > Integrations` and make sure every day is selected under `Synchronization`.
# Microsoft Planner Integration
Source: https://mooncamp.com/docs/microsoft-planner-integration
An overview of the Microsoft Planner data integration
## Overview
The Microsoft Planner integration updates your goal progress automatically based on task completion in Planner.
The Planner integration is available for customers on the **Pro** and **Enterprise** plans.
## How to set up the integration
Account admins can enable the Planner integration by following these steps:
1. **Access Integrations:**
Go to your Mooncamp workspace settings and open the Integrations section.
2. **Enable Microsoft Planner:**
Find Microsoft Planner and toggle the integration on.
3. **Connect to Microsoft Planner:**
Any user can then sign in with their Microsoft account and grant access to Planner. Once authorized, users can link their Mooncamp goals with their Plans in Microsoft Planner.
## Using Microsoft Planner for tracking goals
To automatically track progress for a goal using Microsoft Planner, follow these steps:
1. **Create or edit a goal:**
Go to the Progress property and choose a measurement type that allows connecting to a data source.
2. **Select Automatic Progress Tracking:**
Click *Connect to data source* and select **Planner** from the list of available integrations.
3. **Tracking Progress:**
Based on the progress type (numeric or percentage-based), choose how to track progress:
There are two options for selecting the tasks to track progress: `Filter` (filtering a set of tasks of a Plan by buckets and labels) and `Distinct tasks` (selecting a set of tasks from a Plan by hand).
* **Progress of tasks:**
This is one of the most popular options. It allows you to link a plan's progress to one of your goals in Mooncamp. When selected, you'll see the percentage of completed tasks among those you've chosen. Progress updates occur when tasks are marked as `In Progress` or `Completed`. In-progress tasks are considered 50% complete, while fully completed tasks are 100% complete.
Example: If your plan has 10 tasks, with 3 Completed and 2 In Progress, the overall progress would be 40%.
* **Progress of checklist items:**
This shows the percentage of completed checklist items.
Example: If there are 10 checklist items and 3 are completed, the overall progress would be 30%.
* **Count of completed tasks:**
This option returns the number of completed tasks. It's useful when you know in advance how many tasks you need to complete, such as milestones. You can set up your goal to target the total number of tasks.
* **Count of completed checklist items:**
This option returns the number of completed checklist items.
* **Progress of tasks:**
This will measure the progress of one or more selected tasks.
* **Progress of checklist items:**
This shows the percentage of completed checklist items of the selected tasks.
* **Count of completed tasks:**
This option returns the number of completed tasks among the selected tasks.
* **Count of completed checklist items:**
This option returns the number of completed checklist items among the selected tasks.
4. **Choose the Plan:**
Select the Plan you want to link to your goal.
5. **Select tasks (optional, per default all tasks are selected)**
Filter tasks by buckets or select specific tasks, see explanation above.
6. **Save your connection:**
After configuring your tracking settings, click *Save*. The Planner icon will appear next to your goal, indicating it's synced with Microsoft Planner.
### Automatic Progress Updates
Once the integration is active, Mooncamp automatically updates your goals based on changes in MS Planner.
Tip for admins: Go to `Settings > Integrations`, and make sure every day is selected under `Synchronization`.
# Microsoft Power BI Integration
Source: https://mooncamp.com/docs/microsoft-power-bi-integration
An overview of the Microsoft Power BI data integration
## Overview
The Microsoft Power BI integration updates your Mooncamp goal progress automatically based on reports in Power BI.
The MS Power BI integration is available for customers on the `Pro` and `Enterprise` plans.
## How to set up the integration
Account admins can enable the Power BI integration by following these steps:
1. **Access Integrations:**
Go to your Mooncamp workspace settings and open the Integrations section.
2. **Enable Microsoft Power BI:**
Find Microsoft Power BI and toggle the integration on.
3. **Connect to Microsoft Power BI:**
Any user can then sign in with their Microsoft account and grant access to Power BI. Once authorized, users can link their Mooncamp goals with their databases in Microsoft Power BI.
## Using Microsoft Power BI for tracking goals
To automatically track progress for a goal using Microsoft Power BI, follow these steps:
1. **Create or edit a goal:**
Go to the Progress property and choose a measurement type that allows connecting to a data source.
2. **Select Automatic Progress Tracking:**
Click `Connect to data source` and select `Power BI` from the list of available integrations.
3. **Tracking progress with DAX queries:**
You will be presented with a screen where you can select a workspace, a dataset and define a DAX query.
DAX (Data Analysis Expressions) is a query language unique to Power BI, enabling you to extract specific values or entire datasets. Using DAX requires a certain level of technical expertise and familiarity with Power BI administration.
In the section below, you'll find instructions on how to retrieve a DAX query from specific report data.
Please note that the **DAX query needs to return one single value**. This is the value that will be displayed as the progress of your goal.
4. **Save your connection:**
After configuring your tracking settings, click `Save`. The Power BI icon will appear next to your goal, indicating it's synced with Microsoft Power BI.
### Automatic Progress Updates
Once the integration is active, Mooncamp automatically updates your goals based on changes in MS Power BI.
Tip for admins: Go to `Settings > Integrations`, and make sure every day is selected under `Synchronization`.
## How to get a DAX query for a specific report
To retrieve the DAX query that generates a specific value in a Power BI report, follow these steps:
1. **Enable Performance Analyzer**:
* Open your Power BI report in either Power BI Desktop or Power BI Service.
* Go to the `View` tab on the ribbon and click on `Performance Analyzer`.
2. **Start Recording**:
* In the Performance Analyzer pane that appears, click on `Start Recording`.
* Interact with the visual or section of the report where the value you are interested in is located. For example, select or filter the visual to trigger the calculation.
3. **Capture the Query**:
* After interacting with the report, go back to the Performance Analyzer pane and click on `Stop Recording`.
* Locate the specific visual that contains the value you want. Click on the corresponding entry in the Performance Analyzer pane and then click on `Copy Query`.
4. **Retrieve the DAX Query**:
* This action copies the DAX query behind that specific visual to your clipboard. You can then paste the DAX query into any text editor to review or analyze further.
This method gives you the exact DAX query that Power BI is using to compute the value for that visual.
# Microsoft Teams Integration
Source: https://mooncamp.com/docs/microsoft-teams-integration
Learn how to connect Mooncamp with your Microsoft Teams
**Note for admins:** In order for users to be able to use the integration, as a first step it needs to be activated in the admin settings via `Settings > Integrations > Messaging`.
**Please note:** In some cases, your Microsoft Team's system administrator must first unlock the app for it to appear in search. You can find the official link to the Mooncamp app in the Microsoft App Store [**here**](https://appsource.microsoft.com/en-us/product/office/wa200002080).
### Install the Mooncamp Bot
To install Mooncamp in Microsoft Teams, click the `...` icon (ellipsis) in the left sidebar, search for "Mooncamp" and click on the Mooncamp app in the list of search results.
On the Mooncamp app detail page, you can click the `Add` button to add the Mooncamp bot to your workspace. Once Mooncamp is added to Microsoft Teams, the bot will guide you through the next steps.
When you click the `Connect with Mooncamp` button, the bot will guide you to your Mooncamp account. The bot will also tell you that the connection has been successfully established.
**Done! 🎉**
# Mooncamp on Mobile
Source: https://mooncamp.com/docs/mobile-app
A guide to accessing Mooncamp as a mobile app
Mooncamp is built as a so-called "Progressive Web App". This means that with the development and improvement of Mooncamp, our product team constantly ensures that all functions can also be used as a mobile version. You can access Mooncamp as a mobile app with the following steps:
1. Open the URL [app.mooncamp.com](http://app.mooncamp.com) in the browser of your smartphone.
2. If you are using an Apple device with iOS, click on "Share" in your browser and then on "Add to your home screen"; for Android, click on the three dots in the top right corner of the browser and then on "Add to start screen".
3. Mooncamp automatically appears on your home screen and you can now quickly check and update your goals on the go.
# Welcome to Mooncamp
Source: https://mooncamp.com/docs/overview
Your central platform for strategy execution and goal management
 ## What is Mooncamp?
Mooncamp is a comprehensive strategy execution platform that brings together your organization's strategic vision, goals, and day-to-day operations in one place. By connecting strategic planning with execution, Mooncamp helps organizations transform their vision into measurable results.
## Why Mooncamp? Challenges of today's organizations
Organizations face critical challenges that make or break their success:
Teams working in isolation with disconnected plans and priorities
Critical information scattered across multiple systems and tools
Disconnect between high-level strategy and day-to-day operations
Suboptimal allocation of time, budget, and talent
Lack of clear, consistent messaging about strategic priorities
Difficulty measuring and monitoring strategic initiative outcomes
## Mooncamp solves these challenges by unlocking five key benefits:
You can view these benefits as stepping stones or building blocks to level up your strategy execution.
**With each level, you unlock new benefits on your way to strategic and operational excellence.**
Gain complete visibility into your strategy execution and business health. Identify risks early, track progress in real-time, and make informed decisions based on actual data. Ensure every employee understands the strategy through clear communication, fostering transparency across the organization.
Eliminate activities that don't drive results. Prioritize strategic initiatives and ensure resources are allocated to what matters most.
Break down silos between teams and create clear connections between company strategy and daily work. Ensure everyone understands how their efforts contribute to organizational success.
Establish clear ownership for goals and initiatives with transparent tracking and progress updates. Enable data-driven measurement of deliverables and outcomes.
Enhance your organization's ability to adapt quickly to changes and seize opportunities. Streamline processes to accelerate execution and drive faster results.
## Achieving Strategy Execution Excellence with Mooncamp
Below are the core features of Mooncamp's platform that help you achieve transparency, focus, alignment, accountability, and execution velocity step by step.
Set up your strategic structure: Define your focus areas, goals, OKRs, and initiatives in one place to ensure everyone is on the same page.
Completely customizable dashboards and reports to track your strategy performance or OKR processes. Schedule recurring reports to keep everyone in the loop.
Use check-ins to create team alignment, remind everyone to update their goals, provide thoughtful communication and boost productivity.
Get a big picture view and track how well your goals and initiatives align with the corporate strategy. Quickly identify synergies or unaligned initiatives.
## Get started with Mooncamp
Learn how to set up your account, invite users and customize your strategy framework.
Learn how to get started with Mooncamp as a team member.
# Notifications
Source: https://mooncamp.com/docs/personal-notifications
Choose through which channels and for which events you would like to receive Mooncamp message
Under *Settings > Notifications*, you can set for yourself which channels you want to be notified on and which events you want to receive notifications about.
### Channels:
* Email
* Slack (integration must be enabled first)
* Microsoft Teams (integration must be enabled first)
In addition to these external channels, you will also receive personal notifications via the inbox within the Mooncamp platform.
### Notifications:
* **Direct messages**: Get a notification when someone replies to your comments or update, or mentions you with @username.
* **Updates on goals**: Get a notification when a goal you're subscribed to is updated.
* **Assignments on goals**: Receive a notification when you are assigned to a goal.
* **Reminder for check-ins**: Receive a notification when it's time to do your check-in.
# Planning spaces
Source: https://mooncamp.com/docs/planning-spaces
An overview of planning spaces and goal drafts
### What are planning spaces?
A planning space is a dedicated area in which you can create goal or OKR drafts together with your team before they are published across your organization.
### Why should you use planning spaces?
Planning spaces are a core part of the OKR process and provide the following benefits, among others:
**Writing good OKRs**
A dedicated area for OKR drafts to be discussed within the team first helps formulate good OKRs before they are published.
**Conscious alignment with overall goals**
As soon as OKRs from other departments or organizational levels (e.g. leadership OKRs) are published, the draft goals from your planning space can be aligned to them.
**Keeping the overview**
Finally, a separate area for goal drafts helps you keep track and not mix your drafts with published goals.
### Planning spaces overview
First navigate to the 'Goals' module and click on the 'Planning' sub-item. From here you will see a list of all *open* plannings (to which you have access).
To show all or only closed planning spaces, click on "Open" in the table header (`1`) and select the appropriate option.
### Creating a planning space
To create a planning space, click on the blue button `1` or on the last row in the table `2`. A window will then open where you can assign the planning space to your team (or teams) and to a cycle before creating it. A name for the planning space will be suggested by Mooncamp, but it can be overwritten.
💡 All users can create, share, edit and delete their own planning spaces. The same applies to planning spaces to which they have full access. If employees do not have the right to create goals, they will not be able to create goal drafts.
### Sharing the planning space with others in your organization
By default, a planning space is shared with the selected team(s) it is associated with. Each team member has full access to the planning space and has the following rights:
* Edit access to the planning space
* Edit the planning space
* Edit name
* Edit cycle
* Edit team
* Create and edit views
* Close and open the planning space
* Create and edit goal drafts
* Publish goal drafts
By default, the rest of the organization does not have access to the planning space. However, the settings can be changed at any time by clicking on "Share" `1`.
### Creating goal drafts
Every goal that is created within a planning space has the status "Draft" by default.
There are two ways to create goal drafts:
**Create drafts yourself**
Goal drafts can be created just like other goals using the blue button or the last row in the table.
**Import goals as drafts**
Often goals change only slightly from cycle to cycle, so it makes sense to import existing goals as duplicates in order to adjust them.
When creating a planning space, you can select whether goals should be imported or not. In addition, goals can be imported at any time by clicking on the ellipsis icon ("...") at the top of the screen and selecting "Import goals" `1`.
### Publishing goal drafts
After working and finalizing the goal drafts and finalizing the goals, they can be published by clicking on the blue button at the top of the screen `1`.
In the window that opens, you can choose whether to publish all the drafts or just a selection of them. With publishing you can also select whether the planning space should be closed afterwards.
### Closing a planning space
When a planning space is closed, no more drafts can be created and it disappears from the list of open planning spaces.
A planning space can be closed in the context of publishing goal drafts `1` or via the ellipsis menu item at the top of the screen `2`.
A planning space can be reopened at any time by clicking on "Reopen" at the top of the screen.
# Personal Information and Reset Password
Source: https://mooncamp.com/docs/profile-settings
Change your name, profile picture, and account language or reset your password
Under *Settings > Profile* you can:
* Upload a **profile picture**, which will appear on your [homepage](/homepage), your public profile page and next to your name in various tools as an "avatar".
* Change your **first** **and** **last name**
* View your **email address** that you are registered with at Mooncamp
* Change the **language** in your account (English and German are supported so far)
* Reset your **password**
# Progress Dashboard
Source: https://mooncamp.com/docs/progress-dashboard
An overview of the Progress dashboard for goals and OKRs.
💡 **Important note:** In order to grant all members access to progress- and health dashboards, this needs to be set once by the admin under *Settings > Access groups > Member > Can view progress and health dashboards*.
The Progress dashboard provides information on the progress of all goals, grouped by team or employee. Any number of filters can be applied to show, e.g., goals that have not been updated yet, are not aligned, or are at risk.
### List of the features and elements of the Goals Dashboard:
**1. Views**
Switch between views and create your own private (if authorized, also public) views.
**2. Key Metrics**
* Overall progress: the total progress of all goals (based on filters) inculding the expected value at the current time
* Goals at risk: All goals with the status "Off Track"
* Total number of goals and goals by type (e.g. Objective or Key Result)
**3. Progress Charts**
The progress of all filtered goals over the selected time period as well as the progress distribution of all filtered goals in that time frame.
**4. Status Charts**
The development of the statuses of all filtered goals over the selected time period as well as the distribution of statuses across all filtered goals in that time frame.
**5. Metrics by Team / Employee**
The metrics can be grouped by team or employees in the upper right corner of the chart. For instance, here you can see how the goal progress or status of the teams or employees compares or which teams or employees have not yet updated any goals.
**6. Cycle Filter**
Here you can select the respective goal cycle. Multiple cycles can also be selected.
**7. Further Filters**
Apply filters to goal evaluation. Possible filters are e.g.:
* Type
* Team
* Owner
* Parent alignment
* Aligned item
* Progress
* Last updated
* Status
**8. Comparison**
Compare the data of your current dashboard to one day, week, month or some custom time frame ago.
**9. Save selected view as favorite in the sidebar via the button *Favorite* in the upper right corner of the page.**
**10. PDF export**
Via the ellipsis (…) in the upper right corner of the screen, it is possible to export the progress dashboard as a PDF file.
# Progress Measurement
Source: https://mooncamp.com/docs/progress-measurement
An overview of the different types of goal progress measurement
## Measurement of Goal Progress
How the progress of goals is to be measured can be determined for each goal individually by clicking on `Progress`.
There are five different options for measuring progress of a goal:
* `Start and target value`
* `Aggregation`
* `Threshold`
* `Open/Done`
* `None`
### Start and target value
This option can be used to define the start and target value for a key figure and the associated unit (e.g. start: 0 % => target: 100 %).
Furthermore, the goal can be automatically updated with integrations to other tools such as Asana, Jira or Excel by clicking on `Connect to data source`. This way you can automate the manual updating of goals.
### Aggregation
With the option `Aggregation`, at first you have the option to customize how goal progress appears in the goal table view. You can choose to display progress as a percentage, as absolute values, or both.
Per default, the progress of the goal is expressed as a percentage of the average progress of all goals below it. Thus, the progress is displayed from 0 to 100%. If the subgoals are not measured on a scale from 0 to 100% and have other units (which often happens), they are translated to a percentage scale beforehand.
Example for the calculation:
**Progress (Aggregation)**
| Goal | Progress (Aggregation) |
| ------------- | ---------------------- |
| **Objective** | 33% |
| Key Result 1 | 100% |
| Key Result 2 | 0% |
| Key Result 3 | 0% |
If you want to allow specific goals to exceed the limit of 100% progress, you can enable the button `Allow overachievement of aligned items` on these goals. This has the consequence that reports and dashboards also do not cap goals at 100%.
Further, you have the option to add up the total values of a goal's subitems to calculate its progress. This enables you to, e.d. add up revenue values from different sales areas or create self-updating KPI trees. You can enable this setting by selecting `Calculate progress by Sum (Absolute)`.
### Threshold
This option is suitable for goals that should not exceed or fall below a certain limit value. It is possible to specify a numerical limit as well as a self-defined unit (e.g. per cent, euro, customers, etc.). Again, the goal can be automatically updated with integrations to other tools such as Asana, Jira or Excel by clicking on `Connect to data source`.
### Open/Done
With this option, progress is only measured in binary (either `Open` or `Done`). So this option is mainly suitable for goals or initiatives with task or milestone character.
### None
Finally, there is the option of not displaying progress. This can be advantageous, for example, for objectives or other goals that should be of a merely qualitative nature. Subordinate Key Results or other sub-goals can, in turn, again have a progress measurement.
# Properties in Mooncamp
Source: https://mooncamp.com/docs/properties
What are properties? How do I create and edit properties?
## Video Tutorial
If you don't feel like reading, here is a detailed video tutorial.
## What are properties?
Properties are one of the most exciting features of Mooncamp, allowing your organization to completely customize the Mooncamp platform to fit your needs, internal processes, and company language.
Properties are used to tailor tools such as Goals or Check-Ins to your organization's needs. Once set up, custom properties can be used, for instance, on Goal views or as filters.
As an admin, you can create, edit, and delete properties under Settings > Properties.
## Creating Properties
Properties can be created by clicking on `Add a property` in the upper right corner of the properties page.
**The following options need to be specified in each property:**
* Name of the property
* (Data) type
* Usage (in which tools should the respective property be available?)
### Options for (data) type
* `Multi select`: Multiple options can be selected (e.g. departments)
* `Single select`: Only one option can be selected (e.g. the status of a Goal)
* `Text`: A text field (e.g. the role or position of an employee)
* `Date`: A date with the format "DD/MM/YYY" (e.g. the birthday of an employee)
* `User`: Selection of one or more users (e.g. manager of an employee or owner of a Goal)
* `Number`: a formatted number field
* `Link`: A link to an external website (e.g. a website or a document)
* `Lookup`: Returns the content of a property from another object (e.g. user)
**Usage**
Here you can select in which databases the property should be available (goals, check-ins, or users).
**Options**
For the type `Multi select`, options specify the possible values of the properties, e.g. `Marketing`, `Sales` and `Human Resources` for the property `Department`.
Options can be sorted on the left side by drag and drop. Furthermore, the colors of the tags can be customized.
## Editing Properties
To edit a property, simply click on the respective property in the table. From here, the name, usage, and data type-specific settings (such as options for multiple selection or format for number) can be changed.
The `data type` itself can no longer be edited, once the property is used.
It is possible to set a property to `inactive` if it is no longer needed but should not be deleted.
## Deleting Properties
To delete a property, move your cursor over the feature in the table and click on the trash can icon on the right.
**Attention**: Once a property has been deleted, it cannot be restored! Therefore, in case of doubt, always use the `Deactivate` function.
## Examples of Properties
Properties on Goal views can be used to give more context, to filter Goals better and to adapt the Goal and OKRs tool to your internal processes and your company language. Properties on user profile pages can be used to display more information such as descriptions, co-workers, or managers.
**Example: Properties on Goals**
**Example: Properties on profile pages**
# Public Links (TV Mode)
Source: https://mooncamp.com/docs/public-links
An overview of public links (TV mode) to views
Public links are available for customers in the `Enterprise` plan.
## Public links (TV mode) described
With this function, it is possible to share a public link to a goals view with anyone who is not in your Mooncamp workspace. Public links are supposed to support sharing a public goal view to e.g. a TV screen in the office or to a dashboard on your company’s intranet (the links can be embedded via i-frame). This way data can be shared with a group of stakeholders that do not have access to your company’s Mooncamp account. A public link can only be created by admins or users with specific access rights and is intended to be embedded and rather not to be sent out.
## How to use public links (TV mode)
A public link can be created via the [goal or OKR explorer](/goal-explorer). Here you have different possibilities to create, sort and filter your goals based on what you would like to share. You can save your individual settings in [views](/views) and for each view a separate public link can be created.
After creating a view, you can publish (or later unpublish) your view as a public link via the ellipsis `...` in the top right corner. Once you have ticked the ‘Share to web’ button, you can easily copy the link and embed it to your company’s internal database or share it on a TV screen in your office spaces.
**Admin note:** In case you would like to give certain access groups or users the right to create public views and thus, public links, you can do so via the admin settings: `Settings > Access Groups`, then choose an existing access group or create a new one. Here, you can activate the permission `Management of public views`.
To learn more about views in general, check out our [views article](/views).
# Reports
Source: https://mooncamp.com/docs/reports
An overview of the reporting feature
The reporting feature is available to all customers with a `Pro` plan or higher.
## What are reports and why use them?
Reports are automated snapshots of your dashboards that can be sent out via email on a recurring basis. They allow you to keep your team and stakeholders informed about KPIs and other insights without requiring them to log into Mooncamp. Furthermore, reports are a great way to maintain consistent communication about strategy performance and goal progress across your organization, fostering transparency and alignment.
With reports, you can:
* Schedule regular dashboard exports to be delivered automatically via email
* Set custom delivery frequencies
* Define specific recipients who should receive the reports
* Include an optional message in the email
* Maintain consistent communication about strategy performance and goal progress across your organization
This feature is particularly useful for sharing updates with executives, stakeholders, or team members who prefer email updates over logging into the platform directly.
## How to create a report
### Via a dashboard
1. Navigate to the dashboard you want to base the report on.
2. Click on the `Schedule` button in the top right corner.
3. Set the delivery frequency of the report.
4. Select the recipients of the report.
5. Choose a subject and whether to add an optional message.
6. Click on `Create`.
Your report is now scheduled and can be accessed via the Reports page in the sidebar or by clicking on `Manage reports` in the top bar of the dashboard page.
### Via the reports page
1. Navigate to the reports page by clicking on the `Reports` menu item in the sidebar.
2. Click on the `New` button.
3. Select the dashboard you want to include in the report.
4. Set the delivery frequency of the report.
5. Select the recipients of the report.
6. Choose a subject and whether to add an optional message.
7. Click on `Create`.
Your report is now scheduled and can be accessed via the Reports page in the sidebar or by clicking on `Manage reports` in the top bar of the respective dashboard page.
## How to edit, pause or subscribe to a report
* **Editing a report**: Simply navigate to the `Reports` page and click on it to edit the report settings.
* **Pausing a report**: Click on the ellipsis `...` in the row of the report you want to pause and select `Pause`. To activate it again, click on `Activate`.
* **Subscribing to a report**: To subscribe or unsubscribe to a report, click on the ellipsis `...` in the row of the report and toggle the `Subscribe` switch.
## How to delete a report
To delete a report, click on the ellipsis `...` in the row of the report you want to delete and select `Delete`.
# Rights and Access Control
Source: https://mooncamp.com/docs/rights-and-access-control
Managing permissions and access groups
As an admin, you can manage the rights of all employees or specific access groups under `Settings > Access Groups`.
By default, these two access groups are created:
* All Members
* Admin
## Edit an access group
The permissions of the access groups can be edited by clicking on the respective group.
## Creating an access group
### Group members
Here all members of the group are defined, who will have the permissions specified below. It is possible to select users manually or by using properties of the users (team, location, manager, etc.).
## Permissions
When creating a new access group, the following permissions can be set:
### Managing the account
**Management of account settings (Admin)**
Authorized users can administer the account and make changes under `Settings > Workspace > General` and under `Settings > Goals`.
**Management of access groups (Admin)**
Authorized users can access this menu we are currently in and make changes.
**Management of properties**
Authorized users can manage properties.
**Management of teams**
Authorized users can create new teams by clicking on "View All" via the sidebar and then adding new teams via the plus.
**Management of users**
Authorized users can see the members section under *Settings - Workspace* and can manage the members of the account.
**Management of public views**
Authorized users can create public links to individual views under *Tools* - *OKRs* - *Explorer* and via the menu, which they reach via the three dots at the top right of the OKR explorer page.
### Managing goals
**Management of goal settings and cycles**
Authorized users have access to advanced goal settings via *Settings > Goals* (e.g. configuring the traffic light system) and are allowed to create and modify goal cycles.
**Unrestricted access to all goals**
This right gives selected users full access (access rights option “Full access”) to all goals and allows to view, edit, delete and edit access rights to these. This also applies for goals where only viewing rights are set. It does not apply to goals where the creator has set the access rights option "No access", these cannot be viewed.
**Can create goals**
Authorized users can create goals.
**Can choose from all teams and their members**
For team and user properties on goals, users are allowed to choose from all teams and members, not just from their teams and their teams' members.
### Managing check-ins
**Management of check-in templates and settings**
Authorized users can create templates as well as set up and manage schedules.
### Dashboards
**Can view progress and health dashboards**
Authorized users have access to the [Progress](/de/progress-dashboard) and [Health](/de/health-dashboard)-Dashboards.
**Can create dashboards and reports**
Authorized users can create dashboards and reports.
**Unrestricted access to all dashboards**
# Salesforce Integration
Source: https://mooncamp.com/docs/salesforce-integration
An overview of the Salesforce data integration.
## Overview
The Salesforce integration updates your goal progress automatically based on task completion in Salesforce.
💡 The Salesforce integration is available for customers on the **Pro** and **Enterprise** plans.
## Enabling the Salesforce integration
Please note: It is recommended to adjust Salesforce's refresh token policy to `Refresh token is valid until revoked` to avoid issues with the integration (see a setup guide below in the [FAQs](#faqs)).
Account admins can enable the Salesforce integration by following these steps:
1. **Access Integrations:** Go to the `Settings` area and open the `Integrations` page.
2. **Enable Salesforce:** Find Salesforce in the integrations list and toggle it on.
## Creating a new Salesforce connection
Any user (not just admins) can now create a new connection to Salesforce. Follow these steps:
1. **Create a new connection:**: Click on `Manage` next to the toggle switch and then click on `Add`.
2. **Grant access to Salesforce:** Click on `Sign in to Salesforce` and click on `Allow access`. Once authorized, users can link their Mooncamp goals with their Salesforce data.
3. **Sharing settings:** Choose whether you want to share the connection with all users or only with yourself.
4. Hit `Save` to finish setting up the connection.
Be aware that sharing the connection with all users allows everyone in this workspace to access the Salesforce data behind that connection.
## Linking a goal's progress to Salesforce data
To automatically track progress for a goal using Salesforce, follow these steps:
1. Create or edit a goal, then go to the Progress property and choose a measurement type that allows connecting to a data source (`Start and Target`, `Threshold`).
2. Click *Connect to data source* and select the **Salesforce** connection you want to use from the list of available connections. (You can also create a new connection here.)
3. First choose the Salesforce `Report` you want to access.
4. Then choose the `Field` you want to use to track progress.
5. Lastly, choose whether you want to `Always sync` the data or only when the value changes.
6. **Save your connection:** After configuring what data to track, hit `Save`. The Salesforce icon will appear next to your goal, indicating it's synced with Salesforce.
### Automatic Progress Updates
Once the integration is active, Mooncamp automatically updates your goals based on changes in Salesforce.
Tip for admins: Go to `Settings > Integrations`, and make sure every day is selected under “Synchronization”.
## FAQs
In some cases, the Salesforce integration stops working due to Salesforce's refresh token policy. To fix this, please adjust Salesforce's refresh token policy to `Refresh token is valid until revoked`. See the video below:
# SAML SSO Setup
Source: https://mooncamp.com/docs/saml-sso
An overview on how to set up SAML SSO in Mooncamp.
SAML SSO is available for our customers in the **`Enterprise Plan`**. In case you would like to use SAML SSO, please ask your Mooncamp contact person our our support team for more details.
## SAML SSO described
SSO means “Single Sign-On” and this function allows you to use your Microsoft or Google account to sign in without having to create a new password. At Mooncamp, we offer Microsoft and Google SSO per default as well as SAML SSO for identity providers like Okta. With SAML SSO, you can integrate your existing single sign-on solution into your Mooncamp account. It is possible to integrate with any SAML 2.0 identity provider.
## Setting up SAML SSO
💡 Integrating SAML SSO is a **technical process**, therefore we recommend that someone from your IT department assists you during the configuration.
In order to set up SAML SSO in your account, navigate to the settings and then to *Identity and Provisioning Settings*. There you will find three options:
* Allow login via password
* Allow login via Google
* Allow login via Microsoft
We recommend choosing one and deactivating the others for security reasons. Although, depending on how your organization is structured, it might make sense to allow multiple options.
In order to correctly fill-in the fields below *SAML*, please use the following instructions:
* As a first step, when setting up the SAML integration on your side, please use the following configurations (Mooncamp can integrate with any SAML 2.0 identity provider):
ACS-URL: [`https://app.mooncamp.com/api/v1/saml/acl`](https://app.mooncamp.com/api/v1/saml/acl)
Entity-ID: [`https://app.mooncamp.com/api/v1/saml/metadata`](https://app.mooncamp.com/api/v1/saml/metadata)
* Please make sure to add a custom value with the name `email` that matches the user's email address.
* As a last step, copy your SAML application's metadata and paste it into your SAML configuration detail section within your [*Identity and Provisioning Settings*](https://app.mooncamp.com/#/identity-and-provisioning).
💡 **Important note:** Your IT administrators might need to first **approve** Mooncamp as a provider before you can use SAML SSO. Further, it is important for the setup of SAML SSO that the **email address** of a user in Mooncamp is the same as at your identity provider.
Once you have made sure everything is set up correctly, the users just need to be added to your Mooncamp account with their Microsoft or Google e-mail and they will be able to log in using the *Login via SSO* button.
# Azure SCIM integration
Source: https://mooncamp.com/docs/scim-azure
An overview on how to set up user provisioning with Azure via SCIM in Mooncamp.
## User provisioning described
With user provisioning you can get all user profiles from your company’s identity provider (i.e. Azure) synchronized with Mooncamp. This means when a new employee joins or leaves your organization and would need to be added or deleted as a user to Mooncamp, it will happen automatically once the employee gets added or deleted in your identity provider.
User provisioning is an **Enterprise feature** and needs to be configured by Mooncamp first. Additionally, your IT administrators might need to first approve Mooncamp as a provider before you can set up user provisioning.
## Setting up user provisioning with Azure
In order to set up SSO in your account, Navigate to `Settings` → `Security and Identity` → `User Provisioning`
Click on `Activate user provisioning`. User provisioning is now activated for your account. An `API token` is required to initiate configuration at azure. Visit [https://portal.azure.com](https://portal.azure.com) and navigate to `Enterprise applications`.
Click `New application`:
Click `+ Create your own application` and name the app `Mooncamp user provisioning`:
Select `• Integrate any other application you don't find in the gallery (Non-gallery)` and click `Create`. You can ignore the suggestions found from gallery applications.
Navigate to `Provisioning` and click `Get started`:
Then select `Provisioning Mode` → `Automatic`. As a Tenant URL add: *[https://identity.mooncamp.com/scim/v2](https://identity.mooncamp.com/scim/v2)* and under Secret Token insert the `API token` copied from Mooncamp’s setting menu.
After clicking `Test Connection` you should get a positive feedback.
Click on `Save`, expand `Mappings` and click on `Provision Azure Active Directory Users`. Find the entry mapping and select it. Set the `Matching precedence` to 2 and click `Ok`.
Find the entry mapping and select it. Change `mailNickname` to `objectId` and set `Match objects using this attribute` to `Yes`. `Matching precedence` should be `1`. Click `Ok`.
Click again on the entry mapping `userPrincipalName` → `userName` and set `Match objects using this attribute` to `No` leaving us with a single entry configuring a `Matching precedence`.
Click on `Save` and then on `Provisioning` at the top of the page.
Select `Provision Azure Active Directory Groups`. Find the entry mapping and select it. Set the `Matching precedence` to `2`. Click on `Ok`. Find the entry mapping and select it. Set `Match objects using this attribute` to `Yes`. Again find the entry mapping `displayName` → `displayName` and set `Match objects using this attributes` to `No`.
Click on `Save`and configure `Users and groups` according to your requirements. Click on `Start provisioning`.
It can take up to an hour until the initial run of the provisioning is started. If the initial run is complete you can start pulling in the users into Mooncamp.
Navigate again to `Settings` → `Security and Identity` → `User Provisioning` within Mooncamp. You should now see that there are users available to be synced to Mooncamp
Click on `Synchronize` to push these users to Mooncamp. Under `Members` you should now find these users. The `Attribute Mapping` section allows you to map any *SCIM attribute* to *Mooncamp Properties*. Read more about *Mooncamp Properties* here: [Properties in Mooncamp](/properties).
Users are automatically synchronized to Mooncamp daily. To immediatly synchronize any change provisioned through Azure use the `Synchronize` button.
# Sidebar
Source: https://mooncamp.com/docs/sidebar
An overview of the sidebar
## Overview
The sidebar is divided into four sections. If you hover your mouse over your company name, you can log out using the down arrow, and you can hide the navigation bar using the double arrows on the right side.
## 1. Search, Home, Inbox and Settings
The first section includes a quick search, your inbox, and your personal settings (as well as account settings if you have administrator rights).
**Search**: With quick search (`Ctrl + K` or `⌘ + K` on Mac) you can search for specific goals, teams or people. By clicking on one of the search results, you will then land on the respective goal, team page or public profile of a workspace member.
[Home page](/homepage): Your homepage allows you to access all of Mooncamp's tools available to you without having to switch windows. It also gives you an overview of all goals you are the owner of.
**Inbox**: In your inbox you can see all tasks assigned to you and reminders for e.g. upcoming check-ins or surveys, as well as notifications about relevant comments and mentions within the platform.
**Settings**: In your [profile settings](/profile-settings) you can set things like your profile image, your name and your language. Furthermore, under “[Notifcations](/personal-notifications)” you can specify your preferences if and how you want to be notified by Mooncamp about certain events.
## 2. (Team) Spaces
The teamspace you are assigned to within Mooncamp as well as your company space are automatically shown in your sidebar.
## 3. Tools
In this list you can see all tools of Mooncamp that you have access to as a user, such as goals or check-ins.
### Goals
In the [goal explorer](/goal-explorer) you can create additional goal views and add them to your personal favorites via ‘Favorite’ in the top right. These favorites are automatically pinned to the top of your sidebar. In the goals feed you can see all updates that have been made to the goals from the explorer. The [Plannings](/planning-spaces) provide a detached space where you can separately plan and later publish your goals for the next cycle.
💡 **Note:** The favorite function can also be used for single goal items, check-in views or dashboards.
### Check-ins
With [Check-ins](/check-ins) you update your goal progress as well as view your team’s and organization's updates.
### Dashboards
In this section, various types of dashboards are available to you. The [Progress Dashboard](/progress-dashboard) offers an overview of the current status and progress of all your organization's goals, grouped by team or member. Depending on your Mooncamp plan, the [Health Dashboard](/health-dashboard) provides you with a comprehensive health and quality check for all goals. In addition, with [Custom Dashboards](/dashboards) you have the possibility to create your own reports and visually combine any type of data.
## 5. Trash
Here you can find deleted goals and have the possibility to either restore or permanently delete them.
## 6. Onboarding, Help and Support
The last section in the sidebar leads to different types of resources and is the place where the onboarding guide takes you through the tool step-by-step. Under ‘Video tutorials’ you find short videos on your first steps with Mooncamp and further you can access all contents of our Help Center, our Video FAQs and other resources on OKRs and best practices.
In the lower part you have the possibility to directly contact our support team for any technical questions or our sales team for any questions about our plans. Via ‘What’s new’ you can always check for new functions that have recently been released within Mooncamp.
# Slack Integration
Source: https://mooncamp.com/docs/slack-integration
Learn how to connect and use Mooncamp with your Slack
💡 **Note for admins:** In order for users to be able to use the integration, as a first step it needs to be activated in the admin settings via *Settings > Integrations > Messaging*.
**Please note:** In some cases, your Slack's system administrator must first unlock the app for it to appear in search. You can find the official link to the Mooncamp app in the *Slack app directory* [**here**](https://mooncamphq.slack.com/apps/ASJ1XBZBK-mooncamp).
## Installing the Mooncamp Bot
To install Mooncamp in Slack, in the left sidebar scroll down to *Apps,* click on *+App apps*, search for "Mooncamp" and click on *Add* below the Mooncamp app in the list of search results. You will get directed to Slack’s app directory where you can add the app via the green *Add to Slack* button. You will get directed to the *Mooncamp + Slack* info page, where you can click the *Add to Slack* button to activate the Slack bot in your Mooncamp workspace.
As a next step, go back to Slack and in your sidebar click on *Apps > Manage > Browse Apps > Mooncamp > Configuration* and you will get directed to the Slack app directory again where you can use the green button to *Open in Slack*. Once Mooncamp is added to Slack, the bot will guide you through the next steps.
When you click the "Connect with Mooncamp" button, the bot will guide you to your Mooncamp account. The bot will also tell you that the connection has been successfully established.
**Done! 🎉**
## Using Mooncamp via Slack
Once your Mooncamp Bot is available, you can interact with it via slash commands. These allow you to complete an action with the Mooncamp app simply by sending a message in Slack. To do so, type a forward slash **`/`** in any conversation to view a list of available slash commands.
In order to show your goals in Slack, type */mooncamp goals* into any channel or conversation, press enter and the bot will list your goals. Next to each goal there is an *Update goal* button that you can use to update your goals’ progress directly via Slack. When you click on the button, a modal opens in which you can edit the *status* and the *value* of your goal and if needed, add a comment to the update. Check out this procedure in the video FAQs below.👇
# SSO Setup
Source: https://mooncamp.com/docs/sso
An overview on how to set up SSO in Mooncamp.
## SSO described
SSO means “Single Sign-On” and this function allows you to use your Microsoft or Google account to sign in without having to create a new password. At Mooncamp, we offer Microsoft and Google SSO. We also offer [SAML SSO](/saml-sso) (for providers like Okta).
Your IT administrators might need to first approve Mooncamp as a provider before you can use SSO. Further, it is important for the setup of SSO that the **email address** of a user in Mooncamp is the same as at your provider (e.g. Microsoft).
## Setting up SSO
In order to set up SSO in your account, you just need to make sure it is activated for the appropriate provider. To do that, navigate to the settings and then “Security and Identity Settings”. There you will find three options:
* Allow login via password
* Allow login via Google
* Allow login via Microsoft
We recommend choosing one and deactivating the others for security reasons. Although, depending on how your organization is structured, it might make sense to allow multiple options.
Once you have made sure everything is set up correctly, the users just need to be added to your Mooncamp account with their Microsoft or Google email and they will be able to log in using SSO.
# Teamspaces
Source: https://mooncamp.com/docs/teamspaces
An overview of the teams page in the settings
## Teamspaces explained
Within Team Spaces you can manage teams or departments of your organization. It is possible to create new teams and assign a color, an icon and a description to each team. Further you can map your organizational structure by arranging teams via drag and drop and assigning parent teams, where needed. For each team, it is possible to add new members directly and also assign an owner. Team owners automatically have the right to add new members to their team, without the need for any additional admin settings. In case you need to restructure or merge teams, put projects on hold or finish them, you have the option to archive a team. This removes it from your sidebar, but all associated goals and dashboards remain accessible. Alternatively, there is also the option to fully delete the team along with all its goals.
## How to use Team Spaces
### Creating a team
As an admin, navigate to S*ettings* > *Workspace* > *Teams*. Once there, you can create a new team via the blue button *Create team* as shown in the screenshot below. On the modal that opens, you can enter the team’s name, add a matching icon, a color as well as a description, if needed, and finally click on *Create*. Via *Parent team* you can add a parent to your new team from a list of existing teams. If you wish to create or add a parent at a later point, you can do so via drag and drop in the team overview.
### Team overview
As an admin, you can access the team overview via *Settings* > *Workspace* > *Teams* (see screenshot above). Next to the title of the page, you can find the current amount of active teams in brackets. Below, there are four tabs that separate your active teams from archived teams and from teams you are assigned to as a member. Via *All*, you can find a list of all active and archived teams. On all tabs, you can see the teams’ name, amount of members, owner as well as status. The *Joined* tag shows you that you are a member of a team. You also have a search function via the search icon right next to the blue *Create team* button.
### Editing a team and adding team members
When clicking on a team in the team overview, a team settings modal opens. On the *General* tab, you can edit all initial settings such as name, icon, color, description and parent. Further, you have the option to archive or delete a team.
On the *Members* tab, you find a list of all team members and their role of member or owner, including a search function in the top right corner of the list. Via *Add members* you can add a new member to the team. A person can be a member of one or more teams. By clicking on the role of a person, via *Remove* you can remove a member from a team. Here you can also change a team member’s status from *member* to *owner* or vice versa.
In the team overview, when using the right click on a team, a menu comes up. Here you can either archive or delete the team, create a subteam or navigate directly to the team’s goals via *Open team*. When hovering over a team, you can see an icon appear next to the team name. Via this icon you find the same functions. Further, you can use the icon to drag and drop the team to a different position in the overview.
### Arranging and aligning teams
In the team overview, you can easily arrange and align your teams. To do so, hover over the team you would like to move and use the icon that is coming up on the left next to the team to drag and drop. You can move a team into any position on the list and further also drop it into other teams in order to make it a subteam of an existing one. This way, you can easily display and rearrange your organizational structure.
### Assigning a team owner and ownership rights
To assign an owner to a team, click on a team in the team overview, choose the *Members* tab and click on *Add member* to add the person who is supposed to become the owner. If this person is a member of the team already, you can skip this step. You can directly click on the *Role* dropdown next to the member and chose the role option *Owner*. With this role, the member now has the right to add new members to their team, without the need for any additional admin rights. Especially for larger organizations this can help making administration much easier. Please be aware that new team members can only be added from the existing user base in the organization’s account. A team owner does not have the right to add new users to the account.
💡 **Tip:** Team settings are also **accessible directly via the sidebar or the top navigation of a team’s goal page**. When hovering over a team in the sidebar, you can use the ellipsis, … , to get to the team settings modal. When **clicking on the team in the top navigation of a team page**, you find basic infos such as the amount of members as well as an **ellipsis, … , that opens the team settings modal** directly on the page where you are currently located.
### Archiving, restoring and deleting teams
In case you need to restructure or merge teams, put projects on hold or finish them, you have the options to archive or delete teams. When you click on a team in the overview, under *Actions* you find the option to *Archive a team*. This option removes a team from your sidebar, but all associated goals and dashboards remain accessible. Once archived, you have the option to restore the team via the *Archived* tab and a right-click on the team to be restored. With the second option, *Delete team*, the team will be fully deleted, including all its goals. To fully delete a team, you can also use a shortcut via a right-click on a team in the team overview.
# How to Update a Goal
Source: https://mooncamp.com/docs/updating-goals
Different ways of updating goals
You can update the progress of your goals directly within Mooncamp or via our Slack or Microsoft Teams integration.
### Update progress of goals in Mooncamp
There are several ways to update goals.
**1. Directly from the cascade view**
**2. Progress bar on the detail view of the goal**
**3. On a check-in**
### Update Progress of Goals in Microsoft Teams
If you have the Microsoft Teams integration enabled, you can update goals in the same ways as described above.
In addition, within the **Mooncamp chatbot**, you can enter `goals` to view all goals assigned to you and update them directly in the chat.
### Update Progress of Goals in Slack
If you have the Slack integration enabled, you can access and update your goals in the Mooncamp Slack bot using the `/mooncamp goals` command.
# Views
Source: https://mooncamp.com/docs/views
An overview of Views for goals, check-ins, and dashboards
With views, you can filter your **goals**, **check-ins**, or **dashboards** for specific criteria or properties and save the outcomes in a so-called view. You can create private views on your personal homepage or, if authorized, a public view on your team spaces.
Currently, you can create these types of views for **goal databases**:
* Cascade (nested table)
* List
* Goal Tree
* Network
On **check-in databases**, you can create these types of views:
* Feed
* List
On **dashboard pages**, you can only add dashboard views.
Each view type offers unique benefits for different use cases. These are just a few things you might want to do with views:
* Filtering for specific off-track goals that you are involved in
* Keeping an eye on important strategic initiatives and their health
* Regularly checking the goals of certain teams or team members
Lastly, it is also possible to add a view to the '**Favorites**' section of your sidebar or **export** selected views as a [CSV](/exporting-goals-as-csv) or a [public link](/public-links).
## How to use views
If you don't feel like reading, we have recorded a video tutorial for you. It provides a general overview of views in Mooncamp.
## Where can I create a view?
You can create views in the following places:
* Home (views are private to you)
* Teamspaces
* Goal Explorer
* Check-in Explorer
* Dashboards
* Progress Dashboard
* Health Dashboard
* Custom Dashboards (on tiles)
## Views permissions
Views on the goal explorer are visible to all users in your organization. Views on teamspaces are visible to all users that have at least view access to the teamspace. In every area where views can be created, they will be accessible to everyone. On the **goal explorer**, every view can be published (and unpublished) as a [public link](/public-links) via the ellipsis `...` in the top right corner (only available on the `Enterprise` plan).
**Please note:** By default, only an admin can create views. Additionally, the admin can grant access groups the right to do so via `Settings > Access groups > Account administration > Management of public views`.
## How can I create and edit a view?
### Creating a view
To create a view, click on the `+` in the database header, give your view a name and choose a view type.
Now you can modify your view, e.g., by
* adding filters
* adding sorting options
* displaying or hiding properties
* reordering columns
* wrapping cells
* etc.
### Editing and deleting a view
Once you have added a new view, you can edit its name, icon, and type by clicking on its name again. Here, you can also delete the view, if needed.
## Views for goal databases
Views for goals can be created on your [homepage](/homepage), on [teamspaces](/teamspaces), and the [Goal Explorer](/goal-explorer). On your **homepage**, goals are already pre-filtered to show all goals that are related to your user account. On a **teamspace**, goals are pre-filtered to show the respective team's goals only.
In the Goal Explorer, you can export **any goal view** as a **CSV**, including data like title, creator, latest update, current value, status, and all related properties (excluding update history or comments). For CSV export details, see [this article](/exporting-goals-as-csv). Additionally, every public view can be exported as a **public link** accessible to non-users. For public link details, see [this article](/public-links).
Other than this, views for goals function the same everywhere.
### Goal view types
Displays goals in a nested table to show the hierarchy of goals at various levels.
Shows all goals in a simple flat list.
Offers a visual map of goals and OKRs, showing strategic pillars and initiatives in a hierarchical view.
Displays goals in a network view, showing the relationships between goals and their alignments.
## Views for Check-ins
Views for check-ins can be created in the check-in explorer. Here you have two view types:
The feed basically shows the same info as a list, however, displays each check-in in the form of a card. This makes it possible to show the content of a check-in, such as free-text replies to template questions and goal updates. This view is ideal if you would like to screen the content directly and it is even possible to react with an emoji for praise or a comment for questions or discussions.
Shows all check-ins in a simple flat list. You can choose to display properties like the team, the creator, the creation date, or the template title.
### Check-in view settings
In the upper right corner of your check-in view, there are a number of settings including options to filter, sort, or display check-ins and their properties for your views. You can filter for team, creation date, and the creator of a check-in, and as everywhere, filters can be combined via AND and OR. Sorting is possible ascendingly or descendingly for the creation date. Editable properties to display include the team of a check-in and the title of the template that was used.
## Views for dashboards
Views can be created for the [Progress Dashboard](/progress-dashboard) and the [Health Dashboard](/health-dashboard) with the same setting options for both dashboard types. For the [Progress Dashboard](/progress-dashboard), there is an additional `Compare to` function, which gives you the possibility to compare your current data to the past.
On a [**Custom Dashboard**](/dashboards), it is possible to create tiles that show different data. For every list-type tile (goals, check-ins, update feed, members), it is possible to create a view with differing filter, sort, and display settings.
## Pin views as a favorite to your sidebar
Views can be saved as a favorite and, in this way, be added to the sidebar just above your Teamspaces.
## Views and cycles
Per default, the currently selected cycle is globally applied to every view. However, you can lock a cycle within a view, ensuring that users see the exact data you want them to see on goal tables or dashboards. If no cycle is locked, the currently selected cycle for each user will apply automatically.
To learn more about cycles, you can read [this article](/cycles).
# Workspace settings
Source: https://mooncamp.com/docs/workspace-settings
Edit the name and logo of your workspace
Under *Settings > General* you can change the name of your organization and upload a logo. The infromation added here will then always be displayed in the top left of your sidebar.
Further below, there is an invite link that can be used to collectively invite existing users to Mooncamp. They can easily register using the link; an important requirement for this is that the users have already been created under *Settings > Members*.
## What is Mooncamp?
Mooncamp is a comprehensive strategy execution platform that brings together your organization's strategic vision, goals, and day-to-day operations in one place. By connecting strategic planning with execution, Mooncamp helps organizations transform their vision into measurable results.
## Why Mooncamp? Challenges of today's organizations
Organizations face critical challenges that make or break their success:
Teams working in isolation with disconnected plans and priorities
Critical information scattered across multiple systems and tools
Disconnect between high-level strategy and day-to-day operations
Suboptimal allocation of time, budget, and talent
Lack of clear, consistent messaging about strategic priorities
Difficulty measuring and monitoring strategic initiative outcomes
## Mooncamp solves these challenges by unlocking five key benefits:
You can view these benefits as stepping stones or building blocks to level up your strategy execution.
**With each level, you unlock new benefits on your way to strategic and operational excellence.**
Gain complete visibility into your strategy execution and business health. Identify risks early, track progress in real-time, and make informed decisions based on actual data. Ensure every employee understands the strategy through clear communication, fostering transparency across the organization.
Eliminate activities that don't drive results. Prioritize strategic initiatives and ensure resources are allocated to what matters most.
Break down silos between teams and create clear connections between company strategy and daily work. Ensure everyone understands how their efforts contribute to organizational success.
Establish clear ownership for goals and initiatives with transparent tracking and progress updates. Enable data-driven measurement of deliverables and outcomes.
Enhance your organization's ability to adapt quickly to changes and seize opportunities. Streamline processes to accelerate execution and drive faster results.
## Achieving Strategy Execution Excellence with Mooncamp
Below are the core features of Mooncamp's platform that help you achieve transparency, focus, alignment, accountability, and execution velocity step by step.
Set up your strategic structure: Define your focus areas, goals, OKRs, and initiatives in one place to ensure everyone is on the same page.
Completely customizable dashboards and reports to track your strategy performance or OKR processes. Schedule recurring reports to keep everyone in the loop.
Use check-ins to create team alignment, remind everyone to update their goals, provide thoughtful communication and boost productivity.
Get a big picture view and track how well your goals and initiatives align with the corporate strategy. Quickly identify synergies or unaligned initiatives.
## Get started with Mooncamp
Learn how to set up your account, invite users and customize your strategy framework.
Learn how to get started with Mooncamp as a team member.
# Notifications
Source: https://mooncamp.com/docs/personal-notifications
Choose through which channels and for which events you would like to receive Mooncamp message
Under *Settings > Notifications*, you can set for yourself which channels you want to be notified on and which events you want to receive notifications about.
### Channels:
* Email
* Slack (integration must be enabled first)
* Microsoft Teams (integration must be enabled first)
In addition to these external channels, you will also receive personal notifications via the inbox within the Mooncamp platform.
### Notifications:
* **Direct messages**: Get a notification when someone replies to your comments or update, or mentions you with @username.
* **Updates on goals**: Get a notification when a goal you're subscribed to is updated.
* **Assignments on goals**: Receive a notification when you are assigned to a goal.
* **Reminder for check-ins**: Receive a notification when it's time to do your check-in.
# Planning spaces
Source: https://mooncamp.com/docs/planning-spaces
An overview of planning spaces and goal drafts
### What are planning spaces?
A planning space is a dedicated area in which you can create goal or OKR drafts together with your team before they are published across your organization.
### Why should you use planning spaces?
Planning spaces are a core part of the OKR process and provide the following benefits, among others:
**Writing good OKRs**
A dedicated area for OKR drafts to be discussed within the team first helps formulate good OKRs before they are published.
**Conscious alignment with overall goals**
As soon as OKRs from other departments or organizational levels (e.g. leadership OKRs) are published, the draft goals from your planning space can be aligned to them.
**Keeping the overview**
Finally, a separate area for goal drafts helps you keep track and not mix your drafts with published goals.
### Planning spaces overview
First navigate to the 'Goals' module and click on the 'Planning' sub-item. From here you will see a list of all *open* plannings (to which you have access).
To show all or only closed planning spaces, click on "Open" in the table header (`1`) and select the appropriate option.
### Creating a planning space
To create a planning space, click on the blue button `1` or on the last row in the table `2`. A window will then open where you can assign the planning space to your team (or teams) and to a cycle before creating it. A name for the planning space will be suggested by Mooncamp, but it can be overwritten.
💡 All users can create, share, edit and delete their own planning spaces. The same applies to planning spaces to which they have full access. If employees do not have the right to create goals, they will not be able to create goal drafts.
### Sharing the planning space with others in your organization
By default, a planning space is shared with the selected team(s) it is associated with. Each team member has full access to the planning space and has the following rights:
* Edit access to the planning space
* Edit the planning space
* Edit name
* Edit cycle
* Edit team
* Create and edit views
* Close and open the planning space
* Create and edit goal drafts
* Publish goal drafts
By default, the rest of the organization does not have access to the planning space. However, the settings can be changed at any time by clicking on "Share" `1`.
### Creating goal drafts
Every goal that is created within a planning space has the status "Draft" by default.
There are two ways to create goal drafts:
**Create drafts yourself**
Goal drafts can be created just like other goals using the blue button or the last row in the table.
**Import goals as drafts**
Often goals change only slightly from cycle to cycle, so it makes sense to import existing goals as duplicates in order to adjust them.
When creating a planning space, you can select whether goals should be imported or not. In addition, goals can be imported at any time by clicking on the ellipsis icon ("...") at the top of the screen and selecting "Import goals" `1`.
### Publishing goal drafts
After working and finalizing the goal drafts and finalizing the goals, they can be published by clicking on the blue button at the top of the screen `1`.
In the window that opens, you can choose whether to publish all the drafts or just a selection of them. With publishing you can also select whether the planning space should be closed afterwards.
### Closing a planning space
When a planning space is closed, no more drafts can be created and it disappears from the list of open planning spaces.
A planning space can be closed in the context of publishing goal drafts `1` or via the ellipsis menu item at the top of the screen `2`.
A planning space can be reopened at any time by clicking on "Reopen" at the top of the screen.
# Personal Information and Reset Password
Source: https://mooncamp.com/docs/profile-settings
Change your name, profile picture, and account language or reset your password
Under *Settings > Profile* you can:
* Upload a **profile picture**, which will appear on your [homepage](/homepage), your public profile page and next to your name in various tools as an "avatar".
* Change your **first** **and** **last name**
* View your **email address** that you are registered with at Mooncamp
* Change the **language** in your account (English and German are supported so far)
* Reset your **password**
# Progress Dashboard
Source: https://mooncamp.com/docs/progress-dashboard
An overview of the Progress dashboard for goals and OKRs.
💡 **Important note:** In order to grant all members access to progress- and health dashboards, this needs to be set once by the admin under *Settings > Access groups > Member > Can view progress and health dashboards*.
The Progress dashboard provides information on the progress of all goals, grouped by team or employee. Any number of filters can be applied to show, e.g., goals that have not been updated yet, are not aligned, or are at risk.
### List of the features and elements of the Goals Dashboard:
**1. Views**
Switch between views and create your own private (if authorized, also public) views.
**2. Key Metrics**
* Overall progress: the total progress of all goals (based on filters) inculding the expected value at the current time
* Goals at risk: All goals with the status "Off Track"
* Total number of goals and goals by type (e.g. Objective or Key Result)
**3. Progress Charts**
The progress of all filtered goals over the selected time period as well as the progress distribution of all filtered goals in that time frame.
**4. Status Charts**
The development of the statuses of all filtered goals over the selected time period as well as the distribution of statuses across all filtered goals in that time frame.
**5. Metrics by Team / Employee**
The metrics can be grouped by team or employees in the upper right corner of the chart. For instance, here you can see how the goal progress or status of the teams or employees compares or which teams or employees have not yet updated any goals.
**6. Cycle Filter**
Here you can select the respective goal cycle. Multiple cycles can also be selected.
**7. Further Filters**
Apply filters to goal evaluation. Possible filters are e.g.:
* Type
* Team
* Owner
* Parent alignment
* Aligned item
* Progress
* Last updated
* Status
**8. Comparison**
Compare the data of your current dashboard to one day, week, month or some custom time frame ago.
**9. Save selected view as favorite in the sidebar via the button *Favorite* in the upper right corner of the page.**
**10. PDF export**
Via the ellipsis (…) in the upper right corner of the screen, it is possible to export the progress dashboard as a PDF file.
# Progress Measurement
Source: https://mooncamp.com/docs/progress-measurement
An overview of the different types of goal progress measurement
## Measurement of Goal Progress
How the progress of goals is to be measured can be determined for each goal individually by clicking on `Progress`.
There are five different options for measuring progress of a goal:
* `Start and target value`
* `Aggregation`
* `Threshold`
* `Open/Done`
* `None`
### Start and target value
This option can be used to define the start and target value for a key figure and the associated unit (e.g. start: 0 % => target: 100 %).
Furthermore, the goal can be automatically updated with integrations to other tools such as Asana, Jira or Excel by clicking on `Connect to data source`. This way you can automate the manual updating of goals.
### Aggregation
With the option `Aggregation`, at first you have the option to customize how goal progress appears in the goal table view. You can choose to display progress as a percentage, as absolute values, or both.
Per default, the progress of the goal is expressed as a percentage of the average progress of all goals below it. Thus, the progress is displayed from 0 to 100%. If the subgoals are not measured on a scale from 0 to 100% and have other units (which often happens), they are translated to a percentage scale beforehand.
Example for the calculation:
**Progress (Aggregation)**
| Goal | Progress (Aggregation) |
| ------------- | ---------------------- |
| **Objective** | 33% |
| Key Result 1 | 100% |
| Key Result 2 | 0% |
| Key Result 3 | 0% |
If you want to allow specific goals to exceed the limit of 100% progress, you can enable the button `Allow overachievement of aligned items` on these goals. This has the consequence that reports and dashboards also do not cap goals at 100%.
Further, you have the option to add up the total values of a goal's subitems to calculate its progress. This enables you to, e.d. add up revenue values from different sales areas or create self-updating KPI trees. You can enable this setting by selecting `Calculate progress by Sum (Absolute)`.
### Threshold
This option is suitable for goals that should not exceed or fall below a certain limit value. It is possible to specify a numerical limit as well as a self-defined unit (e.g. per cent, euro, customers, etc.). Again, the goal can be automatically updated with integrations to other tools such as Asana, Jira or Excel by clicking on `Connect to data source`.
### Open/Done
With this option, progress is only measured in binary (either `Open` or `Done`). So this option is mainly suitable for goals or initiatives with task or milestone character.
### None
Finally, there is the option of not displaying progress. This can be advantageous, for example, for objectives or other goals that should be of a merely qualitative nature. Subordinate Key Results or other sub-goals can, in turn, again have a progress measurement.
# Properties in Mooncamp
Source: https://mooncamp.com/docs/properties
What are properties? How do I create and edit properties?
## Video Tutorial
If you don't feel like reading, here is a detailed video tutorial.
## What are properties?
Properties are one of the most exciting features of Mooncamp, allowing your organization to completely customize the Mooncamp platform to fit your needs, internal processes, and company language.
Properties are used to tailor tools such as Goals or Check-Ins to your organization's needs. Once set up, custom properties can be used, for instance, on Goal views or as filters.
As an admin, you can create, edit, and delete properties under Settings > Properties.
## Creating Properties
Properties can be created by clicking on `Add a property` in the upper right corner of the properties page.
**The following options need to be specified in each property:**
* Name of the property
* (Data) type
* Usage (in which tools should the respective property be available?)
### Options for (data) type
* `Multi select`: Multiple options can be selected (e.g. departments)
* `Single select`: Only one option can be selected (e.g. the status of a Goal)
* `Text`: A text field (e.g. the role or position of an employee)
* `Date`: A date with the format "DD/MM/YYY" (e.g. the birthday of an employee)
* `User`: Selection of one or more users (e.g. manager of an employee or owner of a Goal)
* `Number`: a formatted number field
* `Link`: A link to an external website (e.g. a website or a document)
* `Lookup`: Returns the content of a property from another object (e.g. user)
**Usage**
Here you can select in which databases the property should be available (goals, check-ins, or users).
**Options**
For the type `Multi select`, options specify the possible values of the properties, e.g. `Marketing`, `Sales` and `Human Resources` for the property `Department`.
Options can be sorted on the left side by drag and drop. Furthermore, the colors of the tags can be customized.
## Editing Properties
To edit a property, simply click on the respective property in the table. From here, the name, usage, and data type-specific settings (such as options for multiple selection or format for number) can be changed.
The `data type` itself can no longer be edited, once the property is used.
It is possible to set a property to `inactive` if it is no longer needed but should not be deleted.
## Deleting Properties
To delete a property, move your cursor over the feature in the table and click on the trash can icon on the right.
**Attention**: Once a property has been deleted, it cannot be restored! Therefore, in case of doubt, always use the `Deactivate` function.
## Examples of Properties
Properties on Goal views can be used to give more context, to filter Goals better and to adapt the Goal and OKRs tool to your internal processes and your company language. Properties on user profile pages can be used to display more information such as descriptions, co-workers, or managers.
**Example: Properties on Goals**
**Example: Properties on profile pages**
# Public Links (TV Mode)
Source: https://mooncamp.com/docs/public-links
An overview of public links (TV mode) to views
Public links are available for customers in the `Enterprise` plan.
## Public links (TV mode) described
With this function, it is possible to share a public link to a goals view with anyone who is not in your Mooncamp workspace. Public links are supposed to support sharing a public goal view to e.g. a TV screen in the office or to a dashboard on your company’s intranet (the links can be embedded via i-frame). This way data can be shared with a group of stakeholders that do not have access to your company’s Mooncamp account. A public link can only be created by admins or users with specific access rights and is intended to be embedded and rather not to be sent out.
## How to use public links (TV mode)
A public link can be created via the [goal or OKR explorer](/goal-explorer). Here you have different possibilities to create, sort and filter your goals based on what you would like to share. You can save your individual settings in [views](/views) and for each view a separate public link can be created.
After creating a view, you can publish (or later unpublish) your view as a public link via the ellipsis `...` in the top right corner. Once you have ticked the ‘Share to web’ button, you can easily copy the link and embed it to your company’s internal database or share it on a TV screen in your office spaces.
**Admin note:** In case you would like to give certain access groups or users the right to create public views and thus, public links, you can do so via the admin settings: `Settings > Access Groups`, then choose an existing access group or create a new one. Here, you can activate the permission `Management of public views`.
To learn more about views in general, check out our [views article](/views).
# Reports
Source: https://mooncamp.com/docs/reports
An overview of the reporting feature
The reporting feature is available to all customers with a `Pro` plan or higher.
## What are reports and why use them?
Reports are automated snapshots of your dashboards that can be sent out via email on a recurring basis. They allow you to keep your team and stakeholders informed about KPIs and other insights without requiring them to log into Mooncamp. Furthermore, reports are a great way to maintain consistent communication about strategy performance and goal progress across your organization, fostering transparency and alignment.
With reports, you can:
* Schedule regular dashboard exports to be delivered automatically via email
* Set custom delivery frequencies
* Define specific recipients who should receive the reports
* Include an optional message in the email
* Maintain consistent communication about strategy performance and goal progress across your organization
This feature is particularly useful for sharing updates with executives, stakeholders, or team members who prefer email updates over logging into the platform directly.
## How to create a report
### Via a dashboard
1. Navigate to the dashboard you want to base the report on.
2. Click on the `Schedule` button in the top right corner.
3. Set the delivery frequency of the report.
4. Select the recipients of the report.
5. Choose a subject and whether to add an optional message.
6. Click on `Create`.
Your report is now scheduled and can be accessed via the Reports page in the sidebar or by clicking on `Manage reports` in the top bar of the dashboard page.
### Via the reports page
1. Navigate to the reports page by clicking on the `Reports` menu item in the sidebar.
2. Click on the `New` button.
3. Select the dashboard you want to include in the report.
4. Set the delivery frequency of the report.
5. Select the recipients of the report.
6. Choose a subject and whether to add an optional message.
7. Click on `Create`.
Your report is now scheduled and can be accessed via the Reports page in the sidebar or by clicking on `Manage reports` in the top bar of the respective dashboard page.
## How to edit, pause or subscribe to a report
* **Editing a report**: Simply navigate to the `Reports` page and click on it to edit the report settings.
* **Pausing a report**: Click on the ellipsis `...` in the row of the report you want to pause and select `Pause`. To activate it again, click on `Activate`.
* **Subscribing to a report**: To subscribe or unsubscribe to a report, click on the ellipsis `...` in the row of the report and toggle the `Subscribe` switch.
## How to delete a report
To delete a report, click on the ellipsis `...` in the row of the report you want to delete and select `Delete`.
# Rights and Access Control
Source: https://mooncamp.com/docs/rights-and-access-control
Managing permissions and access groups
As an admin, you can manage the rights of all employees or specific access groups under `Settings > Access Groups`.
By default, these two access groups are created:
* All Members
* Admin
## Edit an access group
The permissions of the access groups can be edited by clicking on the respective group.
## Creating an access group
### Group members
Here all members of the group are defined, who will have the permissions specified below. It is possible to select users manually or by using properties of the users (team, location, manager, etc.).
## Permissions
When creating a new access group, the following permissions can be set:
### Managing the account
**Management of account settings (Admin)**
Authorized users can administer the account and make changes under `Settings > Workspace > General` and under `Settings > Goals`.
**Management of access groups (Admin)**
Authorized users can access this menu we are currently in and make changes.
**Management of properties**
Authorized users can manage properties.
**Management of teams**
Authorized users can create new teams by clicking on "View All" via the sidebar and then adding new teams via the plus.
**Management of users**
Authorized users can see the members section under *Settings - Workspace* and can manage the members of the account.
**Management of public views**
Authorized users can create public links to individual views under *Tools* - *OKRs* - *Explorer* and via the menu, which they reach via the three dots at the top right of the OKR explorer page.
### Managing goals
**Management of goal settings and cycles**
Authorized users have access to advanced goal settings via *Settings > Goals* (e.g. configuring the traffic light system) and are allowed to create and modify goal cycles.
**Unrestricted access to all goals**
This right gives selected users full access (access rights option “Full access”) to all goals and allows to view, edit, delete and edit access rights to these. This also applies for goals where only viewing rights are set. It does not apply to goals where the creator has set the access rights option "No access", these cannot be viewed.
**Can create goals**
Authorized users can create goals.
**Can choose from all teams and their members**
For team and user properties on goals, users are allowed to choose from all teams and members, not just from their teams and their teams' members.
### Managing check-ins
**Management of check-in templates and settings**
Authorized users can create templates as well as set up and manage schedules.
### Dashboards
**Can view progress and health dashboards**
Authorized users have access to the [Progress](/de/progress-dashboard) and [Health](/de/health-dashboard)-Dashboards.
**Can create dashboards and reports**
Authorized users can create dashboards and reports.
**Unrestricted access to all dashboards**
# Salesforce Integration
Source: https://mooncamp.com/docs/salesforce-integration
An overview of the Salesforce data integration.
## Overview
The Salesforce integration updates your goal progress automatically based on task completion in Salesforce.
💡 The Salesforce integration is available for customers on the **Pro** and **Enterprise** plans.
## Enabling the Salesforce integration
Please note: It is recommended to adjust Salesforce's refresh token policy to `Refresh token is valid until revoked` to avoid issues with the integration (see a setup guide below in the [FAQs](#faqs)).
Account admins can enable the Salesforce integration by following these steps:
1. **Access Integrations:** Go to the `Settings` area and open the `Integrations` page.
2. **Enable Salesforce:** Find Salesforce in the integrations list and toggle it on.
## Creating a new Salesforce connection
Any user (not just admins) can now create a new connection to Salesforce. Follow these steps:
1. **Create a new connection:**: Click on `Manage` next to the toggle switch and then click on `Add`.
2. **Grant access to Salesforce:** Click on `Sign in to Salesforce` and click on `Allow access`. Once authorized, users can link their Mooncamp goals with their Salesforce data.
3. **Sharing settings:** Choose whether you want to share the connection with all users or only with yourself.
4. Hit `Save` to finish setting up the connection.
Be aware that sharing the connection with all users allows everyone in this workspace to access the Salesforce data behind that connection.
## Linking a goal's progress to Salesforce data
To automatically track progress for a goal using Salesforce, follow these steps:
1. Create or edit a goal, then go to the Progress property and choose a measurement type that allows connecting to a data source (`Start and Target`, `Threshold`).
2. Click *Connect to data source* and select the **Salesforce** connection you want to use from the list of available connections. (You can also create a new connection here.)
3. First choose the Salesforce `Report` you want to access.
4. Then choose the `Field` you want to use to track progress.
5. Lastly, choose whether you want to `Always sync` the data or only when the value changes.
6. **Save your connection:** After configuring what data to track, hit `Save`. The Salesforce icon will appear next to your goal, indicating it's synced with Salesforce.
### Automatic Progress Updates
Once the integration is active, Mooncamp automatically updates your goals based on changes in Salesforce.
Tip for admins: Go to `Settings > Integrations`, and make sure every day is selected under “Synchronization”.
## FAQs
In some cases, the Salesforce integration stops working due to Salesforce's refresh token policy. To fix this, please adjust Salesforce's refresh token policy to `Refresh token is valid until revoked`. See the video below:
# SAML SSO Setup
Source: https://mooncamp.com/docs/saml-sso
An overview on how to set up SAML SSO in Mooncamp.
SAML SSO is available for our customers in the **`Enterprise Plan`**. In case you would like to use SAML SSO, please ask your Mooncamp contact person our our support team for more details.
## SAML SSO described
SSO means “Single Sign-On” and this function allows you to use your Microsoft or Google account to sign in without having to create a new password. At Mooncamp, we offer Microsoft and Google SSO per default as well as SAML SSO for identity providers like Okta. With SAML SSO, you can integrate your existing single sign-on solution into your Mooncamp account. It is possible to integrate with any SAML 2.0 identity provider.
## Setting up SAML SSO
💡 Integrating SAML SSO is a **technical process**, therefore we recommend that someone from your IT department assists you during the configuration.
In order to set up SAML SSO in your account, navigate to the settings and then to *Identity and Provisioning Settings*. There you will find three options:
* Allow login via password
* Allow login via Google
* Allow login via Microsoft
We recommend choosing one and deactivating the others for security reasons. Although, depending on how your organization is structured, it might make sense to allow multiple options.
In order to correctly fill-in the fields below *SAML*, please use the following instructions:
* As a first step, when setting up the SAML integration on your side, please use the following configurations (Mooncamp can integrate with any SAML 2.0 identity provider):
ACS-URL: [`https://app.mooncamp.com/api/v1/saml/acl`](https://app.mooncamp.com/api/v1/saml/acl)
Entity-ID: [`https://app.mooncamp.com/api/v1/saml/metadata`](https://app.mooncamp.com/api/v1/saml/metadata)
* Please make sure to add a custom value with the name `email` that matches the user's email address.
* As a last step, copy your SAML application's metadata and paste it into your SAML configuration detail section within your [*Identity and Provisioning Settings*](https://app.mooncamp.com/#/identity-and-provisioning).
💡 **Important note:** Your IT administrators might need to first **approve** Mooncamp as a provider before you can use SAML SSO. Further, it is important for the setup of SAML SSO that the **email address** of a user in Mooncamp is the same as at your identity provider.
Once you have made sure everything is set up correctly, the users just need to be added to your Mooncamp account with their Microsoft or Google e-mail and they will be able to log in using the *Login via SSO* button.
# Azure SCIM integration
Source: https://mooncamp.com/docs/scim-azure
An overview on how to set up user provisioning with Azure via SCIM in Mooncamp.
## User provisioning described
With user provisioning you can get all user profiles from your company’s identity provider (i.e. Azure) synchronized with Mooncamp. This means when a new employee joins or leaves your organization and would need to be added or deleted as a user to Mooncamp, it will happen automatically once the employee gets added or deleted in your identity provider.
User provisioning is an **Enterprise feature** and needs to be configured by Mooncamp first. Additionally, your IT administrators might need to first approve Mooncamp as a provider before you can set up user provisioning.
## Setting up user provisioning with Azure
In order to set up SSO in your account, Navigate to `Settings` → `Security and Identity` → `User Provisioning`
Click on `Activate user provisioning`. User provisioning is now activated for your account. An `API token` is required to initiate configuration at azure. Visit [https://portal.azure.com](https://portal.azure.com) and navigate to `Enterprise applications`.
Click `New application`:
Click `+ Create your own application` and name the app `Mooncamp user provisioning`:
Select `• Integrate any other application you don't find in the gallery (Non-gallery)` and click `Create`. You can ignore the suggestions found from gallery applications.
Navigate to `Provisioning` and click `Get started`:
Then select `Provisioning Mode` → `Automatic`. As a Tenant URL add: *[https://identity.mooncamp.com/scim/v2](https://identity.mooncamp.com/scim/v2)* and under Secret Token insert the `API token` copied from Mooncamp’s setting menu.
After clicking `Test Connection` you should get a positive feedback.
Click on `Save`, expand `Mappings` and click on `Provision Azure Active Directory Users`. Find the entry mapping and select it. Set the `Matching precedence` to 2 and click `Ok`.
Find the entry mapping and select it. Change `mailNickname` to `objectId` and set `Match objects using this attribute` to `Yes`. `Matching precedence` should be `1`. Click `Ok`.
Click again on the entry mapping `userPrincipalName` → `userName` and set `Match objects using this attribute` to `No` leaving us with a single entry configuring a `Matching precedence`.
Click on `Save` and then on `Provisioning` at the top of the page.
Select `Provision Azure Active Directory Groups`. Find the entry mapping and select it. Set the `Matching precedence` to `2`. Click on `Ok`. Find the entry mapping and select it. Set `Match objects using this attribute` to `Yes`. Again find the entry mapping `displayName` → `displayName` and set `Match objects using this attributes` to `No`.
Click on `Save`and configure `Users and groups` according to your requirements. Click on `Start provisioning`.
It can take up to an hour until the initial run of the provisioning is started. If the initial run is complete you can start pulling in the users into Mooncamp.
Navigate again to `Settings` → `Security and Identity` → `User Provisioning` within Mooncamp. You should now see that there are users available to be synced to Mooncamp
Click on `Synchronize` to push these users to Mooncamp. Under `Members` you should now find these users. The `Attribute Mapping` section allows you to map any *SCIM attribute* to *Mooncamp Properties*. Read more about *Mooncamp Properties* here: [Properties in Mooncamp](/properties).
Users are automatically synchronized to Mooncamp daily. To immediatly synchronize any change provisioned through Azure use the `Synchronize` button.
# Sidebar
Source: https://mooncamp.com/docs/sidebar
An overview of the sidebar
## Overview
The sidebar is divided into four sections. If you hover your mouse over your company name, you can log out using the down arrow, and you can hide the navigation bar using the double arrows on the right side.
## 1. Search, Home, Inbox and Settings
The first section includes a quick search, your inbox, and your personal settings (as well as account settings if you have administrator rights).
**Search**: With quick search (`Ctrl + K` or `⌘ + K` on Mac) you can search for specific goals, teams or people. By clicking on one of the search results, you will then land on the respective goal, team page or public profile of a workspace member.
[Home page](/homepage): Your homepage allows you to access all of Mooncamp's tools available to you without having to switch windows. It also gives you an overview of all goals you are the owner of.
**Inbox**: In your inbox you can see all tasks assigned to you and reminders for e.g. upcoming check-ins or surveys, as well as notifications about relevant comments and mentions within the platform.
**Settings**: In your [profile settings](/profile-settings) you can set things like your profile image, your name and your language. Furthermore, under “[Notifcations](/personal-notifications)” you can specify your preferences if and how you want to be notified by Mooncamp about certain events.
## 2. (Team) Spaces
The teamspace you are assigned to within Mooncamp as well as your company space are automatically shown in your sidebar.
## 3. Tools
In this list you can see all tools of Mooncamp that you have access to as a user, such as goals or check-ins.
### Goals
In the [goal explorer](/goal-explorer) you can create additional goal views and add them to your personal favorites via ‘Favorite’ in the top right. These favorites are automatically pinned to the top of your sidebar. In the goals feed you can see all updates that have been made to the goals from the explorer. The [Plannings](/planning-spaces) provide a detached space where you can separately plan and later publish your goals for the next cycle.
💡 **Note:** The favorite function can also be used for single goal items, check-in views or dashboards.
### Check-ins
With [Check-ins](/check-ins) you update your goal progress as well as view your team’s and organization's updates.
### Dashboards
In this section, various types of dashboards are available to you. The [Progress Dashboard](/progress-dashboard) offers an overview of the current status and progress of all your organization's goals, grouped by team or member. Depending on your Mooncamp plan, the [Health Dashboard](/health-dashboard) provides you with a comprehensive health and quality check for all goals. In addition, with [Custom Dashboards](/dashboards) you have the possibility to create your own reports and visually combine any type of data.
## 5. Trash
Here you can find deleted goals and have the possibility to either restore or permanently delete them.
## 6. Onboarding, Help and Support
The last section in the sidebar leads to different types of resources and is the place where the onboarding guide takes you through the tool step-by-step. Under ‘Video tutorials’ you find short videos on your first steps with Mooncamp and further you can access all contents of our Help Center, our Video FAQs and other resources on OKRs and best practices.
In the lower part you have the possibility to directly contact our support team for any technical questions or our sales team for any questions about our plans. Via ‘What’s new’ you can always check for new functions that have recently been released within Mooncamp.
# Slack Integration
Source: https://mooncamp.com/docs/slack-integration
Learn how to connect and use Mooncamp with your Slack
💡 **Note for admins:** In order for users to be able to use the integration, as a first step it needs to be activated in the admin settings via *Settings > Integrations > Messaging*.
**Please note:** In some cases, your Slack's system administrator must first unlock the app for it to appear in search. You can find the official link to the Mooncamp app in the *Slack app directory* [**here**](https://mooncamphq.slack.com/apps/ASJ1XBZBK-mooncamp).
## Installing the Mooncamp Bot
To install Mooncamp in Slack, in the left sidebar scroll down to *Apps,* click on *+App apps*, search for "Mooncamp" and click on *Add* below the Mooncamp app in the list of search results. You will get directed to Slack’s app directory where you can add the app via the green *Add to Slack* button. You will get directed to the *Mooncamp + Slack* info page, where you can click the *Add to Slack* button to activate the Slack bot in your Mooncamp workspace.
As a next step, go back to Slack and in your sidebar click on *Apps > Manage > Browse Apps > Mooncamp > Configuration* and you will get directed to the Slack app directory again where you can use the green button to *Open in Slack*. Once Mooncamp is added to Slack, the bot will guide you through the next steps.
When you click the "Connect with Mooncamp" button, the bot will guide you to your Mooncamp account. The bot will also tell you that the connection has been successfully established.
**Done! 🎉**
## Using Mooncamp via Slack
Once your Mooncamp Bot is available, you can interact with it via slash commands. These allow you to complete an action with the Mooncamp app simply by sending a message in Slack. To do so, type a forward slash **`/`** in any conversation to view a list of available slash commands.
In order to show your goals in Slack, type */mooncamp goals* into any channel or conversation, press enter and the bot will list your goals. Next to each goal there is an *Update goal* button that you can use to update your goals’ progress directly via Slack. When you click on the button, a modal opens in which you can edit the *status* and the *value* of your goal and if needed, add a comment to the update. Check out this procedure in the video FAQs below.👇
# SSO Setup
Source: https://mooncamp.com/docs/sso
An overview on how to set up SSO in Mooncamp.
## SSO described
SSO means “Single Sign-On” and this function allows you to use your Microsoft or Google account to sign in without having to create a new password. At Mooncamp, we offer Microsoft and Google SSO. We also offer [SAML SSO](/saml-sso) (for providers like Okta).
Your IT administrators might need to first approve Mooncamp as a provider before you can use SSO. Further, it is important for the setup of SSO that the **email address** of a user in Mooncamp is the same as at your provider (e.g. Microsoft).
## Setting up SSO
In order to set up SSO in your account, you just need to make sure it is activated for the appropriate provider. To do that, navigate to the settings and then “Security and Identity Settings”. There you will find three options:
* Allow login via password
* Allow login via Google
* Allow login via Microsoft
We recommend choosing one and deactivating the others for security reasons. Although, depending on how your organization is structured, it might make sense to allow multiple options.
Once you have made sure everything is set up correctly, the users just need to be added to your Mooncamp account with their Microsoft or Google email and they will be able to log in using SSO.
# Teamspaces
Source: https://mooncamp.com/docs/teamspaces
An overview of the teams page in the settings
## Teamspaces explained
Within Team Spaces you can manage teams or departments of your organization. It is possible to create new teams and assign a color, an icon and a description to each team. Further you can map your organizational structure by arranging teams via drag and drop and assigning parent teams, where needed. For each team, it is possible to add new members directly and also assign an owner. Team owners automatically have the right to add new members to their team, without the need for any additional admin settings. In case you need to restructure or merge teams, put projects on hold or finish them, you have the option to archive a team. This removes it from your sidebar, but all associated goals and dashboards remain accessible. Alternatively, there is also the option to fully delete the team along with all its goals.
## How to use Team Spaces
### Creating a team
As an admin, navigate to S*ettings* > *Workspace* > *Teams*. Once there, you can create a new team via the blue button *Create team* as shown in the screenshot below. On the modal that opens, you can enter the team’s name, add a matching icon, a color as well as a description, if needed, and finally click on *Create*. Via *Parent team* you can add a parent to your new team from a list of existing teams. If you wish to create or add a parent at a later point, you can do so via drag and drop in the team overview.
### Team overview
As an admin, you can access the team overview via *Settings* > *Workspace* > *Teams* (see screenshot above). Next to the title of the page, you can find the current amount of active teams in brackets. Below, there are four tabs that separate your active teams from archived teams and from teams you are assigned to as a member. Via *All*, you can find a list of all active and archived teams. On all tabs, you can see the teams’ name, amount of members, owner as well as status. The *Joined* tag shows you that you are a member of a team. You also have a search function via the search icon right next to the blue *Create team* button.
### Editing a team and adding team members
When clicking on a team in the team overview, a team settings modal opens. On the *General* tab, you can edit all initial settings such as name, icon, color, description and parent. Further, you have the option to archive or delete a team.
On the *Members* tab, you find a list of all team members and their role of member or owner, including a search function in the top right corner of the list. Via *Add members* you can add a new member to the team. A person can be a member of one or more teams. By clicking on the role of a person, via *Remove* you can remove a member from a team. Here you can also change a team member’s status from *member* to *owner* or vice versa.
In the team overview, when using the right click on a team, a menu comes up. Here you can either archive or delete the team, create a subteam or navigate directly to the team’s goals via *Open team*. When hovering over a team, you can see an icon appear next to the team name. Via this icon you find the same functions. Further, you can use the icon to drag and drop the team to a different position in the overview.
### Arranging and aligning teams
In the team overview, you can easily arrange and align your teams. To do so, hover over the team you would like to move and use the icon that is coming up on the left next to the team to drag and drop. You can move a team into any position on the list and further also drop it into other teams in order to make it a subteam of an existing one. This way, you can easily display and rearrange your organizational structure.
### Assigning a team owner and ownership rights
To assign an owner to a team, click on a team in the team overview, choose the *Members* tab and click on *Add member* to add the person who is supposed to become the owner. If this person is a member of the team already, you can skip this step. You can directly click on the *Role* dropdown next to the member and chose the role option *Owner*. With this role, the member now has the right to add new members to their team, without the need for any additional admin rights. Especially for larger organizations this can help making administration much easier. Please be aware that new team members can only be added from the existing user base in the organization’s account. A team owner does not have the right to add new users to the account.
💡 **Tip:** Team settings are also **accessible directly via the sidebar or the top navigation of a team’s goal page**. When hovering over a team in the sidebar, you can use the ellipsis, … , to get to the team settings modal. When **clicking on the team in the top navigation of a team page**, you find basic infos such as the amount of members as well as an **ellipsis, … , that opens the team settings modal** directly on the page where you are currently located.
### Archiving, restoring and deleting teams
In case you need to restructure or merge teams, put projects on hold or finish them, you have the options to archive or delete teams. When you click on a team in the overview, under *Actions* you find the option to *Archive a team*. This option removes a team from your sidebar, but all associated goals and dashboards remain accessible. Once archived, you have the option to restore the team via the *Archived* tab and a right-click on the team to be restored. With the second option, *Delete team*, the team will be fully deleted, including all its goals. To fully delete a team, you can also use a shortcut via a right-click on a team in the team overview.
# How to Update a Goal
Source: https://mooncamp.com/docs/updating-goals
Different ways of updating goals
You can update the progress of your goals directly within Mooncamp or via our Slack or Microsoft Teams integration.
### Update progress of goals in Mooncamp
There are several ways to update goals.
**1. Directly from the cascade view**
**2. Progress bar on the detail view of the goal**
**3. On a check-in**
### Update Progress of Goals in Microsoft Teams
If you have the Microsoft Teams integration enabled, you can update goals in the same ways as described above.
In addition, within the **Mooncamp chatbot**, you can enter `goals` to view all goals assigned to you and update them directly in the chat.
### Update Progress of Goals in Slack
If you have the Slack integration enabled, you can access and update your goals in the Mooncamp Slack bot using the `/mooncamp goals` command.
# Views
Source: https://mooncamp.com/docs/views
An overview of Views for goals, check-ins, and dashboards
With views, you can filter your **goals**, **check-ins**, or **dashboards** for specific criteria or properties and save the outcomes in a so-called view. You can create private views on your personal homepage or, if authorized, a public view on your team spaces.
Currently, you can create these types of views for **goal databases**:
* Cascade (nested table)
* List
* Goal Tree
* Network
On **check-in databases**, you can create these types of views:
* Feed
* List
On **dashboard pages**, you can only add dashboard views.
Each view type offers unique benefits for different use cases. These are just a few things you might want to do with views:
* Filtering for specific off-track goals that you are involved in
* Keeping an eye on important strategic initiatives and their health
* Regularly checking the goals of certain teams or team members
Lastly, it is also possible to add a view to the '**Favorites**' section of your sidebar or **export** selected views as a [CSV](/exporting-goals-as-csv) or a [public link](/public-links).
## How to use views
If you don't feel like reading, we have recorded a video tutorial for you. It provides a general overview of views in Mooncamp.
## Where can I create a view?
You can create views in the following places:
* Home (views are private to you)
* Teamspaces
* Goal Explorer
* Check-in Explorer
* Dashboards
* Progress Dashboard
* Health Dashboard
* Custom Dashboards (on tiles)
## Views permissions
Views on the goal explorer are visible to all users in your organization. Views on teamspaces are visible to all users that have at least view access to the teamspace. In every area where views can be created, they will be accessible to everyone. On the **goal explorer**, every view can be published (and unpublished) as a [public link](/public-links) via the ellipsis `...` in the top right corner (only available on the `Enterprise` plan).
**Please note:** By default, only an admin can create views. Additionally, the admin can grant access groups the right to do so via `Settings > Access groups > Account administration > Management of public views`.
## How can I create and edit a view?
### Creating a view
To create a view, click on the `+` in the database header, give your view a name and choose a view type.
Now you can modify your view, e.g., by
* adding filters
* adding sorting options
* displaying or hiding properties
* reordering columns
* wrapping cells
* etc.
### Editing and deleting a view
Once you have added a new view, you can edit its name, icon, and type by clicking on its name again. Here, you can also delete the view, if needed.
## Views for goal databases
Views for goals can be created on your [homepage](/homepage), on [teamspaces](/teamspaces), and the [Goal Explorer](/goal-explorer). On your **homepage**, goals are already pre-filtered to show all goals that are related to your user account. On a **teamspace**, goals are pre-filtered to show the respective team's goals only.
In the Goal Explorer, you can export **any goal view** as a **CSV**, including data like title, creator, latest update, current value, status, and all related properties (excluding update history or comments). For CSV export details, see [this article](/exporting-goals-as-csv). Additionally, every public view can be exported as a **public link** accessible to non-users. For public link details, see [this article](/public-links).
Other than this, views for goals function the same everywhere.
### Goal view types
Displays goals in a nested table to show the hierarchy of goals at various levels.
Shows all goals in a simple flat list.
Offers a visual map of goals and OKRs, showing strategic pillars and initiatives in a hierarchical view.
Displays goals in a network view, showing the relationships between goals and their alignments.
## Views for Check-ins
Views for check-ins can be created in the check-in explorer. Here you have two view types:
The feed basically shows the same info as a list, however, displays each check-in in the form of a card. This makes it possible to show the content of a check-in, such as free-text replies to template questions and goal updates. This view is ideal if you would like to screen the content directly and it is even possible to react with an emoji for praise or a comment for questions or discussions.
Shows all check-ins in a simple flat list. You can choose to display properties like the team, the creator, the creation date, or the template title.
### Check-in view settings
In the upper right corner of your check-in view, there are a number of settings including options to filter, sort, or display check-ins and their properties for your views. You can filter for team, creation date, and the creator of a check-in, and as everywhere, filters can be combined via AND and OR. Sorting is possible ascendingly or descendingly for the creation date. Editable properties to display include the team of a check-in and the title of the template that was used.
## Views for dashboards
Views can be created for the [Progress Dashboard](/progress-dashboard) and the [Health Dashboard](/health-dashboard) with the same setting options for both dashboard types. For the [Progress Dashboard](/progress-dashboard), there is an additional `Compare to` function, which gives you the possibility to compare your current data to the past.
On a [**Custom Dashboard**](/dashboards), it is possible to create tiles that show different data. For every list-type tile (goals, check-ins, update feed, members), it is possible to create a view with differing filter, sort, and display settings.
## Pin views as a favorite to your sidebar
Views can be saved as a favorite and, in this way, be added to the sidebar just above your Teamspaces.
## Views and cycles
Per default, the currently selected cycle is globally applied to every view. However, you can lock a cycle within a view, ensuring that users see the exact data you want them to see on goal tables or dashboards. If no cycle is locked, the currently selected cycle for each user will apply automatically.
To learn more about cycles, you can read [this article](/cycles).
# Workspace settings
Source: https://mooncamp.com/docs/workspace-settings
Edit the name and logo of your workspace
Under *Settings > General* you can change the name of your organization and upload a logo. The infromation added here will then always be displayed in the top left of your sidebar.
Further below, there is an invite link that can be used to collectively invite existing users to Mooncamp. They can easily register using the link; an important requirement for this is that the users have already been created under *Settings > Members*.